
Free Flight: Indoor
Bud Tenny
A Tribute: By the time you read this, most of the indoor activity (except for the Nats and the FAI Indoor Team Selection Program) will be winding down until Fall. A lot of members of model clubs have been having the benefit of lots of hard work—their club newsletter. For those clubs that sponsor indoor activity, the typical club newsletter is a source of good info about indoor modeling. These lucky clubs should salute their newsletter editor!
Meeting The Need: Members of those clubs with really active newsletter staffs find more than just contest dates and meeting notices; there are also articles on indoor topics. The really neat thing about these articles compared to this column or Indoor News & Views (Box 545, Richardson TX 75080), is that the articles are at the level of the club activity. If next week's contest is for PennyPlane in the 20' school gym, the Indoor News article on a World Championship model won't help you win the meet!
Be Nice To Your Editor! So, if your club has one of those good newsletters (we see a lot of them) say a kind word to the editor. The chances are that he is now shifting to outdoor topics—but you keep all the issues for reference. While you are at it, thank the club officers who voted the money to finance that newsletter! Communication of ideas and techniques is how our activity grows, and you reap the benefits. By the way, one of the nicest things you can do for the editor is to help him explain your newest idea or winning design. You don't think he has time to make up all that good stuff, do you?
Motor Sticks
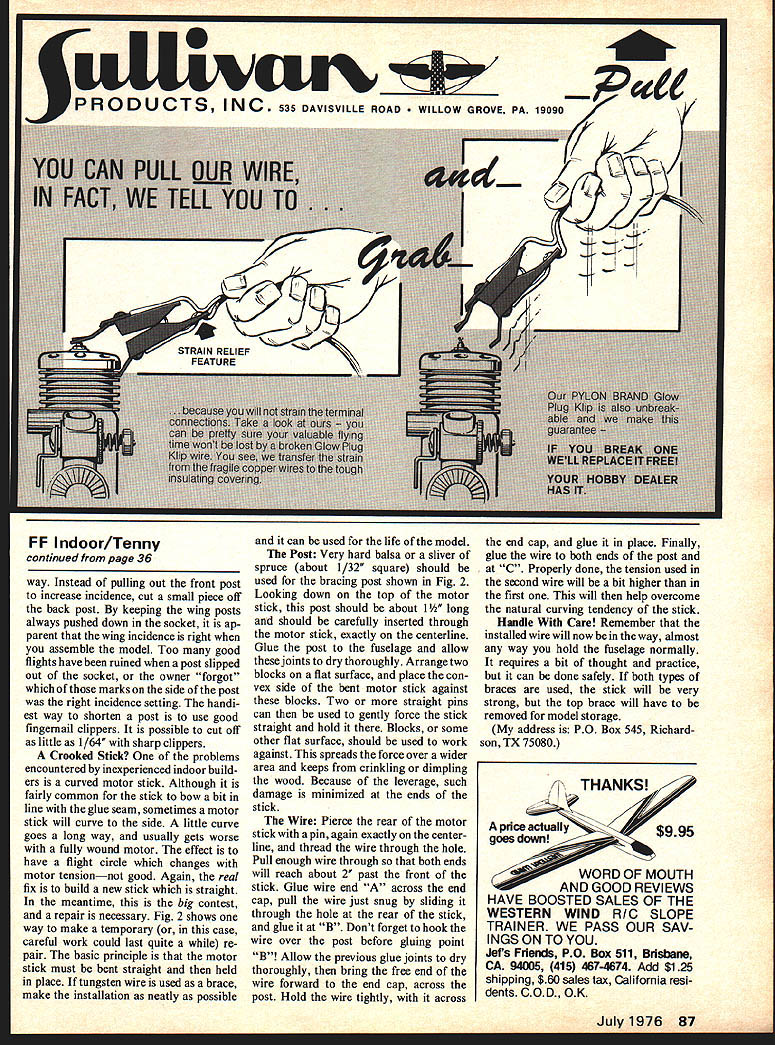
The last column (May '76 MA) dealt with model trim—on the bench and at the flying site. We slipped right past an important model part by saying that a weak motor stick would have to be replaced. Actually, if you just have to fly it that day, there are a couple of things you can do on the field to make a marginal motor stick stronger. First, is the motor stick simply bowing down at both ends, yet staying straight from side to side? If so, the model probably has been diving in during the power burst and flying OK after the power level drops. Or, it may have been flying in fast, tight circles which gradually opened up into a slow climb that wasn't high enough. The answer is to add some strength—some bracing—to keep the motor stick from bowing as much. Fig. 1 shows how this can be done on a temporary basis. If you can borrow some bracing wire (tungsten is best, but nichrome would be OK for one day), use that. Otherwise, emergency use lightweight sewing thread. High drag? Yes, the thread will have more drag than the wire, but that is inconsequential in terms of how much better time the model will turn by getting up nearer the ceiling with a full load of turns.
Some Precautions: First, in Fig. 1, we start with an assembled model and glue the brace wire or thread to the model at the nose cap, on each wing post, and to the top of the fuselage at the rear hook. Note that any bending force on the motor stick will be transferred to the wing posts. Sometimes, wing posts are pulled part-way out of the sockets to get the proper incidence angle; if this is the case, the posts should be lightly spot-glued to the top of the sockets to keep the post from being pushed down into the socket. On wire—the reason that nichrome wire should not be used for motor stick bracing is that it stretches a little and does not recover. So, for any given tension (on a permanent installation), the amount the motor stick can bend will change as the wire stretches.
Build a Better Socket: If the wing socket is reinforced by a small balsa plug in the bottom of the socket, it is then reasonable to adjust the wing incidence a new
Fig. 1. Wire or thread glued to nose, the wing posts and rear of motor stick makes a temporary brace which allows more turns to be used.
Fig. 2. A flat surface, two small blocks and two pins make a fixture to straighten curved motor stick; wire brace holds it straight. Instead of pulling out the front post to increase incidence, cut a small piece off the back post. By keeping the wing posts always pushed down in the socket, it is apparent that the wing incidence is right when you assemble the model. Too many good flights have been ruined when a post slipped out of the socket, or the owner "forgot" which of those marks on the side of the post was the right incidence setting. The easiest way to shorten a post is to use good fingernail clippers. It is possible to cut off as little as 1/64" with sharp clippers.
A Crooked Stick? One of the problems encountered by inexperienced indoor builders is a curved motor stick. Although it is fairly common for the stick to bow a bit in line with the glue seam, sometimes a motor stick will curve to the side. A little curve goes a long way, and usually gets worse with a fully wound motor. The effect is to have a flight circle which changes with motor tension—not good. Again, the real fix is to build a new stick which is straight. In the meantime, this is the big contest, and a repair is necessary. Fig. 2 shows one way to make a temporary (or, in this case, careful work could last quite a while) repair. The basic principle is that the motor stick must be bent straight and held in place. If tungsten wire is used as a brace, make the installation as neatly as possible and it can be used for the life of the model.
The Post: Very hard balsa or a sliver of spruce (about 1/32" square) should be used for the bracing post shown in Fig. 2. Looking down on the top of the motor stick, this post should be about 1½" long and should be carefully inserted through the motor stick, exactly on the centerline. Glue the post to the fuselage and allow these joints to dry thoroughly. Arrange two blocks on a flat surface, and place the concave side of the bent motor stick against these blocks. Two or more straight pins can then be used to gently force the stick straight and hold it there. Blocks, or some other flat surface, should be used to work against. This spreads the force over a wide area and keeps from crinkling or dimpling the wood. Because of the leverage, such damage is minimized at the ends of the stick.
The Wire: Pierce the rear of the motor stick with a pin, again exactly on the centerline, and thread the wire through the hole. Pull enough wire through so that both ends will reach about 2" past the front of the stick. Glue wire end "A" across the end cap, pull the wire just snug by sliding it through the hole at the rear of the stick, glue at "B". Don't forget to hook the wire over the post before gluing point "B"! Allow the previous glue joints to dry thoroughly, then bring the free end of the wire forward to the end cap, across the post. Hold the wire tightly, with it across the end cap, and glue it in place. Finally, glue the wire to both ends of the post and at "C". Properly done, the tension used in the second wire will be a bit higher than in the first one. This will then help overcome the natural curving tendency of the stick.
Handle With Care! Remember that the installed wire will now be in the way, almost any way you hold the fuselage normally. It requires a bit of thought and practice, but it can be done safely. If both types of braces are used, the stick will be very strong, but the top brace will have to be removed for motorized storage.
(My address is: P.O. Box 545, Richardson, TX 75080.)
Transcribed from original scans by AI. Minor OCR errors may remain.

