
Free Flight: Indoor
Bud Tenny
Rules proposals
We are halfway through a new rules-making cycle. If you noticed, all the Indoor rules proposals which will be considered during this cycle were published in the December 1986 issue of MA (in the "Competition Newsletter"). I hope you contacted your District Indoor CR member and told him your feelings about these proposals before his deadline (December 1, 1986) for mailing in his Initial Vote ballot. Otherwise, he had to vote without your guidance! If that was the case and a proposal you favored is eliminated by the Initial Vote results, don't complain. After the Initial Vote results are published, please try to do better by helping the ICB decide which of the surviving rules should be adopted.
Prop wrap up
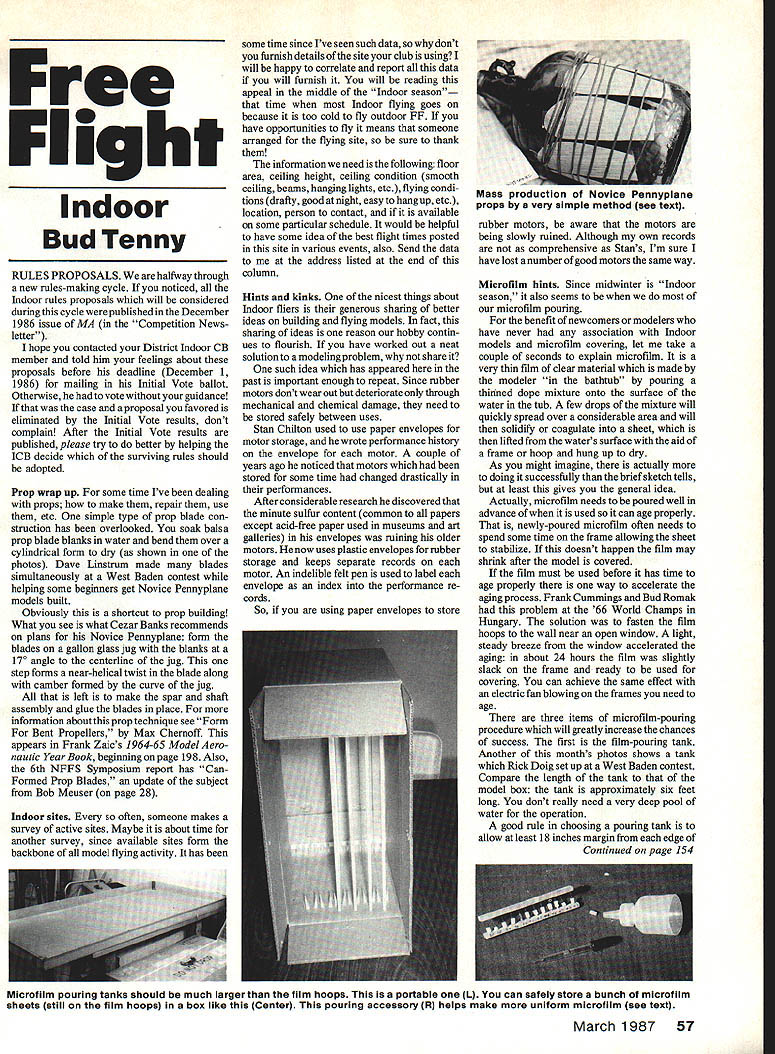
For some time I've been dealing with props: how to make them, repair them, use them, etc. One simple type of prop blade construction has been overlooked. You soak balsa prop blade blanks in water and bend them over a cylindrical form to dry (as shown in one of the photos). Dave Linstrum made many blades simultaneously at a West Baden contest while helping some beginners get Novice Pennyplane models built.
Obviously this is a shortcut to prop building. What you see is what Cezar Banks recommends on plans for his Novice Pennyplane: form the blades on a gallon glass jug with the blanks at a 17° angle to the centerline of the jug. This one step forms a near-helical twist in the blade along with camber formed by the curve of the jug.
All that is left is to make the spar and shaft assembly and glue the blades in place. For more information about this prop technique see "Form For Bent Propellers," by Max Chernoff. This appears in Frank Zaics's 1964–65 Model Aeronautic Year Book, beginning on page 198. Also, the 6th NFFS Symposium report has "Can-Formed Prop Blades," an update of the subject from Bob Meuser (on page 28).
Indoor sites
Every so often, someone makes a survey of active sites. Maybe it is about time for another survey, since available sites form the backbone of all model flying activity. It has been some time since I've seen such data, so why don't you furnish details of the site your club is using? I will be happy to correlate and report all this data if you will furnish it. You will be reading this appeal in the middle of the "Indoor season"—that time when most Indoor flying goes on because it is too cold to fly outdoor FF. If you have opportunities to fly it means that someone arranged for the flying site, so be sure to thank them!
The information we need is the following:
- Floor area
- Ceiling height
- Ceiling condition (smooth ceiling, beams, hanging lights, etc.)
- Flying conditions (drafty, good at night, easy to hang up, etc.)
- Location
- Person to contact
- Availability schedule (if it is available on some particular schedule)
- Best flight times posted at this site for various events (if known)
Send the data to me at the address listed at the end of this column.
Hints and kinks
One of the nicest things about Indoor fliers is their generous sharing of better ideas on building and flying models. In fact, this sharing of ideas is one reason our hobby continues to flourish. If you have worked out a neat solution to a modeling problem, why not share it? One such idea which has appeared here in the past is important enough to repeat. Since rubber motors don't wear out but deteriorate only through mechanical and chemical damage, they need to be stored safely between uses.
Stan Chilton used to use paper envelopes for motor storage, and he wrote performance history on the envelope for each motor. A couple of years ago he noticed that motors stored for some time had changed drastically in their performances. After considerable research he discovered that minute sulfur content common in papers (except acid-free paper used in museums and art galleries) in his envelopes was ruining his older motors. He now uses plastic envelopes for rubber storage and keeps separate records on each motor. An indelible felt pen is used to label the envelope and index into the performance records.
So, if you are using paper envelopes to store rubber motors, be aware that the motors are being slowly ruined. Although my own records are not as comprehensive as Stan's, I'm sure I have lost a number of good motors the same way.
Microfilm hints
Since midwinter is "Indoor season," it also seems to be when we do most of our microfilm pouring.
For the benefit of newcomers or modelers who have never had any association with Indoor models and microfilm covering, let me take a couple of seconds to explain microfilm. It is a very thin clear film made by pouring a thinned dope mixture onto the surface of water in the tub. A few drops of the mixture will quickly spread over a considerable area and will solidify into a sheet. The sheet is then lifted from the water's surface with the aid of a frame or hoop and hung up to dry.
As you might imagine, there is actually more to doing it successfully than the brief sketch tells, but at least this gives you the general idea.
Actually, microfilm needs to be poured well in advance if the film is to be used. Newly-poured microfilm often needs some time on the frame allowing the sheet to stabilize; this doesn't happen if covered immediately. Microfilm may shrink after the model is covered with it unless it has time to age properly. Frank Cummings and Bud Romak tried this problem at the '66 World Champs in Hungary. The solution was to fasten the film hoops to the wall near an open window. A light, steady breeze from the window accelerated the aging process; in about 24 hours the film was slightly slack on the frame and ready to be used for covering. You can achieve the same effect with an electric fan blowing on the frames you need to age.
There are three items of microfilm-pouring procedure which will greatly increase the chances of success:
- The pouring tank
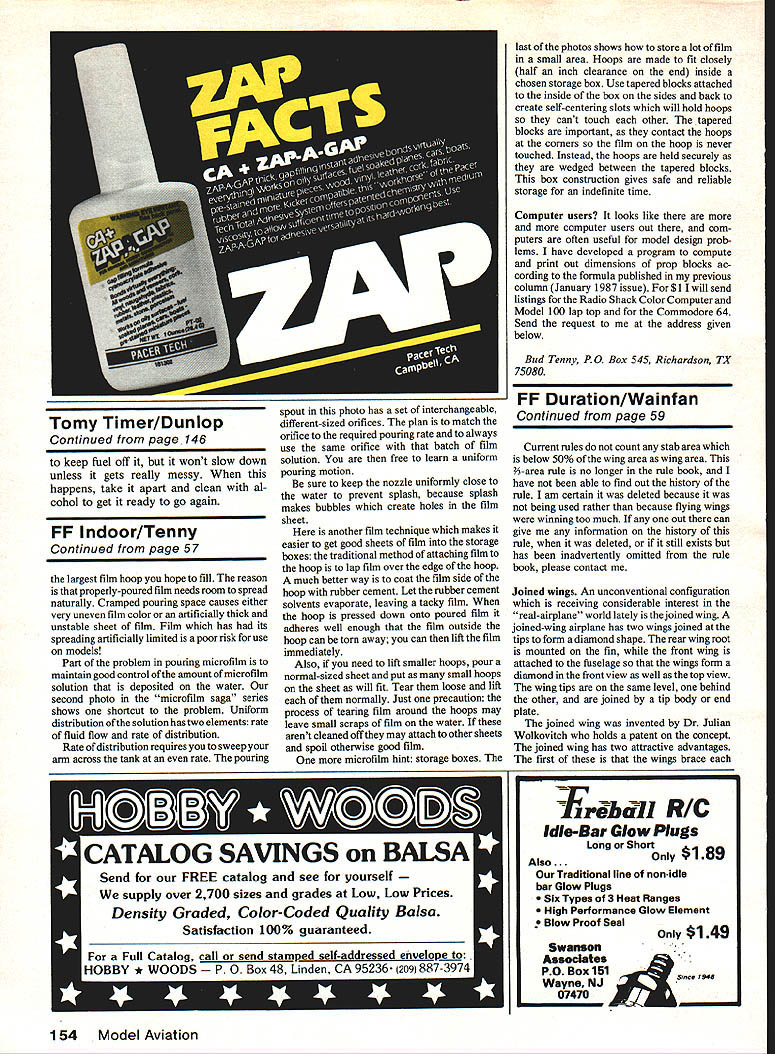
- A good tank setup is important. One of this month's photos shows a tank which Rick Doig set up at a West Baden contest. Compare the length of the tank to that of the model; the tank is approximately six feet long. You don't really need a very deep pool of water for the operation.
- A good rule in choosing a pouring tank is to allow at least 18 inches margin from each edge of the largest film hoop you hope to fill. Properly-poured film needs room to spread naturally. Cramped pouring space causes either very uneven film color or an artificially thick and unstable sheet of film. Film which has had its spreading artificially limited is a poor risk for use on models.
- Control of the amount of solution deposited
- Uniform distribution of the solution has two elements: rate of fluid flow and rate of distribution.
- Rate of distribution requires you to sweep your arm across the tank at an even rate. One shortcut is to use a pouring spout with interchangeable, different-sized orifices. Match the orifice to the required pouring rate and always use the same orifice with that batch of film solution. This lets you learn a uniform pouring motion.
- Be sure to keep the nozzle uniformly close to the water to prevent splash, because splash makes bubbles which create holes in the film sheet.
- Attaching and lifting film from hoops; storage
- The traditional method of attaching film to the hoop is to lap film over the edge of the hoop. A much better way is to coat the rim side of the hoop with rubber cement. Let the rubber cement solvents evaporate, leaving a tacky film. When the hoop is pressed down onto poured film it adheres well enough that the film outside the hoop can be torn away; you can then lift the film immediately.
- If you need to lift smaller hoops, pour a normal-sized sheet and put as many small hoops on the sheet as will fit. Tear them loose and lift each off normally. One precaution: the process of tearing film around the hoops may leave small scraps of film on the water. If these aren't cleaned off they may attach to other sheets and spoil otherwise good film.
- Storage boxes: store a lot of film in a small area by making hoops fit closely (about half an inch clearance on the end) inside a chosen storage box. Use tapered blocks attached to the inside of the box on the sides and back to create self-centering slots which will hold hoops so they can't touch each other. The tapered blocks are important, as they contact the hoops at the corners so the film on the hoop is never touched. Instead, the hoops are held securely as they are wedged between the tapered blocks. This box construction gives safe and reliable storage for an indefinite time.
Computer users?
It looks like there are more and more computer users out there, and computers are often useful for model design problems. I have developed a program to compute and print out dimensions of prop blocks according to the formula published in my previous column (January 1987 issue). For $1 I will send listings for the Radio Shack Color Computer and Model 100 laptop and for the Commodore 64. Send the request to me at the address given below.
Bud Tenny P.O. Box 545 Richardson, TX 75080
Transcribed from original scans by AI. Minor OCR errors may remain.

