
Free Flight: Indoor
Bud Tenny
Model Improvement: Time and again, it is said that indoor models must be flown repeatedly in order to get them properly trimmed. In a way, that is true; the real secret is a systematic approach coupled with good record keeping. By using a systematic approach—change one factor, test fly and record the results—it is possible to tell exactly what improves performance and by how much.
Performance Testing: Although the phrase "with all other factors held constant" is not easily made to come true with respect to indoor models, do the best you can when testing a new design. When evaluating a new model do not blast off for the ceiling with a full load of turns! Instead, select or make up about three rubber motors as exactly alike as possible, and weighing about 20% of model weight (except Pennyplane, which has too short a fuselage to use this much rubber). For any particular change in trim, fly the model once with each motor and record rpm and rate of sink. RPM can be measured easily by counting a number of prop revolutions and measuring the time, but rate of sink is harder. Such testing can be done best in a gym with bleachers, where the model can be observed at two different, standardized altitudes.
What to Look For: The model should be launched with only enough turns for it to climb and level out at an altitude just above some selected altitude marker which can be observed from an upper bleacher level. For example, by standing in one particular spot it may be possible to select a distinctive feature (window or poster or similar object). Begin timing as the model comes level with the selected marker, and stop timing as it gets level with a similar, lower marker. The lower marker should be at least 4 ft. above the floor to minimize the effect of floor turbulence and ground effect. With a second stopwatch, check rpm right after the start of the timing period and right after the end of the time. Reject any test which shows a change of more than one rpm, since this means (usually) the model is running out of turns. Change motor size or correct the condition which causes the rpm change, then resume testing.
Establish Trim Limits: If a model is trimmed from nose-up (too much wing incidence) to nose-down (too little incidence), the rpm will gradually increase until the model is obviously diving. On the other hand, the rate of sink will be higher at both nose-up and nose-down trim positions. Generally, the change in sink rate will be small from nose-up trim to optimum trim, so this allows for a broad range of trim near the optimum. In general, fine trim changes will help offset air conditions in the site—slightly nose-down during turbulence and slightly nose-up if the air is very calm. It is important to know one's models well enough to spot minor trim changes by observation of the model flight and rpm.
Flight Attitude: Don't let this confuse you, but the flight attitude of the model during the test period (called cruise period) should be slightly nose-up. The difference will become apparent after a few test sessions; too much nose-up trim gives the model a slightly hesitant, unsteady attitude with higher sink rate. With the optimum trim, the attitude will be almost as nose-high but the flight will be very smooth and steady. Visual observation of a model trimmed nose-down leads to the description continued on next page. 'lead sled.' The model moves forward steadily, ignoring all but the very high level disturbances — a smooth downward spiral.
Motorstick Construction: Previous columns have dealt with weak and crooked motor sticks, showing how to make field repairs. The real repair is to build a new motorstick that is both strong and straight. Remember that the motorstick does more than just support the motor; it must be strong enough to hold the wing and tail in proper alignment. If the stick bends (Fig. 1) the stabilizer gets positive incidence and the model will dive. If the stick twists (Fig. 2) the stab tilt will be disturbed and the model won't handle full power well.
How Strong? This will sound dumb, but the motorstick on an indoor model, and all the other parts also, must be only strong enough to do the job. A super-strong motorstick will be so heavy that the wings must be stronger to carry the weight. Then, the model needs more rubber, which calls for a stronger model, etc. Don't let this vicious circle bother you! Select a design with a moderate length stick (such as 12 or 13") as a starter, and use a length of 7-mm dia laboratory glass tubing as a form. The shorter stick will be stiffer for a given length, and the larger diameter will resist twisting better.
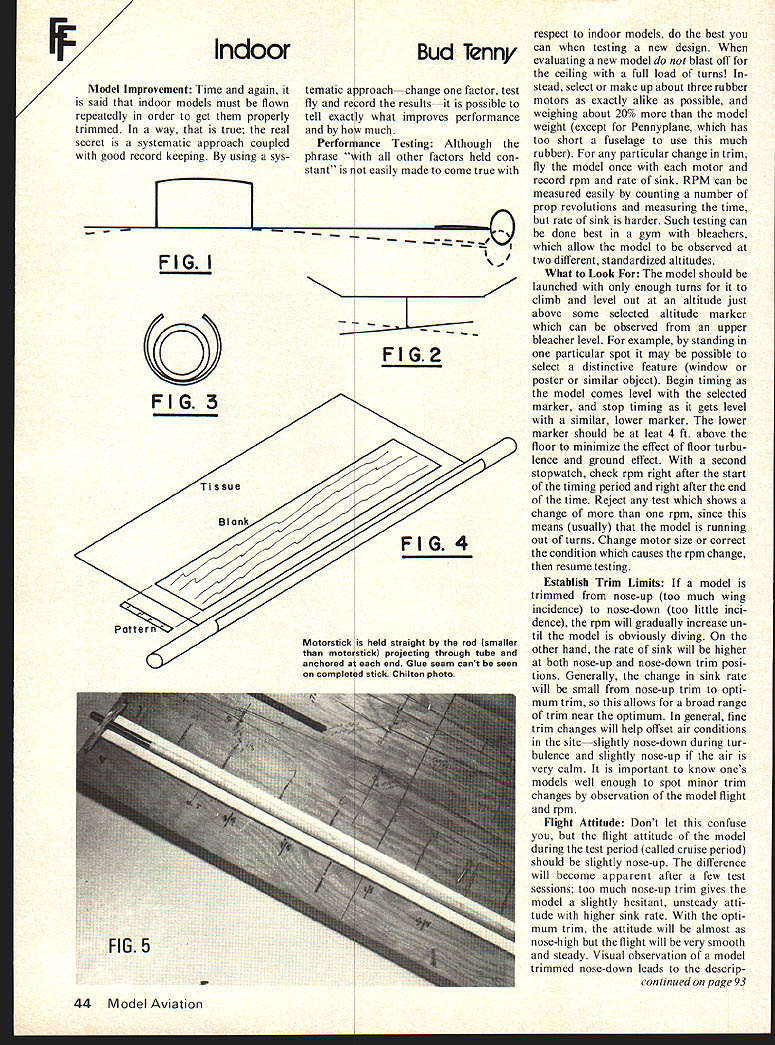
Step by Step: The wood for motorsticks should be "C" grain (very speckled) and about .016" thick. Examine the sheet and feel it to be sure it is uniform in thickness, density and quality. Cut a narrow (1/4") strip off the end of the sheet, moisten it, and bend it around the glass form (Fig. 3). Trim the ends to an exact fit with the balsa wrapped closely around the form. This piece is now a pattern for the width of the motorstick blank (Fig. 4). Cut the previously selected balsa sheet to the length of the motorstick. Use a straightedge and a sharp blade to make one edge of the blank straight and true. Use the pattern to set the straightedge exactly parallel to the first cut, so that a blank is formed which is a perfect rectangle; the width equal to the length of the pattern and the length equal to the required motorstick length. The steps described above require only careful workmanship; they are crucial to producing a straight, strong motorstick.
Roll It Up: The basic process of making a hollow motorstick is to wrap a moist piece of wood around a form and bake it dry. Again, careful work is necessary — not hard but a bit finicky. Refer to Fig. 4 and follow along. Select a piece of Japanese tissue 2" longer than the motorstick blank and about 8" wide. Soak the blank in warm water for about 10 min. Meanwhile, moisten the edge of the paper so it will adhere to the glass form, and roll at least one turn of paper on the form. Remove the balsa blank from soaking and blot all the excess moisture. Place the blank on the tissue and roll the stick exactly parallel to the form and roll the form across the blank. Stop rolling just as the blank is completely rolled up, and note that the seam (visible through the damp tissue) is exactly parallel and straight. If not, do it over until it is! After the seam is straight, finish rolling the tissue and moisten the furred edge to secure it. Bake the form half an hour in an oven set at lowest heat and then allow it to cool. Work carefully to remove the tissue and peel the rolled stick and to separate the paper from the stick.
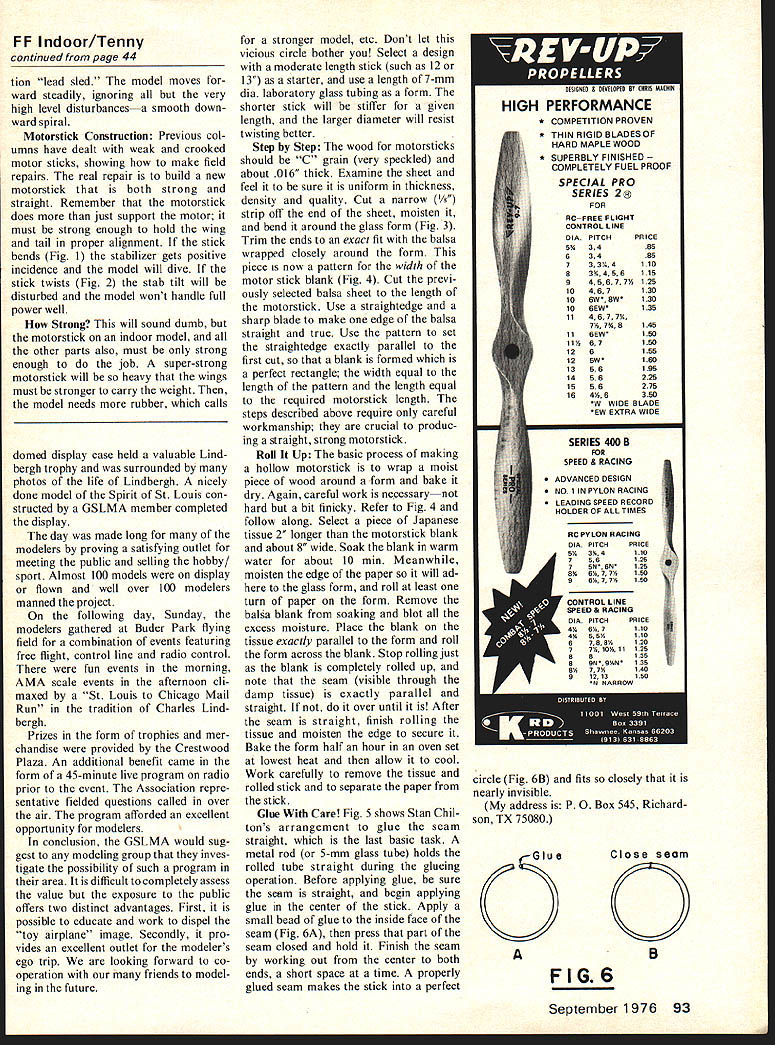
Glue With Care! Fig. 5 shows Stan Chilton's arrangement to glue the seam straight, which is the last basic task. A metal rod (or 5-mm glass tube) holds the rolled tube straight during the gluing operation. Before applying glue, be sure the seam is straight, and begin applying the glue in the center of the seam. Apply a small bead of glue to the inside face of the seam (Fig. 6A), then press that part of the seam closed and hold it. Finish the seam by working out from the center to both ends, a short space at a time. A properly glued seam makes the stick into a perfect circle (Fig. 6B) and fits so closely that it is nearly invisible.
(My address is: P. O. Box 545, Richardson, TX 75080.)
Transcribed from original scans by AI. Minor OCR errors may remain.

