


Free Flight: Indoor
Bud Tenny Box 545 Richardson, TX 75080
NFFS PUBLICATIONS
The National Free Flight Society has many publications, foremost being the annual Symposium report. The latest issue, SYMPO 88, contains 26 articles, several based on computer simulations. As usual there are design articles, trim articles, construction articles, and a broad variety of other topics, including a piece by Jim Richmond. Jim describes the general philosophy and approach that has led him to become Indoor World Champion five times.
NFFS has compiled an indexed bibliography of all the Symposium reports using 34 keywords to help locate articles, model-of-the-year selections, and references cited in the reports. This reference is available for $9 postpaid (NFFS members) or $11 for nonmembers. Order from NFFS Publications, 4858 Moorpark Avenue, San Jose, CA 95129.
Computer users: The same data is available on AppleWorks floppy disk from the author, Jim Wilson, 1030 Avenue D, Redondo Beach, CA 90277 ($20 in North America, $25 elsewhere).
NFFS Publications also has issues of past Symposium reports from 1972 through 1987 and several other technical and historical publications.
Building indoor boxes
My previous column (October 1988 MA) showed pictures of my Novice Pennyplane box. The model box fits against the rear of the small Samsonite suitcase I use for transport, leaving room for a box of spare tails or a cardboard folder of balsa and other repair materials. The extra-strong suitcase top is a heavy packing case that allows the models to be shipped as regular airline luggage. Jim Clem has shipped a similar Samsonite suitcase with the models mounted directly inside for several years with no problems.
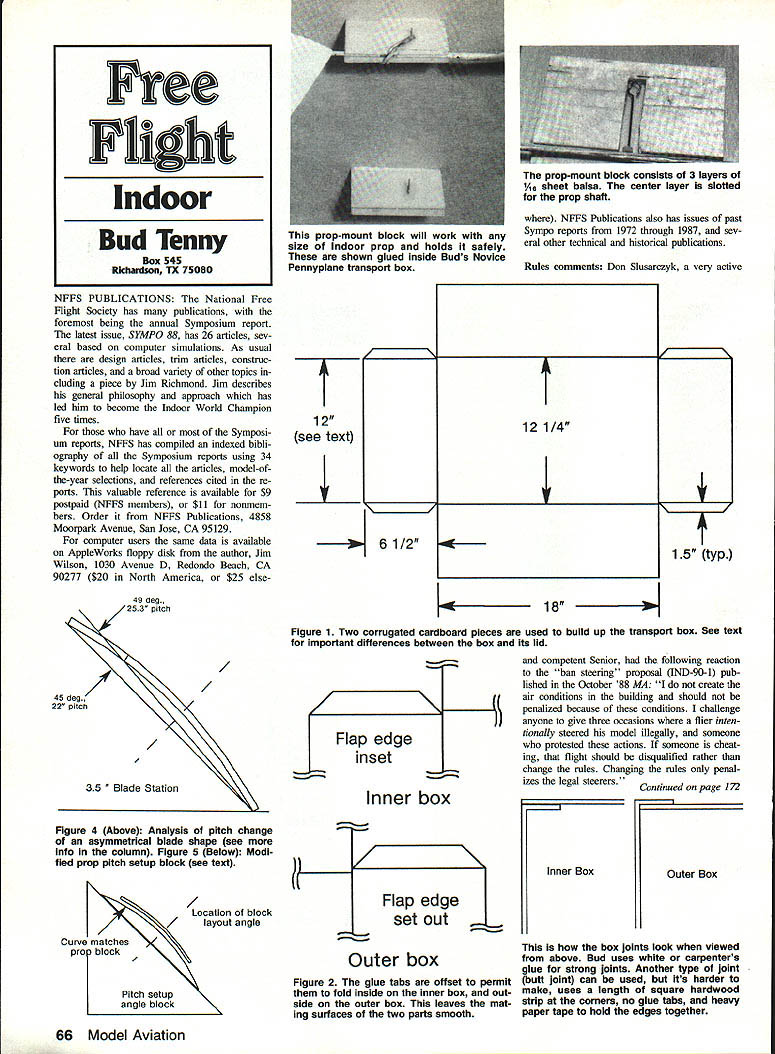
The model box consists of an inner box and an outer box serving as a full-depth lid which fits snugly over the inner box. The inside dimensions of the inner box are 18 x 12.25 in. and 6.5 in. deep; the outside dimensions of the outer box are defined by the inside dimensions of the suitcase.
- Figure 1 shows the dimensions of the corrugated cardboard used to build the Pennyplane box.
- Figure 2 shows an important detail: the ends of the inner box are inset so the flaps will fit inside on all corners; on the outer box the reverse is true.
- Figure 3 shows the top view of both boxes and how the flaps attach to avoid interfering with the fit between lid and box.
An alternate way to assemble the boxes is to use a butt joint. In the very corner of the joint, a 1-in. square hardwood strip reinforces the corner, and paper wrapping tape covers the outside of the joint. This is neater but requires much greater accuracy when cutting the cardboard.
I purchased 4 x 8-ft. cardboard sheets from a local container vendor and carefully cut out the pattern. After cutting, score each inner line and fold the flaps up at right angles to the adjacent panel. Pre-bend all seams until the box almost holds its shape, then make a trial assembly and temporarily tape everything in place long enough to verify dimensions. Finally, glue one joint at a time using white or yellow carpenter's glue.
When laying out the lid, increase the basic dimensions by 1/8 in. to ensure the lid will slip over the inner box. Remember how the glue flaps alternate to prevent interference and change the lid layout accordingly.
The prop mounts for the Pennyplane box glue directly to the side of the box and are made from three layers of 1/16-in. balsa sheet. The center layer is slotted to pass the prop shaft.
Two corrugated cardboard pieces are used to build up the transport box. Flap edges are inset and glue tabs are offset so the inner box fits inside the outer box with smooth mating surfaces on the outside. A butt-joint alternative uses a lengthwise square hardwood strip in the corners and heavy paper tape on the outside.
More on gallon-jug props
What's the real pitch of a jug prop? When a jug prop has an asymmetrical shape with regard to the layout line on the form, the actual pitch differs from the pitch of the form.
- Figure 4 shows a section through a prop blank symmetrical with respect to the layout line. As the blade gets narrower (dashed line), the blade angle (pitch) increases by the amount shown. More important, if the station shown is used to align the blades for prop assembly, the angle at each station of the assembled prop decreases by the same amount.
- Figure 5 shows how to prevent the blade-angle change. Instead of the conventional angle template, add a curved block with the layout-line location marked. Align the block and the layout line so the blade will have the calculated pitch if the blade is symmetrical. The blade-angle change in the nonsymmetrical area can then be calculated.
Flying opportunities
The following listing gives the contact person for each area known to have regular indoor activity.
If contest directors can give about 11 weeks' notice and tell me about contests, I will list them here.
- California
- Santa Ana: Santa Ana hangar is not currently available. Curt Stevens, 25108 Marguerite Parkway, Mission Viejo, CA 92692; phone (714) 240-3433.
- San Diego: Monthly sessions in Category I. Howard Haupt, 3860 E. Cole Ave., San Diego, CA 92117.
- Colorado
- Denver: Les Shaw, 995 McIntire St., Boulder, CO 80303; phone (303) 499-0946.
- Connecticut
- Glastonbury: George Armstead, 89 Harvest Lane, Glastonbury, CT 06073.
- Florida
- Miami: Dr. John Martin, 2180 Tigertail Ave., Miami, FL 33133; phone (305) 858-6363.
- Iowa
- Cedar Rapids: Approximately weekly flying sessions all winter; 34-ft. ceiling. Contact Paul McIlrath, 1524 48th St. NE, Cedar Rapids, IA 52402; phone (319) 393-4677.
- Massachusetts
- Cambridge: Ray Harlan, 15 Happy Hollow Rd., Wayland, MA 01778; phone (617) 358-4013.
- New Jersey
- Glassboro: Doug Barber, 146 Stratton House, Maple Shade, NJ 08052; phone (609) 235-5318.
- New York
- NYC: Contact Ed Whitten, P.O. Box 176, Wall St. Station, New York, NY 10005; phone (212) 785-3???
- Oklahoma
- Oklahoma City: Bill Baker, P.O. Box 249, Norman, OK 73070-0249.
- Pennsylvania
- Philadelphia: Joe Krusk, 409 Warner Rd., Wayne, PA 19087; phone (215) 688-3927.
- Texas
- Ft. Worth/Dallas: Jesse Shepherd, 2713 Summit View, Bedford, TX 76021; phone (817) 282-3710.
- Utah
- Salt Lake City: Franklin Anderson, 6137 Bee Park Dr., Salt Lake City, UT 84118.
FF Old-Timers/Baker
More next time. Please keep those letters and photos coming.
The big fin makes the high-power trick; it wants to spiral-dive if flown hands-off. In a September column I talked about the importance of having a small fin area if you plan to fly the FF Flight with high power. I was pleased to get a letter from Bill McCombs, a senior engineer at Vought Corporation. He wrote about a valuable book published by Air Age, Inc. (Model Airplane News) some years ago, entitled Flying and Improving Scale Model Airplanes. If you can find a copy, get it—it's full of data on free-flight performance, stability, and trim, and is not limited to scale models.
Bill later published Making Scale Models Fly, mostly limited to scale models but with principles that apply broadly. You may be able to buy it directly from him at 2106 Siesta Dr., Dallas, TX 75224. If you can find a copy of the earlier, larger book, it's worth the hunt.
Bill notes that as power and climb angle increase, the fin size that can be tolerated (without spiral flight developing) is smaller. With very large dihedral, the spiral flight can be a climb, but spiral dive lurks nearby. For older antique Cabin models—since rules often prevent cutting fin area or increasing dihedral—it's better to fly Long Cabins and Musketeers at the power levels they were designed to handle.
Hansa No-Cal/Lidberg
I lay the body down on its left, covered side, and glue on the motor stick, making sure not to place the stick where the wing must fit. Add the stabilizer and wing. If you haven't already done so, make up the tip tanks and add the "jet" engine.
Make lightening holes in sheet-balsa parts using a piece of sharpened brass tubing or the eraser holder from an old wooden pencil; cover these parts and glue them in place. Attach a loop of rubber and check the balance. Add clay at the front of the body as necessary to obtain the balance point shown on the plan.
Check the plane for any warps, using dry heat (an electric stove burner or space heater) to straighten them. Try a test glide, making sure the prop freewheels in the air. Some adjustment by adding or removing clay may be necessary for optimal glide.
Try some low-power flights—use about 100 turns (wind in the correct direction). Power adjustments are made largely by using the bendable thrust bearing. If the model stalls, bend in a bit more downthrust. If it won't climb, reduce downthrust, add more turns, and/or remove some clay. This airplane seems happiest with a wide climb turn.
If you're ready to turn a few heads at the flying field, the Hansa is a surefire way to have some fun.
Lippisch/McIlrath
Another idea that didn't pan out—but failures and frustrations are common in research work, and sometimes they provide a laugh, even if the humor isn't obvious at the time.
Once, while building a new tail duct to replace a damaged one, Dr. Lippisch inspected the nearly completed section. He picked it up, weighed it in his hand, and tossed it down with obvious dissatisfaction. "Too heavy!" he announced. I pointed out it was much lighter than the old one—23 grams instead of 31. He sputtered, then quoted what might be called Lippisch's First Law of Aerodynamics: "If it feels too heavy, it is too heavy!" and left, probably lamenting the problem of finding good model builders.
Dr. Lippisch's wit was often mixed with wisdom. Once, when a pedal-powered plane (the jokingly named "pedalflügel") was under consideration, he described a balsa tail boom that supported “fifteen hundred pounds in compression.” When someone asked about buckling under unexpected loads, the doctor replied, "If it breaks, we fix it," his standard response when we questioned the strength of unmanned models.
This line might seem flippant, but safety was always his primary concern; he was proud there had never been a fatal accident during testing of any of his civil designs. Wartime development of the rocket-powered Me-163 also adhered to cautious methods—testing began with unpowered glides to gather engineering data and familiarize pilots.
Years later, the Gossamer Condor and Albatross projects confirmed that extreme lightness and easy repairability were keys to success in human-powered flight. The many crashes the Condor and Albatross survived without serious injury showed that beneath the casualness, Lippisch's maxim expressed a sound engineering principle.
Dr. Alexander Lippisch was ahead of his time. His ideas were so advanced that he spent much of his adult life dragging the aeronautical world along behind him—convincing doubting experts, pleading for research funds, and making the case for the future. His sense of humor was one trait that made his brilliant leadership in aeronautical science possible for nearly 60 years.
CL Aerobatics/Fancher
The response rate was somewhat affected, but I found the ship could be flown fairly comfortably with the supplied carbon lines and handle. More details will follow when we fly the ship.
The bellcrank itself is mounted on top of the wing, with the control lines routed through the fuselage to the nose and thence to the inboard wing. A two-piece lead-out guide was provided to locate the lead-outs at the appropriate positions.
More next time. Please keep the letters and photos coming.
Transcribed from original scans by AI. Minor OCR errors may remain.

