
Free Flight: Old Timers
Clarence Haught
Sometimes it's difficult to remember that not everyone cut their modeling teeth on ignition engines. Judging from my mail, I suspect it's time to devote a little space to the idiosyncrasies of spark ignition.
Ignition basics
The basic difference between glow and spark ignition is how the fuel/air mixture is ignited. Glow ignition depends on a constantly glowing wire coil. Spark ignition delivers a repeated, timed spark.
A 3-volt power source will not jump the spark plug gap by itself. Jumping the typical 0.015 to 0.020 in. gap requires a transformer (an ignition coil) to change the low-voltage, high-amperage current to a high-voltage, low-amperage charge that will fire the plug. Ignition coils have two windings: a primary winding consisting of a few turns of heavy wire, and a secondary winding consisting of many turns of fine wire.
In practice, if we connect one side of a 3-volt power source to the engine mount lug (ground) and the other through the primary coil winding to the insulated contact point, we have a circuit controlled by a mechanical switch (points). This switch is timed to the piston position within the cylinder. While the engine is getting ready to fire, the points are closed and current flows in the coil, building a magnetic field in the primary winding. When the engine is ready to fire, the points open, interrupting the primary current and causing the magnetic field to collapse across the secondary winding. This induces a high-voltage current in the secondary circuit, which has the power needed to jump the spark plug gap and fire the mixture.
A 200-volt, 0.1 MFD (microfarad) condenser connected from the points to ground aids the instantaneous collapse of the primary current and reduces arcing at the points.
Installation and servicing
Many potential field problems can be eliminated at installation or by routine servicing:
- Use good components and adequate hookup wire (18-gauge multi-strand).
- Solder all joins securely.
- Mount components solidly and support wiring by bundling and/or securing to the aircraft structure.
- Many condensers currently in use have solid leads that are prone to vibration failures. Keep these wires as short as possible, solder the stranded wire close to the condenser, and secure the solid portion of the lead to the structure with epoxy glue.
Batteries and points
The most significant difference in spark ignition today and the "old days" has to be the improvement in batteries. As a youngster I spent hours trying to get a balky engine running only to have it quit when switching from boosters to flight batteries. Today I don't even use boosters on my bigger ships equipped with "C" or "D" alkaline cells.
Dry points are a must. Keep them clean and adjusted around 0.008 to 0.012 in. and your engine will be happy. Keep oil away from all ignition components — oil is a great conductor (i.e., a short-circuiter).
Troubleshooting approach
My experience has shown that most troubles occur in the following priority order; I troubleshoot accordingly:
- Batteries
- Points
- Wiring
- Condensers
- Coils
It bears mention that most of us assume trouble is in the ignition system. Failure to start can also be due to fuel-related problems. If preliminary checks indicate some spark, try putting a glow plug in the engine, connect it to a 1½-volt battery, and try starting the engine. Yes, the engine will run on your gas-oil fuel mixture as long as the glow plug is connected to a power source. This technique will allow you to clear any flooding and obtain a needle-valve setting. Then go back and try spark ignition. I find this method saves valuable time in the field as it eliminates futile troubleshooting in the wrong area.
There's nothing mysterious about troubleshooting. A thorough, systematic approach will get you back in the air in minimal time.
Test unit and field tips
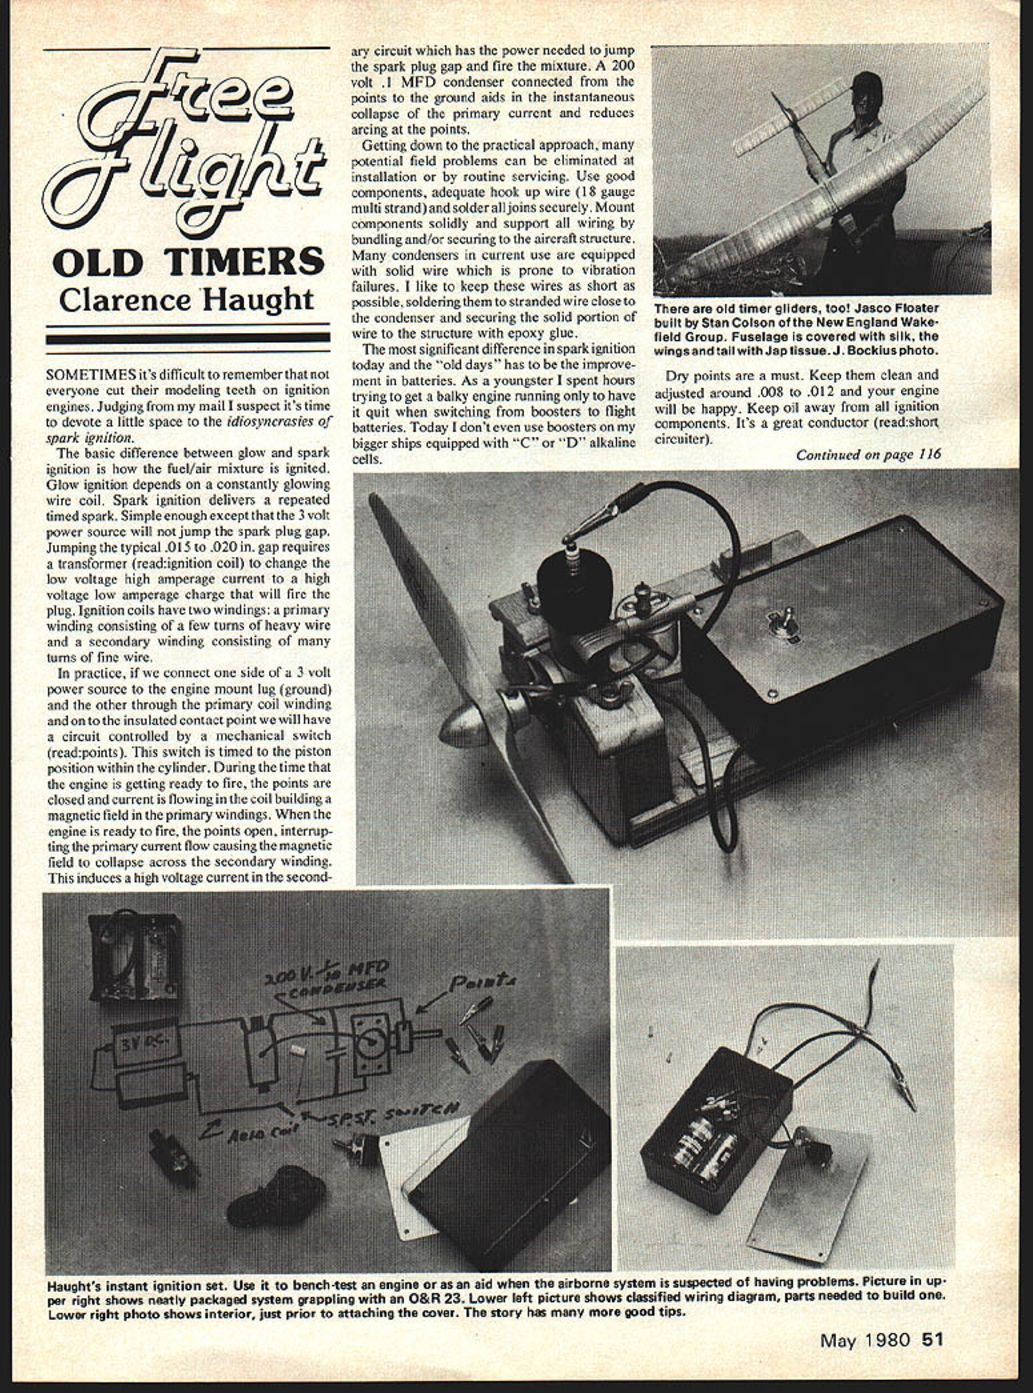
The photographs this month show a simple, inexpensive ignition unit made from stock electronic-supply-house parts (with the exception of the coil). I built the unit for test-stand use, but found it makes a valuable troubleshooting aid in the field. If component failure is suspected, simply disconnect the aircraft ignition system and hook up your test-box system. This allows you to isolate engine problems from ignition-component problems much the same as the glow-plug technique allows separation of problems.
A few notes on building the unit I used:
- Housing: electronics supply-house "experimenter box."
- Battery box and coil: secured with silicone-rubber bathtub caulking cement.
- Condenser/capacitor: 200-volt, 0.1 MFD (Radio Shack) soldered in next to the coil; the capacitor itself is epoxy-cemented directly to the coil.
- Power: alkaline "D" cells eliminate the need for booster batteries.
- Leads: all leads that exit the box are first knotted inside for strain relief.
- Connections: alligator clips on the external leads simplify connections.
Another useful device in troubleshooting is a volt-amp meter to check for presence of current in the system. Lacking such a meter, a simple 3-volt test light can be useful. An inexpensive one can be made from a 3-volt bulb, a bulb socket, and two short test leads. Use these aids to determine battery condition, current at the points, and short circuits to ground.
Notes and news
The San Diego Aeroneers: The old San Diego Aeroneers are out to recapture the distinction of being the club in San Diego! They have a newsletter going now, and the issue I received had a reproduction of the glow-plug instructions for Arden engines which listed two mix-it-yourself fuel formulas.
- Formula A (gasoline-base): 25% SAE 70 oil, 50% white gasoline, 25% No. 1 Nitrophane. This mixture reveals its ignition-era ancestry and is described as "A very satisfactory gasoline-base fuel and not critical."
- Formula B (alcohol-base): 25% castor oil, 37% methanol, 37% nitromethane. Described as "An especially recommended alcohol-base fuel very hot and not critical" — not far from today's popular blends.
You can contact the San Diego Aeroneers at 2879 Marathon Drive, San Diego, CA 92123.
Cycle Manual: Richard Corey, P.O. Box 597, 415 Homer Road, Minden, LA 71055 is reproducing the Super Cycle operating instructions. Nicely done in original color and format, the 16-page booklet includes troubleshooting and disassembly instructions as well as operating procedures and some dimensional drawings. Cost is $4 postpaid.
New event: Well, sort of. Bob Stalick, well-known in free-flight circles as an author, active AMA official, and originator of the SAM name for the Society, is proposing an "Old Timer Scale" event. Currently flown during the indoor season by the Willamette Model Club of Albany, Oregon, the event calls for:
- A rubber-powered replica of an Old Timer or Antique Gas Model.
- Maximum wingspan of 24 in.
- Judged on fidelity to original and duration.
- Engine compartment and propeller not judged.
Sounds like loads of fun and eliminates all the old excuses: "I can't find an engine, my building room is too small for old timers, too much work," etc.
Clarence Haught Rt. 5, Box 16, Coeur d'Alene, ID 83814.
Transcribed from original scans by AI. Minor OCR errors may remain.

