
Free Flight: Old-Timers
Clarence Haught
Getting it there
Today's modelers are finding out what old-timers always knew: the bigger the model, the more fun! But with today's shrinking automobiles, many of us are limited to designs that will fit in our car. Of course, there are other solutions short of trading the family car for a pickup or station wagon. We could, for example, build two-piece wings and hope we can still get the fuselage inside the vehicle. Maybe rest the tail on the dashboard.
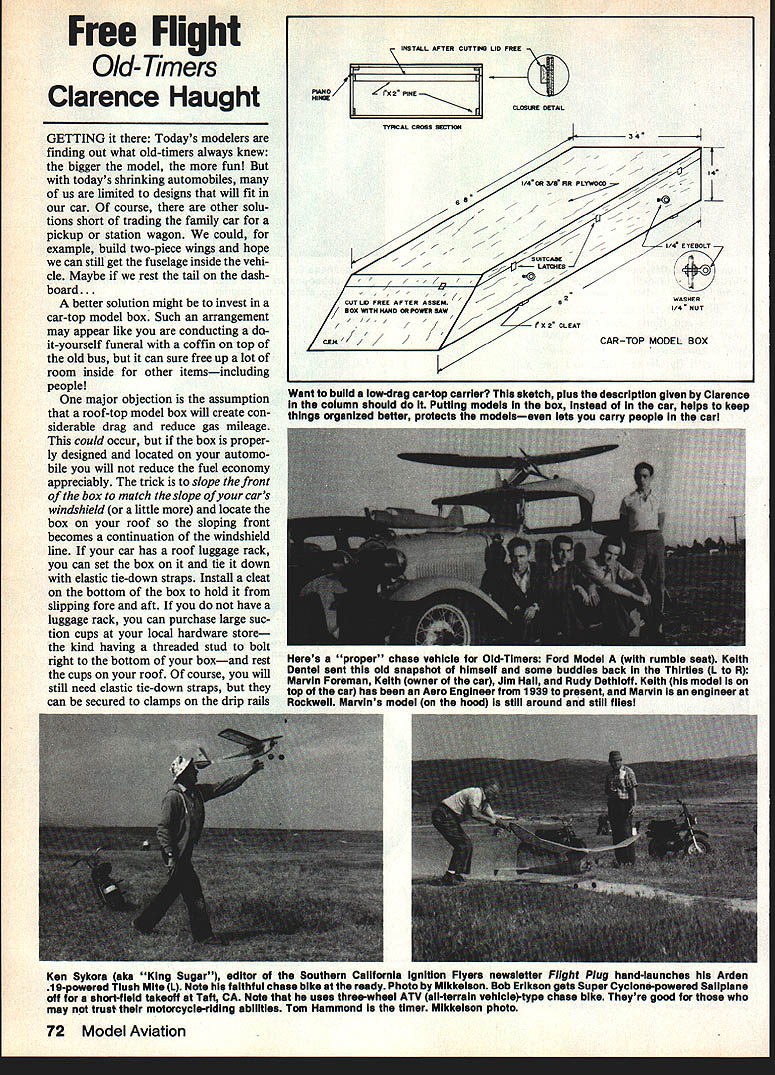
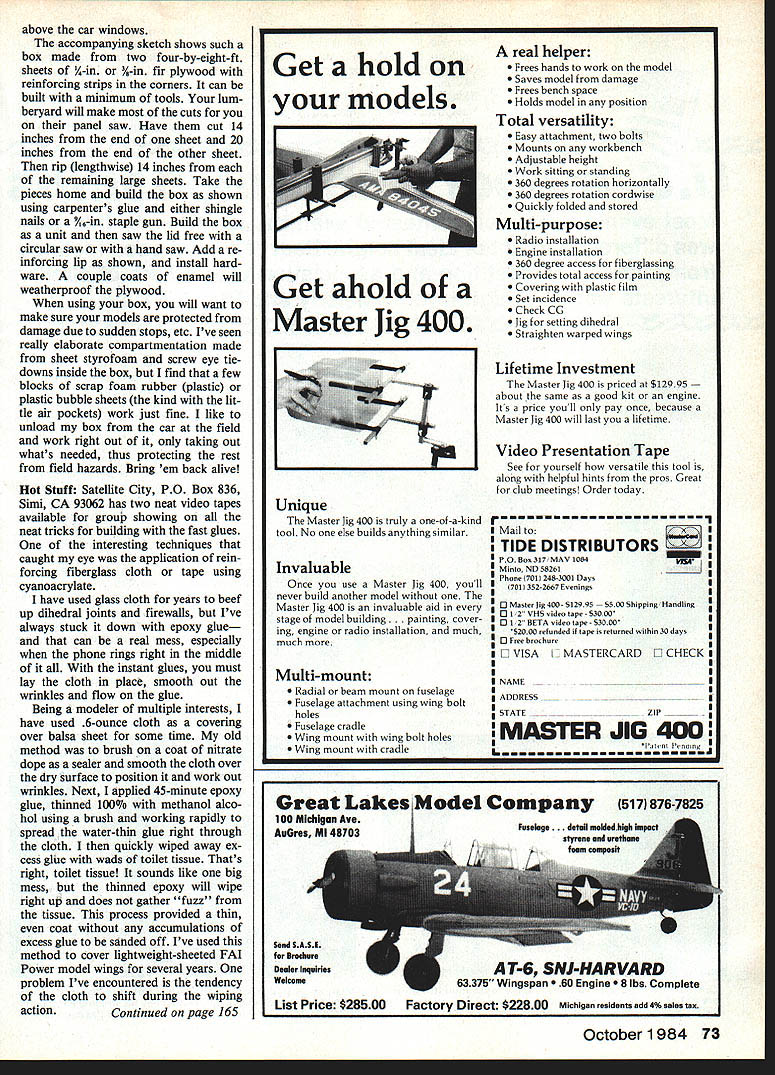
A better solution might be to invest in a car-top model box. Such an arrangement may look like you are conducting a do-it-yourself funeral coffin on top of the old bus, but it can sure free up a lot of room inside for other items — including people!
One major objection is the assumption that a roof-top model box will create considerable drag and reduce gas mileage. This could occur, but if the box is properly designed and located on your automobile you will not reduce fuel economy appreciably. The trick is to slope the front of the box to match the slope of your car's windshield (or a little more) and locate the box on your roof so the sloping front becomes a continuation of the windshield line.
If your car has a roof luggage rack, you can set the box on it and tie it down with elastic tie-down straps. Install a cleat on the bottom of the box to hold it from slipping fore and aft. If you do not have a luggage rack, you can purchase large suction cups at your local hardware store — the kind having a threaded stud to bolt right to the bottom of your box — and rest the cups on your roof. Of course, you will still need elastic tie-down straps, but they can be secured to clamps on the drip rails above the car windows.
Building the roof-top model box
The accompanying sketch (not shown here) illustrates a box made from two 4-by-8-ft sheets of 1/4-in. or 3/8-in. fir plywood with reinforcing strips in the corners. It can be built with a minimum of tools. Your lumberyard will make most of the cuts for you on their panel saw.
Suggested cutting sequence:
- Have the yard cut 14 inches from the end of one sheet and 20 inches from the end of the other sheet.
- Then rip (lengthwise) 14 inches from each of the remaining large sheets.
Take the pieces home and build the box as shown using carpenter's glue and either shingle nails or a 3/8-in. staple gun. Build the box as a unit and then saw the lid free with a circular saw or a hand saw. Add a reinforcing lip as shown, and install hardware. A couple coats of enamel will weatherproof the plywood.
Protecting models in the box
When using your box, make sure your models are protected from damage due to sudden stops, etc. I've seen elaborate compartmentation made from sheet styrofoam and screw-eye tie-downs inside the box, but I find that a few blocks of scrap foam rubber (plastic) or plastic bubble sheets (the kind with the little air pockets) work just fine.
I like to unload my box from the car at the field and work right out of it, only taking out what's needed, thus protecting the rest from field hazards. Bring 'em back alive!
Hot Stuff: fast glues and fiberglass cloth
Satellite City, P.O. Box 836, Simi, CA 93062 has two neat video tapes available for group showing on all the neat tricks for building with fast glues. One interesting technique shown was the application of reinforcing fiberglass cloth or tape using cyanoacrylate (instant) glue.
I have used glass cloth for years to beef up dihedral joints and firewalls, but I've always stuck it down with epoxy glue — and that can be a real mess, especially when the phone rings right in the middle. With instant glues, you must lay the cloth in place, smooth out the wrinkles and flow on the glue.
Being a modeler of multiple interests, I have used 6-ounce cloth as a covering over balsa sheet for some time. My old method was to brush on a coat of nitrate dope as a sealer and smooth the cloth over the dry surface to position and work out wrinkles. Next, I applied 45-minute epoxy glue, thinned 100% with methanol alcohol, using a brush and working rapidly to spread the water-thin glue right through the cloth. I then quickly wiped away excess glue with wads of toilet tissue. That's right — toilet tissue! It sounds like one big mess, but the thinned epoxy will wipe right up and does not gather "fuzz" from the tissue. This process provided a thin, even coat without accumulations of excess glue to be sanded off. I've used this method to cover lightweight-sheeted FAI Power model wings for several years. One problem I encountered was the tendency of the cloth to shift during the wiping action.
It seemed a good idea to try adhering glass cloth to large areas using the instant-glue technique. Experiments proved the idea worked well, but the fumes produced during setting of the glue proved to be too much for me. I have since revised my method by tacking the cloth down around all the edges and wherever else is needed with instant glue, and then using the epoxy-glue method to bond the rest. This system works great.
Finishing surfaces covered in this manner is easily accomplished with epoxy paints — clear or pigmented. I usually spray a color coat of dope for visibility or appearance considerations and then coat it with clear epoxy paint (thinned down on Free Flight models).
Incidentally, small pieces of 0.6-ounce cloth adhered with Hot Stuff (or the equivalent) make excellent field repairs, and your flight kit should not be without these essentials. As with many products used in our hobby, health hazards exist — be wary of skin contact with epoxy products, and always ensure adequate ventilation is present.
Clarence Haught 3226 Honeysuckle Dr., Coeur d'Alene, ID 83814
Transcribed from original scans by AI. Minor OCR errors may remain.

