
Free Flight: Scale Sport
Bill Warner
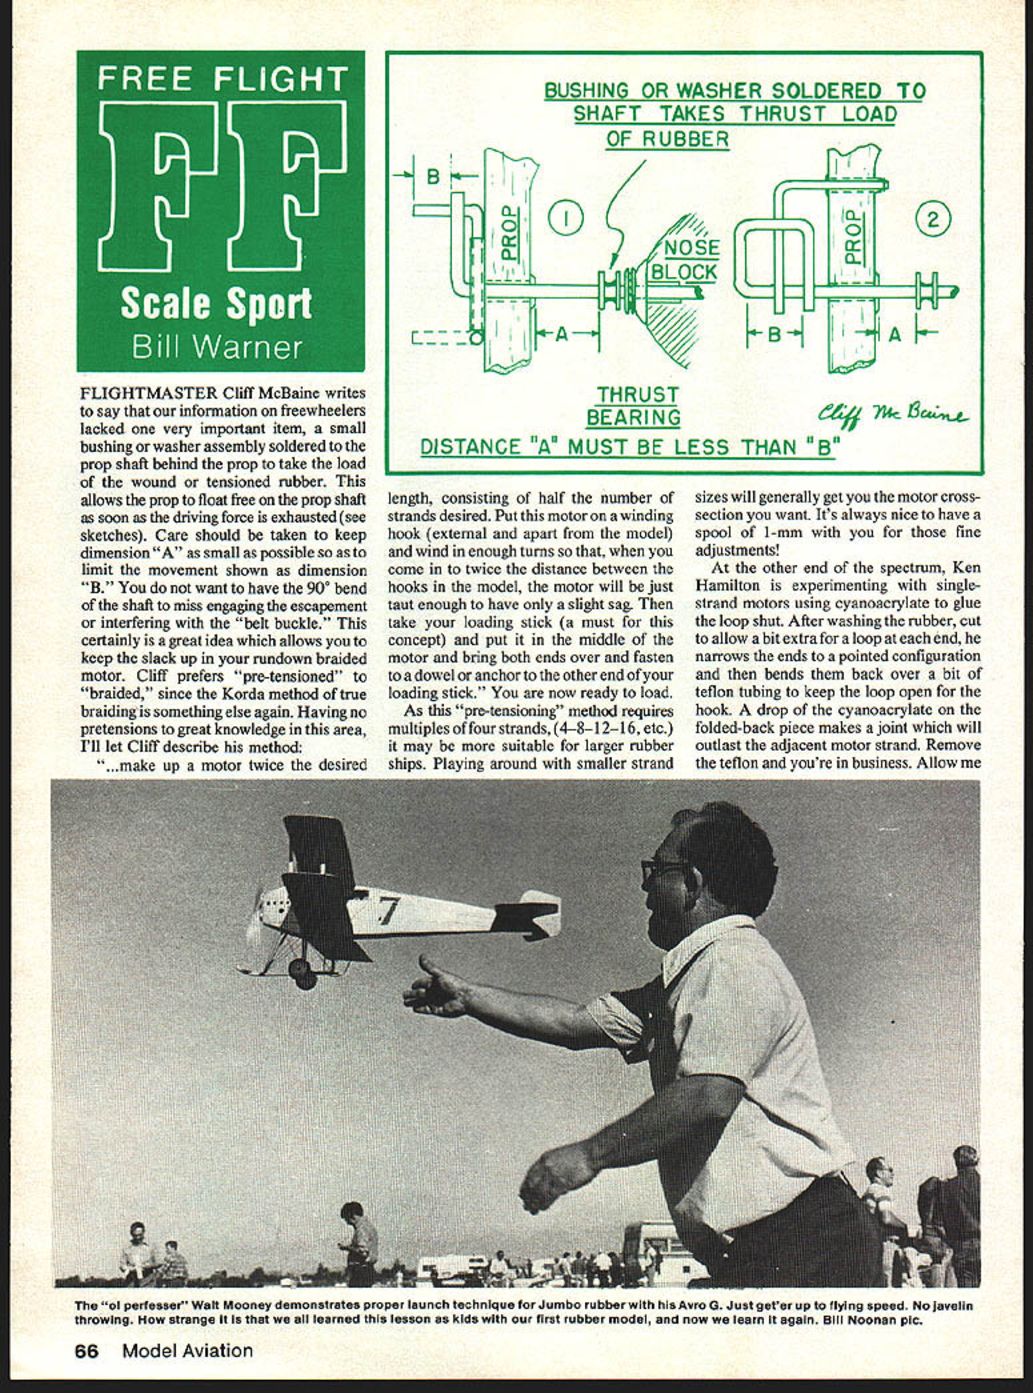
FLIGHTMASTER Cliff McBaine writes to say that our information on freewheelers lacked one very important item: a small bushing or washer assembly soldered to the prop shaft behind the prop to take the load of the wound or tensioned rubber. This allows the prop to float free on the prop shaft as soon as the driving force is exhausted (see sketches). Care should be taken to keep dimension "A" as small as possible to limit the movement shown as dimension "B." You do not want the 90° bend of the shaft to miss engaging the escapement or to interfere with the "belt buckle."
This is a great idea which lets you keep the slack up in your rundown braided motor. Cliff prefers "pre-tensioned" to "braided," since the Korda method of true braiding is something else again. Having no pretensions to great knowledge in this area, I'll let Cliff describe his method:
"...make up a motor twice the desired length, consisting of half the number of strands desired. Put this motor on a winding hook (external and apart from the model) and wind in enough turns so that, when you come in to twice the distance between the hooks in the model, the motor will be just taut enough to have only a slight sag. Then take your loading stick (a must for this concept) and put it in the middle of the motor and bring both ends over and fasten to a dowel or anchor to the other end of your loading stick. You are now ready to load."
This "pre-tensioning" method requires multiples of four for strands (4, 8, 12, 16, etc.), so it may be more suitable for larger rubber ships. Playing around with smaller strand sizes will generally get you the motor cross-section you want. It's always nice to have a spool of 1-mm with you for those fine adjustments!
At the other end of the spectrum, Ken Hamilton is experimenting with single-strand motors using cyanoacrylate to glue the loop shut. After washing the rubber, cut to allow a bit extra for a loop at each end; he narrows the ends to a pointed configuration and then bends them back over a bit of Teflon tubing to keep the loop open for the hook. A drop of cyanoacrylate on the folded-back piece makes a joint which will outlast the adjacent motor strand. Remove the Teflon and you're in business.
I must again caution you about what one may tend to forget with familiarity: cyanoacrylate glue (Hot Stuff, Permabond, Zap, etc.) is highly effective at what it was invented to do—gluing parts of the human body together. If you get even the tiniest drop in your eye, it will be extremely painful and may keep it glued shut for up to four days. Ready to put on those safety glasses now? The easiest way to get it in your eye is to have the bottle right in front of you on the edge of your building area and reach down to pick up a dropped part under the table. Keep it to the rear of your building space and always out of the reach of kids.
Another way of making single-strand motors, used by the indoor crowd for years, is this: double back a loop on the end of your motor strand around a Q‑Tip stick or some doweling and have a partner stretch the loop while you whip a dozen turns around with thread. A drop of glue keeps the thread from coming undone and the loose end can be trimmed quite close without slipping through. Single-strand motors are smooth-running and enable those of us who never have exactly the right size of rubber to reduce power.
Fernando Ramos, world‑renowned scale expert, columnist, and homebuilder, is now in the air with his 12' to the foot Marquart "Charger." We implored him to tape a few inches of cardboard tube sticking out of each side of the fuselage near the tail so we could model it as a scale rubber job, but to no avail. To make more time to play with his new toy, he has turned his editorship of Flightmasters Scale News and Views over to yours truly after twelve long years of devoted service. If you'd like to get this publication—which will feature at least two large fold‑out scale plans and lots of 3‑views—send $9 ($10 for full membership) to: Phyllis Warner, 432‑C San Vicente Blvd., Santa Monica, CA 90402.
How to launch a free‑flight scale job boils down to three factors:
- keeping it realistic,
- saving the model from damage, and
- trying to comply with the rules if one is in a contest.
Some specific items that need to be thought out include:
- hand‑launch technique,
- R.O.G. (rise-off-ground) technique,
- launching devices, and
- model construction to make launching and repairs easier.
Outside of Harold Osborne's rail‑launched Opel "Hatry" Jetex ship, I have never witnessed a true catapult or downhill‑ramp launching of a FF scale job, so let's concentrate on hand‑launching for the time being. R.O.G., required by AMA scale rules in indoor and outdoor rubber and optional in gas (but so rewarded in points as to render it almost obligatory), can be a real pain in the empennage. Many flying sites are paved with asphalt, which grinds off wingtips and makes for jarring nose contacts. When one cannot walk out to a softer area to fly, the chance of destroying many hours of careful work is multiplied greatly.
In some cases, R.O.G. may be required from an unimproved surface that, to a scale pilot, would appear to have foot‑high boulders and foot‑deep ruts in the way. Putting a couple of sheets of plywood down may enable STOL‑type ships to get off, but how about those which require a run of 20 feet or more?
Planes with retractable gear look kind of silly flying around with the wheels down all the time. One could, of course, make them retract by installing complicated and heavy mechanisms. I have seen retracts, but have never seen one work as well as a "wheels‑up" model. Retracts in a rubber job add much weight and weakness in the undercarriage. Weight in electric planes is already a problem, and in CO2 ships, forget it.
Anticipating a howl of indignation from R.O.G.‑oriented friends who cry that real planes were not hand‑launched, consider this from "General" Dave Stott of the Flying Aces Club: "Unless you go to gearing, a rubber job just has to swing a big prop. This is enough defacing of the scale appearance without extending the landing gear so it can R.O.G., which is only a small percentage of the entire flight. I cannot see sticking to a scale‑length landing gear and sacrificing prop efficiency, either. Most of all, to see a WWII fighter or a race plane roaring around with its gear down is not in keeping with the designed function of the machine. If you must R.O.G., then let the hatches slide back, and at least 15° of flap be used on models as well. And let the performance be judged no farther than when the model leaves the ground, and pick up again when it touches down for a landing. All in between is not applicable. And what should we do with our seaplanes? All of us are not so fortunate as to have a Lake Elsinore at our disposal. Must we all choose our scale jobs to conform to the available sites?"
This raises the question: are we building "flying scale" or "takeoff scale" models? The insistence on exact landing gear length as a prime factor can be ridiculous. Judges and competitors should balance scale fidelity with practical flightability.
An excellent method of hand‑launching is proposed by Ken Hamilton, who has noticed many otherwise accomplished scale modelers launching with excessive speed and/or nose‑up angles and with the hand moving through an arc. Ken advises the model be projected "...along a straight line (the desired flight path) by means of an arm motion involving both the shoulder and elbow joints as the arm moves the hand in a straight line." If one can match the flying speed expected from the model, excess lift (produced by nose‑up hurling) will be minimized. Sort of just let it fly out of your hand. Ken, one of the top men in the aircraft industry (Sabreliner project) before his retirement, adds: "Real aircraft are docile within a design speed envelope, but become unruly if pushed outside it, too!"
A few construction hints:
- Keep the model tough where it needs to be tough — landing gear attach points, motor and prop supports, the nose and wingtips.
- Make wingtips and leading edges easy to replace.
- Consider small removable tip tanks or wingtip panels that can be repaired or replaced without ruining the rest of the model.
- Where possible, design the undercarriage so it can be altered quickly from scale to practical for R.O.G. without permanent damage to the appearance.
Hand‑launch technique is critical. A smooth, controlled toss with the correct amount of up‑elevator and a good clean grip will save many models. Practice launches with a hand‑launched trainer to learn your release technique. For R.O.G., ensure that the gear and propeller combination provide adequate acceleration without undue drag; if retracts are used, they should be sturdy and simple.
In contests, remember that judges are primarily looking for a good, reliable flight and a model that represents its subject well. Don't sacrifice flight ability for a marginal gain in scale appearance. If you can have both, fine; if not, make the model fly well.
This month's TWA comes from Dick Seifried. His Curtiss XP‑37 (photo in Jan. MA) was lost at the 1978 Flightmasters' Annual after three flights of about a minute each and a final awe‑inspiring 14 minutes out‑of‑sight! At 22" span, the one‑ounce model was built "a la Earl Stahl" with clamshell construction. It flew on six strands of 1/8" x 22" Sig contest rubber with one‑minute motor runs. The model did best in calm air but had trouble with ground turbulence due to the low power. Dick feels that a shorter or more powerful motor would get it up and out of this problem, with a reduction of motor run to 35–40 seconds. Dick offers to loan the photo negative for making your own plans. His address is: R. Seifried Jr., 13022 Barto Dr., Granada Hills, CA 91344.
Many readers have recommended the best buy of the year: a gold mine of rubber‑scale plans reproduced in a catalogue by Golden Age Reproductions, P.O. Box #13, Braintree, MA 02184. Put out by Joe Fitzgibbon, the book shows plans you can order full size from him; the collection of 150 vintage drawings is more than worth the $5 price of the catalogue. Send $5. You won't regret it!
Keep the great hints, tips, TWAs and 5 x 7 B/W photos coming!
Bill Warner 432‑C San Vicente Blvd. Santa Monica, CA 90402
Transcribed from original scans by AI. Minor OCR errors may remain.

