
Free Flight: Scale-Sport
Ralph D. Kuenz
I HAVE been dealing with lightweight finishes for models in the past few articles. Discussions have covered the use of colored tissue, color doped surfaces, masks, appliques, and air-brushing techniques.
Several inquiries have been made to me to explain my method of obtaining a lightweight simulation of the lozenge pattern fabric used on German aircraft in WWI. I shall attempt to explain my light method, albeit this undertaking is a little "heavy" for the beginner.
Early use of camouflage in WWI consisted of painting irregular blotches of green, mauve (pale bluish purple), and dark green on the upper surfaces of aircraft to protect them from attack while on the ground. The lower surfaces were sometimes painted a light blue or were covered with a light blue fabric. Early in 1917, the German Air Ministry introduced a fabric which was printed in a pattern of irregular shaped polygons of various pastel colors. This became known as "Lozenge" fabric. This pre-printed fabric was finished with a clear matte lacquer giving the covering material a translucent quality. This technique of providing camouflage weighed much less than the earlier method of using painted colors.
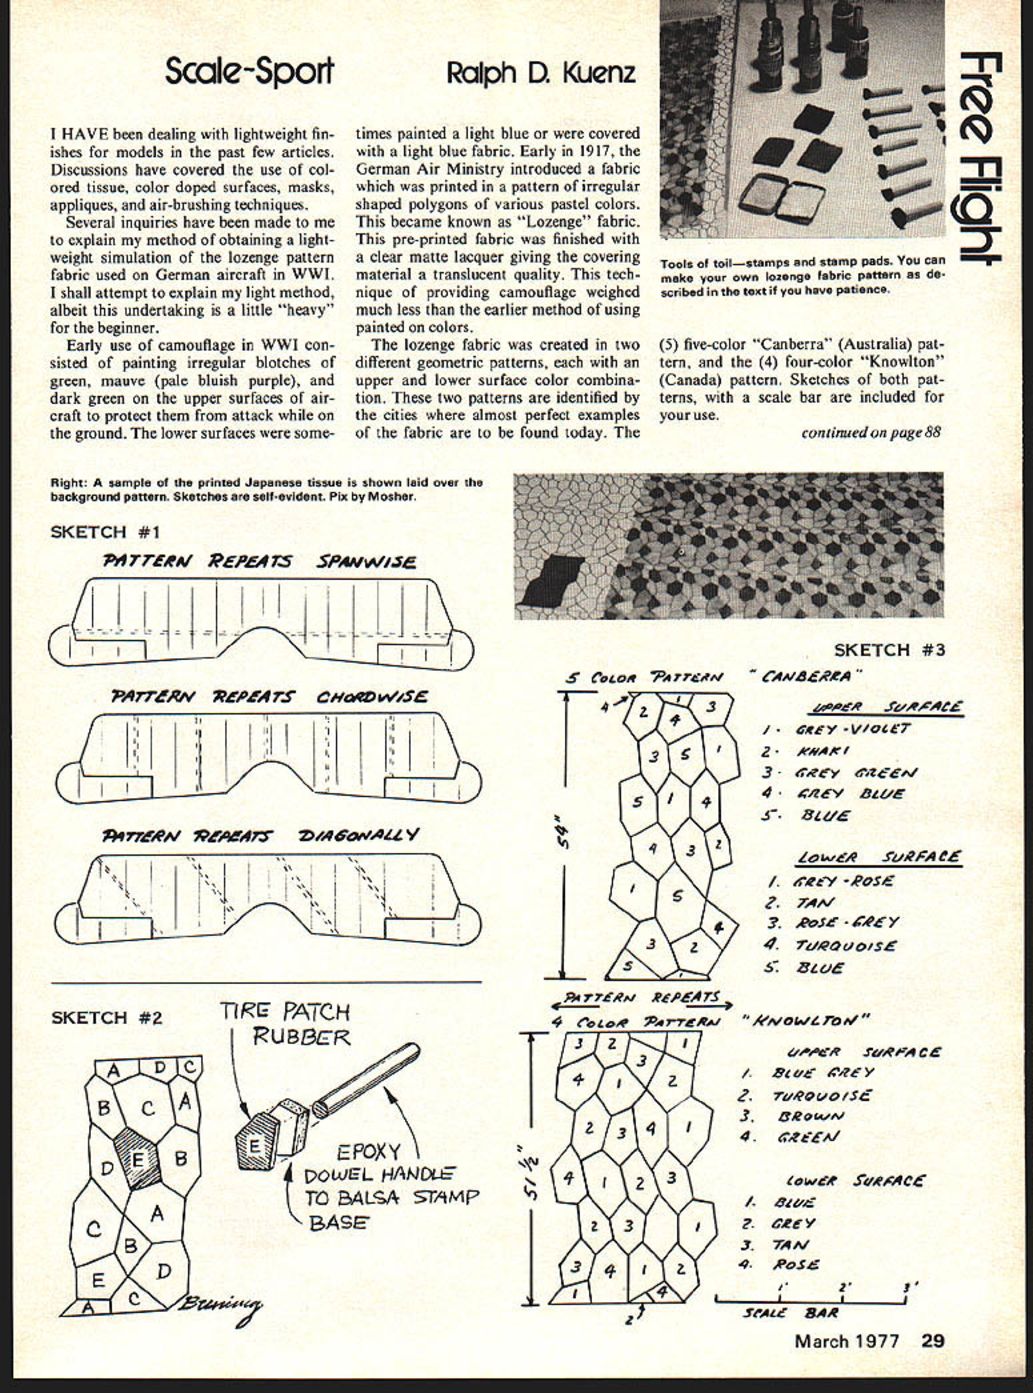
The lozenge fabric was created in two different geometric patterns, each with an upper and lower surface color combination. These two patterns are identified by the cities where almost perfect examples of the fabric are to be found today. The (5) five-color "Canberra" (Australia) pattern, and the (4) four-color "Knowlton" (Canada) pattern. Sketches of both patterns, with a scale bar are included for your use.
FF Scale/Kuenz continued from page 29
I wish to express my appreciation to the people who have provided the necessary reference material on lozenge fabric. This article merely hopes to explain a method of duplicating the fabric on Japanese tissue for model work. This is made possible through the research of those who have published the references listed.
It was my desire to simulate the translucent quality of the original fabric on tissue. This is lost on a model subject where the individual colored areas are painted on. Several unsuccessful methods were attempted before I arrived at the method described. These were, and I list them that you might not plow the same ground:
1) Colored chalk rubbed into the tissue through a template of the individual color areas. With this method the color pattern was not clearly defined. Wet shrinking was not possible, results were unsatisfactory. 2) Direct application of the color pattern using felt-tip marking pens. The pens are too wet causing the color to bleed beyond the defined border. It was impossible to clearly describe each polygon. Results unsatisfactory.
3) The pattern was lightly drawn on tissue with a soft pencil. Model was covered and one thin coat of dope applied. The colors were then filled in using a fine-tip (nylon) marker. The colors were streaked, borders uneven. Some stretching of the tissue from pen pressure. Holes in the tissue are quite possible. Results were marginal, looked OK from ten feet.
All the above methods showed a common lack of clear, even definition of each colored lozenge area. To overcome this problem I decided to stamp each polygon on the tissue.
To begin, first select the pattern you are going to use. Then scale this to match the scale of your model. The pattern repeats itself as shown in the photographs. Draw the pattern over an 8 1/2 x 11" sheet of paper. This original is then copied on a commercial copier (Xerox, Kodak, etc.) eight to ten times. Then, matching the pattern edges, similar to laying shingles on a roof, tape the sheets to a large piece of poster-board. This will be your background for the stamping process.
Buy a tire patch repair kit, and rubber cement a copy of the complete pattern to the large piece of rubber it contains. Now cut out the individual polygons. Let the protected smooth surface of the rubber be the face of your stamp, that is, the side that will contact the tissue. Epoxy the pieces to a balsa backing and 3" length of 1/4" dowel as shown in Sketch #2. These are your stamps. For stamp pads I cut strips from an old cotton sheet 10" long and 1 1/4" wide. Fold these strips to fit into an aspirin tin and tack-sew the edges. These are your stamp pads, simple and inexpensive.
Marking pen colors are either waterproof or dope-proof, but not both. The coloring material for this project is permanent type marking pen colors. The permanent type is waterproof allowing you to water shrink the tissue. The colors are obtained by using the "Magic Marker" bottle type pens. The color combinations
FF Scale (continued)
shown on sketch #3 can be very closely matched within the range of colors available in the Magic Marker line. Those who want an exact match of known colors will have to mix the color solution using the color list in the references.
The bottle type marking pens are available from art supply stores. They deal in this type of product and will generally carry a complete color selection. Be sure to get the permanent or waterproof type. This will be the most expensive item on your shopping list in this project. The bottles sell for about a dollar apiece. It is a good idea to test each bottle that you buy to be sure of the color you are getting. Some of the color coded labels can fool you.
To obtain the color, remove the cap and carefully add 1/4 ounce of thinner. This will be absorbed by the wad of padding in the bottle. Using needle-nose pliers, gently remove the padding, squeezing out the solvent and color in stages. When you have completely removed the padding material from the bottle you will have a concentrated color solution in the bottle. Store the padding material from the bottle in a baby food jar for re-use.
Tape a sheet of white Japanese tissue over the repeated lozenge pattern fastened to the posterboard. The pattern will be clearly visible through the tissue. At this point you have three options as to how you wish the lozenge pattern to repeat on the model. That is, considering the grain of the tissue, the apparent seam of the pattern can run spanwise, chordwise, or diagonally. (See sketch #1.) You will want the tissue grain to run spanwise, so the grain relative to the apparent fabric seam is your choice. I think that a chordwise seam, being shortest, reveals less waviness in the covering job and always looks better.
You are now ready to begin the actual stamping of the tissue. I kept my bottles of color, stamp pads, and stamps in a flat throwaway aluminum baking pan during this operation to protect the table. Remember, these are permanent colors.
Start with the lightest color first. Pour the color onto the stamp pad. Now using the proper stamp, do all of one color for the entire sheet of Japanese tissue. Press the stamp on the pad, and then on the tissue over the pattern that matches showing through.
Rock the stamp around once in a circular motion to be sure each edge is well defined. You will soon get the feel of it as you observe the results of pressure and the rocking. You will also do this about 3,000 times for each sheet of tissue; it's all drudgery until you are on the darker colors and can see the fruit of your work. When the sheet is complete, remove it from the posterboard carefully. It will tend to stick in places, and you wouldn't want to tear this precious bit of tissue.
I believe you will find yourself measuring each piece when using it to cover your model. The model will in all probability be something you have taken special pains with, too.
Note: The pattern shown in the photos was taken from an article by Peter Gray in the November 1957 Aeromodeller magazine. It is the five-color Canberra pattern with approximately (1) one foot removed from what is the top as shown on sketch #3. Later publications have shown the complete pattern (with seven more polygons) that I pass on to you.
You will have to use thinned white glue to apply the tissue to avoid causing the colors to run. Wet shrink by spraying water lightly so as not to loosen the glue. Note that on the wings, the ailerons were covered separately. When your model is covered and water shrunk, fog on clear dope with an airbrush. Especially with the first coat, the dope should be applied almost dry. Hold the airbrush well back, and easy does it, don't get the tissue wet and run the colors.
Sound like a lot of work? It is. Every modeler who admires your work will know it. Some will say you're nuts. Admit it, and have fun.
References
"WWI German Aircraft Finish" by Peter Gray, Aeromodeller magazine, Nov. 7, 1957, p 206.
"German World War I Lozenge Pattern Fabric" by Keith Ward, Chicago Scalemasters Newsletter.
"Authentic WWI German Camouflage Fabric" by J. W. Kohler, American Modeller magazine, July-Aug. 1964, p 44.
Color List
Color list prepared from research by Keith Ward of the Chicago Scalemasters. This list uses the number code on sketch #3 and relates the color numbers of the Federal Standard colors as found in the "Federal Color Guide #595 A." This guide is available at $4 from The Superintendent of Documents, U.S. Govt. Printing Office, Wash., D.C. 20025.
Five-color pattern, Upper: 1) 36081 with small amt 37144, 2) 30227, 3) 34227, 4) 35042, 5) 25102. Lower: 1) 36231 with small amt 37144, 2) 20400, 3) 37142 with small amt 36231, 4) 35299, 5) 35164.
Four-color pattern, Upper: 1) 36231 with small amt 37144, 2) 34092, 3) 30318, 4) mix equal 34373 and 34272. Lower: 1) mix equal 35526 and 35737, 2) 24410, 3) 30450, 4) 31433.
Ralph Kuenz, 14645 Stahelin, Detroit, MI 48223.
Transcribed from original scans by AI. Minor OCR errors may remain.

