
FREE FLIGHT SPORT and SCALE
Bill Warner, 1370 Monache Avenue, Porterville CA 93257
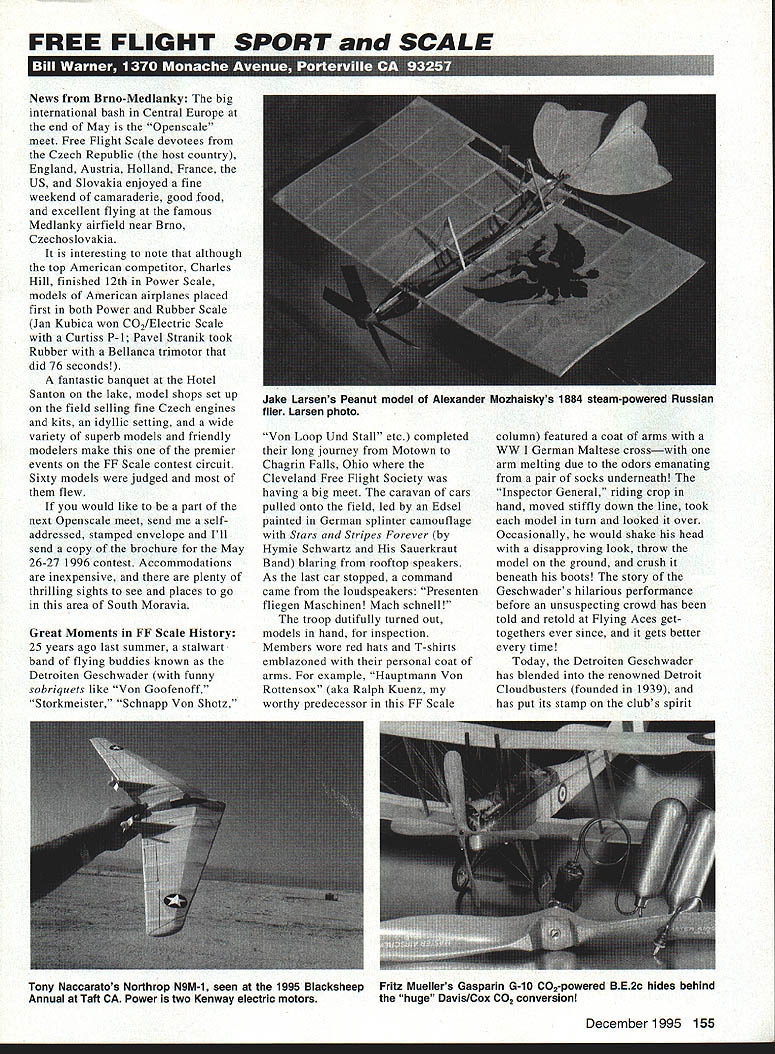
News from Brno-Medlanky: The big international bash in Central Europe at the end of May is the "Openscale" meet. Free Flight Scale devotees from the Czech Republic (the host country), England, Austria, Holland, France, the US, and Slovakia enjoyed a fine weekend of camaraderie, good food, and excellent flying at the famous Medlanky airfield near Brno, Czech Republic.
It is interesting to note that although the top American competitor, Charles Hill, finished 12th in Power Scale, models of American airplanes placed first in both Power and Rubber Scale. Jan Kubica won CO2/Electric Scale with a Curtiss P-1; Pavel Stranik took Rubber with a Bellanca trimotor that did 76 seconds!
A fantastic banquet at the Hotel Santon on the lake, model shops set up on the field selling fine Czech engines and kits, an idyllic setting, and a wide variety of superb models and friendly modelers make this one of the premier events on the FF Scale contest circuit. Sixty models were judged and most of them flew.
If you would like to be a part of the next Openscale meet, send me a self-addressed, stamped envelope and I'll send a copy of the brochure for the May 26-27, 1996 contest. Accommodations are inexpensive, and there are plenty of thrilling sights to see and places to go in this area of South Moravia.
Great Moments in FF Scale History
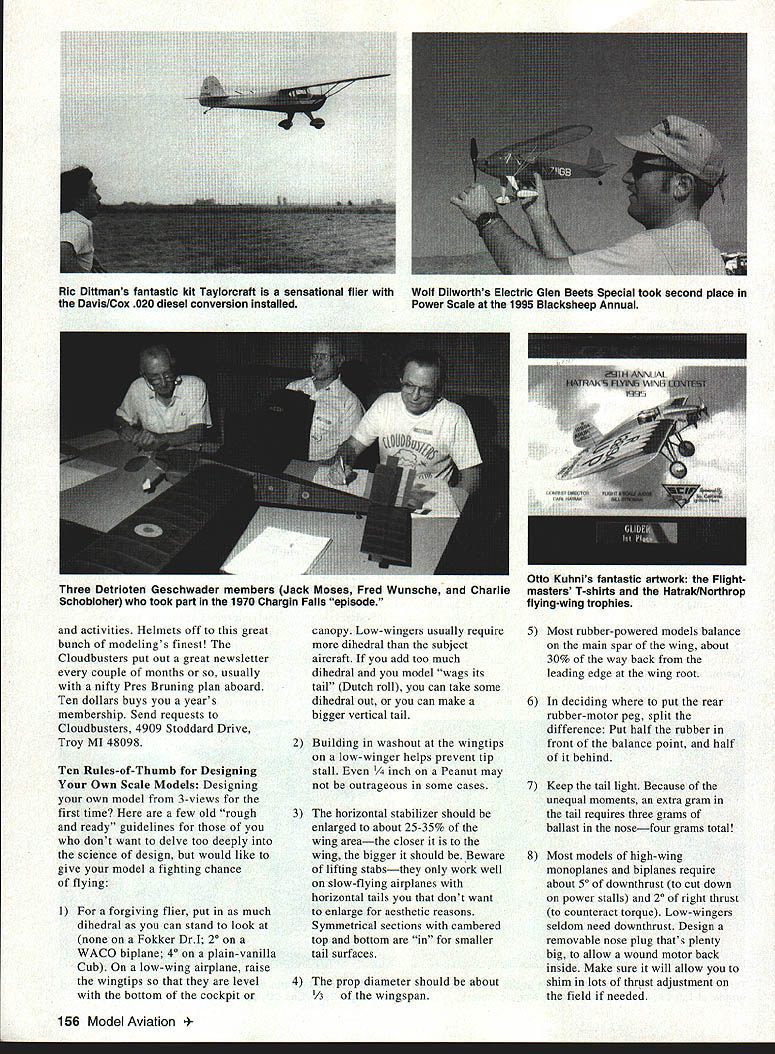
Twenty-five years ago last summer, a stalwart band of flying buddies known as the Detroiten Geschwader (with funny sobriquets like "Von Goofenoff," "Storkmeister," "Schnapp," "Von Shotz," "Von Loop Und Stall," etc.) completed their long journey from Motown to Chagrin Falls, Ohio, where the Cleveland Free Flight Society was having a big meet. The caravan of cars pulled onto the field, led by an Edsel painted in German splinter camouflage with Stars and Stripes Forever (by Hymie Schwartz and His Sauerkraut Band) blaring from rooftop speakers. As the last car stopped, a command came from the loudspeakers: "Presenten fliegen Maschinen! Mach schnell!"
The troop dutifully turned out, models in hand, for inspection. Members wore red hats and T-shirts emblazoned with their personal coat of arms. For example, "Hauptmann Von Rottensox" (aka Ralph Kuenz, my worthy predecessor in this FF Scale column) featured a coat of arms with a WWI German Maltese cross — with one arm melting due to the odors emanating from a pair of socks underneath! The "Inspector General," riding crop in hand, moved stiffly down the line, took each model in turn and looked it over. Occasionally, he would shake his head with a disapproving look, throw the model on the ground, and crush it beneath his boots! The story of the Geschwader's hilarious performance before an unsuspecting crowd has been told and retold at Flying Aces get-togethers ever since, and it gets better every time!
Today, the Detroiten Geschwader has blended into the renowned Detroit Cloudbusters (founded in 1939), and has put its stamp on the club's spirit and activities. Helmets off to this great bunch of modeling's finest! The Cloudbusters put out a great newsletter every couple of months or so, usually with a nifty Pres Bruning plan aboard. Ten dollars buys you a year's membership. Send requests to Cloudbusters, 4909 Stoddard Drive, Troy MI 48098.
Ten Rules-of-Thumb for Designing Your Own Scale Models
Designing your own model from 3-views for the first time? Here are a few old "rough and ready" guidelines for those of you who don't want to delve too deeply into the science of design, but would like to give your model a fighting chance of flying:
- For a forgiving flier, put in as much dihedral as you can stand to look at (none on a Fokker Dr.I; 2° on a WACO biplane; 4° on a plain-vanilla Cub). On a low-wing airplane, raise the wingtips so that they are level with the bottom of the cockpit or canopy. Low-wingers usually require more dihedral than the subject aircraft. If you add too much dihedral and your model "wags its tail" (Dutch roll), you can take some dihedral out, or you can make a bigger vertical tail.
- Building in washout at the wingtips on a low-winger helps prevent tip stall. Even 1/4 inch on a Peanut may not be outrageous in some cases.
- The horizontal stabilizer should be enlarged to about 25–35% of the wing area — the closer it is to the wing, the bigger it should be. Beware of lifting stabs — they only work well on slow-flying airplanes with horizontal tails; you don't want to enlarge for aesthetic reasons. Symmetrical sections with cambered top and bottom are "in" for smaller tail surfaces.
- The prop diameter should be about 1/3 of the wingspan.
- Most rubber-powered models balance on the main spar of the wing, about 30% of the way back from the leading edge at the wing root.
- In deciding where to put the rear rubber-motor peg, split the difference: put half the rubber in front of the balance point, and half of it behind.
- Keep the tail light. Because of the unequal moments, an extra gram in the tail requires three grams of ballast in the nose — four grams total!
- Most models of high-wing monoplanes and biplanes require about 5° of downthrust (to cut down on power stalls) and 2° of right thrust (to counteract torque). Low-wingers seldom need downthrust. Design a removable nose plug that's plenty big to allow a wooden motor back inside. Make sure it will allow you to shim in lots of thrust adjustment on the field if needed.
- Balance the spar sticks on the bottom of the wing with the ones on the top. Due to the camber of the wing, there is more tissue on top to shrink tight and bow the wing. A little more spar material on top won't hurt. Beware having all your spars on the bottom and none on the top!
- Add bits of balsa sheet (hard points) to places on your model where things like the wings or landing-gear struts attach. Gluing parts to wood is always stronger than gluing to tissue!
Cottage Wings Source Guide
Larry Croskrey writes, "I didn't think it was a bit unreasonable to ask for miniature bamboo poles from the local hobby shop." How many of you, like Larry, have received quizzical looks from your local dealer when you've asked for bamboo, Japanese tissue, FAI Tan II rubber, or even 4- to 6-pound balsa?
Well, there is an entire world of wonderful stuff out there that you will never find at your hobby dealer, or see mentioned in model magazines due to space limits. My non-profit, annotated, constantly updated "where-to-find-it" list has more than 200 listings of places to find plans, supplies, data, and clubs of interest to FF Scale modelers. It can be yours for a dollar bill and a large self-addressed envelope with 55 cents worth of stamps on it. Send requests to Bill Warner, 1370 Monache Avenue, Porterville CA 93257.
Here's a sample listing on a subject that's apropos to one of this month's topics:
"AIRCRAFT DATA Wm. McCombs Box 763576 Dallas TX 75224"
Bill McCombs' 1994-updated book, Making Scale Models Fly, is something every FF Scaler should have in his/her library. It is extensive and intensive, and should answer most any question a beginner in this branch of the hobby might have. The book is $14.95, postage paid. It's highly recommended. Bill also has an update available for those who purchased an earlier edition. For a self-addressed stamped envelope, Bill will send you a free sheet on things that plague Free Flight model airplanes.
Light Trim on Dark Backgrounds
Everyone loves to cut out black tissue letters and stick 'em on white- or yellow-covered models. They stand out nicely, and are easy to do with just thinned clear dope. The problems start when you try light markings over a dark background.
One way to avoid problems is to spray a sheet of tissue with the opaque color you want. Take this sheet and tape it down on some cardboard. Place a typing-paper cover sheet with the letters or trim you want over the tissue, and cut them out with a new blade. If you need the same markings for both sides of the airplane, cut through two layers of the sprayed tissue at once. Remember: they should be stacked with the unsprayed sides together. If you don't, you'll end up with two left-side displays!
Attach the markings with thinned white glue, and carefully wipe off the excess glue with a damp cloth. You can also spray the backside of the markings with 3M spray cement from a photo store.
Tony Peters, writing in the Mid-Hudson Model Masters newsletter Wing Tips, tells how he's used self-sticking white contact paper (the kind used for covering shelves) for markings. Tony cuts out the letters using a light box and an X-Acto knife. For large letters, he recommends using sprayed tissue (attached with water-based acrylic varnish) to save weight.
Well gang, until next time, don't dope in unventilated rooms, don't fly upwind of large bodies of water, and just for the heck of it, donate a subscription to a model magazine to your local library.
Transcribed from original scans by AI. Minor OCR errors may remain.

