
FREE FLIGHT: SPORT and SCALE
Fernando Ramos 19361 Mesa Dr. Villa Park, CA 92861
Balsa sheeting
More thoughts on balsa sheeting: many Free Flight (FF) model airplane designers seem to shy away from sheeting—particularly in Scale—mostly because of the weight constraint. I prefer the realism that sheeting provides, despite the slight weight gain. After choosing the right balsa for sheeting, the increased weight is so negligible that you might wonder why you didn't do it before.
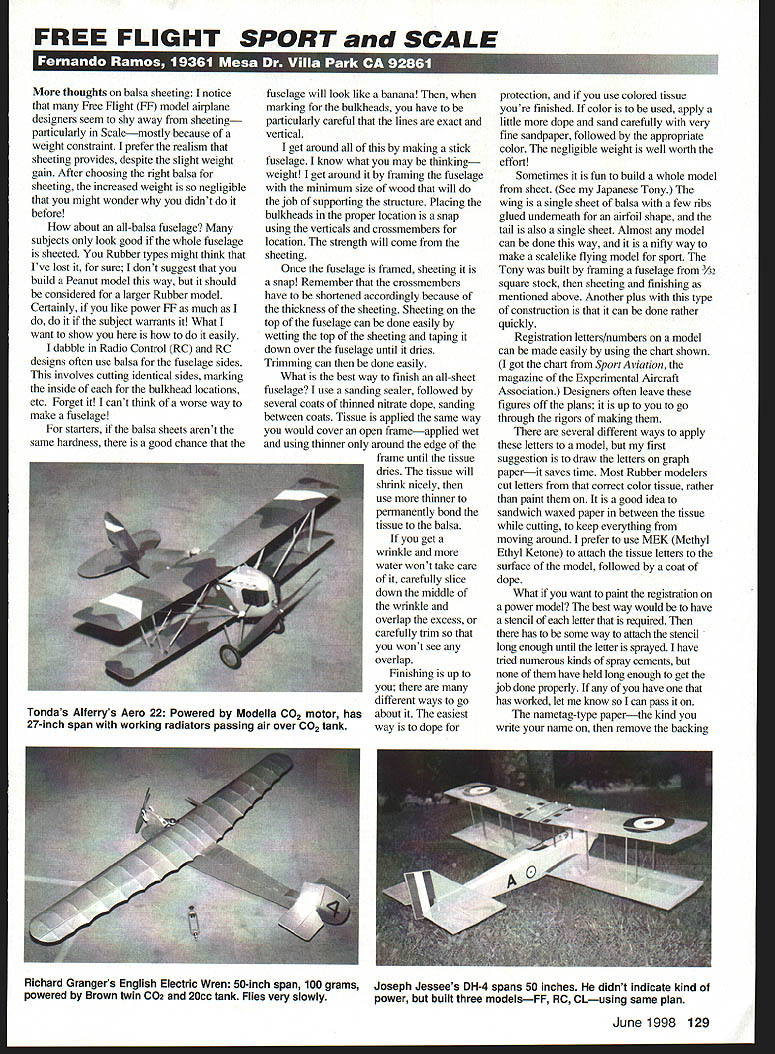
Sometimes it is fun to build a whole model from sheet (see my Japanese Tony). The wing can be a single sheet of balsa with a few ribs glued underneath for an airfoil shape, and the tail can be a single sheet. Almost any model can be done this way, and it is a nifty way to make a scale-like flying model for sport. The Tony was built by framing a fuselage from 3/32" square stock, then sheeting and finishing as mentioned below. Another plus with this type of construction is that it can be done rather quickly.
All-balsa fuselage and framing
How about an all-balsa fuselage? Many subjects only look good if the whole fuselage is sheeted. You rubber modelers might think I've lost it—I don't suggest you build a Peanut model this way—but it should be considered for a larger Rubber model. Certainly, if you like power FF as much as I do, do it if the subject warrants it.
RC designers often use balsa for fuselage sides, cutting identical sides and marking the inside of each for bulkhead locations. Forget it! I can't think of a worse way to make a fuselage. If the balsa sheets aren't the same hardness, the fuselage will likely end up looking like a banana. Marking for bulkheads requires extreme precision to keep lines vertical.
I get around all of this by making a stick fuselage. You may be thinking—weight! I frame the fuselage with the minimum size wood that will do the job of supporting the structure. Placing the bulkheads in the proper location is a snap using the verticals and crossmembers for location. The strength will come from the sheeting.
Once the fuselage is framed, sheeting is a snap. Remember that the crossmembers must be shortened to allow for the thickness of the sheeting. Sheeting the top of the fuselage can be done easily by wetting the top sheeting and taping it down over the fuselage until it dries. Trimming can then be done easily.
Dealing with wrinkles
If you get a wrinkle and more water won't take care of it, carefully slice down the middle of the wrinkle and overlap the excess, or carefully trim so that you won't see any overlap.
Finishing an all-sheet fuselage
What is the best way to finish an all-sheet fuselage? I use a sanding sealer, followed by several coats of thinned nitrate dope, sanding between coats. Apply tissue the same way you would on an open frame—applied wet and using thinner only around the edge of the frame until the tissue dries. The tissue will shrink nicely; then use more thinner to permanently bond the tissue to the balsa.
Finishing is up to you; there are many different approaches. The easiest way is to dope for protection; if you use colored tissue you're finished. If you intend to add color, apply a little more dope and sand carefully with very fine sandpaper, then apply the appropriate color. The negligible weight increase is well worth the effort!
Framing notes
When framing, remember:
- Use the minimum-size wood necessary to support the structure.
- Shorten crossmembers to account for sheeting thickness.
- Use wet sheeting taped down to conform to curves, then trim when dry.
Registration letters and markings
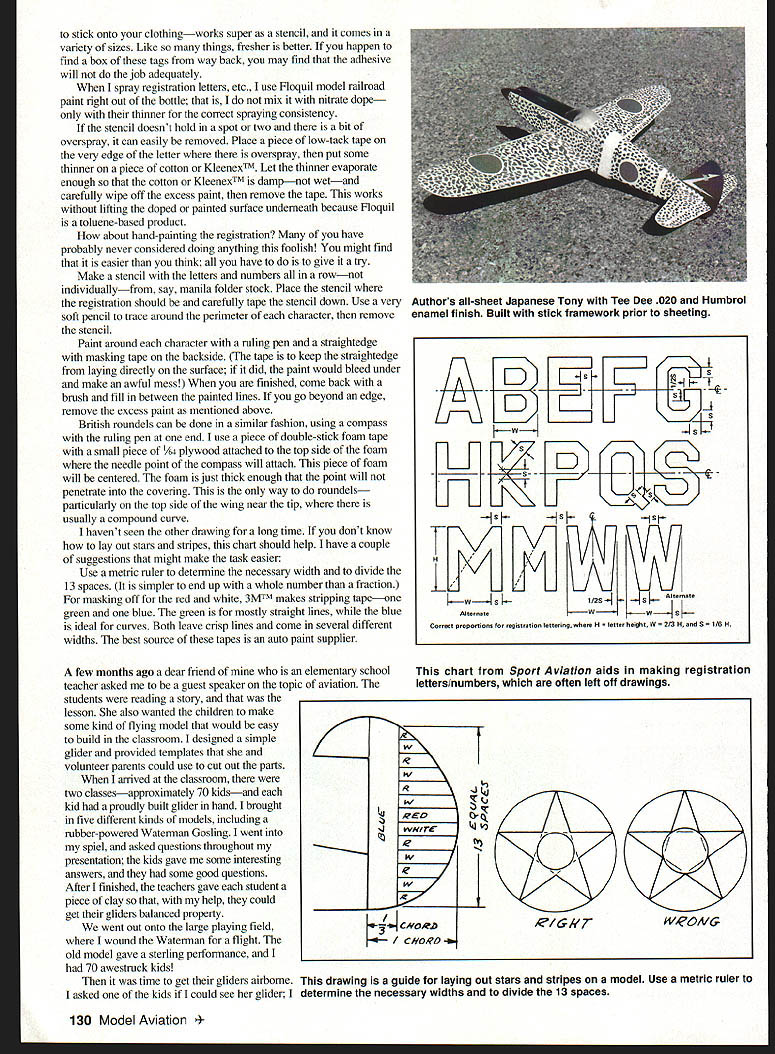
Registration letters/numbers on a model can be made easily by using a chart (I got the chart from Sport Aviation, the magazine of the Experimental Aircraft Association). Designers often leave these figures off plans; it is up to you to add them.
There are several ways to apply letters:
- Tissue letters (common for Rubber models)
- Draw the letters on graph paper first—it saves time.
- Sandwich waxed paper between the tissue layers while cutting to prevent movement.
- Attach tissue letters with MEK (methyl ethyl ketone), then coat with dope.
- Spray paint (common for power models)
- Best approach is to make a stencil for each letter.
- Stencil must be held in place long enough to spray; many spray cements tried have not held adequately.
- Nametag-type adhesive paper (the type you write your name on and peel off) works well as a stencil and comes in various sizes. Use fresh stock for better adhesive performance.
- When spraying, I use Floquil model railroad paint straight from the bottle, thinned only for spraying consistency—not mixed with nitrate dope.
If the stencil doesn't hold in spots and there is overspray, remove it by:
- Placing a piece of low-tack tape on the very edge of the letter where there is overspray.
- Dabbing thinner on a piece of cotton or Kleenex™ and letting the thinner evaporate until the cotton is damp, not wet.
- Carefully wiping off the excess paint, then removing the tape. This works without lifting the doped or painted surface underneath because Floquil is a toluene-based product.
Hand-painting registrations
Hand-painting is possible and may be easier than you expect:
- Make a stencil with the letters and numbers all in a row (not individually) from manila folder stock.
- Place and tape the stencil where the registration should be; use a very soft pencil to trace the perimeter of each character.
- Remove the stencil. Paint around each character with a ruling pen and a straightedge, placing masking tape on the backside of the straightedge to prevent bleeding.
- Fill in between the painted lines with a brush. If paint goes beyond an edge, remove the excess as described above.
Roundels and complex markings
British roundels can be done similarly, using a compass with the ruling pen at one end. I use a piece of double-stick foam tape with a small piece of 1/4" plywood attached to the top side of the foam where the compass needle will attach. This foam piece is centered and thick enough that the needle will not penetrate the covering. This method is especially useful for roundels on the top side of a wing near the tip where there is often a compound curve.
For stars and stripes:
- Use a metric ruler to determine the necessary dimensions and divide the 13 spaces; metric divisions often yield whole numbers rather than fractions.
- For masking off red and white stripes, 3M makes striping tape: a green tape for mostly straight lines and a blue tape ideal for curves. Both leave crisp lines and come in several widths. An auto paint supplier is often the best source.
Classroom project and outreach
A few months ago a friend who is an elementary school teacher asked me to be a guest speaker on aviation. The students were reading a story, and she wanted the children to make a simple flying model easy to build in the classroom. I designed a simple glider and provided templates for teachers and volunteer parents to use to cut parts.
When I arrived, there were two classes—approximately 70 kids—and each had a poorly built glider in hand. I brought in five different kinds of models, including a rubber-powered Waterman Gosling. I asked questions during the presentation and the kids responded with interesting answers and good questions. After I finished, the teachers gave each student a piece of clay so, with my help, they could balance their gliders.
We went out to the playing field. I wound the Waterman for a flight; the old model gave a sterling performance and I had 70 awestruck kids. Then I checked one student glider for alignment and center of gravity, gave it a chuck, and it flew perfectly. Then the rest of the kids did the same—what a sight! This gives me hope that the hobby will continue if enough kids are exposed to it.
This story leads to a video recommendation: Basics of Rubber Power. If you are a teacher or have a club, this will be of great help. I would not show it all at once—pick parts that suit your needs, then show other parts for motivation. It is produced by Harding Aero Publications, 4782 Unity Line Rd., New Waterford, OH 44445; Tel.: (330) 457-1600. Cost: $19.95.
They also have a new video called Master Models Vol. #1 — Dennis Norman. Dennis is well-known for his work building multiengined Rubber Scale models. The video covers interesting techniques that the average modeler generally doesn't use. Cost: $19.95.
Publications, books, and subscriptions
A few magazines I recommend:
- Aeroplane Monthly (my favorite full-scale magazine)
- Aviation Modeller International
- Flying Scale Models (these two often include two to four full-size plans in each issue)
- Scale Aircraft Modeller
- Scale Aviation Modeller
- Windsock Datafiles
Subscriptions aren't cheap, but the information is valuable. You can subscribe through Wise Owl Publications, 4314 West 238th St., Torrance, CA 90505-4509; Tel.: (310) 375-6258.
Book recommendation:
- Making Scale Model Airplanes Fly, by William McCombs. Revised edition with a wealth of information. Current price: $14.95 plus $2 shipping. William McCombs: 2106 Siesta Dr., Dallas, TX 75224.
Suppliers, services, and events
- Trophies: Bob Holman (plan fame) can laser-cut wood or metal to make neat aviation-style trophies, including ones for Old-Timer events. Bob Holman: Box 741, San Bernardino, CA 92402; Tel.: (909) 885-3959.
- Decals: A friend, Jim Hanson of Goat Hill Graphics, makes terrific decals using computer and scanner technology. Contact: Jim Hanson, 331 Hamilton St., Costa Mesa, CA 92627; Tel.: (714) 646-3603.
- Club event: The Blacksheep Squadron has a big Scale contest held Memorial Weekend at Taft, California. This year they are adding a Scale ROW (rise-off-water) event for any type of power—should be interesting to see how they construct a pond from which to take off.
Acknowledgments
Thanks to those who answered my request regarding decals. I discovered a local source (Goat Hill Graphics) making quality decals with modern equipment.
---
Transcribed from original scans by AI. Minor OCR errors may remain.

