
Free Flight: Sport and Scale
Bill Warner, 1370 Monache Avenue, Porterville, CA 93257
My workbench looked like a candidate for federal disaster assistance until I discovered a little plastic hand-held battery-operated vacuum cleaner at my local 99-cent store. It picks up balsa dust and small chips effectively, while leaving loose pins. Next to my Dremel Moto-Tool and X-Acto 8B, this has become the most useful thing in the shop. It's small, handy, cheap, and has just the right amount of power. Mine required some massaging, as the fan had a tendency to move on its shaft and contact the case, but a little CyA locked it on. Keep your eyes open—one you'll love it!
Field Serviceability
Back in the Thirties, most scale models were made with the rubber motor glued inside the nose block — not the greatest idea for motor servicing. Nothing is more frustrating than having to play little games with your model on the field, especially at a contest. Serviceability is the byword. That hidden diesel buried deep within your cowl may look great, but if you can't get to the compression screw, you are in for grief. A little removable or spring-loaded panel here and there can save worlds of headaches when you need to change a motor or replace batteries.
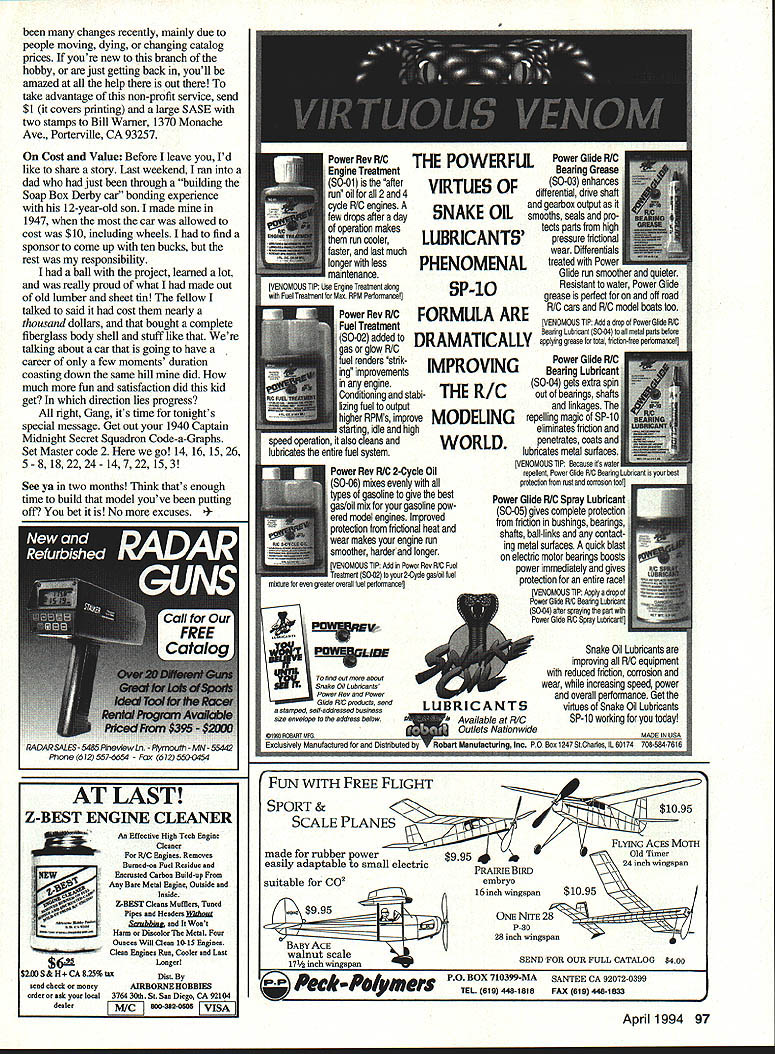
On my new Sikorsky S-42 Clipper Electric, I have a removable cabin area as well as a side door to access, move, or change batteries (attached with Velcro to allow CG changes). Near the tailpost is a little access door to quickly attach or unhook a piece of music wire used as a spring to pull down on a hook attached to the stab. A final door accesses the charging jack and motor switch. When the door located at the hand-launching point is snapped shut, the motors are switched on. It is an easy model to work on.
Decals the Hard Way
Yes, you can make decals by Xeroxing your copy onto self-stick clear mylar. Once they are on the model, overspraying with Testors Dull Cote takes care of their main drawback: the shiny surface. Anyone who has ever gotten one a tiny bit off and tried to move it once it stuck down can attest to the second drawback.
I prefer making decals the hard way, on soak-off decal paper available from a good art store. In a pinch I have even used Kraft water-activated-adhesive packaging tape, painting the tape on the gummed side. On the S-42 I wanted decals for the Pan Am logo, the Sikorsky logo, and the portholes down the side of the fuselage.
For the simple Sikorsky logo, no background was needed, so a couple of coats of clear Krylon sprayed on the backing paper (glue side up) were the base for the artwork, which I applied with a draftsman's pen. This works better than small paint brushes for many applications.
A draftsman's pen is a stem with two slightly curved, adjustable sides that come to a "nib" point and have a screw adjustment to control the distance between them. When they almost touch they do what a fountain pen does, only better. I scrubbed the nib a bit first with scouring powder, wiped it down with vinegar to get better adhesion for the paint and India ink, then applied the ink. A coat of Testors Dull Cote finished the job.
The Pan Am decals and the portholes had a blue background painted on the clear Krylon base, and then were decorated using the drafting pen.
I always make several extra decals and use the worst for testing; the best go on the model. Draw what you want on a piece of typing or tracing paper and then transfer it to the decal paper using carbon paper. Then draw the design on the prepared surface with India ink or thinned enamel. Again, use a clear spray over your artwork before soaking off the decal.
Applying the Decal
Prepare the model surface by wetting a little raw decal paper and wiping some of its surface glue onto the model to ensure adequate adhesion. Keep note of the soaking time on your test decal (one of those you didn't like). Soaking too little means you may tear it when pushing it off; soaking too long may remove too much glue.
Push the decal part way off the edge of the paper backing and stick this part to the model, then slide the backing paper out from underneath. Lightly dab it down and work out any wrinkles or bubbles with a Kleenex. You can carefully wash off excess glue with a damp tissue or cloth.
When the decal is dry, a couple of coats of clear gloss or Dull Cote can be sprayed over the installation (if weight is no object). Sand very lightly around the edge to feather it into the model's surface so that after a couple of coats you will no longer be able to tell it from artwork applied directly to the surface. Practice this technique on an old model.
The Black Hole Decision
Tom Arnold, master builder, philosopher, and editor of the San Diego Scale Staffel newsletter, recently suggested painting the inside of your model's canopy if you are not intending to furnish the interior. I agree — no one wants to look in and see a sloppy rubber motor or a poorly sculpted pilot head.
My aversion to clear plastic windows dates back to seeing an RC scale ship that looked pretty nice until you looked into the interior, which was filled with all manner of electromechanical clutter installed in a slapdash manner. Did the guy really figure no one was going to look in?
Not wanting anyone to see my slapdash clutter of batteries and components, and having only two weeks to design and build the entire model, the decision to go with opaque portholes was easy. Still, a series of black holes along the fuselage was not quite what I wanted.
Luckily, one of the books I was using for scale information had an artist's rendition, and I copied the way the pro did them: light blue background with a little shaded dark crescent centered at about 11 o'clock (analog, not digital) and a shaded white crescent at 5 o'clock. The effect was better than I deserved! The hole outlines were done with India ink using a plastic hole stencil.
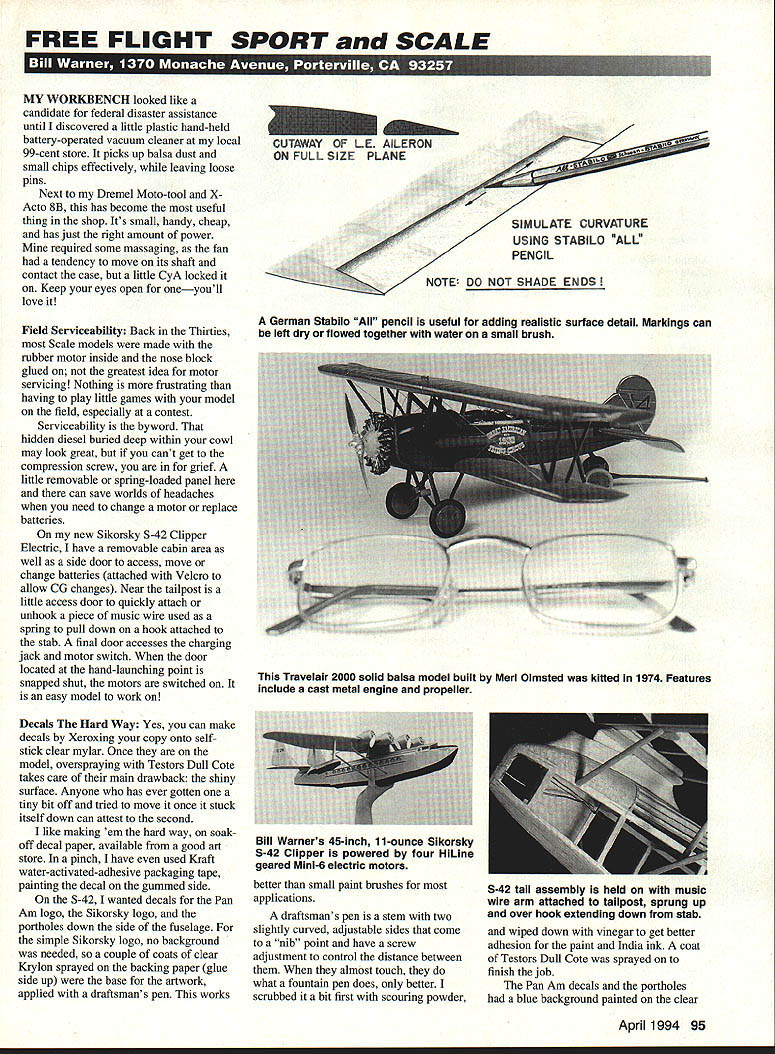
Simulate Curvature Using Stabilo "All" Pencil
A light touch on thin tissue is enough, and you can leave it as-is or do more shading. Try both dry and wet and see which you prefer. With a sharp point (a dull point requires too much push for thin tissue) leaned over a bit, it did not harm the tissue on my test model. Bob says it's good for adding exhaust smudges, too. Better spray a little clear "fix" over it — either Dull Cote or clear dope — to prevent problems when flying over damp grass or similar.
Arnold and Aristotle
Remember Aristotle's admonition of the Golden Mean, "nothing overmuch"? Tom Arnold's extensive attacks on sacred cows include a devastating indictment of panel lines, retract gear doors, and rivets.
He argues that many modelers turn their planes into caricatures by adding too-prominent detail. If you add more than the actual scale amount, you'll call attention to it; you'll show up prominently from a scale 50 yards on a model.
His solution: leave them off if you can't make them truly scale. Many artist-modelers have reached a balanced approach to model appearance, emphasizing the salient features that give the craft its special personality and suppressing details that could be distracting.
Probably the most clever example of subtlety was Ken McDonough's between-the-wars all-sheet rubber-powered biplane. He drew the internal wiring bracing on the underside of the wing, then painted over it with natural fabric color. When you put the model between you and the sun, you could see the "wires"! Think of this the next time you are tempted to draw overstated non-contributory surface detail on your model.
Happy Hints Department
- Barry Berman of Escondido, California writes that he has found Titebond to be better than CyA for adhering carbon-fiber strands to balsa. Worth a try.
- Bob Lopshire of Gainesville, Florida sent along a neat pencil called the Stabilo "All." It says on the pencil that it marks on metal, glass, and plastic. Not only does it mark easily, but it turns to watercolor when water is applied with a small paintbrush. I tried it on a covered model and found it great for adding shading to simulate a rounded aileron leading edge.
Cottage Wings Resource Guide
This bimonthly column is much too short to include very much about new stuff on the market and to plug all the good clubs, supplies, and sources of information. The annotated listings on the Cottage Wings list are now approaching 200, with (hopefully) useful comments where I have personal experience.
If you have a year-old list, there have been many changes recently, mainly due to people moving, dying, or changing catalog prices. If you're new to this branch of the hobby, or are just getting back in, you'll be amazed at all the help available. If you'd like a copy of the list, send $1 (it covers printing) and a large SASE with two stamps to Bill Warner, 1370 Monache Ave., Porterville, CA 93257.
On Cost and Value
Before I leave you, I'd like to share a story. Last weekend I ran into a dad who had just been through a "building the Soap Box Derby car" bonding experience with his 12-year-old son. I made mine in 1947, when the most the car was allowed to cost was $10, including wheels. I had to find a sponsor to come up with ten bucks, but the rest was my responsibility.
I had a ball with the project, learned a lot, and was really proud of what I had made out of old lumber and sheet tin. The fellow I talked to said it had cost them nearly a thousand dollars, which bought a complete fiberglass body shell and related parts. We're talking about a car that is going to have a career of only a few moments' duration coasting down the same hill nine times a day. How much more fun and satisfaction did this kid get? In which direction lies progress?
All right, gang, it's time for tonight's special message. Get out your 1940 Captain Midnight Secret Squadron Code-a-Graphs. Set Master code 2. Here we go: 14, 16, 15, 26, 5, 8, 18, 22, 24, 14, 7, 22, 15, 3!
See ya in two months! Think that's enough time to build that model you've been putting off? You bet it is! No more excuses.
Transcribed from original scans by AI. Minor OCR errors may remain.

