

Free Flight: Sport & Scale
Bill Warner
THE CASE of the incredible shrinking ribs! You just opened a new kit, carefully sealed at the factory for your protection. All appears to be in order, and you can't wait to get building. However, after cutting out the ribs and laying them over the plan, you note (to your horror) that the ribs are all an eighth of an inch too short. Has the printed wood dried out and shrunk? Has the plan swelled up? Was the guy who drew them a practical joker? What do you do now—take it back?
Stuart Hersey, 15, a newcomer to Scale, writes in with this common ailment. Having just bought a kit myself which had exactly the same problem, I am led to believe that it may be a widespread phenomenon. I suspect the cause to be using different methods to print the wood than to print the plan.
Most of us have had the experience of a Xerox copy being a different scale than the original, and I have had large prints "grow" a few percentage points at the printers before. What to do? Well, one can always Xerox the ribs and other parts from the plan (making sure the Xerox is set at 1:1), then wipe thinner across the back of the copy, apply it to your sheet balsa (either a fresh sheet or over the back of the short-ribbed one). Allow it to dry and peel off—and you'll have a new, right-on set of parts.
A second way, the one that I use, is to pin down the leading edge, glue the short ribs to it, and allow the trailing edge to fall where it will. Once the wing is on the plane, it won't be noticeable. Superscale nuts will object, but then they don't build from kits, anyway. Maybe the best way is to measure the printed wood and the plan ribs before you plunk down your money in the first place.
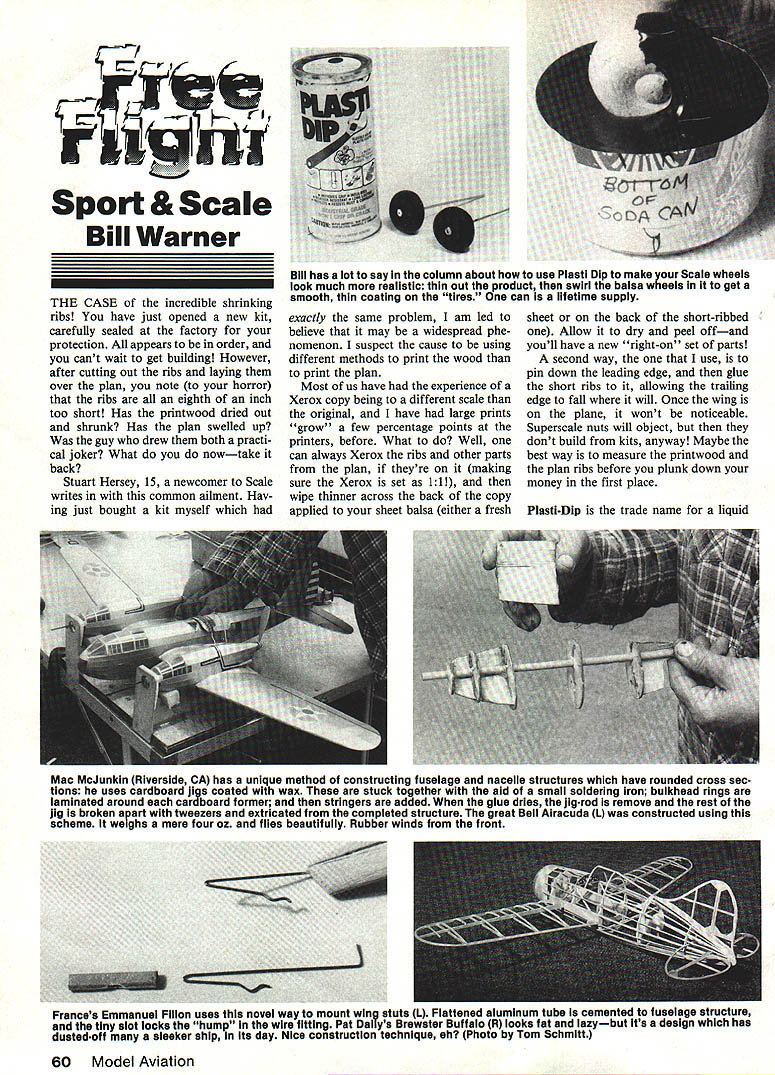
Plasti-Dip for Scale Wheels
Bill has a lot to say in the column about how to use Plasti-Dip to make your Scale wheels look much more realistic: thin the product, then swirl the balsa wheels in it to get a smooth, thin coating on the "tires." One can is a lifetime supply.
After nine months sitting on the shelf, I found the can of Plasti-Dip still usable, though its contents had shrunk some 50 percent. I used nitrate dope thinner and lots of patience to bring it up to the top again. No skin had formed on the material, so I cut off the bottom of a soda can and filled it about three-quarters full. It was still too thick a goo, so thinner was added until a practice wheel spun very slowly and got a coating. A big glob remaining would overlap as the spin continued and the wheel would be wiped off, so more thinner was added.
Best results were obtained when the wheel was sanded smooth, given two coats of sealer (nitrate dope) with talcum added to get a good, grain-free surface, then spun in the goo. Thicker coats hide balsa grain but add weight. I found the best results came from a rather thin mixture, applied in two or three coats allowing a few hours to dry between coats.
When the wheel has a centered, inserted axle hole, it can easily be mounted on a dowel and spun using this "axle" until it is dry enough to set aside for thorough drying. Spin it for a couple of minutes to let the material stop moving on the wheel. A two-inch wheel takes about 20 seconds on the slow turn while the rim is in the goo to get well-coated.
The thinned material provides a flat finish, giving a perfect rubber appearance instead of the "right-out-of-the-can" gloss finish you get with the thick material. Extra Plasti-Dip should be poured back in the can for future use. You'll have more than you need and can use it to coat screwdriver and plier handles, watch crystals, electrical stuff, dip rubber hand-grips on joysticks, or a million other useful things. Storing the can upside down may retard thinner evaporation, but make sure it's in a larger—and empty—can just in case it leaks.
Plasti-Dip, if not available from your local hardware or arts store, can be located via PDI, Inc., 1458 West County Road C, St. Paul, MN 55113; phone (612) 633-9633.
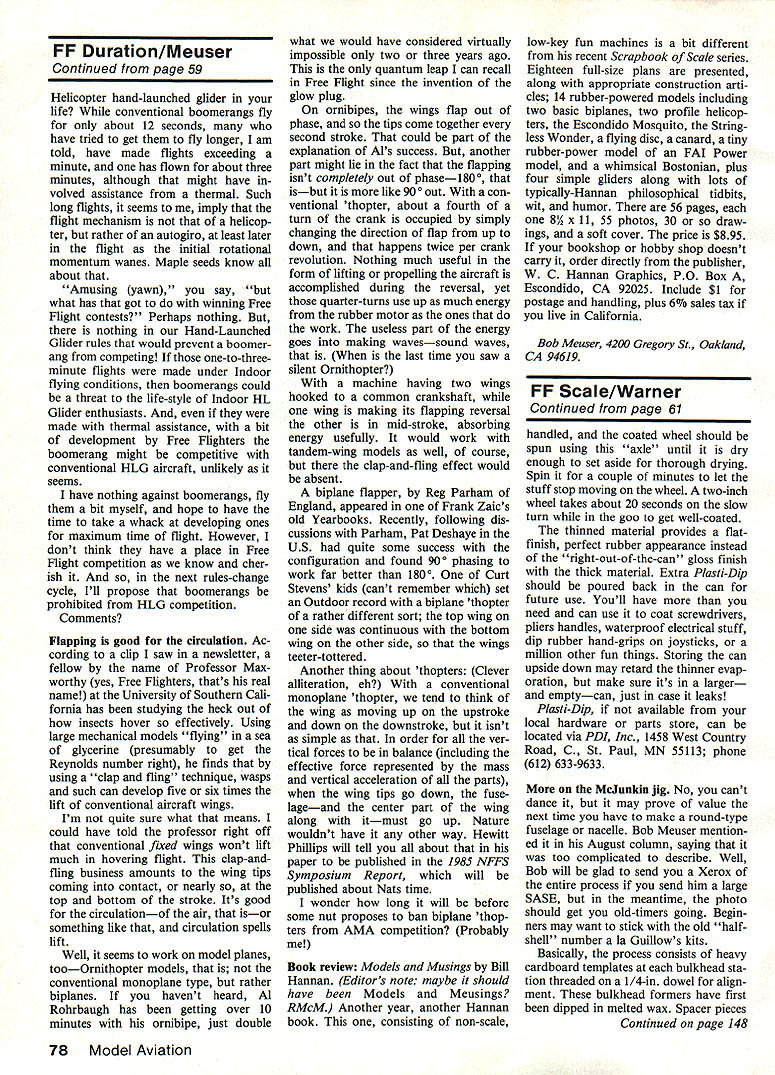
McJunkin Jig
More on the McJunkin jig. No, you can't dance it, but it may prove valuable the next time you have to make a round-type fuselage or nacelle. Bob Meuser mentions that it is too complicated to describe. He'll be glad to send you a Xerox of the entire process if you send him a large SASE, but in the meantime the photo should get you and old-timers going. Beginners may want to stick with the "half-shell" number in a Guillow kit.
Basically, the process consists of heavy cardboard templates at each bulkhead threaded on a 1/4-in. dowel for alignment. These bulkhead formers have first been dipped in melted wax. Spacer pieces between them are similarly coated, and the entire assemblage is then tacked together with a soldering iron.
The next step is to wrap thin strips of 1/32-in. balsa (which have been soaked and then drawn through some Titebond glue) a couple of turns around each bulkhead former. After they dry, the longeron strips are added, tacking them to each balsa ring at the appropriate location with CyA and then touching each joint with a tiny bit of Titebond just to make sure.
The last step is the most fun: gently breaking apart the wax-welded jig on the inside of your new fuselage. After gently twisting out the 1/4-in. dowel, use a pair of tweezers to extract former bits from between the stringer gaps. The formers can be reused again and again. Great idea to get multiple nacelles, floats, or dual fuselages!
Cottage Cheese Containers and Vacuum-Forming
Dick Howard (Lake Havasu, AZ) has a magic touch. Whether flying his Gee Bee or one of his many twin-rubber marvels, he has the full attention of everyone on the site when he performs. One of the secrets of his success has to do with cottage cheese—the containers, that is. The thin plastic tubs can be used to make all sorts of neat things.
He uses the lids for heat-forming material to "vacuum-form" pilot busts, radial engine facades, and the like. The curved tub is turned for prop blades. By cutting blades out of the rounded sides at about a 15° angle off the vertical to the left, they are beautifully preformed for "as-is."
Larger models use two thicknesses; the lamination is accomplished with a light swipe of an acetone-dampened cloth across one piece and then slapping the other one on. Don't use too much acetone, or you'll dissolve the lot. The finished blades can then be glued into a hub or a spinner, and they are all but indestructible.
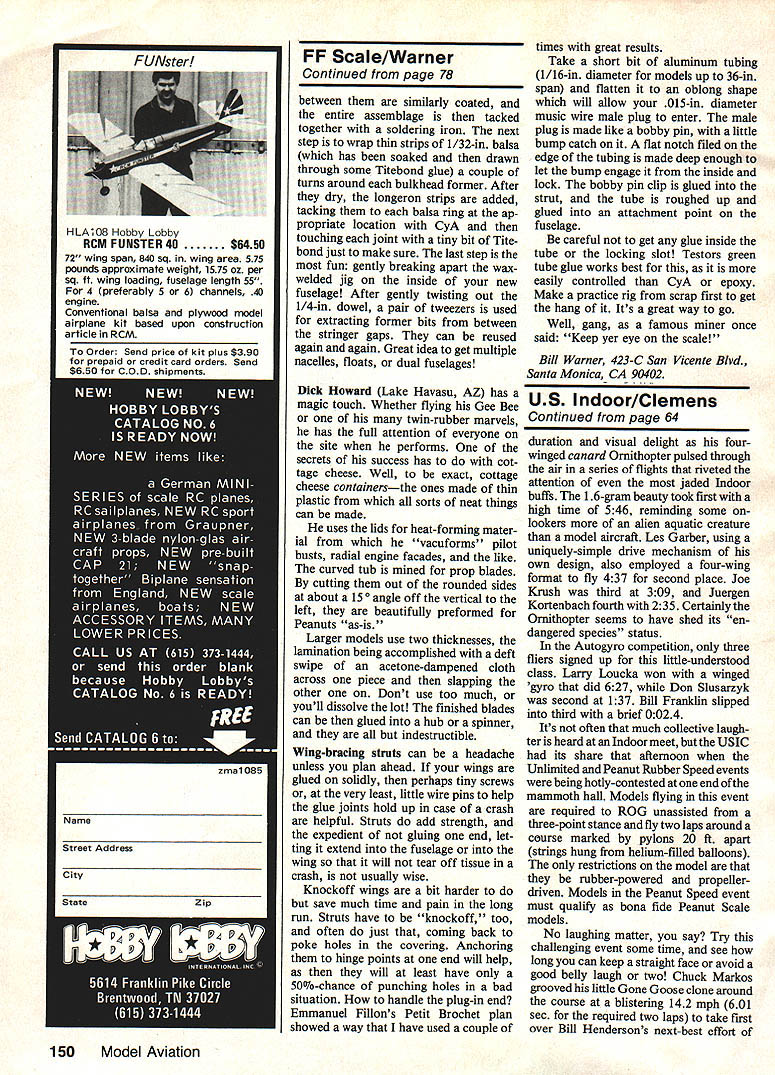
Wing-Bracing, Knockoff Wings, and Struts
Wing-bracing struts can be a headache unless you plan ahead. If your wings are glued on solidly, tiny screws or, at the very least, little wire pins to help the glue joints are helpful in case of a crash. Struts do add strength, and the expedient of not gluing one end—letting it extend into the fuselage or into the wing so that it will not tear off tissue in a crash—is not usually wise.
Knockoff wings are harder to do, but they save time and pain in the long run. Struts have to be "knockoff," too, and often do just that—coming back to poke holes in the covering. Anchoring them at hinge points at one end will help, as then they will at least have only a 50 percent chance of punching holes in a bad situation.
How to handle the plug-in end? Emmanuel Follin's Petit Brochet plan showed a way that I have used a couple of times with great results:
- Take a short bit of aluminum tubing (1/16-in. diameter for models up to 36-in. span) and flatten it to an oblong shape which will allow your .015-in. diameter music-wire male plug to enter.
- Make the male plug like a bobby pin, with a little bump catch on it.
- File a flat notch on the edge of the tubing deep enough to let the bump engage it from the inside and lock.
- Glue the bobby-pin clip into the strut, roughen and glue the tube into an attachment point on the fuselage.
Be careful not to get any glue inside the bore or the locking slot. Testors green-tube glue works best for this, as it is more easily controlled than CyA or epoxy. Make a practice rig from scrap first to get the hang of it. It's a great way to go.
Well, gang, as a famous minor once said: "Keep yer eye on the scale!"
Bill Warner 423-C San Vicente Blvd., Santa Monica, CA 90402.
Transcribed from original scans by AI. Minor OCR errors may remain.

