
Free Flight: Sport & Scale
Bill Warner
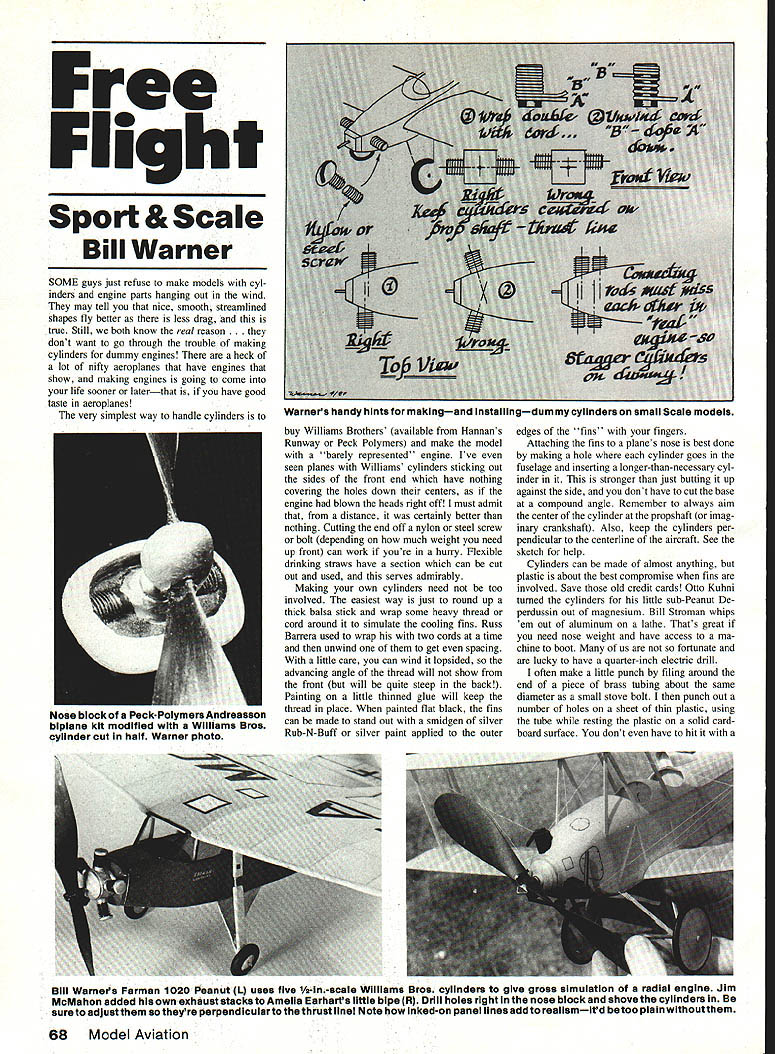
Dummy cylinders and engine detailing
Some modelers refuse to build models with cylinders or engine parts exposed. They may argue streamlined shapes reduce drag — true — but often the real reason is avoiding the work of making dummy engines. Many attractive full‑scale aircraft have engines showing, and adding even simple engine detail brings models to life.
The simplest approaches
- Buy Williams Bros. cylinders (available from Hannan's Runway or Peck Polymers) for a minimally represented engine.
- Cut the end off a nylon or steel screw/bolt if you need nose weight and are in a hurry.
- Use a section of flexible drinking straw for a quick, lightweight cylinder.
Make your own cylinders (basic method)
- Use a thick balsa stick as a core.
- Wrap heavy thread or cord around the core to simulate cooling fins. Russ Barrera wrapped two cords at a time, then unwound one to get even spacing.
- Fix the thread with a little thinned glue and paint flat black. Rub silver Rub‑N‑Buff or silver paint onto the fin edges for highlight.
Mounting tips
- Drill socket holes in the nose and insert cylinders longer than required; this is stronger than butting them on the side and avoids complicated base trimming.
- Aim the center of each cylinder at the prop‑shaft (imaginary crankshaft) and keep cylinders perpendicular to the aircraft centerline.
- Linked panel lines around the nose add realism.
Materials and fabrication options
- Plastic is a good compromise for fin detail; save old credit cards and thin plastic sheets.
- Metal (aluminum, magnesium) turned on a lathe gives realistic detail and weight if you have access to machining — Otto Kuhni and Bill Stroman have used lathes for small cylinders.
- If you lack a lathe, make a simple punch: file the end of a brass tube to the desired diameter, then punch donut shapes from thin plastic while supporting the plastic on cardboard.
- Stack donut washers on a stove bolt or dowel, clamp and turn in a drill to size; sand with 60‑grit then finer papers. Ream to form fin and cylinder diameters, and finish by shaping the fin roots and rounding edges.
Additional detailing (go as far as you want)
- Cylinder heads, valve towers, rocker covers, pushrods, spark plugs and wiring
- Crankcase detail, exhaust piping and collectors
- Magnetos, carburetors, airflow baffles, cowlings
Always remember you are making a flying scale model — balance detail with weight and durability.
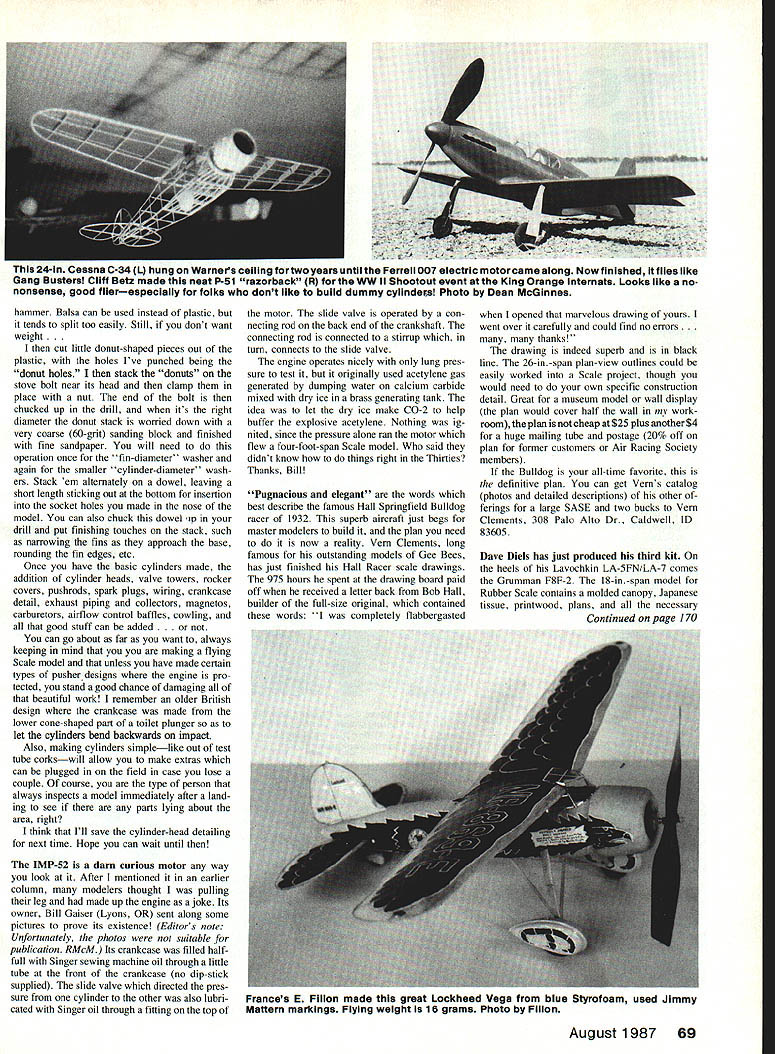
Quick methods and captions (examples)
- Use Williams Bros. cylinders cut in half for small radials.
- Drill holes in the nose block and insert cylinders, ensuring alignment with thrust line.
- For very small work, 1/4‑in. electric drills and simple jigs are often all you need.
---
IMP‑52 engine (oddball gasoline engine)
The IMP‑52 is an unusual engine. Owner Bill Gaiser (Lyons, OR) documented some curious features:
- The crankcase was filled about half full with Singer sewing‑machine oil through a front tube (no dipstick).
- A sliding valve directed pressure from one cylinder to the other and was lubricated via a fitting on top of the motor.
- The slide valve is operated via a connecting rod from the back of the crankshaft, linked to a stirrup on the valve.
- It could be started by lung pressure, but originally the fuel was acetylene generated by dumping water on calcium carbide mixed with dry ice in a brass generator; the dry ice supplied CO2 to buffer the explosive acetylene.
- The engine ran a four‑stroke‑on‑four‑stroke sequence — a curious design from the Thirties.
---
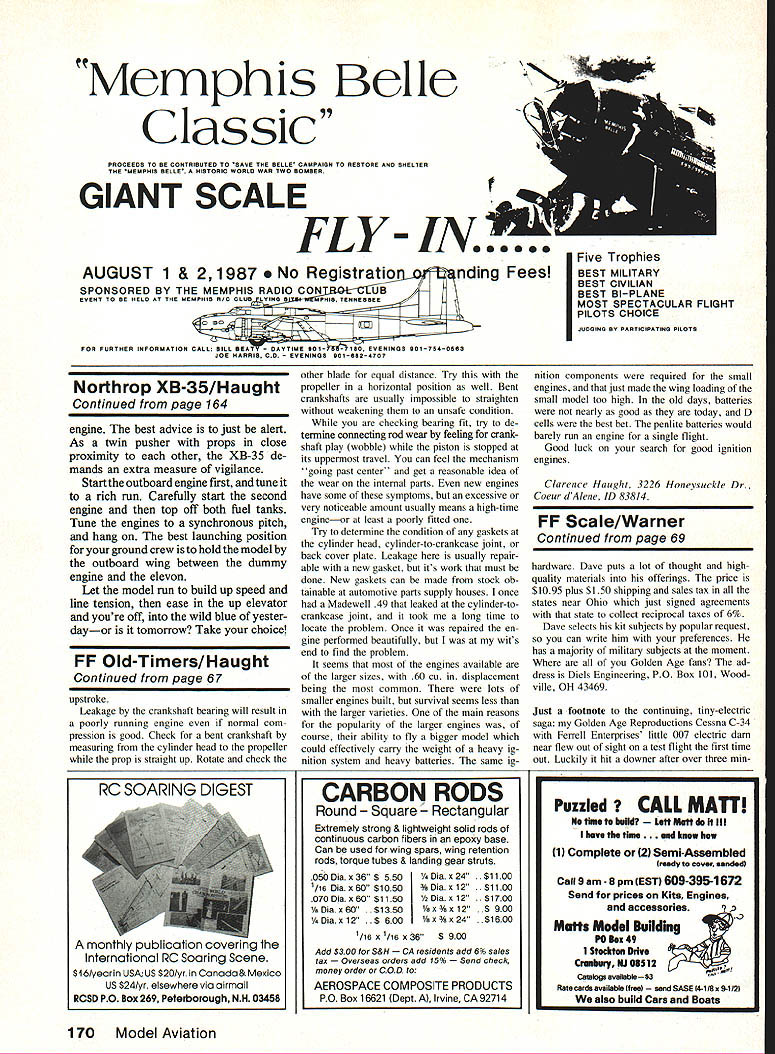
Hall Springfield Bulldog racer plan
The Hall Springfield Bulldog (1932) — "pugnacious and elegant" — is a superb subject for scale builders. Vern Clements, noted for his Gee Bee drawings, has produced a definitive scale drawing:
- Full‑size original builder Bob Hall praised Vern's drawing, saying he found no errors.
- The drawing: black line, rendered at an 18‑inch span. A 97.75‑inch wingspan full‑scale reference was used; 26‑inch span plan outlines can be worked into a scale project with additional construction detailing.
- Price: $25 for the plan, plus $4 for a large mailing tube and postage. (20% discount for former customers or Air Racing Society members.)
- To order Vern's catalog and descriptions, send a large SASE and $2 to:
Vern Clements, 308 Palo Alto Dr., Caldwell, ID 83605.
---
Kits and releases
- Dave Diels has produced his third kit: following the Lavochkin LA‑5FN/LA‑7, he released the Grumman F8F‑2. The 18‑in.‑span Rubber Scale model includes a molded canopy, Japanese tissue, printed plans, and the necessary materials for assembly.
---
Comet 10‑centers and scratch projects
A recent club project and renewed interest in Comet "10‑centers" (small, inexpensive vintage designs) has led to renewed builds and even contest events. If you want to try a 10c project, here are plan and printwood sources:
- John Pond Old Time Plan Service
- 4269 Syoko Circle, San Jose, CA 95136
- Plans ~ $2.75 each + ~20% postage. Include $1.50 for his latest index list.
- Jack Fike’s Scale Flight Model Company
- 630 Fairway Lane, Bloomington, IN 47401
- Offers a limited selection of Comet 10‑center plans at $2 each; printwood $2 extra; most kits available for ~$6.95. Send SASE for catalog.
- Don Belote
- 1834 Bame Place, Toledo, OH 43613
- Has offered plan and paper printwood copies for $0.50 each at swap meets; send SASE to inquire.
Expect to spend more than the original 10¢ nominal price once you factor printwood, tissue, adhesives and fixtures.
My Comet Me 109 — tips and materials
I built a Comet Me 109 for outdoor flying and learned:
- Use spray‑adhesive (3M Spray Mount) to temporarily secure paper templates to balsa for clean cutting and to prevent small part breakouts.
- For 1/2‑in. square stock and other small hardwood pieces, modern hobby sources sell short lengths; expect to pay a few cents to a dollar apiece for specialty stock.
- Modern materials save time: CA glue, good sandpaper, nitrate dope, ready rubber loops, and plastic props make construction and finishing quicker and more durable than older methods.
- Keep a running tally of costs — they add up faster than nostalgia suggests.
---
Newsletter spotlight
CIA Informer (Central Indiana Aeromodelers newsletter)
Origins and purpose
- The CIA Informer began in 1974 to coordinate contest scheduling and communication among clubs across a tricky tri‑state area (Indiana, Michigan, Ohio) that overlapped multiple AMA districts.
- Coordinating dates across AMA districts 3W, 6 and 7 required close communication with each contest‑sponsoring club to avoid conflicts and concentrate contest calendars within the good‑weather season.
Role and outcome
- The Informer became a single‑point vehicle for an annual condensed contest calendar and for late updates or specific meet details.
- By producing a tri‑AMA‑district Free Flight contest calendar each year (ready before the holiday season), the Informer reduced duplicative work by district coordinators and smoothed contest scheduling across the region.
- The CIA cluster of clubs matured from remnants of older Hoosier clubs and grew through outreach; many remote members contributed and participated in formal contests despite distance from meetings.
Mission: keep local Free Flight clubs informed, coordinated, and growing.
Transcribed from original scans by AI. Minor OCR errors may remain.

