
Free Flight: Sport & Scale
Bill Warner 423-C San Vicente Blvd. Santa Monica, CA 90402
Repairing: challenge or pain?
What do you dislike about modeling? Probably the most oft-mentioned bête noire of the veteran tissue trimmer is repairing. There is a fine line between a challenge and a pain in the butt, and perhaps it is the way we approach it that makes the difference. Meeting a challenge and being triumphant is what makes the encounter fun. Slogging through restoration for hours and hours just to get back to the place you started from can be a real drag. I would like to propose a couple of simple solutions for the repairing problem.
Decide: scrap, give away, display, or fix?
Let's suppose you have either chosen a model with lousy free-flight characteristics or built one from a kit with pretty colored box art but heavy internal parts. In either case, the model may be a poor flier. You probably have high hopes for it, and it may take a while to accept the message: "I'm not going to fly, Charlie, no matter what you do!"
Options:
- Stomp it or otherwise destroy it for catharsis if you are not enjoying the rebuild. If you need storage space, this clears room for another project.
- Give the remains away. Examining other people's wrecks at the field can teach construction, covering, joinery, and problem-solving techniques.
- If you like the model and don't want to eradicate it, bite the bullet and fix it — but first make a careful analysis to decide whether it will be worth repairing to fly again.
Analyze before repairing or retesting
Before beginning repairs, determine whether the model can be fixed well enough to fly. A friend with a video camera can be invaluable: review the flights that destroyed the model and decide what caused the damage — warp, wind, aft CG, mishandling, etc. No use doing a meticulous repair only to return to the field and repeat the same failure.
Most models taken to the field in a raw state are likely to suffer secondary damage. Don't leave details exposed: engine parts, unprotected cowlings, and wheel pants can be banged or torn off. Often, weight must be added to replace a part left off; for example, a heavy cowl should have an equal amount of lead taped where the cowl would occupy.
Apply protection:
- Tape sponge rubber or other padding over chin areas, wheel-pant impact points, wing tips, and top surfaces.
- The protection should not protrude too far or disrupt airflow — you are trying to save structure, not alter the aerodynamics.
- Never apply final color doping and detailing before initial testing.
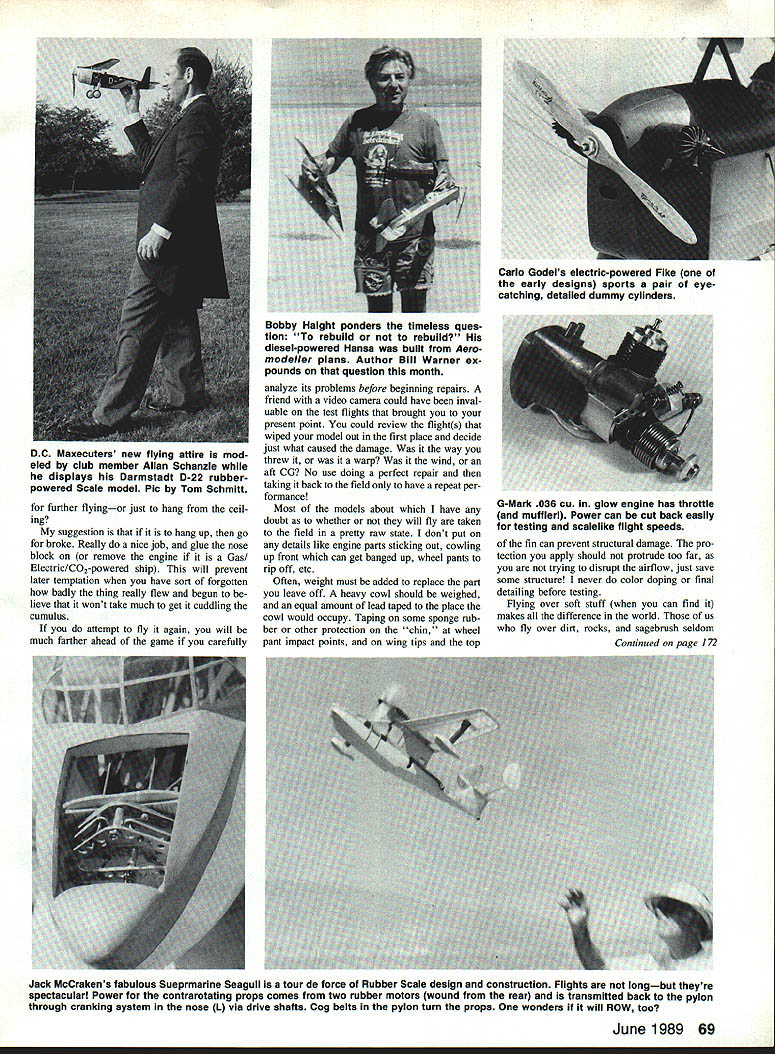
When testing scale-like flight speeds, reduce power. A small G-Mark .036 cu. in. glow engine with a throttle muffler can be throttled back easily. Flying over soft terrain for initial tests makes a big difference.
If the model is intended for display
If the model is to hang from the ceiling, go for broke on the finish. Do a really nice job and glue the nose block on (or remove the engine if it is a gas/electric/CO2-powered ship). This prevents later temptation to re-fly something you have forgotten was a poor performer.
Practical preflight and test tips
- Check the model carefully before flying. Steam out wing warps and add a bit of noseweight if needed — a forward CG increases stability.
- Make sure the nose block on a rubber model is snug so it won't change thrust angle mid-launch.
- Tack-glue components so they can separate on impact. A wing secured with a couple of tack spots may survive a break; a solidly glued-on wing can take much more structure with it when it goes.
- Design wings to plug onto wires or into sockets where practical.
- When testing, avoid windy conditions and avoid fully wound rubber motors. Use a longer rubber motor with fewer winds for tests (smaller, not shorter).
- For engine-powered models, consider installing props backward and running the engine very rich for tests. Some engines (e.g., G-Mark .035) have throttles and can be slowed without encountering a rich/lean surge.
- An engine cutoff timer helps prevent overlong runs that can lead to spiral dives and destruction.
Repair techniques and rebuilding
When you repair, try doing things differently than before. If a joint has repeatedly failed, change the joint design. Recommendations:
- Use scarf joints and splices that increase glue area instead of butting ends together with small gussets.
- Use spruce or hardwood reinforcements under sheeting where loads concentrate.
- Consider glassing over critical areas if you expect long-term loads.
- Trim splinters and remove crushed wood before re-skinning.
- Re-skin with lightweight tissue or modern film covering if necessary.
- If the model is warped beyond easy repair, consider stripping it down and rebuilding the affected area rather than trying to patch it — it may be faster and yield a better flying result.
We all hate repairs, but simple repairs can be tolerated if the model shows promise. Avoid doing repairs merely to return the model to the same unimpressive performance it had before.
Famous goof: I once forgot to remove a stuffer stick from inside a Macchi C.202 rubber model. It caused a persistent right-side bias and produced some very surprised looks from the flier. So, fellow birdmen, the next time you mess up, don't feel so stupid.
Happy hints
- From the Northwest Scale Watch newsletter: try Elmer's contact cement in the small tube for attaching windows and canopies. It has excellent tack, dries clear, and can be cleaned up with warm water without scarring plastic or finishes.
- Greg Davis (builder of museum-quality FF scale models) endorses Coverite's BalsaRite to seal balsa before tissue covering. Ric Dittman advises thinning it like dope; if covering with silk, use two coats. BalsaRite works on bond-paper cowlings and decking because it is nonshrinking and prevents "cave-ins."
Events and announcements
NFFS U.S. Outdoor Championships
- When: June 19–23, 1989
- Where: Lawrenceville, IL
- Events: 61 events including Old-Timer SAM events, NFFS events from Towline Glider to Ornithopter, and Flying Aces Club events from Jumbo Rubber to mass launches (Thursday and Friday).
- Contacts:
- A. Italiano, 1655 Revere Dr., Brookfield, WI 53005 — schedule and entry information.
- Don Sachs, R.R. 5, Box 566, Bloomingdale, NJ 07407 — NFFS events information.
- FACC HQ: Len Reisel, 3301 Cindra Lane, Erie, PA 16506 — Scale events.
- Send a large SASE for details.
U.S. Indoor Championships
- When: June 1–4, 1989
- Where: Minidome, Johnson City, TN
- Events: AMA Scale, Peanut Scale, Pistachio Scale.
- Contacts:
- General info: A. Italiano (address above). Send a large SASE.
- MIAMA Pistachio Grand Prix info: Dr. J. Martin, 2180 Tigertail Ave., Miami, FL 33133. Send a large SASE.
Kits and supplies
Helldivers and other kits
- Dave Deeds (Denis Engineering) offers an SBD-4 kit for $14 plus S&H. It spans 17 in. Not strictly scale, but a fine kit for fun.
- Also available: TBD-1 Devastator kit for $15.50 plus P&H; spans 25 in. Decals and canopy quality are excellent.
- Order from: Denis Engineering, P.O. Box 101, Woodville, OH 43469. Ask for his full list of Thirties- and WWII-type kits and include a SASE.
Wet T-shirt contest / shirts
I had planned an event but could not get AMA to sanction it. Last year's winner, the Cactus Squadron (FAC), received many requests and is making more shirts. If you want one, send $10 and a SASE to:
- Dave Schlosberg, 7420 E. Buena Terra Way, Scottsdale, AZ 85255.
The shirts are especially notable for the Curtiss Sparrowhawk with its Zeppelin hook.
Transcribed from original scans by AI. Minor OCR errors may remain.

