
Free Flight: Sport & Scale
Bill Warner 1370 Monache Ave. Porterville, CA 93257
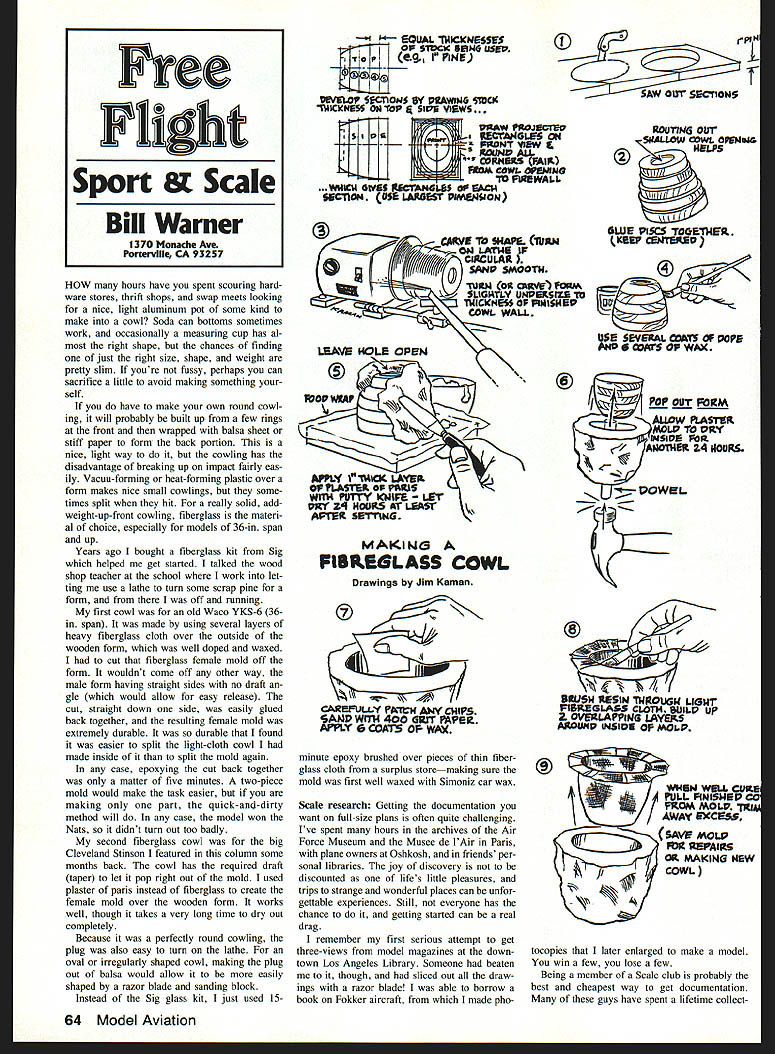
Fiberglass cowlings
How many hours have you spent scouring hardware stores, thrift shops, and swap meets looking for a nice, light aluminum pot of some kind to make into a cowl? Soda-can bottoms sometimes work, and occasionally a measuring cup has almost the right shape, but the chances of finding just one of just the right size, shape, and weight are pretty slim. If you're not fussy, perhaps you can sacrifice a little to avoid making something yourself.
If you do have to make your own round cowling, it will probably be built up from a few rings at the front and then wrapped with balsa sheet or stiff paper to form the back portion. This is a nice, light way to do it, but the cowling has the disadvantage of breaking up on impact fairly easily. Vacuforming or heat-forming plastic over a form makes nice small cowlings, but they sometimes split when they hit. For a really solid, weight-up-front cowling, fiberglass is the material of choice, especially for models of 36-inch span and up.
Years ago I bought a fiberglass kit from Sig which helped me get started. I talked the wood shop teacher at the school where I worked into letting me use a lathe to turn some scrap pine for a form, and from there I was off and running.
My first cowl was for an old Waco YKS-6 (36-inch span). It was made by using several layers of heavy fiberglass cloth over the outside of the wooden form, which was well doped and waxed. I had to cut that fiberglass female mold off the form. It wouldn't come off any other way. The male form had straight sides with no draft angle (which would allow for easy release). I cut straight down one side, glued it back together, and the resulting female mold was extremely durable. It was so durable that I found it was easier to split the light-cloth cowl I had made inside of it than to split the mold again.
Epoxying the cut back together was only a matter of five minutes. A two-piece mold would make the task easier, but if you are making only one part, the quick-and-dirty method will do. In any case, the model won at Nats, so it didn't turn out too badly.
My second fiberglass cowl was for the big Cleveland Stinson I featured in this column some months back. The cowl had the required draft (taper) to let it pop right out of the mold. I used Plaster of Paris instead of fiberglass to create the female mold over the wooden form. It works well, though it takes a very long time to dry out completely.
Because it was a perfectly round cowling, the plug was also easy to turn on the lathe. For an oval or irregularly shaped cowl, making the plug out of balsa would allow it to be more easily shaped by a razor blade and sanding block. Instead of the Sig glass kit, I just used 15‑minute epoxy brushed over pieces of thin fiberglass cloth from a surplus store—making sure the mold was first well waxed with Simoniz car wax.
Scale research
Getting the documentation you want for full-size plans is often quite challenging. I've spent many hours in the archives of the Air Force Museum and the Musée de l'Air in Paris, with plane owners at Oshkosh, and in friends' personal libraries. The joy of discovery is not to be discounted as one of life's little pleasures, and trips to strange and wonderful places can be unforgettable experiences. Still, not everyone has the chance to do it, and getting started can be a real drag.
I remember my first serious attempt to get three-views from model magazines at the downtown Los Angeles Library. Someone had beaten me to it, though, and had sliced out all the drawings with a razor blade! I was able to borrow a book on Fokker aircraft, from which I made photocopies that I later enlarged to make a model. You win a few, you lose a few.
Being a member of a scale club is probably the best and cheapest way to get documentation. Many of these guys have spent a lifetime collecting photos, drawings, and stuff they'll never use in a million years, and they're glad that someone will be able to do something with it.
Once upon a time, magazines were full of three-view drawings, and these are still around in people's basements and workshops. A note to a club newsletter usually brings results, even on the most obscure of aircraft.
Commercial photo services
There is another way to get the data you need, and that is a commercial service. Bob Baska, an ex‑reading teacher (can't be all bad), has one of the best services I have come in contact with. His Foto‑Paks (I said his was a reading — not a spelling — teacher) seem to average about $20 and usually include over 20 photos that are taken with the modeler in mind. This comes to under a dollar a shot. If you figure in your time, trouble, the expense of getting to the airport, plus developing, it's certainly reasonable.
Some Paks have as few as three shots (RCAF Harvard for $6) to a South African Mark IX Spitfire with 75 shots for $45.50. Three-views go for $3 (12 pages on the J-3 Cub). Send $3 for his 1990 catalog, which will just about cover the postage and printing of this 54‑page tome.
Scale Model Research 2334 Ticonderoga Way Costa Mesa, CA 92626 Tel: 714/979-8058
His service is fast and complete. You can even get a 20 x 30‑inch color enlargement of a particular photo for your desk for $20!
Ducted fans for Free Flight?
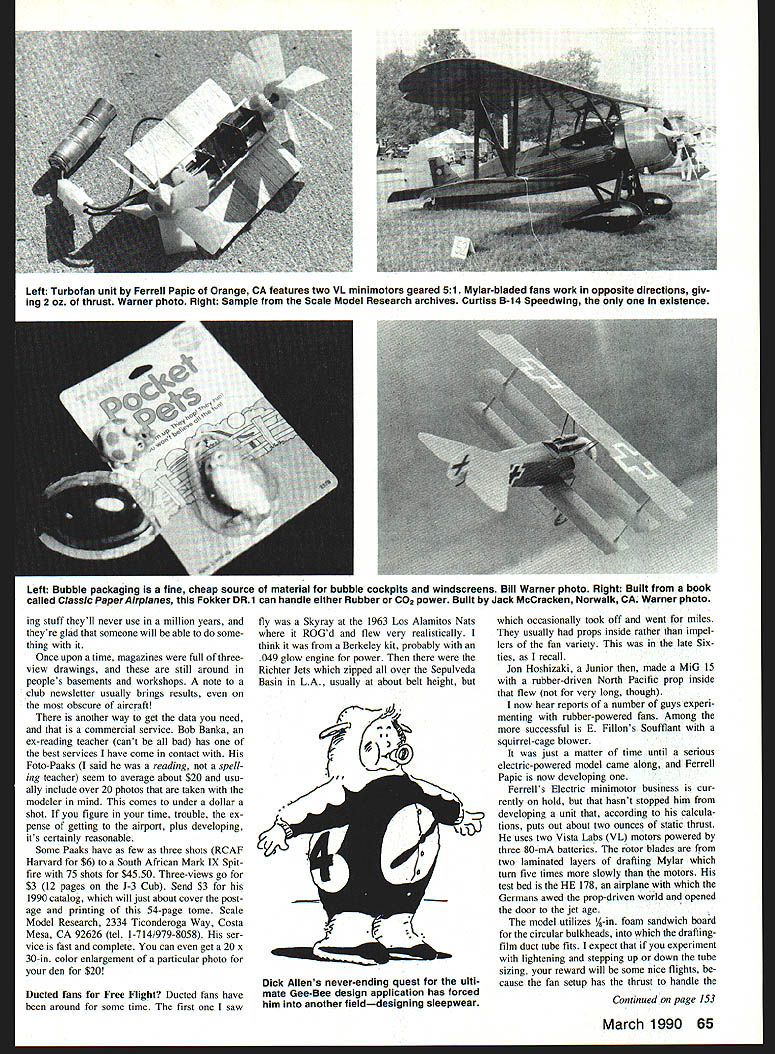
Ducted fans have been around for some time. The first one I saw was a Skyray at the 1963 Los Alamitos Nats where it ROG'd and flew very realistically. I think it was from a Berkeley kit, probably with an .049 glow engine for power. Then there were the Richter jets which zipped all over the Sepulveda Basin in L.A., usually at about belt height, but which occasionally took off and went for miles. They usually had props inside rather than impellers of the fan variety. This was in the late Sixties, as I recall.
Jon Hoshizaki, a junior then, made a MiG‑15 with a rubber-driven North Pacific prop inside that flew (not for very long, though).
I now hear reports of a number of guys experimenting with rubber-powered fans. Among the more successful is E. Fillion's Squirt with a squirrel-cage blower.
It was just a matter of time until a serious electric-powered model came along, and Ferrell Papic is now developing one.
Ferrell's electric minimotor business is currently on hold, but that hasn't stopped him from developing a unit that, according to his calculations, puts out about 2 ounces of thrust. He uses two Vista Labs (VL) minimotors powered by three 80‑mA cells. The rotor blades are from two laminated layers of drafting Mylar which turn five times more slowly than the motors. His test bed is the He 178, an airplane which the Germans used to explore the prop-driven world and open the door to the jet age.
The model utilizes 1/4‑inch foam sandwich board for the circular bulkheads, into which the drafting-film duct is glued. It is, in fact, the same construction techniques you use for other light models. If you experiment with lightening and stepping up or down the throat, your reward will be some nice flights, because the fan setup has the thrust to handle the job.
Continued on page 153
Paper airplanes
Many of us who grew up during the war years had to make do with cardboard, pine, and paper models when all of the balsa was diverted to making life rafts and for other important uses. Some of the paper models even flew for a few seconds! They were sort of fun to make, ranging from the small models given away on the Jack Armstrong program to larger ones on heavy stock in punch-out books.
Jack McCracken, a super scale modeler and painstaking scratch-builder of models and full-size aircraft, has been making paper planes in his spare time for the fun of it, and loving it. The models range from the Italian twin-hulled flying boats to a Fokker DR.I. Most of them would probably fly on rubber power, too. He adds balsa reinforcements here and there, sometimes a balsa spinner or a set of wheels. They are as cute as a bug’s ear.
His models are taken from a book of models called Classic Paper Airplanes. It costs about $20, the authors are Johnson and Austin, and it is published by St. Martin’s Press, 175 Fifth Ave., New York, NY 10010 (ISBN 0-312-02734-6). Maybe your local bookseller could get one for you.
Some of the models it includes:
- Spirit of St. Louis
- SM‑55
- Schleicher‑Rhönadler
- Avro 560
- MS Type N
- Blackburn Monoplane
- Hawker Hart
- Fairey Long‑Range
- Fokker D‑8
- Fokker DR.I
What a great present to give a kid who has never experienced anything other than the plastic kit, or the modeler who has everything except this! The artwork is first class. (There’s a write-up and photo of the book in the September 1989 “Product Review” section of MA—Ed.)
Bubble-pack canopies
Al Lawton has made a 3‑D Corsair from foam meat trays, using the rounded corners to build the rounded fuselage, and topping the whole affair off with the bubble packing for the canopy. It is beautifully finished. Those little Tomy Pocket Pets make great gifts for your young friends, provided they give you the packing. I even know a modeler who re-heats the stuff and uses it for his own canopy forms. I think all this is a reaction to the rising cost of modeling. It brings out the creativity in everyone.
Stuck caps — quick fix
Ever have the experience of trying to get the cap off a paint bottle or contact‑cement jar when it has made the decision to stay put? Using the old vise-and-water-pump-pliers trick often messes up the cap or breaks the bottle. A wealth of new tools has been picked up by the generations of modelers’ kids who were in the vicinity of such an event.
Books have been written on the subject, but here is how to avoid the problem from ever occurring again:
- Turn the whole affair upside down and fill the glue side of the cap with thinner, with or without a touch of solvent—leave more than a drop in the cap. Let it soak and the cap should loosen. Note: dope thinner dissolves those clear little square bottles that just look like glass and hold plastic car enamel, so be cautious. I wouldn’t use diesel fuel though I don't know how it works on acrylics.
- When you get ready to re‑install a cap, wipe the threads on the bottle with a rag and smear a little Vaseline—not too much—on them. If this is too messy, a couple of turns of Teflon pipe‑joint tape will do. It is available in any hardware store for about a dollar for a hundred‑yard supply. Get it on nice and wide, and put some over the top of the bottle to help get an airtight seal.
Support the National Free Flight Society (NFFS)
Chris Weinreich is taking over the monthly editorship of the NFFS Digest. Bob Meuser is retiring as editor so he can build a couple of scale models. Chris wants to make the Digest stronger in both the FF scale and sport categories. All of you avid FF nuts out there need no prodding to pitch in and give him a hand.
NFFS is rapidly becoming the most important national organization for free flighters as AMA devotes more and more attention to the needs of the RC majority. I heartily urge you to become an NFFS member and to make a small contribution to the Digest.
Now is the time to send Chris pictures, hints, tips, descriptions of interesting models, experiences, drawings, etc. Address them to:
Chris Weinreich 905 W. 5th Ave. Olympia, WA 98502
Or call him some evening at 206/352-8183 and talk about what you can do to help keep FF strong and vital.
A year's membership, which includes a subscription to the Digest, costs $15 if you're over 19, or $7.50 if you're under. To join, send your name, address, age, and AMA number along with a check made out to the National Free Flight Society to:
National Free Flight Society 6164 East Cactus Wren Rd. Scottsdale, AZ 85253
Diels kit fans
If you already know about Dave Diels' fine rubber-powered scale model kits, you are aware that they are quite special. "Highly recommended" is the only label one can use on his new F4F Wildcat kit. It's a real winner and sells like the blazes. Originally done by Bill Hannan for the Model Builder WWII Rubber Scale book, it has produced consistent results for many average and expert modelers.
Dave's second new offering is the tail-first Shinden, which might best be described as an interesting subject. Each kit comes with good wood, fine-quality tissue, detailed documentation, and building instructions. Drop him a large SASE at:
Diels Engineering P.O. Box 101 Woodville, OH 43469
for his latest listings. Even if you don't build them, his kits, in limited production, are going to be collector's items someday.
FF Duration / Joyner
To keep it simple and fly without a timer, a prop-stop actuated auto-governor is about the only safe way to fly a right‑right pattern with a small‑stab Wakefield.
But sometimes even the prop-stop A/R is not safe. If it trips too soon, while the model is under power, it will cause the model to spin into the right. If it trips on launch... well, at least you don't have to walk far to pick up the pieces.
Rex Hinson (Inverness, FL) has come up with a rather clever way of making sure the rudder trips when it is supposed to—and not before. Instead of using the drop‑pin of the Montreal prop stop to trip a lever and release the line to the rudder, Rex adds a round disc of thin aluminum on the front of his turned aluminum nose block. There is a hole in the disc for the drop‑pin and a slot at the top of the disc.
The line to the rudder is hooked to one of the Z‑shaped wire pivots on the top of the nose block. The other end of the wire is hooked down to the aluminum disc. When rubber‑motor torque runs down, the Montreal drop‑pin, which is spring‑loaded, moves to the rear and drops into the hole in the aluminum disc. Since the prop is still turning, the disc will rotate until the slot in the edge uncovers the wire, which unhooks and releases the outrigger line. There is a second hole for the drop‑pin in the aluminum nose block to firmly stop the propeller and allow it to freewheel.
As you can see in the photographs, Rex uses an aluminum barstock hub. The hinges are 1/2‑inch wire soldered to sections of brass tube approximately 1/4‑inch long. Stub dowels in each blade fit into the tubes, allowing precise setting of blade pitch.
Cyclones from Siberia
Yet another engine is now available to do battle with the Rossi and Nelson for FIC. The Cyclone A .25/1 includes a brake and produces a claimed 1 horsepower at 28,000 to 30,000 rpm. Price is a whopping $280.
But if that seems high, consider the Cyclone C for F2C (FAI CL speed). The price: $600. However, that does include the tuned pipe, carbon fiber single‑blade prop, fuel tank and a claimed 1.8 horsepower at 39,000 rpm.
The folks in Siberia are also offering two Wakefield front ends, and a prop assembly "for experts" with variable pitch and delayed start for $80. The standard Montreal‑type stop unit is $25.
Transcribed from original scans by AI. Minor OCR errors may remain.

