
Free Flight: Sport & Scale
Bill Warner 1370 Monache Ave. Porterville, CA 93257
Color‑Xeroxed Decals
COLOR‑XEROXED DECALS are easy to make, says Dick Drake of the Thermal Thumbers. At a recent meet he showed fantastic decals made by SCAMPS members on a color Xerox using Mylar self‑adhering film available at blueprint shops. You can enlarge or reduce your artwork, even cut and paste the original artwork in several sizes to use the same markings on different size models.
Panel instruments are a good place to use this technique since you always need them regardless of model size. White‑line faces, black‑background faces, faces with color bands, or "illuminated" needles should be easy to reproduce. Apply to already‑doped, finished surfaces; a dusting of Testors Dull Cote will kill unwanted gloss. Thanks, Dick!
Adhesive Transfer ("Snot") Tape
Most modelers know ordinary tape. Adhesive transfer tape (often nicknamed "snot tape") is similar but with no flexible backing—just a thin, even coating of adhesive on a peel‑off shiny paper. 3M calls it adhesive transfer tape; Tuck calls it carpet tape.
Dick Howard (retired, Lake Havasu, Arizona) has been experimenting with it. One useful technique: lay a bit of the white tissue you'll use for a stripe onto the sticky strip (before peeling the shiny backing). Cut the tissue to shape with a sharp razor blade, then peel the tissue strip onto the adhesive. Remove the shiny backing and stick the adhesive‑with‑tissue to the model. The opaque adhesive helps the white tissue strip look good. You can, of course, use colored tissue over dark tissue, but white over dark is the combination people most often have trouble matching. Keep up the good work, Dick!
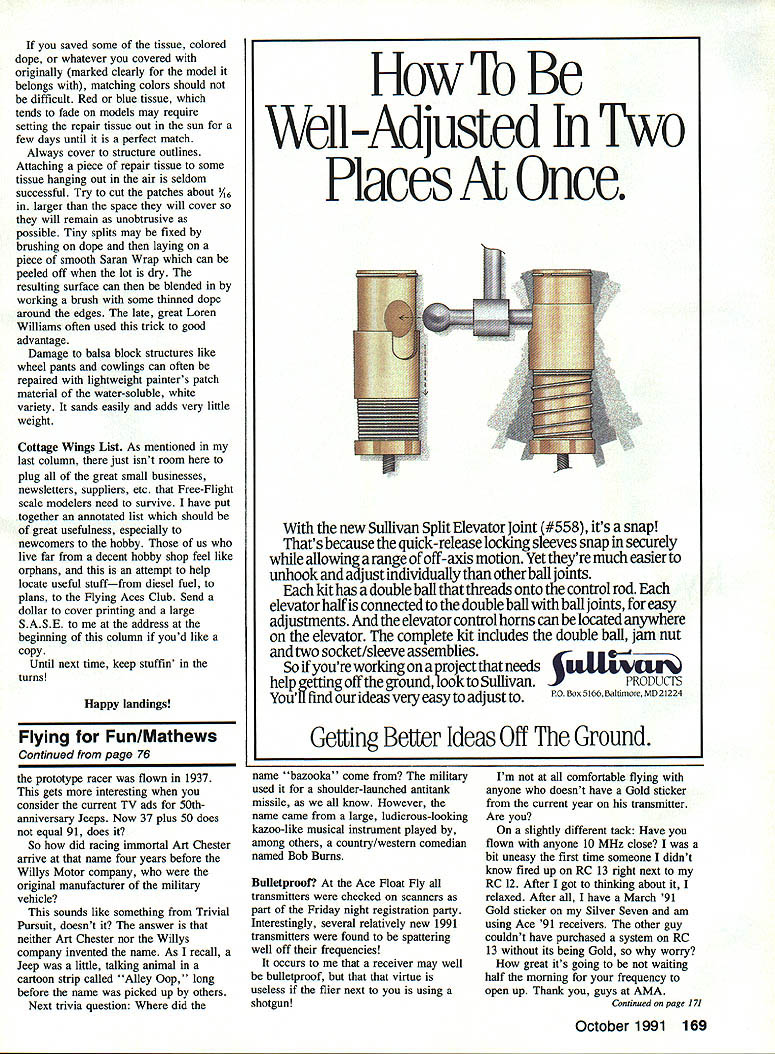
Propeller Pattern and Building (siscaform propeller)
Pattern: Jose Mondejar Jr. used an 8‑inch siscaform propeller design. Transfer the pattern to a cardboard template and cut the prop from X‑ray celluloid. Sliced ribs give lightness.
BUILDING INSTRUCTIONS (siscaform propeller)
- Prep the hub: make a rectangular piece from cardboard and trace the center line. Make a bushing by winding the cardboard around a 3/8‑inch diameter round stick using white glue; note cardboard grain when building.
- Trace and cut the cardboard propeller pattern. Pencil‑copy the pattern onto an X‑ray celluloid sheet and cut the celluloid prop from the pattern.
- Put the celluloid propeller pattern upside down and, with a round stick or ball‑point pen, wind the prop blade clockwise.
- Insert the prop hub and place it in the center, checking cross reference lines; heat (bake) the prop to set the shape.
- Lock for desired pitch by twisting the propeller.
- Finish the prop with a nose washer or use the bushing.
Diagram and complete instructions are implied for the siscaform propeller construction.
Wing Construction and Covering (Jack McGillivray)
Jack McGillivray (writing "SAM Speaks" in Ontario) recommends light wing loadings for long, slow flights and reduced impact damage. Using scale rib spacing for appearance means lightening the ribs. One method:
- Lay down the leading and trailing edges per plan.
- Add rectangular strips to the lower part of each rib between notches.
- Fit a full‑depth thin balsa spar at the top and bottom rib locations and glue the spar to the lower strips at the point of maximum camber.
- Make a curved template and slice out the upper parts of the ribs. (Some modelers prefer laminating two thin balsa strips for maximum strength.)
Jack adheres tissue to both ribs and spar so the tissue can shrink lightly without distortion or wash‑out. He recommends covering the bottom wing first, slipping a balsa shim under the trailing edge tip; then cover the top—the tissue will hold twist. A bit of twist in the wing is desirable.
Jack's favorite covering material is Ganpi tissue, available in Japanese art stores for about $6 a sheet. It requires no doping and is available white. "No other tissue equals its lightness," Jack says.
HiLine Micro‑4
If you've been waiting to try electric‑powered scale and can build a light rubber‑powered ship, the HiLine Micro‑4 is a suitable kit. Designed for models of 50–75 sq in of wing that weigh between 10 and 30 grams (minus motor system), the package includes motor, Ni‑Cd batteries, props, and parts to make a charger—introductory price $17.95 plus $2.00 postage. For a catalog, send $1.00 to HiLine, Ltd., P.O. Box 1283, Bethesda, MD 20827.
Repairing Crash Damage
Dave Stott (co‑founder of the modern Flying Aces movement) replied unhesitatingly to "What do you most dislike about modeling?": "Repairing!" Many agree—it feels like work. A few guidelines to make repairs easier:
- Adopt a positive attitude; damage is often not as bad as it looks.
- Cut away the covering to the nearest undamaged longeron, rib, bulkhead, or other solid attachment point. Save any artwork that can be soaked off with thinner or otherwise preserved.
- Glue back what you can. Sometimes it's easier to cut away the damaged part and glue in new material, trimming to fit after it dries. Testor's "Green Tube" Cement for Wood Models is recommended for most repairs; use cyanoacrylate (instant glue) only rarely.
- For broken leading or trailing edges, make temporary balsa shelves to pin them up while the glue dries. If wings come off, pin them flat to the bench. Add doublers for short breaks; butt joints are not very strong.
- Check plane balance if one wing was repaired—add weight to the opposite side if necessary.
- Double‑glue joints: let the first coat soak into the wood pores before adding a second coat. A fillet or a little glue skin on the outside generally helps. Consider adding braces to prevent a repeat break. Keep the repair area sizable to ensure straight drying. Use long, straight balsa "yardsticks" under wings and stab halves to check alignment.
- When damage is severe, a removable external brace that can later be soaked off with thinner can be useful.
Color and covering tips:
- If you saved some of the original tissue or dope (clearly marked), color matching will be easier. Red or blue tissue may have faded—set the repair tissue out in the sun for a few days to match.
- Always cover to structural outlines; attaching a patch to floating tissue seldom works. Cut patches about 1/16 in. larger than the space to minimize visible edges.
- Tiny splits can be fixed by brushing on dope, laying on smooth Saran Wrap while drying, then peeling off and blending the edges with thinned dope (a trick often used by the late Loren Williams).
- Balsa block structures like wheel pants and cowlings can be repaired with lightweight painter's patch material or the water‑soluble white variety; it sands easily and adds very little weight.
Suppliers, Kits, and Parts
- A.J.'s (California 93727) is listed as a production source for Shocker and Maz Hog kits in various sizes, plus seven sizes of the Nos Gas S.W.A. design. They also offer reissues of the Hurricane 69 and Vanguard 66 (originally from the Advanced Engineering Company). A KSB timer is listed at $17.50. They also stock 4‑inch needle valves for $2 each that fit K & B metric engines (3.25 to 7.5) and other engine parts for K & B and Cox. Send for their catalog.
- Hannan — 2229 Prescott Hwy 16, Nepean, Ontario, Canada K2E 6Z8. Telephone: 613/226‑5663.
Cottage Wings List
I have compiled an annotated list of small businesses, newsletters, suppliers, and other resources useful to Free‑Flight scale modelers—especially newcomers and those far from hobby shops. Send $1 to cover printing and a large S.A.S.E. to me at the address above if you'd like a copy.
Until next time, keep stuffin' in the turns!
Happy landings!
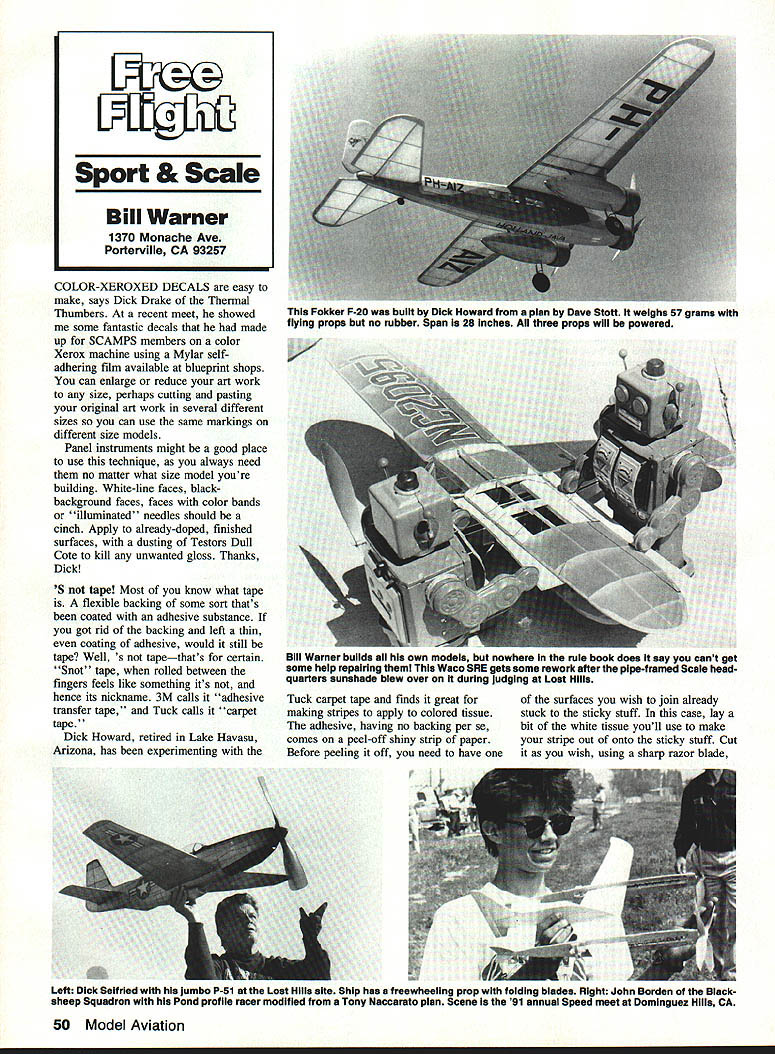
Transcribed from original scans by AI. Minor OCR errors may remain.

