
Fun Flying Foamies
It's almost like being a kid again! Take a supermarket meat tray, cut out one of these neat little foam gliders, make up a dowel hand‑launcher, and you're ready to play.
Model design: Joel Goldbach Text/art: Larry Kruse
Overview
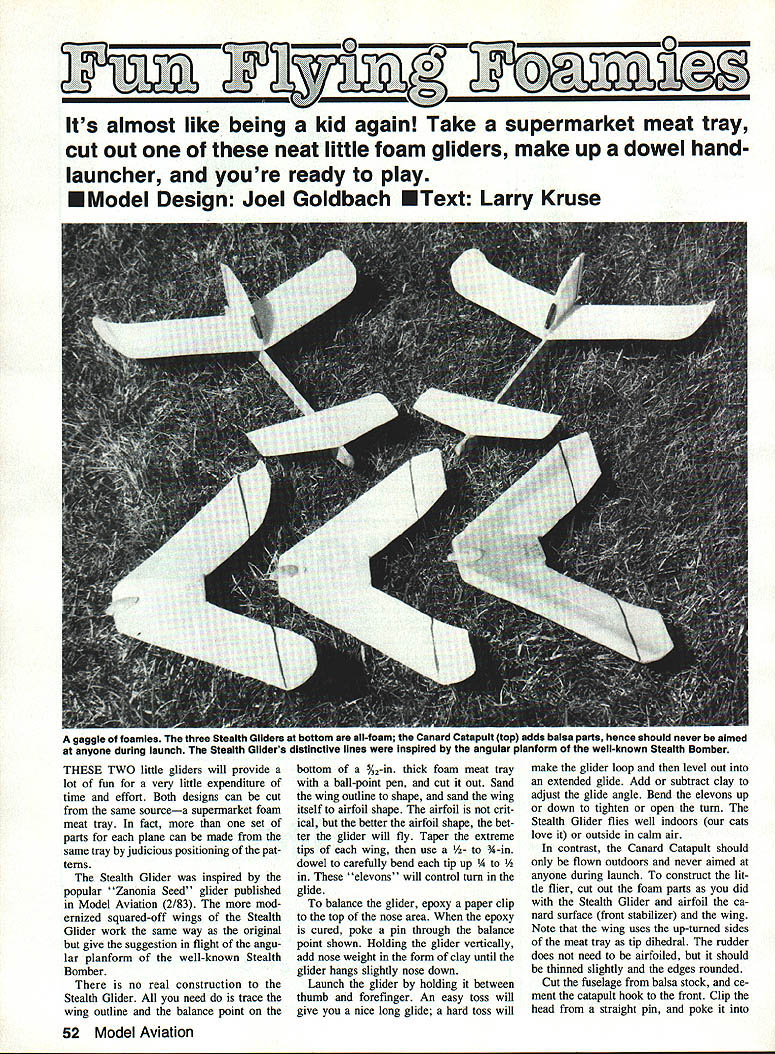
These two little gliders will provide a lot of fun for very little expenditure of time and effort. Both designs can be cut from the same source—a supermarket foam meat tray. In fact, more than one set of parts for each plane can be made from the same tray by judicious positioning of the patterns.
The Stealth Glider was inspired by the popular "Zanonia Seed" glider. The more modern squared‑off wings of the Stealth Glider work the same way as the original but give the suggestion in flight of the angular planform of the well‑known Stealth Bomber.
Stealth Glider
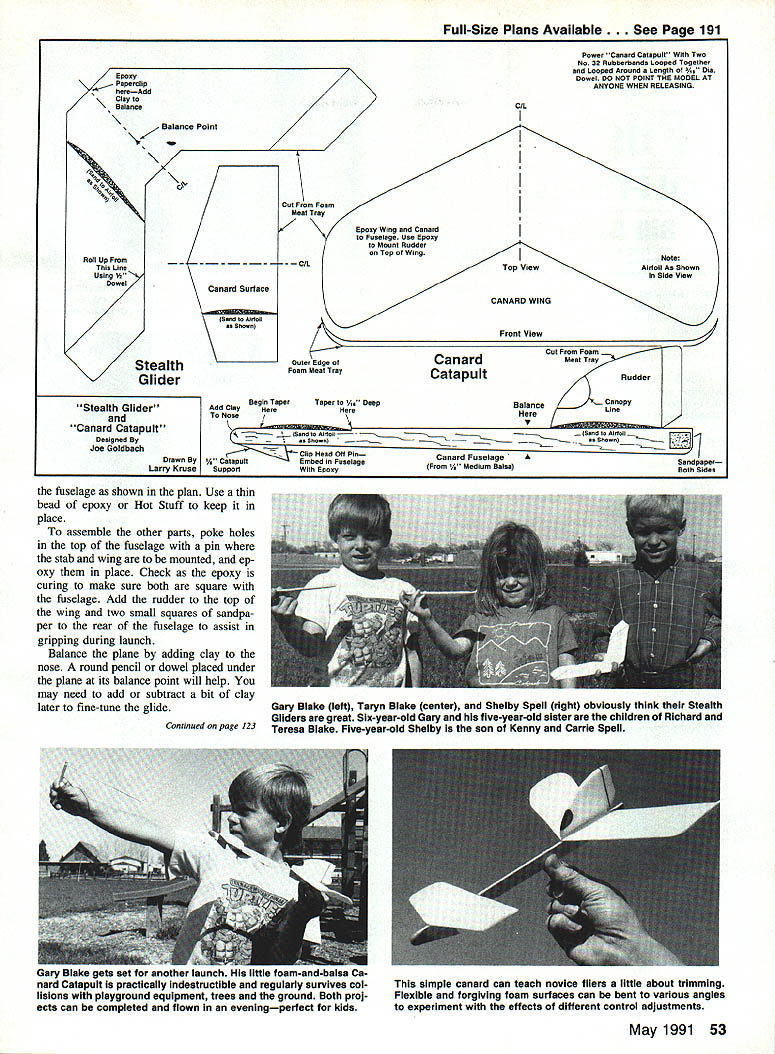
- Trace the wing outline and the balance point on the bottom of a 1/4‑in. thick foam meat tray with a ball‑point pen, and cut it out.
- Sand the wing outline to shape and sand the wing itself to an airfoil shape. The airfoil is not critical, but the better the shape, the better the glider will fly.
- Taper the extreme tips of each wing.
- Use a 1/2‑ to 3/4‑in. dowel to carefully bend each tip up 1/4 to 1/2 in. These "elevons" will control turn in the glide.
- To balance the glider, epoxy a paper clip to the top of the nose area. When the epoxy is cured, poke a pin through the balance point. Hold the glider vertically and add nose weight (clay) until the glider hangs slightly nose down.
- Launch by holding between thumb and forefinger. An easy toss will give a long glide; a hard toss will make the glider loop and then level out. Add or subtract clay to adjust glide angle. Bend the elevons up or down to tighten or open the turn.
- The Stealth Glider flies well indoors or outside in calm air.
Canard Catapult
- Cut out foam parts as with the Stealth Glider. Airfoil the top and bottom of the canard (front stabilizer) and the wing.
- Note: the wing uses the up‑turned sides of the meat tray as tip dihedral.
- The rudder does not need a full airfoil but should be thinned slightly and the edges rounded.
- Cut the fuselage from 1/4‑in. medium balsa stock and cement the catapult hook to the front.
- Clip the head from a straight pin and poke it into the fuselage where shown on the plan. Use a thin bead of epoxy to keep parts in place while assembling.
- Poke holes in the top of the fuselage for the stab and wing mounts and epoxy them in place. Check epoxy curing and make sure both stab and wing are square to the fuselage.
- Add the rudder to the top wing.
- Use two small squares of sandpaper on the rear fuselage to assist gripping during launch.
- Balance the plane by adding clay to the nose. A round pencil dowel placed under the plane at its balance point will help. You may need to add or subtract a bit of clay later to fine‑tune the glide.
- Power the Canard Catapult with two No. 32 rubber bands looped together and looped around a length of 5/16‑in. dia. dowel. DO NOT POINT THE MODEL AT ANYONE WHEN RELEASING.
Plans and Notes
- Epoxy paperclip here — add clay to balance.
- Balance point (mark on plan).
- Roll up from this line using 1/8‑in. dowel.
- Cut pieces from foam meat tray; use outer edge of tray where indicated.
- Canard surface — taper to airfoil as shown.
- Epoxy wing and canard to fuselage. Use epoxy to mount rudder on top of wing.
- Note: airfoil as shown in side view.
- Add clay to nose to balance.
- Begin taper here; taper to 1/8‑in. deep here.
- Sand to airfoil as shown.
- Clip head off pin — embed in fuselage with epoxy.
- Canard fuselage from 1/4‑in. medium balsa.
- 1/4‑in. catapult support.
- Balance here (mark on plan).
- Rudder — canopy line — sandpaper on both sides for grip.
Launcher and Trimming
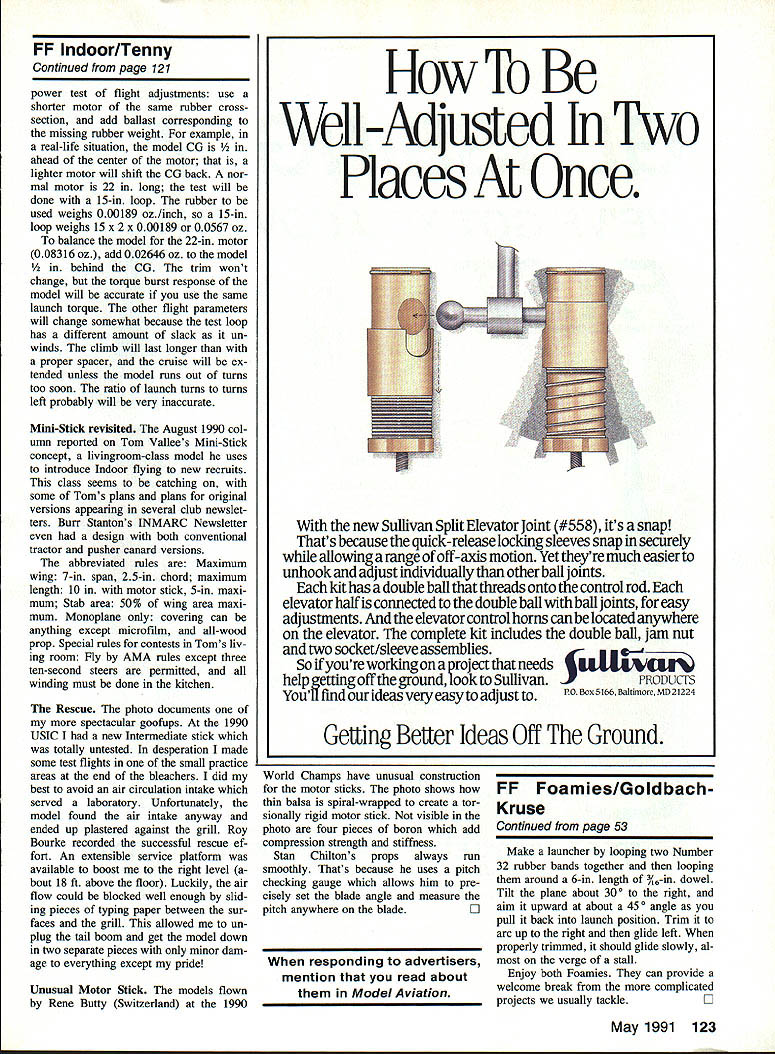
- Make a launcher by looping two Number 32 rubber bands together and then looping them around a 6‑in. length of 5/16‑in. dowel.
- Tilt the plane about 30° to the right, and aim it upward at about a 45° angle as you pull it back into launch position.
- Release so the plane arcs up to the right and then glides left. Trim until it arcs and then glides slowly, almost on the verge of a stall.
- When trimming, adjust clay for balance and tweak elevons or control surfaces for turn and glide angle.
Enjoy both Foamies. They can provide a welcome break from the more complicated projects we usually tackle.
Credits: Designed by Joel Goldbach; drawn by Larry Kruse.
Transcribed from original scans by AI. Minor OCR errors may remain.

