

The Gambler
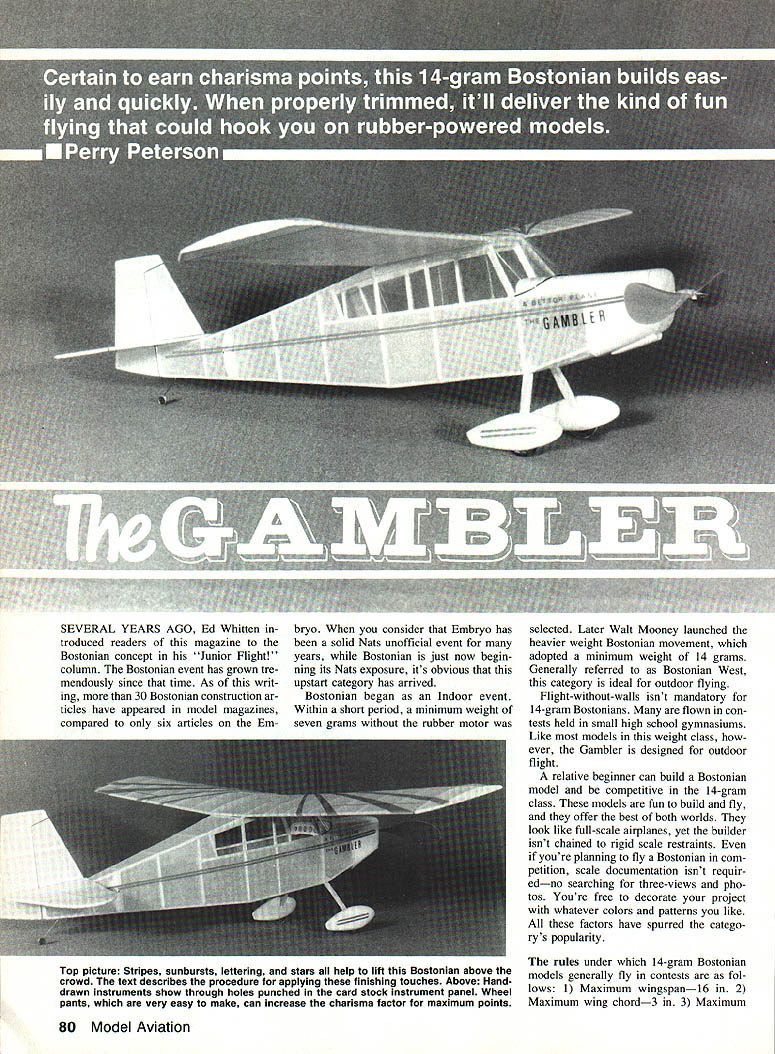
Certain to earn charisma points, this 14-gram Bostonian builds easily and quickly. When properly trimmed, it'll deliver the kind of fun flying that could hook you on rubber-powered models. — Perry Peterson
Several years ago, Ed Whitten introduced readers of this magazine to the Bostonian concept in his "Junior Flight!" column. The Bostonian event has grown tremendously since that time. As of this writing, more than 30 Bostonian construction articles have appeared in model magazines, compared to only six articles on the Embryo. When you consider that the Embryo has been a solid Nats unofficial event for many years, while Bostonian is just now beginning its Nats exposure, it's obvious that this upstart category has arrived.
Bostonian began as an indoor event. Within a short period, a minimum weight of seven grams without the rubber motor was selected. Later, Walt Mooney launched the heavier-weight Bostonian movement, which adopted a minimum weight of 14 grams. Generally referred to as Bostonian West, this category is ideal for outdoor flying.
Flight-without-walls isn't mandatory for 14-gram Bostonians. Many are flown in contests held in small high school gymnasiums. Like most models in this weight class, however, the Gambler is designed for outdoor flight.
A relative beginner can build a Bostonian model and be competitive in the 14-gram class. These models are fun to build and fly, and they offer the best of both worlds. They look like full-scale airplanes, yet the builder isn't chained to rigid scale restraints. Even if you're planning to fly a Bostonian in competition, scale documentation isn't required—no searching for three-views and photos. You're free to decorate your project with whatever colors and patterns you like. All these factors have spurred the category's popularity.
The rules under which 14-gram Bostonian models generally fly in contests are as follows:
- Maximum wingspan—16 in.
- Maximum wing chord—3 in.
- Maximum length from thrust button to furthest point aft—14 in.
- Maximum propeller diameter—6 in.
- Landing gear must have at least two wheels of at least 3/4-in. diameter each.
- Fuselage must be large enough to contain an imaginary cargo box 1 1/2 x 2 1/2 x 3 in. in any orientation.
- Minimum weight without rubber motor—14 grams.
- Plane must have windshield and clear vision of at least 1 sq. in. to each side.
- Biplanes are allowed, but total wing area is limited to 48 sq. in.
- All official flights must rise off ground.
If a suitable place for takeoff is not found, rule 10 above will be waived by the Contest Director to allow hand-launched flights. Some groups abide by an additional rule stating that the space for the imaginary cargo box in rule 6 above must be framed by the fuselage longerons. Without the longeron rule, some modelers were using a large cockpit canopy to form the theoretical box. Some builders have even constructed planes with the longest dimension of the imaginary box in a vertical position.
The longeron rule is intended to retain as much visual resemblance to full-size airplanes as possible. Many groups award additional appearance points by using a charisma factor, assigned to each plane by the contest judges. Flight scores are multiplied by the charisma factor to arrive at the total score. Check with your local club for its specific interpretation of the rules (and if they don't fly Bostonians, ask them to start).
Patterned after the Citabria, the Gambler is a great way to get into the Bostonian movement. It's both easy to build and a terrific flier. The wheel pants may be omitted—but at the risk of losing charisma points since the model would look less like a Citabria.
Construction
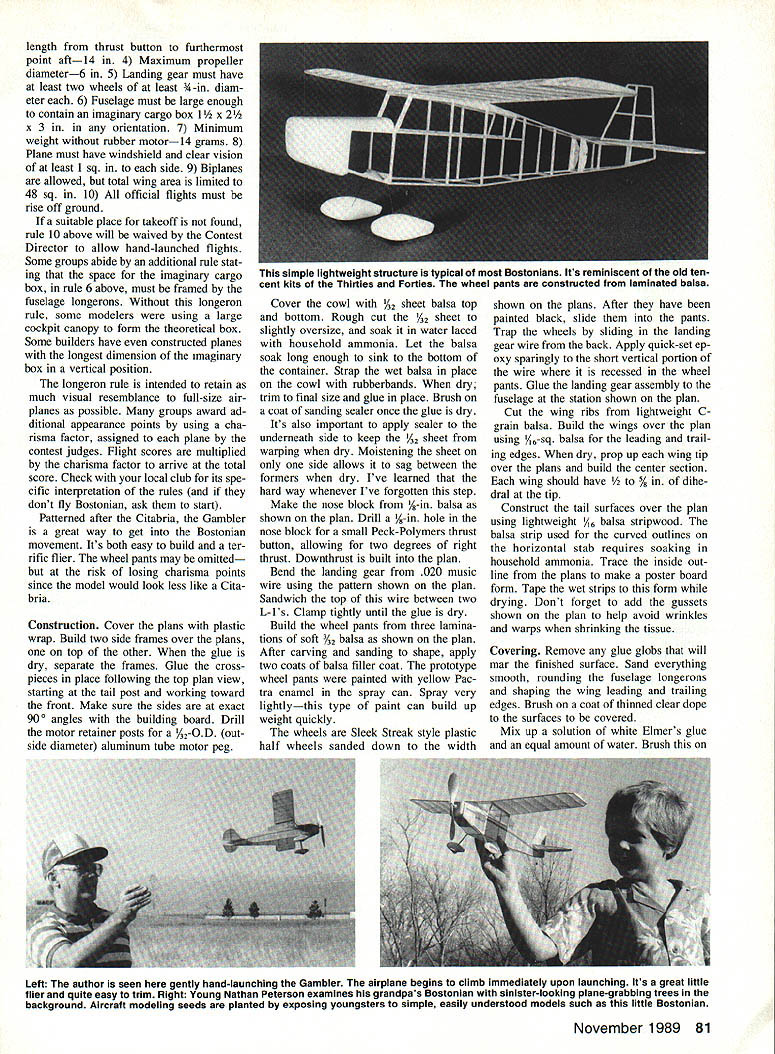
Cover the plans with plastic wrap. Build two side frames over the plans, one on top of the other. When the glue is dry, separate the frames. Glue the crosspieces in place following the top plan view, starting at the tail post and working toward the front. Make sure the sides are at exact 90° angles with the building board. Drill the motor retainer posts for a 1/8-in. O.D. (outside diameter) aluminum tube motor peg.
Cover the cowl with 1/32-in. sheet balsa top and bottom. Rough-cut the 1/32-in. sheet to slightly oversize, and soak it in water laced with household ammonia. Let the balsa soak long enough to sink to the bottom of the container. Strap the wet balsa in place on the cowl with rubber bands. When dry, trim to final size and glue in place. Brush a coat of sanding sealer once the glue is dry.
It's also important to apply sealer to the underside to keep the 1/32-in. sheet from warping when dry. Moistening the sheet on only one side allows it to sag between the formers when dry. I've learned the hard way whenever I've forgotten this step.
Make the nose block from 1/4-in. balsa as shown on the plan. Drill a 1/8-in. hole in the nose block for a small Peck-Polymers thrust button, allowing for two degrees right thrust. Downthrust is built into the plan.
Bend the landing gear from .020-in. music wire using the pattern shown on the plan. Sandwich the top wire between two L's. Clamp tightly until the glue is dry.
Build the wheel pants from three laminations of soft 3/32-in. balsa as shown on the plan. After carving and sanding to shape, apply two coats of balsa filler coat. The prototype wheel pants were painted with yellow Pactra enamel from a spray can. Spray very lightly—this type of paint can build up weight quickly.
The wheels are Sleek Streak-style plastic half-wheels sanded down to the width shown on the plans. After they have been painted black, slide them into the pants. Trap the wheels by sliding in the landing gear wire from the back. Apply quick-set epoxy sparingly to the short vertical portion of the wire where it is recessed in the wheel pants. Glue the landing gear assembly to the fuselage at the station shown on the plan.
Cut the wing ribs from lightweight C-grain balsa. Build the wings over the plan using 1/16-in. sheet balsa for the leading and trailing edges. When dry, prop up each wing tip over the plans and build the center section. Each wing should have 1/2 to 1 1/8 in. of dihedral at the tip.
Construct the tail surfaces over the plan using lightweight 1/16-in. balsa stripwood. The balsa strip used for the curved cutouts on the horizontal stab requires soaking in household ammonia. Trace the inside outline from the plans to make a poster-board form. Tape the wet strips to this form while drying. Don't forget to add gussets shown on the plan to help avoid wrinkles and warps when shrinking the tissue.
Covering
Remove any glue globs that will mar the finished surface. Sand everything smooth, rounding the fuselage longerons and shaping the wing leading and trailing edges. Brush on a coat of thinned clear dope to the surfaces to be covered.
Mix up a solution of white Elmer's glue and an equal amount of water. Brush this on the outside surface of the area to be covered by the first piece of tissue. Lay the tissue down over this area, and gently pat down and pull out any wrinkles. Cut off the excess tissue when dry. Go on to the next area to be covered and repeat this procedure. I used yellow Japanese tissue from Oldtimer Model Supply.
When everything is covered, mist on a little water to snug up the tissue. I use a squeeze-trigger adjustable sprayer purchased at a garden supply counter. Adjust for the finest spray possible. Spray a fine water mist into the air, wait a second to let the larger droplets fall, then hold the part to be shrunk so that it catches the mist as it falls. Don't let the tissue reach the point of looking soaked. You want it moistened just enough to sag a little.
Drying can be hastened with a blow dryer. When it's dry, brush on a coat of nonshrink dope thinned 50% with dope thinner. Sig Lite Coat is a good nonshrink butyrate dope, and Oldtimer Model Supply stocks a good nonshrink nitrate dope.
Decorating and finishing
The wing sunbursts were cut from red tissue and doped in place. Lay the sunburst in place, then bond it by brushing on some dope thinner to activate the dope underneath. After the final coat of dope, the red stars were applied to the wing center section using decals available from Sig.
The lettering on the cowl was accomplished by rubbing instant lettering onto self-stick clear Mylar film. The instant rub-on lettering can be found in art and graphic supply counters; the Mylar is available in office supply stores (where it's called laminating film). After it has been rubbed off onto the film, trim the lettering with scissors close to the edge as you would a decal. Remove the backing paper, and carefully press the lettering in place on the model. Once it's applied, the lettering isn't easy to remove without damage to the model, so be sure to position it exactly right the first time. As with decals, don't brush on dope over the lettering.
The fuselage and wheel pant stripes are pieces of self-stick red tape, which can be found at stores that sell rub-on instant lettering. You may want to use the self-stick tape sold by R/C model suppliers because it will withstand fuselage handling better.
Cut the windows from lightweight acetate. I used material purchased from the Micro-X company; it is thin, lightweight, and of excellent quality. Clean all fingermarks before gluing in place with RC/56 glue sparingly applied. Glue the windshield only on the back and bottom of the sides, not on the lower part where it overhangs the top of the cowl. Once the glue is dry, apply a thin strip of black self-stick tape on the windshield bottom.
Flying
When pitted against models in the same weight class, the Gambler is a potential winner in almost any Bostonian contest. To utilize this airplane's full potential, though, make sure the flying surfaces are straight, true, and properly glued on. Check the alignment of the wing leading edge; it must be exactly square with the fuselage sides under the wing. Measure to make sure that the wing tips are at an equal distance from the tips of the horizontal tail. Sight from the back to make certain the tail surfaces are true.
Each wing can benefit from 1/16 in. of washout. If you are flying indoors, however, leave the inboard wing flat and build washout only in the outboard one to help keep the turns flat. Balance the plane at the point shown on the plan. Establish the glide first, using the tail surfaces for adjustment. Use thrust only to adjust the powered portion of the flight.
With their ease of building and relatively relaxed requirements, the 14-gram Bostonians have earned their popularity. The Gambler makes a good first foray into the category. Once your model is built and properly flight-trimmed, I'll wager you won't be forever hooked on Bostonians!
Transcribed from original scans by AI. Minor OCR errors may remain.

