
Garami's Strato-Streak
A real winner in 1941, this lovely little ship has been flown all around the world—by the author. For 1/2A FF or RC, it's a guaranteed good Old-Timer wherever you are.
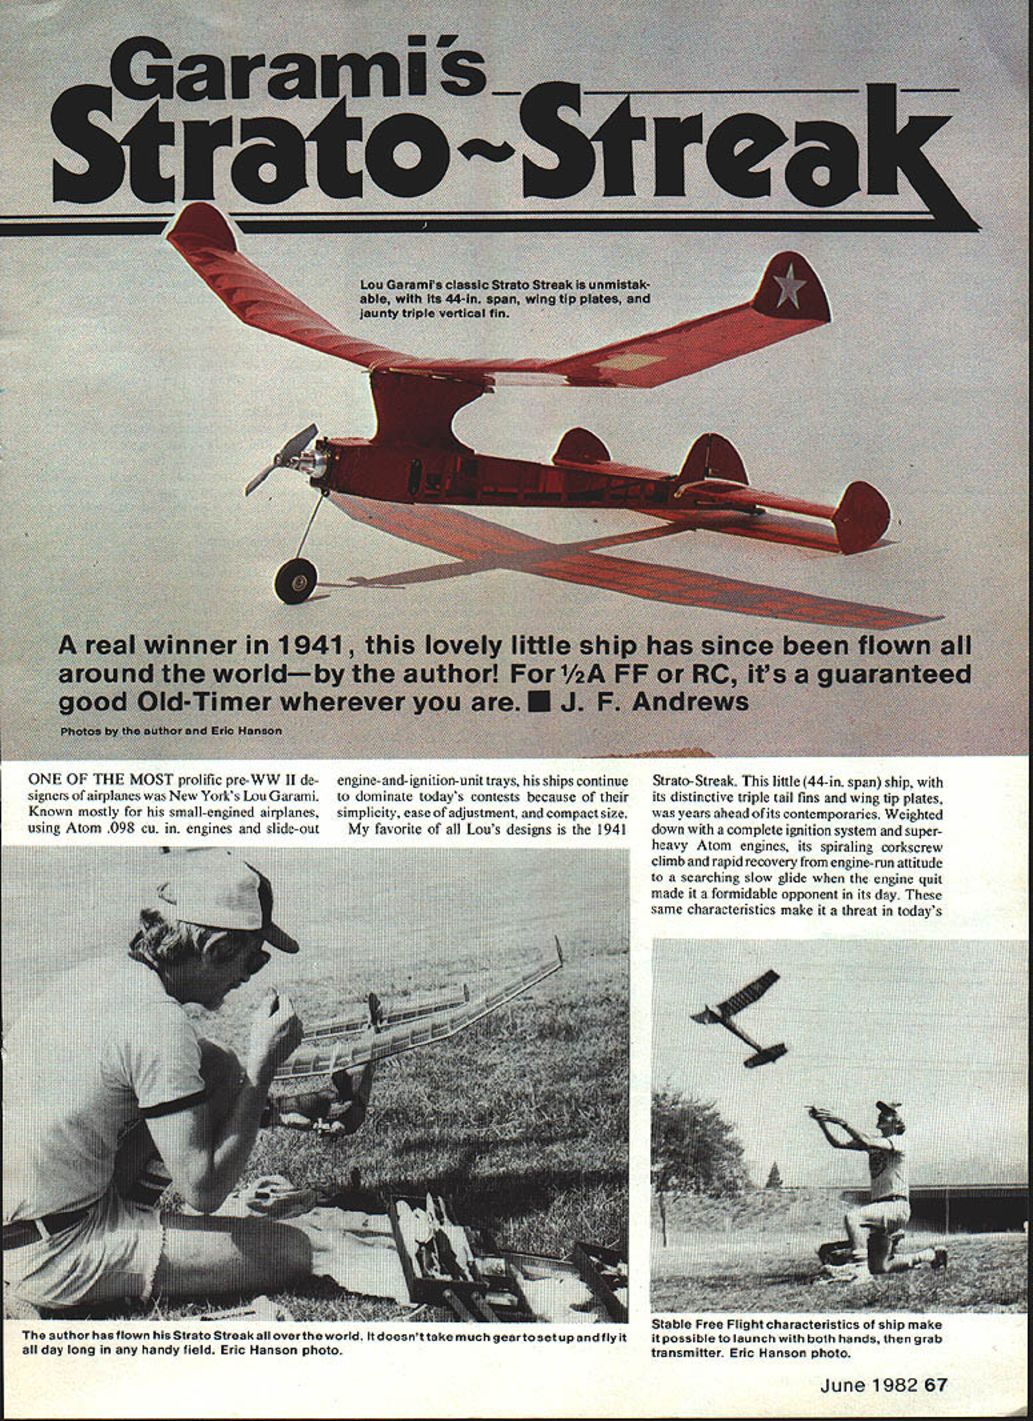
One of the most prolific pre‑WWII designers of airplanes was New York's Lou Garami. Known mostly for his small‑engined airplanes using Atom .098 cu. in. engines and slide‑out engine-and-ignition trays, his ships continue to be popular because of their simplicity, ease of adjustment, and compact size. My favorite of Lou's designs is the 1941 Strato‑Streak. This little 44 in. span ship, with its distinctive triple tail fins and wing tip plates, was years ahead of its contemporaries.
Weighted down with a complete ignition system and super‑heavy Atom engines, its spiraling corkscrew climb and rapid recovery from engine‑run attitude to a searching slow glide when the engine quit made it a formidable opponent in its day. These same characteristics make it a threat in today's contests.
The model shown here is modified with a two‑channel radio installation. If you wish to build a Free Flight ship, omit the hinges and control surfaces and the other modifications made to move the engine forward. An added bay in the fuselage sides helps balance a lightweight modern glow‑plug engine. If an ignition engine is planned, omit the extra nose section and the model will be exactly as originally designed. Wood sizes, spars, rib locations, and airfoils are shown on the original drawings.
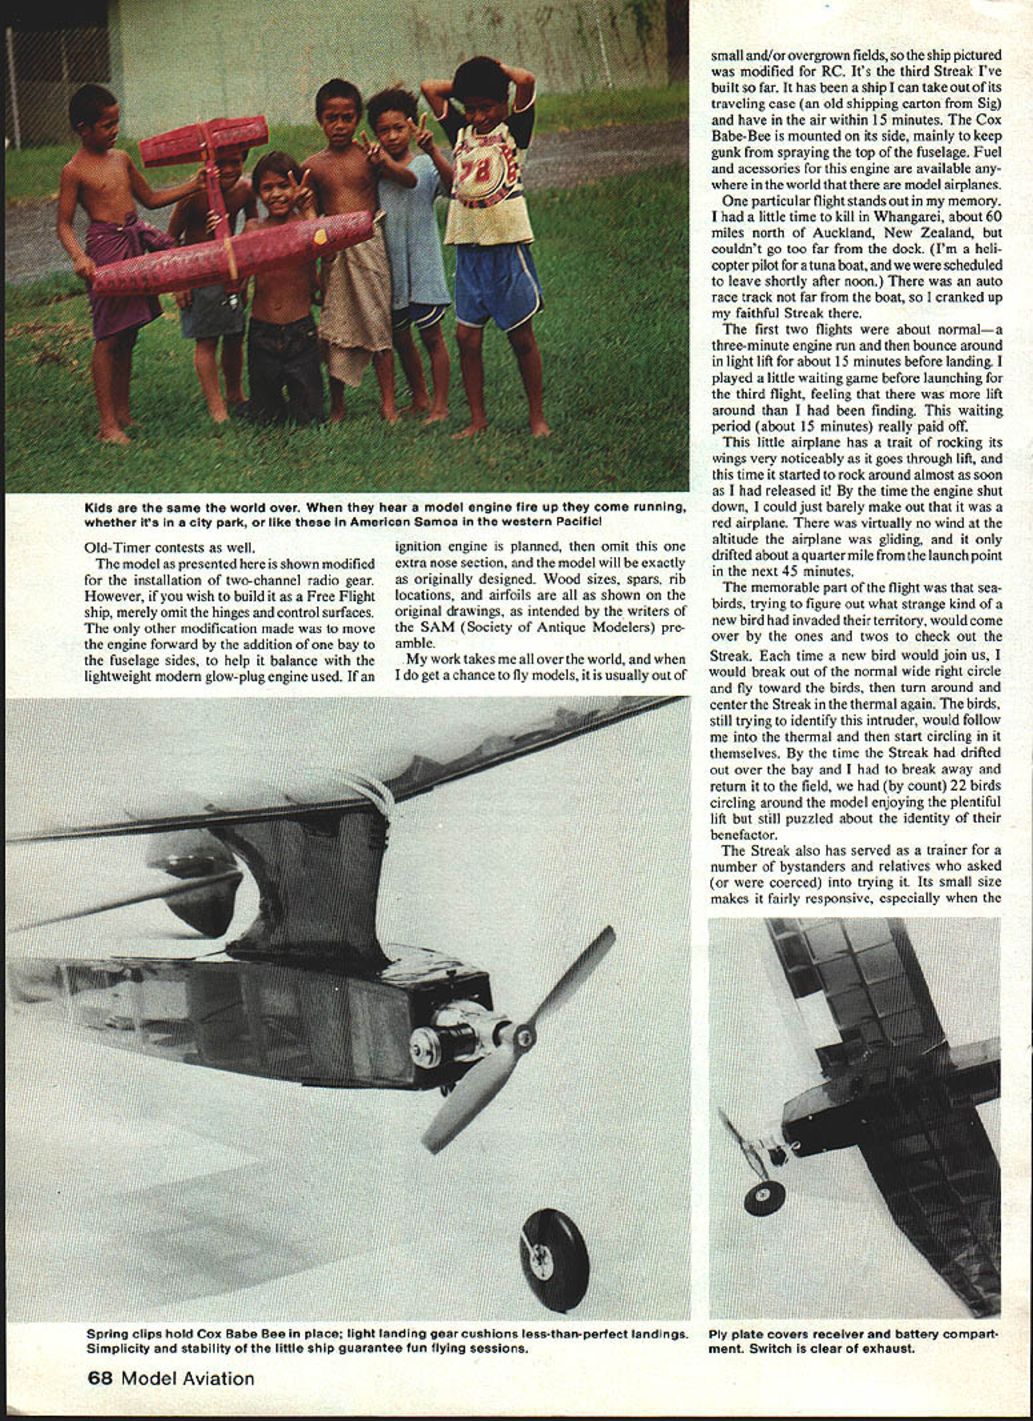
I’ve built three Streaks so far. The ship can be taken out of its traveling case—an old shipping carton—and be in the air within 15 minutes. A Cox Babe‑Bee mounted on its side mainly keeps gunk from spraying the top of the fuselage. Fuel and accessories for this engine are available anywhere there are model airplanes.
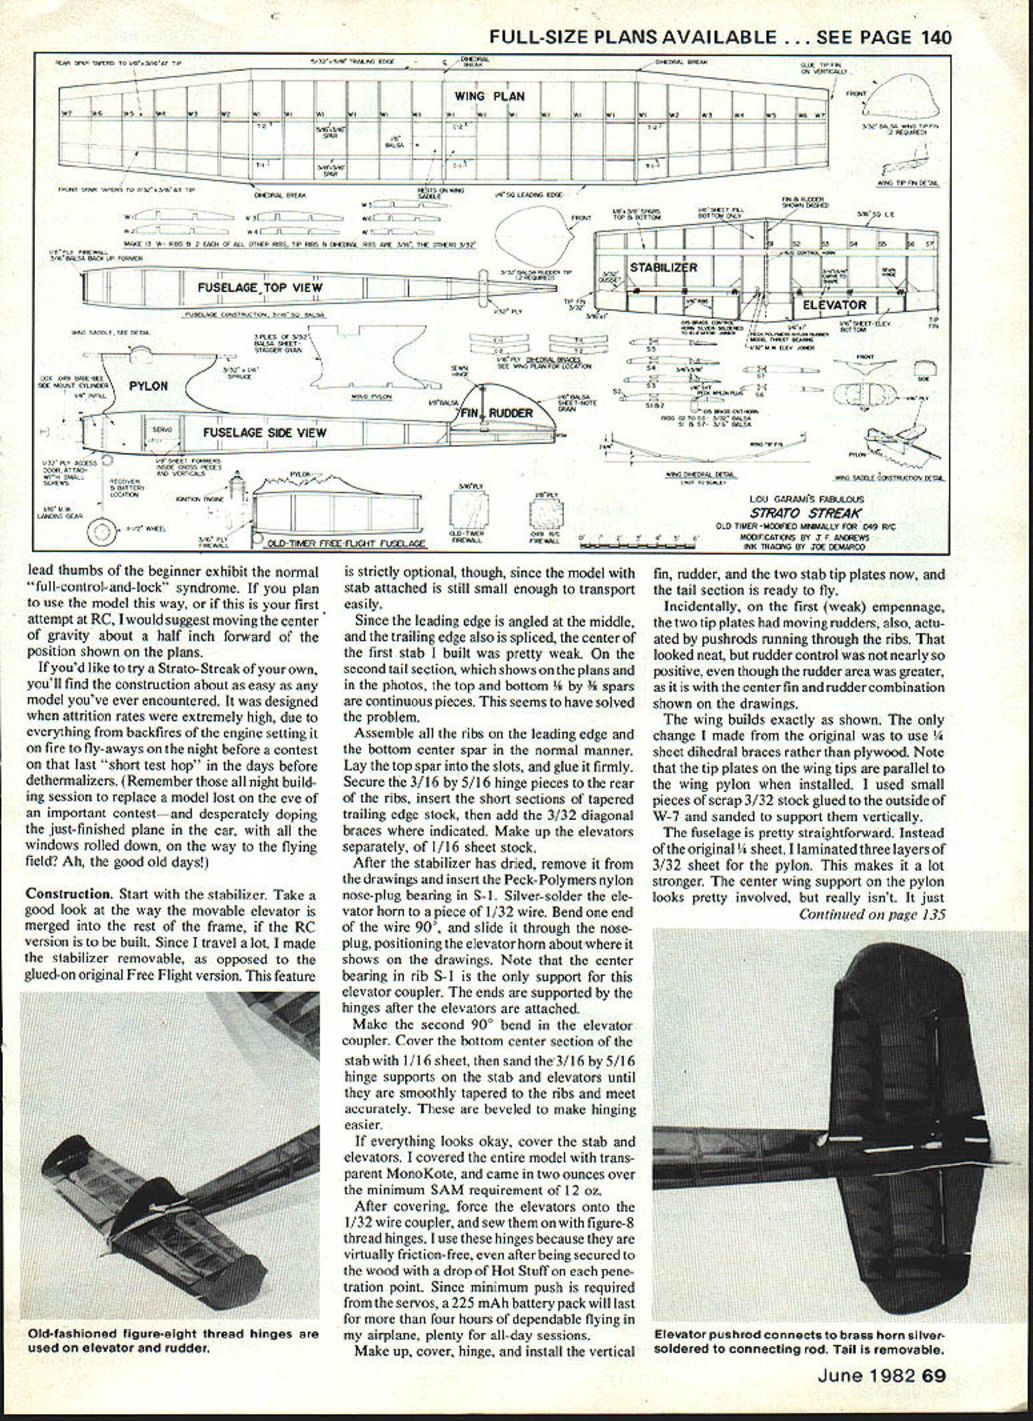
FULL‑SIZE PLANS AVAILABLE PAGE 140
Anecdote: Whangarei flight
One flight stands out in my memory. With a little time to kill in Whangarei, about 60 miles north of Auckland, New Zealand, and unable to go far from the dock, I launched my Streak from an auto race track near the boat. The first two flights were typical—a three‑minute engine run, then bouncing around in light lift for about 15 minutes before landing. I delayed the third launch about 15 minutes, feeling more lift coming up, and it paid off.
This little airplane rocks its wings noticeably when it finds lift. By the time the engine shut down on that flight I could barely make out the red airplane. With virtually no wind and good altitude the model glided and drifted about a quarter mile from the launch point over the next 45 minutes. Seabirds, curious about this new "bird," came over one or two at a time to check it out. Each time a bird joined, I would fly toward it, center the Streak in the thermal, and watch the birds begin circling as well. At one point I counted 22 birds circling around the model, enjoying the lift and still puzzled about its identity.
The Streak has also served as a trainer for bystanders and relatives. Its small size makes it responsive, especially with spring clips to hold the Cox Babe‑Bee in place. The light landing gear cushions less‑than‑perfect landings, and a ply plate covers the receiver and battery compartment. Simplicity and stability guarantee fun flying sessions.
Modifications and versions
- RC vs Free Flight:
- For RC, the plans here show an extra fuselage bay and a two‑channel radio installation.
- For Free Flight, omit hinges and control surfaces and build the original, shorter nose.
- If you plan to use an ignition engine, omit the extra nose section to match the original design.
- Balance suggestion:
- If this is your first RC model, move the center of gravity about 1/2 in. forward of the position shown on the plans.
- Materials and plans:
- Wood sizes, spars, rib locations, and airfoils are as shown on the original drawings.
Construction
If you'd like to try a Strato‑Streak, you'll find the construction about as easy as any model you've encountered. It was designed in an era when attrition rates were high, so robustness and simplicity were priorities.
Stabilizer and elevators
- Start with the stabilizer. If building the RC version, consider making the stabilizer removable for travel; the original Free Flight version had it glued on.
- On the first stab I built, the center was weak because the leading edge and trailing edge were spliced at the center. On the later tail section (as shown on the plans), the top and bottom 1/8 x 3/8 spars are continuous pieces, which solves that weakness.
- Assemble ribs on the leading edge and the bottom center spar. Lay the top spar into the slots and glue firmly.
- Secure 3/16 x 5/16 hinge pieces to the rear of the ribs, insert short sections of tapered trailing‑edge stock, and add 3/32 diagonal braces where indicated.
- Make elevators separately from 1/16" sheet stock.
Elevator coupler and bearings
- After the stabilizer has dried, remove it from the drawings and insert the Peck‑Polymers nylon nose‑plug bearing in rib S‑1.
- Silver‑solder the elevator horn to a piece of 1/32" wire. Bend one end 90° and slide it through the nose‑plug, positioning the elevator horn as shown on the drawings. The center bearing in rib S‑1 is the only support for this elevator coupler; the ends are supported by the hinges after the elevators are attached.
- Make the second 90° bend in the coupler. Cover the bottom center section of the stab with 1/16" sheet, then sand the 3/16 x 5/16 hinge supports on the stab and elevators until they are smoothly tapered to the ribs. These bevels make hinging easier.
Covering and hinges
- I covered the entire model with transparent MonoKote and came in two ounces over the minimum SAM requirement of 12 oz.
- After covering, force the elevators onto the 1/32" wire coupler and sew them on with figure‑8 thread hinges. These hinges are virtually friction‑free; secure each penetration with a drop of Hot Stuff adhesive.
- Because minimum servo push is required, a 225 mAh battery pack will last for more than four hours of dependable flying in my airplane.
Tail assembly
- Make up, cover, hinge, and install the center fin, rudder, and the two stab tip plates. On my first empennage the tip plates had moving rudders actuated by pushrods running through the ribs; the appearance was neat but control was not as positive as the center fin and rudder combination shown on the drawings.
Wing
- Build the wing as shown on the plans. The only change I made was to use 1/4" sheet dihedral braces rather than plywood.
- Note the tip plates on the wing tips are parallel to the wing pylon when installed. I used small pieces of scrap 3/32" stock glued to the outside of W‑7 and sanded to support them vertically.
Fuselage
- The fuselage is straightforward. Instead of the original 1/4" pylon sheet, I laminated three layers of 3/32" sheet for the pylon to strengthen it.
- The center wing support on the pylon looks involved but mostly needs carving to fit the pylon. Don't glue it in place until after the pylon is secured to the fuselage so any alignment errors can be corrected.
- For the 1/2A RC version lay up fuselage sides with the extension shown. For FF, build the shorter original nose. Tack‑glue the second and third bottom crosspieces when joining the sides, since these will likely need to be removed to install electronics.
Radio, servos, and equipment
- Install the battery and receiver in the forwardmost bay, right behind the engine, and pad with foam rubber.
- I used two Novak Micro Servos with a Futaba radio, installed inverted directly under the pylon center. These servos are reliable but require major surgery to access, so install carefully.
- Pushrods: I used the New Zealand equivalent of Nyrods to protect servos from impact with solid pushrods. The antenna runs through a spare piece of Nyrod housing and extends out of the tail like a lightweight dethermalizer fuse.
- Make sure everything functions without binding before covering.
Engine mounting and landing gear
- The bottom front of the fuselage is covered with a removable plate of 1/32" plywood, held to 3/16" square doublers by small wood screws.
- Landing gear is bent from 1/16" wire with a shock‑absorbing loop. Spring clips hold the Cox Babe‑Bee in place; the engine is mounted on its side to keep gunk off the pylon and to protect the switch, which is mounted on the left side of the fuselage for visibility when holding the model ready for launch.
- The Cox Babe‑Bee is secured with wire clips for quick removal; wood screws will also work.
- I bent the firewall and used heavy thread and Hot Stuff for attachments. The gear is lighter gauge than the original but still allows R.O.G. (rise off ground), and the springiness helps in rough landings.
Flying
- Preflight:
- Check for warps. The Streak is built with no washout or intentional misalignments.
- Trim everything neutral on the transmitter and on the airplane for the first launches.
- Launch and climb:
- Under power the model climbs higher in wide left‑hand turns on my airplane; pylon models often are unstable turning left but this ship is happiest climbing left. Let it climb in wide left circles and enjoy it.
- For early flights, the 6 x 3 Cox Tee‑Dee prop was mounted backwards as a trimming trick to reduce thrust and speed. After initial trimming, reverse the prop for normal thrust.
- Maximum altitude is achieved by keeping control inputs to a minimum and climbing more or less into the wind at a good speed. If the nose gets too high and airspeed falls, feed in down trim until it under‑elevates and noses over; then trim a small amount of up to recover and continue the climb.
- Thermal hunting:
- The Streak glides slowly and smoothly; wing rocking or bounces often indicate lift. If wings rock noticeably, you’re probably in a thermal—tighten the glide circle and enjoy the ride.
- If the plane hits a downdraft, trim the nose down and fly out of that area. Downdrafts often indicate lift nearby, so slow down and feel around the area.
- Handling:
- The model is forgiving and wants to fly; after a few flights you can preset trims on the transmitter and launch hands‑off. I sometimes throw the airplane with the transmitter antenna retracted, then extend the antenna and pick up the transmitter—this is possible because the airplane is so stable.
- Keep small rudder trim adjustments to stay upwind and watch for wing wobbles that indicate lift.
Final notes
- The Streak is equally at home as a Free Flight Old‑Timer or a small RC ship. Its simplicity, stability, and compact size make it ideal for travel and for fun flying sessions.
- If this is your first RC model, move the center of gravity about 1/2 in. forward of the plans' position for extra stability.
- I sincerely hope you enjoy your Strato‑Streak as much as I have mine.
Transcribed from original scans by AI. Minor OCR errors may remain.

