


Gold Rush
Martyn Cowley
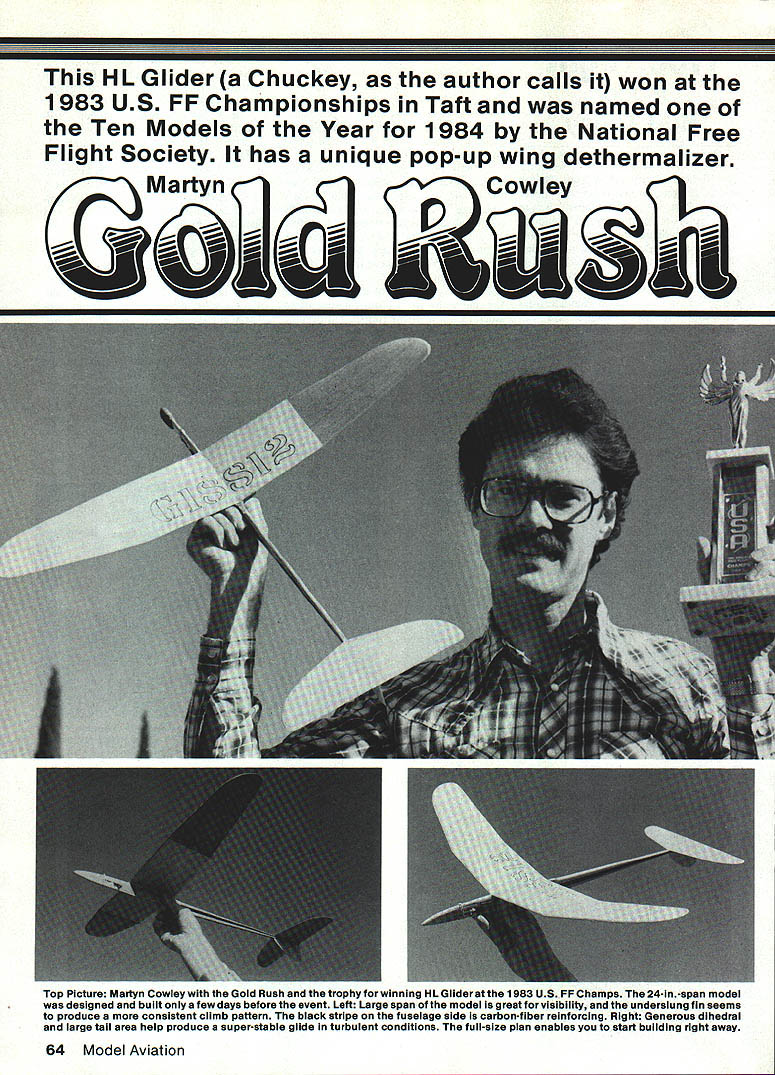
This HL (hand-launched) glider — a chuck glider commonly known as a Chucky — won at the 1983 U.S. FF Championships in Taft and was named one of the Ten Models of the Year for 1984 by the National Free Flight Society. It features a unique pop-up wing dethermalizer.
Background and influences
Firstly, let's set things straight — just another hand-launched glider story. I'm British and have been chucking for some 20 years since I was a wee lad. Early influences include Lee Hines' Sweepette 2.0, Tony Slater's 18‑in Slami, and the long-fuselage, underslung-fin types from the Aeromodeller Plans Service. With a long fuselage and underslung fin, I think I've taken chuck gliders to every model event I've ever attended. I also flew CL combat, so there was always something to fly or run around after between competition flights.
Typically in England it's always blowing half a gale; I usually enter a chuck glider when it's too windy to fly anything else. From this background I prefer large models. I have flown some 24 × 5‑in wings for stability in turbulence, primarily for visibility and for being able to carry the model downwind after landing. On a long flight on a windy day I don't believe you lose too much altitude using a larger model, especially since they have superior glide. Large gliders tend to glide you out of trouble; make a mistake and an 18‑in model typically puts you on the ground quicker — you miss the core of a thermal.
I've always preferred weighty models in rough weather. Personally, I think heavier models throw better. There's nothing worse than almost ripping off your arm overthrowing a very lightweight model. In England I always used drop-off weights to dethermalize (DT) — no problem. California thermals play differently; I lost several models trying tip-up tails and hinge methods, which could never give really consistent flights. Pop-up tails never seat exactly the same twice and can require potentially dangerous trim setups.
A right launch wash-in on the inboard right-hand panel with the model gliding left may sound like a spiral-dive waiting to happen — but it's great trimming. The model can part climb like a power model rolling left then turning right; in glide it behaves like a rubber model trimmed to fly right/left using side thrust against warp. Any stalls from poor trim or turbulence tend to wing‑over; in wind transition a smooth glide still gives a chance of a good flight.
My best Chuckies use warp tail tilt to give a left glide; I have always needed just a touch of right rudder to hold the glide open. If the opposite rudder comes stronger the model tightens up; strong lift prevents spinning-in. Others see things differently.
Pop-up wing dethermalizer
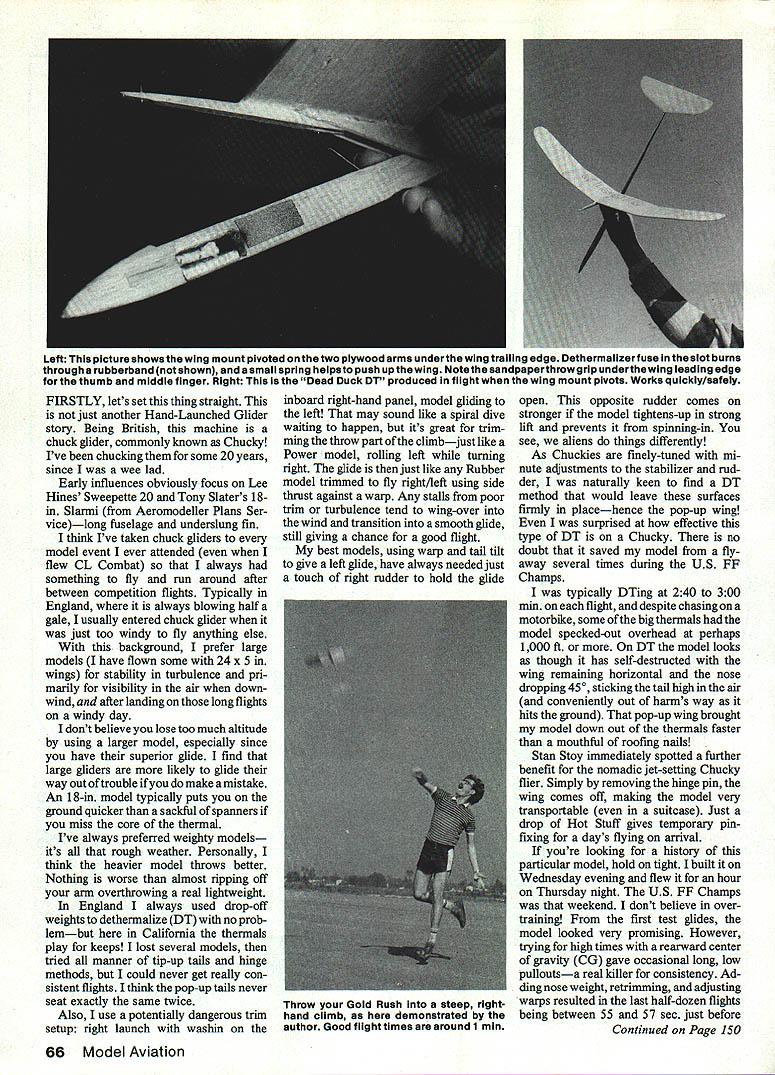
Because Chuckies are finely tuned with minute adjustments to stabilizer and rudder, I was keen to find a DT method that would leave surfaces firmly in place — hence the pop-up wing. I was surprised how effective this type of DT is.
The Chucky no doubt saved my model from flyaways several times during the U.S. FF Champs, typically DT'ing 240–300 sec (4–5 min) flights despite being chased by a motorbike. Some big thermals had the model specked overhead perhaps 1,000 ft. The DT model looks as though it has self‑destructed — wing remaining horizontal, nose dropping, tail sticking up — the air conveniently out of harm's way, and it hits the ground. The pop-up wing brought the model down out of thermals faster than a mouthful of roofing nails.
Stan Stoy immediately spotted a further benefit for the nomadic, jet‑setting Chucky flier: simply removing the hinge pin lets the wing come off, making the model very transportable — suitcase size. For a temporary pin you can drop in a bit of Hot Stuff.
Contest story
If you're looking for a detailed history of this particular model, hold on tight. I built it on Wednesday evening and flew it for an hour on Thursday night — the U.S. FF Champs was that weekend. I don't believe in over-training!
From the first test glides the model looked very promising. Trying for high times with a rearward center of gravity (CG) gave occasional long, low pullouts — a real killer for consistency. Adding nose weight, retrimming, and adjusting warps resulted in the last half‑dozen test flights being between 55 and 57 sec just before dark. The model was a bit over‑elevated for an ideal throw at that CG, but I wanted a conservative trim.
At Taft on Sunday I did two low‑power launches to check nothing had changed, entered the contest and posted 2:00, 1:20, 2:00, 1:30, 2:00 — then flew off with seven straight maxes to equal Bill Blanchard's 1974 magic 10 (the goal of all Chucky fliers). I must confess I drew inspiration from having witnessed Mike McKeever's and Jim Lueken's previous attempts at the record.
I think I must have been more tired than I realized, because my 11th flight was a real gamble. Even before I launched I had doubts about the air. I relaxed too soon and blew it with a 1:20 flight. Next time after I get to ten I'm going to take a couple of minutes' time‑out to get serious!
One final comment: standing out in the dirt ready for my eighth or ninth flight, I suddenly noticed the stabilizer was still held to the fuselage only with 1/4‑in double‑stick transfer adhesive — a technique I use with new models for first flights in case the incidence needs adjusting before permanent gluing. I chose to leave things as they were for the rest of my flights. In fact, I still haven't glued it on!
I made no other test flights between contest flights and had not adjusted the model at all since I set it up that Thursday night. To me, that confirms this pop‑up wing DT system is reliable.
Construction
Chuckies are quick and easy to build, so I won't bore you with too many details. Gold Rush will only take about two to three hours to complete. If it takes more than that, you're working too hard. The main thing is to get it light and fly it.
- Choose the lightest wood you can find for the wings and tail. This is a big model; heavy balsa will prevent you from picking it up.
- Razor planes are the best tool ever invented for shaping Chucky wings. I recommend the David brand because of its superior shallow blade angle.
- Shape the wing while it is one full‑span piece. Start by carving some washout into the undersurface of the trailing edge of the tips, then thin the wood toward the tips before shaping the airfoil. Finally, cut the wing into panels and epoxy the dihedral joints.
- Use hard balsa with a long, straight grain for the fuselage. You can make two fuselages from one piece of 1/4 × 1 × 36 in stock.
- Cut the wing mount free from the fuselage and epoxy it to the wing. Add the two 1/16‑in ply pivot arms and drill through the fuselage for the pivot wire and bearing tube.
The mount is held down at the front during launch (and flight) by a small elastic band which gets burned through by a DT fuse. To help the wing start to kick up, a small 1/32‑in diameter wire spring fits into a slot in the wing mount to push it up.
Don't forget to reinforce the wing trailing edge with a 1/4‑in balsa throw tab for the index finger. Your thumb and middle finger grip the fuselage under the wing leading edge.
Final advice
- Don't wait until a few days before your next contest to start your model. Start building a Gold Rush right now.
- Use the pop‑up wing DT to keep control surfaces undisturbed and for easy transportability.
- If you correspond with advertisers, mention that you read about them in Model Aviation.
Transcribed from original scans by AI. Minor OCR errors may remain.

