
Gollygeewhiz
Dan Rutherford
For Half-A powered Combat which is coming on strong in some areas, a simple, sturdy scorcher.
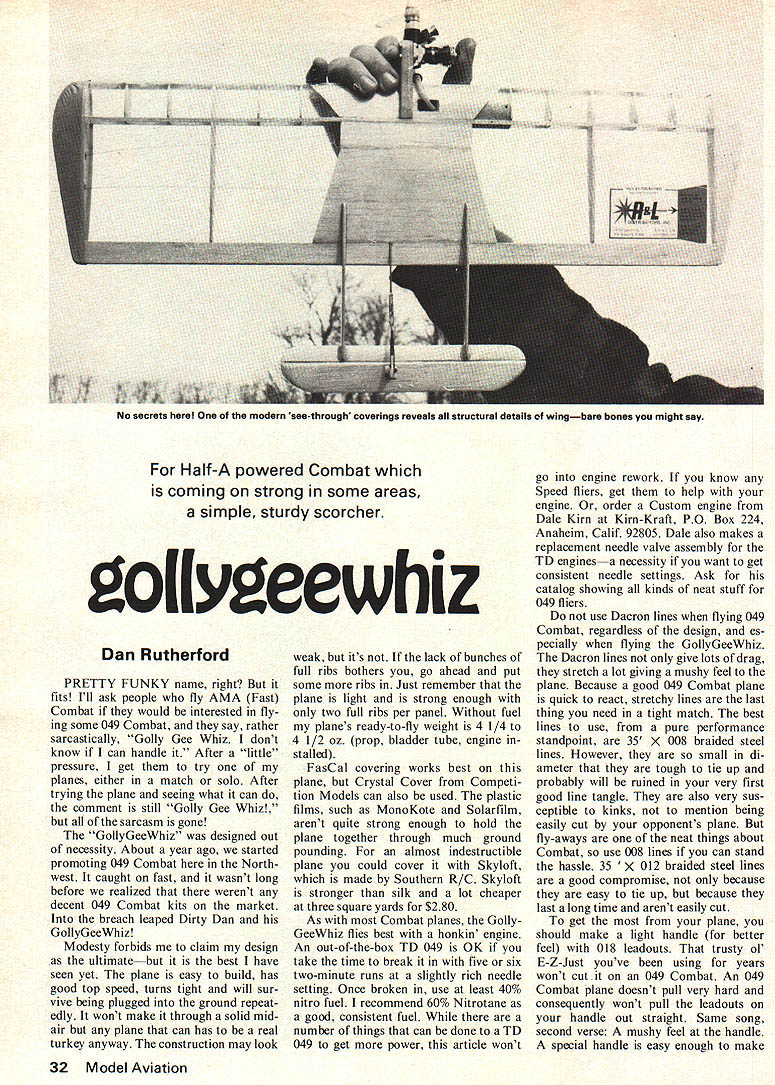
PRETTY FUNKY name, right? But it fits! I'll ask people who fly AMA (Fast) Combat if they would be interested in flying some 049 Combat, and they say, rather sarcastically, "Golly Gee Whiz, I don't know if I can handle it." After a "little" pressure, I get them to try one of my planes, either in a match or solo. After trying the plane and seeing what it can do, the comment is still "Golly Gee Whiz!" but all of the sarcasm is gone!
The "GollyGeeWhiz" was designed out of necessity. About a year ago, we started promoting 049 Combat here in the Northwest. It didn't take long before we realized that there weren't any decent 049 Combat kits on the market. Into the breach leaped Dirty Dan and his GollyGeeWhiz!
Modesty forbids me to claim my design as the ultimate — but it is the best I have seen yet. The plane is easy to build, has good top speed, turns tight and will survive being plugged into the ground repeatedly. It won't make it through a solid mid-air touch, but any plane that can has to be a real turkey anyway. The construction may look weak, but it's not. If the lack of bunches of full ribs bothers you, go ahead and put some more ribs in. Just remember that the plane is light and is strong enough with only two full ribs per panel. Without fuel my plane's ready-to-fly weight is 4 1/4 to 4 1/2 oz. (prop, bladder tube, engine installed).
FasCal covering works best on this plane, but Crystal Cover from Competition Models can also be used. The plastic films, such as MonoKote and Solarfilm, aren't quite strong enough to hold the plane together through much ground pounding. For an almost indestructible plane you could cover it with Skyloft, which is made by Southern R/C. Skyloft is stronger than silk and a lot cheaper at three square yards for $2.80.
As with most Combat planes, the GollyGeeWhiz flies best with a honkin' engine. An out-of-the-box TD 049 is OK if you take the time to break it in with five or six two-minute runs at a slightly rich needle setting. Once broken in, use at least 40% nitro fuel. I recommend 60% Nitrotane as a good, consistent fuel. While there are a number of things that can be done to a TD 049 to get more power, the article won't go into engine rework. If you know any Speed fliers, get them to help with your engine. Or, order a Custom engine from Dale Kirn at Kirn-Kraft, P.O. Box 224, Anaheim, Calif. 92805. Dale also makes a replacement needle valve assembly for the TD engines — a necessity if you want to get consistent needle settings. Ask for his catalog showing all kinds of neat stuff for 049 fliers.
Do not use Dacron lines when flying 049 Combat, regardless of the design, and especially when flying the GollyGeeWhiz. The Dacron lines not only give lots of drag, they stretch a lot giving a mushy feel to the plane. Because a good 049 Combat plane is quick to react, stretchy lines are the last thing you need in a tight match. The best lines to use, from a pure performance standpoint, are .035 x .008 braided steel lines. However, they are so small in diameter that they are tough to tie up and probably will be ruined the very first good line tangle. They are also very susceptible to kinks, not to mention being easily cut by your opponent's plane. But fly-aways are one of the neat things about Combat, so use .008 lines if you can stand the hassle. .035 x .012 braided steel lines are a good compromise, not only because they are easy to tie up and aren't easily cut, but because they last a long time and aren't easily cut.
To get the most from your plane, you should make a light handle (for better feel) with 08 leadouts. That trusty ol' E-Z-Just you've been using for years won't cut it on an 049 Combat. An 049 Combat plane doesn't pull very hard and consequently won't pull the leadouts out of your handle out straight. Same song, second verse: A mushy feel at the handle. A special handle is easy enough to make out of 1/4" ply. Just be sure to include some form of adjustment. For leadouts on the handle I use old AMA Combat lines. I have enough old lines to make 3,887 handles, and you probably do too if you have been flying Combat for any length of time.
Enough of this rambling, let's build. Best place to start is with the motor mount assembly. You can cut out the other parts while the mount assembly is drying. The mounts can be made with 3/8" sq. maple. If you have a jig-saw, cut 3/8 x 1/2" maple stock down the center to give mounts that are 3/8" wide and almost 1/4" deep. Cut the balsa spacer to size and glue to the mounts with epoxy. As long as you mixed too much epoxy anyway, go ahead and smear it all over one side of the mount assembly. Lay this whole sticky mess on a piece of 1/32" ply. The excess ply can be cut off after the epoxy is dry.
Now start cutting wood. Cut all parts as accurately as possible. Things should fit when you start building. All joints must fit snugly. A well-built GollyGeeWhiz is tough to break, but one that is sloppily-built is just another clunk plane looking for a spot upon which to disintegrate.
The mount assembly should be dry by now so trim off the excess ply and cut the hole for the LE. With 5-minute epoxy, glue the LE and the two center ribs to the mount assembly. Make sure you get everything straight. If you get this all lined up just right, the rest of the plane will just fall into place. If you get it crooked ... well, just don't get it crooked.
There is no need to build this plane on your plans. Just draw a straight line on your building board to line up the TE. Another line at a right angle to the first will help you get one tip rib square to the TE. With the TE and LE marked for rib locations, one tip rib square to the TE and a straight motor mount assembly, everything has to come out lined up properly, and you won't get your plans screwed up.
We are finally ready to get this plane framed up. Initial framing is done with the plane upside down, so the bottom sheeting can be installed immediately after all ribs are installed complete. Pin the TE to the building board, being sure it is aligned with that straight line already drawn. Glue the bottom spar (actually this will be the top spar when the plane is right side up) into the mount assembly and then glue the two center ribs to the TE. The spar can be blocked up with scrap 1/4" sq., which is much better than letting everything hang there in mid-air while you try to work on it.
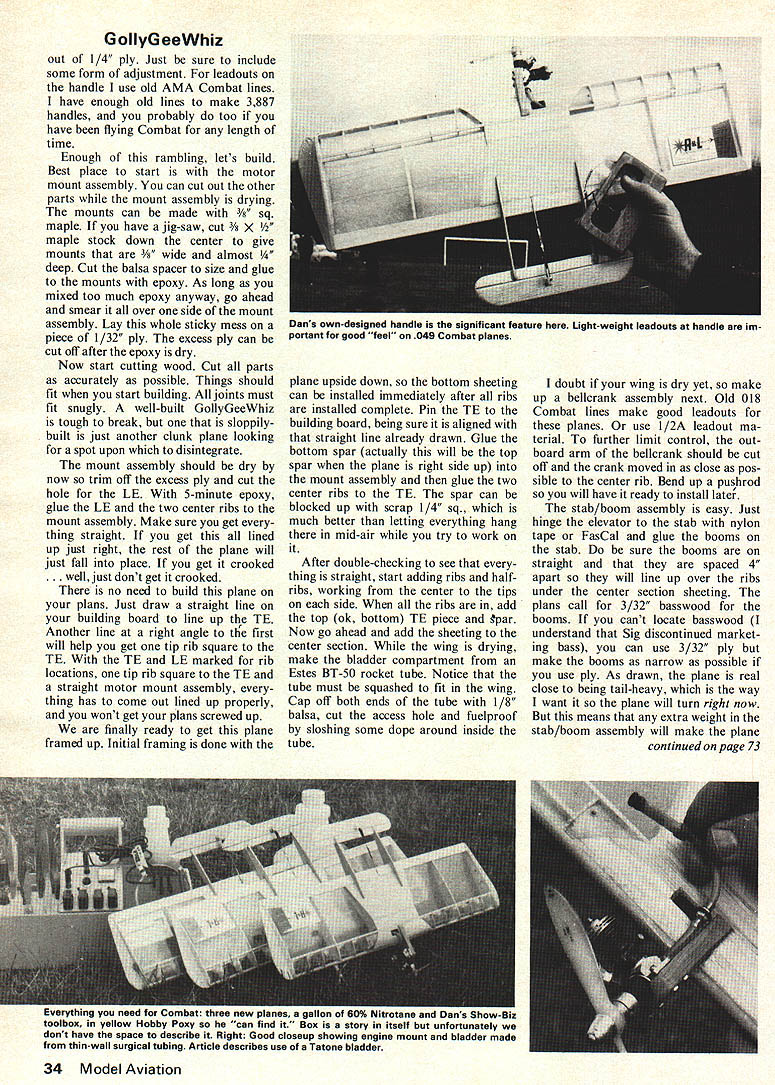
After double-checking to see that everything is straight, start adding ribs and half-ribs, working from the center to the tips on each side. When all the ribs are in, add the top (ok, bottom) TE piece and spar. Now go ahead and add the sheeting to the center section. While the wing is drying, make the bladder compartment from an Estes BT-50 rocket tube. Notice that the tube must be squashed to fit in the wing. Cap off both ends of the tube with 1/8" balsa, cut the access hole and fuelproof by sloshing some dope around inside the tube.
I doubt if your wing is dry yet, so make up a bellcrank assembly next. Old 018 Combat lines make good leadouts for these planes. Or use 1/2A leadout material. To further limit control, the outboard arm of the bellcrank should be cut off and the crank moved in as close as possible to the center rib. Bend up a pushrod so you will have it ready to install later.
The stab/boom assembly is easy. Just hinge the elevator to the stab with nylon tape or FasCal and glue the booms on the stab. Do be sure the booms are straight and that they are spaced 4" apart so they will line up over the ribs under the center section sheeting. The plans call for 3/32" basswood for the booms. If you can't locate basswood (I understand that Sig discontinued marketing bass), you can use 3/32" ply but make the booms as narrow as possible if you use ply. As drawn, the plane is real close to being tail-heavy, which is the way I want it so the plane will turn right now. But this means that any extra weight in the stab/boom assembly will make the plane
GollyGeeWhiz/Rutherford
tail-heavy and almost impossible to fly level. If you worry about this, just move the motor ahead 1/4" and try the plane once. You can always move the engine back if the plane isn't responsive enough for you.
Pull the wing off the board, turn it over (it should now be right side up) and pin it down on the building board. Mark the inboard tip rib for leadout position and lay the bellcrank assembly in position. Using your best eye and a piece of sharpened 1/4" brass tubing, punch holes in the ribs for the leadouts. Glue in the complete bellcrank assembly. Thread the leadouts through the ribs and notch the TE for the pushrod. Cut off the front of the rib that is in the way of the bladder tube and install the bladder tube. Check to be sure that the bellcrank is working without binds. Add the top sheeting. If you want, you can glue on the tips and leave the inboard tips now, but I usually wait until the LE is carved to shape.
When everything is dry, plane the LE to shape and sand the entire structure. If you haven't already done so, glue on the tips (don't forget the tip weight). You now are ready to cover the plane. I cover my planes from tip rib to tip rib with FasCal and then cover the tips with MonoKote. The MonoKote does a lot better job on the compound curves and adds some color to the plane, making it easier to see in a match.
If you cover with FasCal, you can glue the booms directly onto the covering. If you are using any other covering material, don't take the chance. Remove the covering at the joint and glue directly to the center section sheeting. I glue the booms to the FasCal because, occasionally, I can recycle a set of booms when the plane gets wiped out. The booms are a lot easier to get off if they aren't glued to wood.
Add a control horn and the Kwik-Link, install a motor, and you should be ready to go flying. I didn't mention that you will have to make up a bladder fuel tank (use a small Tatorne bladder, cut down to about 1 1/2"), but that is kind of obvious isn't it?
There are a couple of things to do before going out to fly your new GollyGeeWhiz. Optional, yes, but they not only add immensely to your total enjoyment of Combat flying, they insure that you will arrive at the field looking like a Combat jock, not a turkey. First, you have probably noticed Combat fliers' "flippin' fingers" are always cut and in various stages of healing. The quickest way to get your "Combat hands" is to stick your fingers in a running prop. Felt good, didn't it? If it hurts too much, bite on an old glow plug. Do not bandage your fingers. This way everybody will be able to see how active a Combat flier you are. As long as you have some fresh cuts at hand (so to speak) practice pouring raw fuel on your cuts without wincing.
Second, you are going to have to get yourself accustomed to the minor aggravations that go along with using pen bladders. Try to blow one up with fuel, using your regular fuel bulb. Can't do it? Squeeze harder! Use both hands! Yuk, blew the end right out of your fuel bulb didn't you? Go get a 2-oz. dose syringe at your local veterinarian, or your hobby shop may have one.
CML, the people that make Guillotine Combat kits and Captain's Bladders, market a 2-oz. syringe that works and only costs $1.39. Now, using the syringe, fill the bladder with fuel. Aiming carefully to avoid wasting fuel, or shooting yourself in the face or chest with fuel from the full bladder. Sooner or later you'll get hit with fuel from a bladder so you might as well do it once on purpose so you will know what to look forward to next time. Wipe yourself off with your shirt to give it that nice touch of nitro stain. Now that you are cut and bleeding, covered with fuel and biting on a plug, go fly!
Assuming that your plane is straight (no warps), it shouldn't give you any trouble on the first flight. Be sure that you don't have too much control for that first time up. Most of my planes have less than 1/2" total travel on the elevator, measured at the TE. Getting a good setting on the engine will probably be your only problem on the first few flights, especially if you didn't get a Kirn-Kraft needle valve as I suggested.
With the engine running, lean it out slowly until it peaks out. Then richen it up slowly until it just slightly cracks rich. As soon as the plane is launched the engine should lean out and be right on. If not, lean it out or richen it up for the next flight. Each engine requires a slightly different setting, so experiment until you can get it right every time. No matter what setting the engine requires before launching, don't worry about it. Just concentrate on getting the engine to run WFO in level flight and maneuvers.
Don't be afraid to try different props if the engine bogs down in the turns. I generally use a Top Flite 5 1/4 X 3 nylon prop, but your engine might pull a 5 1/4 X 4. Or you could try a Grish (Tornado) 8 1/2 X 3. If you can afford to use wood props, the Top Flite 5 1/4 X 3 Power Prop is great on a honkin' engine, but you might go through a whole box of them in one day if you fly as much as we do here in the Northwest. For streamers use regular crepe paper material as used for Fast Combat streamers but make them 1/2" wide and use carpet thread for the leader. Most string is a little too tough for an 049 engine to cut.
I hope that you will give 049 Combat a try, whether you are a "pro" Combat flyer or a Sport flier looking for an inexpensive way to break into Combat. We here in the N.W. fly lots of Combat, and 049 Combat has really caught on fast. And if we like it, then it must be good. Try a GollyGeeWhiz. You'll see what I am talking about.
One last thing. Anybody with any interest at all in Combat should belong to the Miniature Aircraft Combat Association. In the past year, MACA has become a super organization. Tom Southern and Bill Allen do a newsletter for MACA that is always very good. Within MACA a Combat Advisory Committee has been formed to advise the Control Line Contest Board on proposed rules that affect Combat. Formation of the CAC and priming of the newsletter are just two of the more visible things accomplished by MACA, mainly through the efforts of Tom and Bill.
If you would like to be part of MACA, send check or money order for $5.00 to: Tom Southern, 2207 Paul, Longview, Texas 75601. Or clip the coupon from the magazine.
Transcribed from original scans by AI. Minor OCR errors may remain.

