
GOT THE BUILT-UP RIB BLUES
Harry Schoaf
If this looks scary, it sure beats making them one at a time. And the weight is only 25% that of solid ribs. Bet you won’t want to cover the wing!
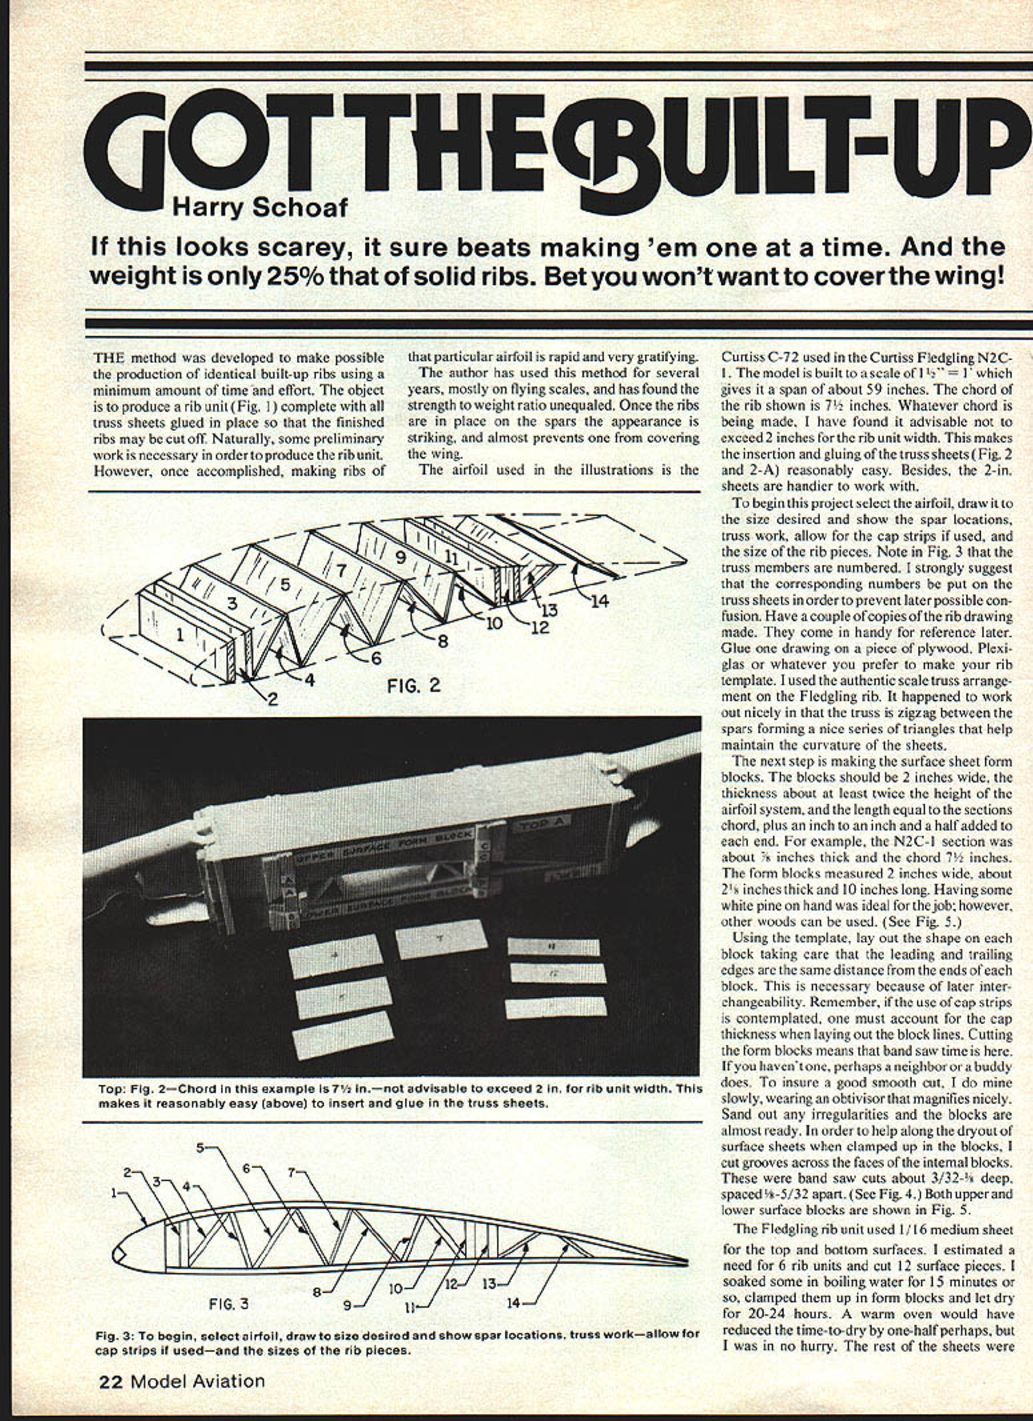
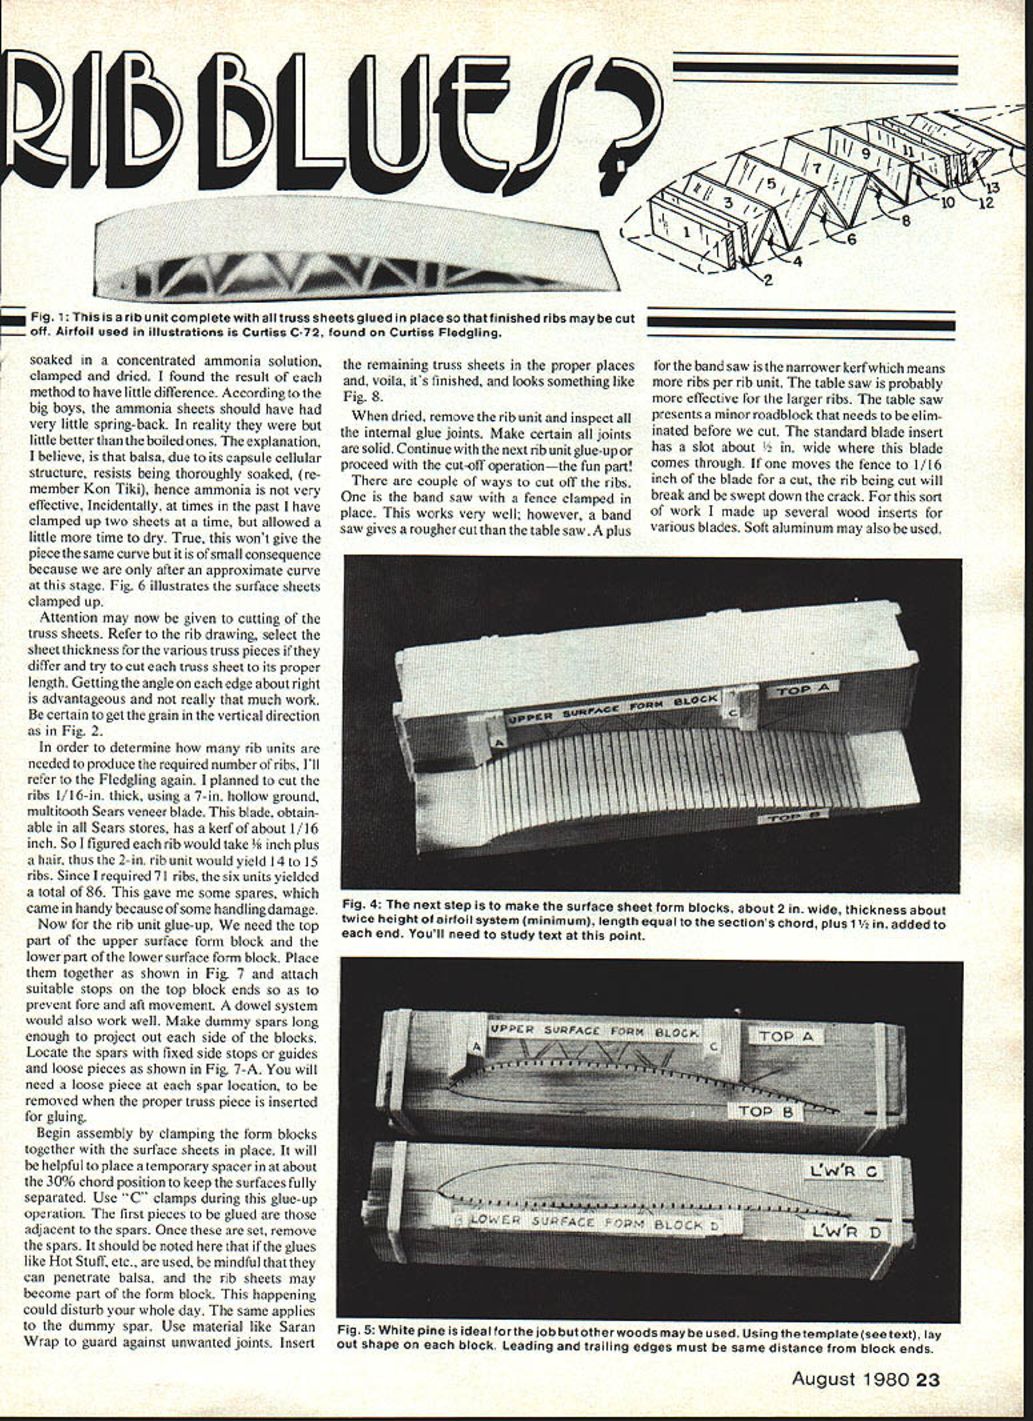
The method was developed to make possible the production of identical built-up ribs using a minimum amount of time and effort. The object is to produce a rib unit (Fig. 1) complete with all truss sheets glued in place so that the finished ribs may be cut off. Naturally, some preliminary work is necessary in order to produce the rib unit. However, once accomplished, making ribs of that particular airfoil is rapid and very gratifying. The author has used this method for several years, mostly on flying scales, and has found the strength-to-weight ratio unequaled. Once the ribs are in place on the spars the appearance is striking, and almost prevents one from covering the wing.
The airfoil used in the illustrations is the Curtiss C-72 used in the Curtiss Fledgling N2C-1. The model is built to a scale of 1" = 1', which gives it a span of about 59 inches. The chord of the rib shown is 7½ inches. Whatever chord is being made, I have found it advisable not to exceed 2 inches for the rib unit width. This makes the insertion and gluing of the truss sheets (Fig. 2 and 2‑A) reasonably easy. Besides, the 2‑in. sheets are handier to work with.
Planning and templates
- Select the airfoil, draw it to the size desired, and show the spar locations, truss work, allowance for cap strips if used, and the size of the rib pieces.
- Note in Fig. 3 that the truss members are numbered. Put the corresponding numbers on the truss sheets to prevent later confusion.
- Have a couple of copies of the rib drawing made for reference.
- Glue one drawing on a piece of plywood, Plexiglas, or whatever you prefer to make your rib template.
I used the authentic scale truss arrangement on the Fledgling rib. It worked out nicely in that the truss is zigzag between the spars forming a series of triangles that help maintain the curvature of the sheets.
Making the form blocks
The next step is making the surface sheet form blocks.
- Blocks should be 2 inches wide.
- Thickness should be at least twice the height of the airfoil section.
- Length should equal the section chord, plus an inch to an inch and a half added to each end.
For example, the N2C-1 section was about 7½ inches thick and the chord 7½ inches. The form blocks measured 2 inches wide, about 2½ inches thick, and 10 inches long. White pine was ideal for the job, but other woods can be used.
Using the template, lay out the shape on each block, taking care that the leading and trailing edges are the same distance from the ends of each block. This is necessary for interchangeability. If cap strips are to be used, account for their thickness when laying out the block lines.
Cutting the form blocks requires a band saw. Cut slowly and use an optivisor to see the line clearly. Sand out any irregularities. To help the surface sheets dry when clamped in the blocks, cut grooves across the faces of the internal blocks: band saw cuts about 3/32" deep, spaced 5/32" apart. Both upper and lower surface blocks are shown in Fig. 5.
Surface sheets: soaking and forming
The Fledgling rib unit used 1/16" medium sheet for the top and bottom surfaces. I estimated a need for six rib units and cut 12 surface pieces.
- Soak some sheets in boiling water for about 15 minutes, clamp them up in the form blocks, and let dry for 20–24 hours. A warm oven would reduce dry time.
- Soak other sheets in a concentrated ammonia solution, clamp and dry. Results of the two methods were similar; ammonia-soaked sheets have a little less spring-back.
Balsa’s capillary cellular structure resists thorough soaking, so ammonia can be especially effective. In the past I have clamped two sheets at a time; drying time is longer and the pieces won’t get exactly the same curve, but for approximate curve stages this is acceptable (see Fig. 6).
Cutting truss sheets
Now cut the truss sheets. Refer to the rib drawing, select sheet thicknesses (various truss pieces differ), and try to cut each truss sheet to its proper length. Get the edge angles about right and have the grain vertical where possible. Number the truss pieces to avoid mix-ups.
To determine how many rib units are needed, refer to blade kerf and rib thickness. For the Fledgling I planned to cut ribs 1/16" thick using a 7‑in. hollow-ground, multi-tooth Sears veneer blade. This blade has a kerf of about 1/16 inch, so each rib would take 1/16 inch plus a hair; thus the 2‑in. rib unit would yield 14 to 15 ribs. Since I required 71 ribs, six units yielded a total of 86, giving spares for handling damage.
Rib unit glue-up
You will need the top part of the upper surface form block and the lower part of the lower surface form block. Place them together as shown in Fig. 7 and attach suitable stops on the top block ends to prevent fore-and-aft movement. A dowel system also works well.
- Make dummy spars long enough to project out each side of the blocks.
- Locate the spars with fixed side stops or guides and loose pieces as shown in Fig. 7‑A. You will need a loose piece at each spar location to be removed when the proper truss piece is inserted for gluing.
Assembly procedure:
- Clamp the form blocks together with the surface sheets in place.
- Place a temporary spacer at about the 30% chord position to keep the surfaces fully separated.
- Use "C" clamps during this glue-up operation.
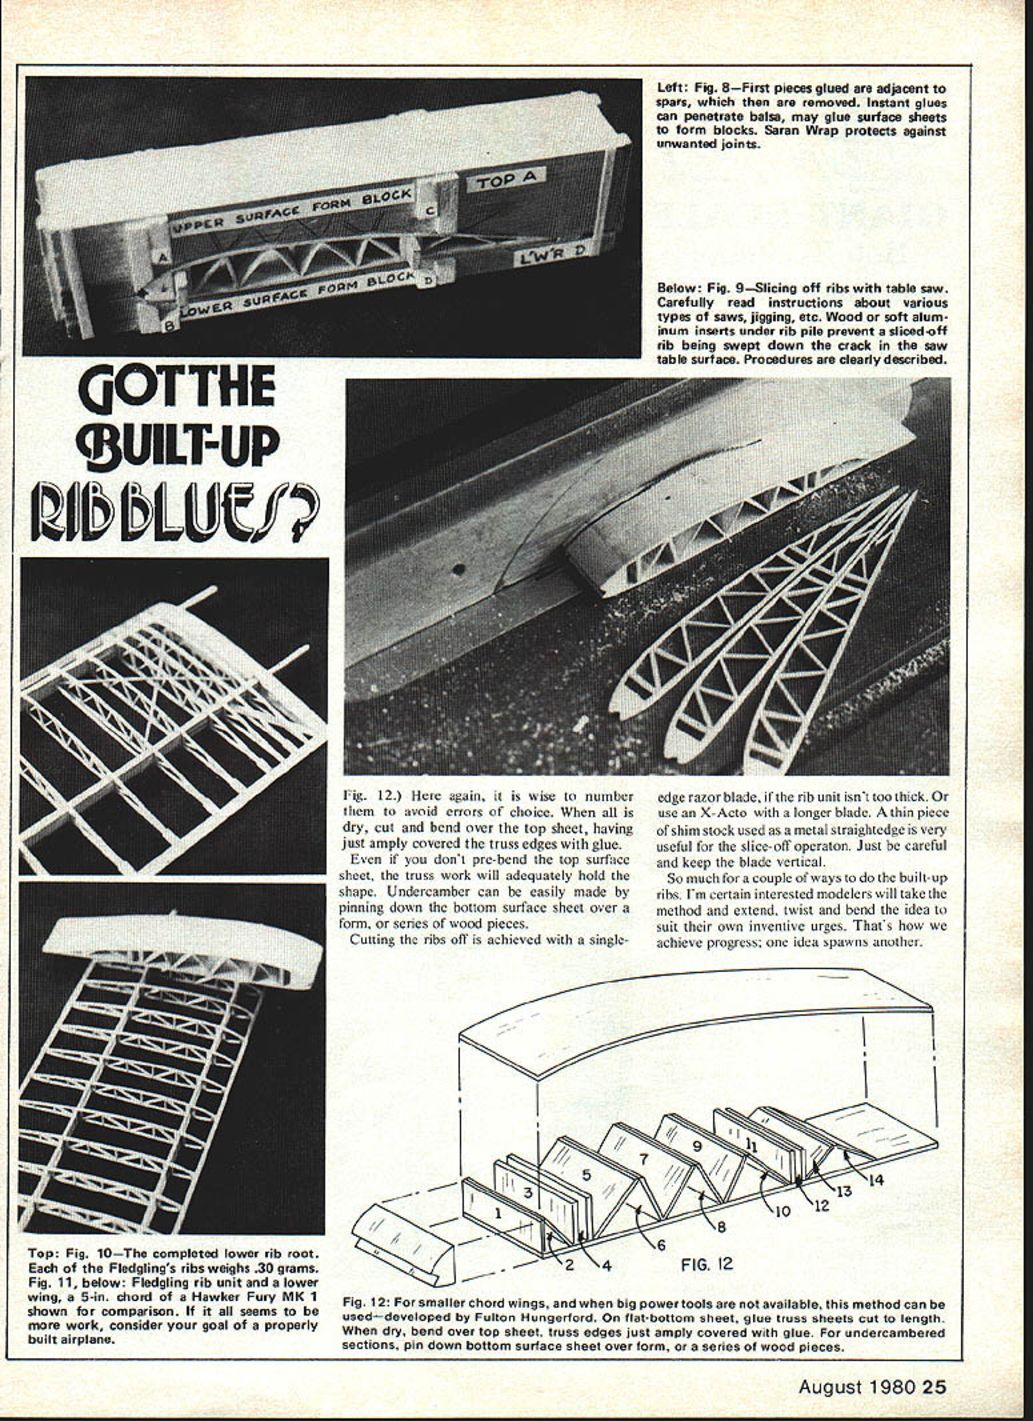
- Glue the first pieces adjacent to the spars. Once set, remove the spacer.
- Be mindful that some glues (Hot Stuff, etc.) can penetrate balsa and cause the rib sheets to become part of the form block—this can ruin the form. Use Saran Wrap or similar to guard against unwanted joints between sheet and block or dummy spar.
- Insert the remaining truss sheets in their proper places and glue.
When dry, remove the rib unit and inspect all internal glue joints. Make certain all joints are solid. Continue with the next rib unit glue-up or proceed with the cut-off operation.
Cutting off the ribs
There are two main ways to cut off the ribs:
- Band saw with a fence clamped in place: gives a narrower kerf (more ribs per unit) but a rougher cut.
- Table saw: cleaner cut and probably more effective for larger ribs, but requires dealing with the blade-insert slot.
The standard table saw blade insert has a slot about 3/8" wide. If you move the fence to 1/16" of the blade, the rib being cut may break and fall into the slot. Make up several wood inserts for various blades (soft aluminum also works).
- Insert the new insert blank in place.
- Carefully crank up the running, submerged blade so it cuts up into the insert and makes its own slot.
- With this insert you can cut strips against the fence, paper thin (see Fig. 9).
Make a couple of test cuts with waste stock to establish the rib thickness desired, then slice them off. Move slowly and carefully; pushing too fast may knock out a truss piece due to a poor glue area.
For thinner units, a single-edge razor blade or an X‑Acto with a longer blade can be used for slicing off ribs. A thin piece of shim stock as a metal straightedge is very useful. Keep the blade vertical.
Weight, strength and covering
One significant attribute of the built-up rib is low weight. The Fledgling ribs averaged 0.30 grams. A solid rib of the same dimensions weighed 1.20 grams—a ratio of 1 to 4. Fig. 10 shows the Fledgling's lower wing root; Fig. 11 shows the Fledgling rib unit and, for comparison, the lower wing of a Hawker Fury Mk I with a 5‑in. chord.
Built-up ribs do not have the same fore-and-aft compressive load capacity as a solid rib because there simply isn't as much wood in the built-up. If you plan to use a highly loaded covering such as silk, it is wise to:
- Use a solid rib every 6 or 8 ribs.
- Include occasional compression members between the spars, as done in full-scale practice.
Simpler method for smaller chords
The described procedure is great for big wings with chords of 5 or 6 inches and up. Smaller chords can be built by a simpler method if you don't have big power tools. It's especially good for flat-bottom sections where you want a light structure. This method is favored by Fulton Hungerford, who is also a master model-building innovator.
Assuming you have the airfoil laid out and the truss work established:
- Cut the flat-bottom surface sheet.
- Glue the truss sheets (cut to length) onto this bottom sheet (see Fig. 12). Number them to avoid errors.
- When dry, cut and bend over the top sheet, having just enough glue to cover the truss edges.
Even if you don't pre-bend the top surface sheet, the truss work will adequately hold the shape. Undercamber can be made by pinning down the bottom surface sheet over a form or series of wood pieces.
Final thoughts
So much for a couple of ways to do built-up ribs. I'm certain interested modelers will take the method and extend, twist, and bend the idea to suit their own inventive urges. That's how we achieve progress: one idea spawns another.
Transcribed from original scans by AI. Minor OCR errors may remain.

