
Gotha 145: Peanut Scale
Designed by: Steve Crowe Drawn by: Steve Crowe Inked by: Dick Gleason Plate 1 — 1983
Overview
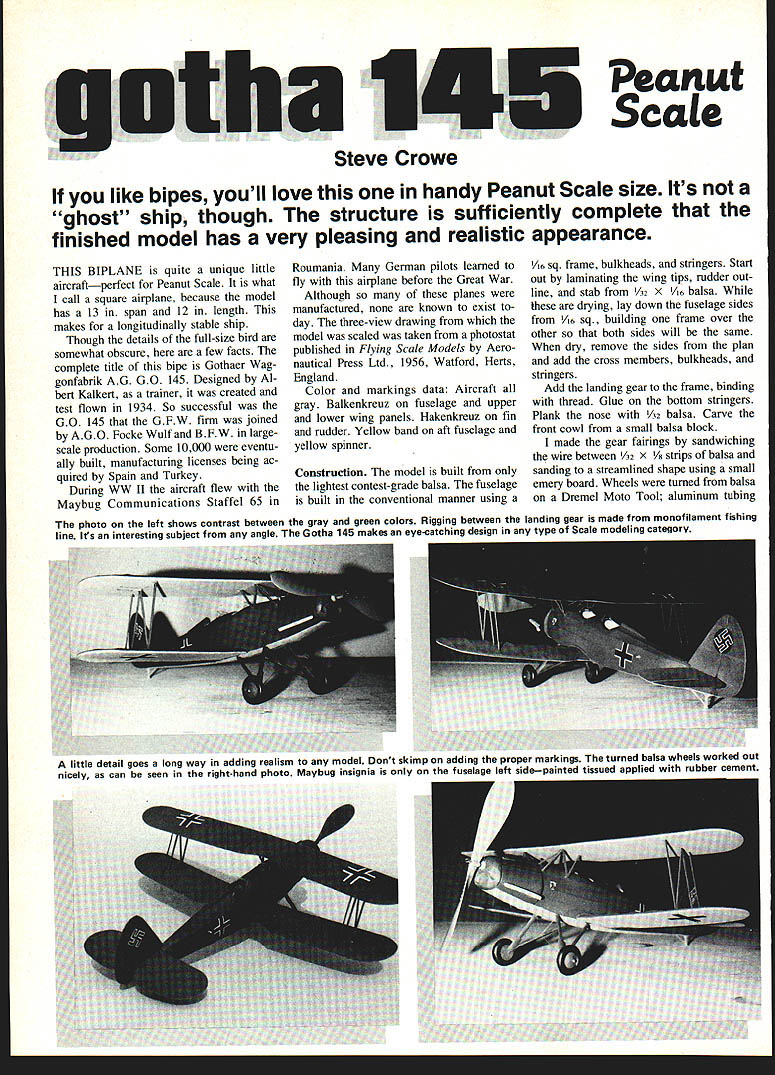
This Peanut Scale biplane is a compact, realistic model with a pleasing appearance and good flying characteristics. The model is what the designer calls a "square" airplane: 13 in. wingspan and 12 in. overall length, which gives excellent longitudinal stability. The full-size type is the Gothaer Waggonfabrik A.G. G.O. 145, designed by Albert Kalkert as a trainer and first flown in 1934. About 10,000 were produced under several firms and licensed abroad. During World War II the aircraft flew with a communications Staffel in Romania. No full-size examples are known to survive. The three-view used for the model was taken from a photostat published in Flying Scale Models (Aeronautical Press Ltd., 1956).
Color and markings
- Aircraft overall gray
- Balkenkreuz on fuselage and upper/lower wing panels
- Hakenkreuz on fin and rudder
- Yellow band aft fuselage
- Yellow spinner
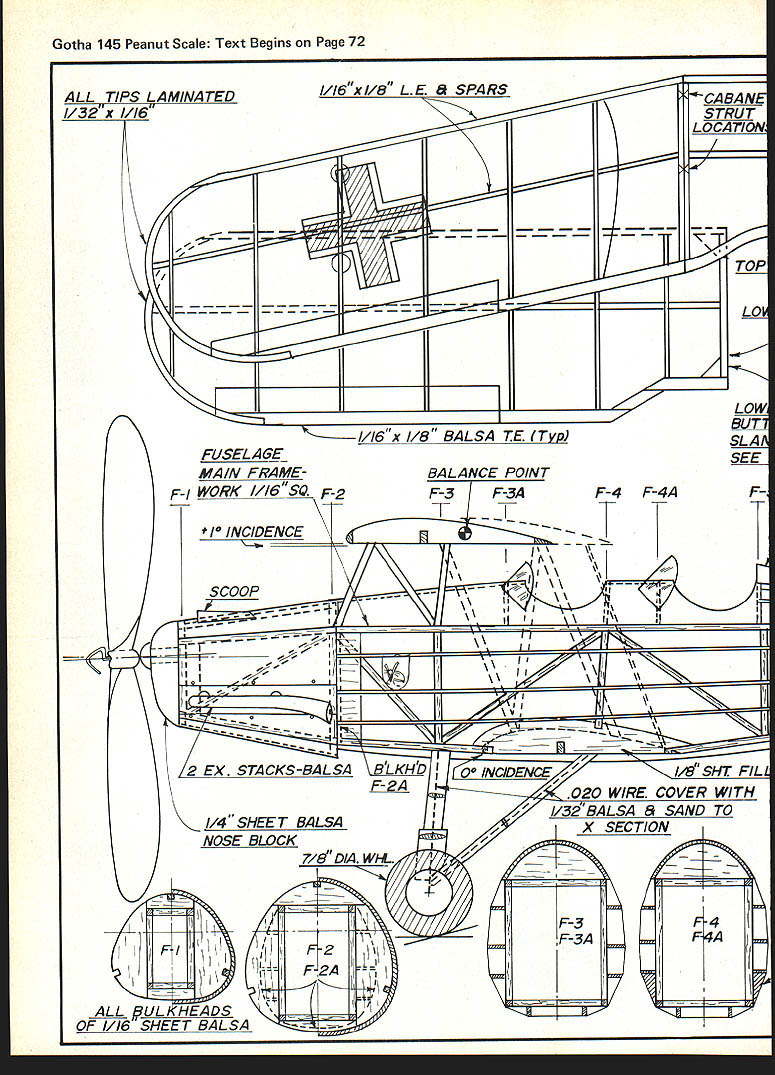
Parts and materials (from plan notes)
- All tips laminated 1/32" x 1/16"
- 1/16" x 1/8" leading edges & spars
- Cabane strut locations shown on plan
- 1/16" x 1/8" balsa trailing edge (typical)
- Fuselage main frame: 1/16" sq. (F-1 frame)
- Balance point and formers: F-3, F-3A, F-4, F-4A
- Incidence: +1° (stab), 0° indicated elsewhere per plan
- Scoop and 2 exhaust stacks (balsa)
- Bulkhead: 1/16" sheet balsa (all bulkheads)
- Stringers: 1/32" sheet cut to fuselage contour (all stringers)
- Wheel: 7/8" diameter
- .020" wire cover with 1/32" balsa and sand to cross section
- 1/8" sheet fill where indicated
- 1/4" sheet balsa nose block
- Center section & butt ribs: 1/16" sheet
- Wing rigging wires as shown on plan
- Interplane strut locations on plan
- All ribs: 1/32" sheet unless noted
- Rudder outline laminated 1/32" x 1/16" (leading edge) and inner structure 1/16" sq.
- Stab: +1° incidence (build per plan)
- 1/32" ply and 1/16" balsa used in tail construction as indicated
- Bamboo used for tailskid
- Aileron slave strut: make 2
- Strut material: 2 each from 1 mm coffee stirring sticks (cabane and interplane struts)
- PEANUT SCALE model
Component references on plan: F-1, F-2 / F-2A, F-3 / F-3A, F-4 / F-4A, F-6, F-7, F-8
Construction
- Use only the lightest contest-grade balsa.
- Start by laminating the wing tips, rudder outline, and stabilizer from 1/32" x 1/16" balsa. Let them dry.
- Build the fuselage sides from 1/16" sq. stock, constructing one side over the other so both are identical. When dry, remove sides from the plan and add cross members, bulkheads, and stringers.
- Add the landing gear to the frame and bind with thread. Glue on the bottom stringers.
- Plank the nose with 1/32" balsa and carve the front cowl from a small balsa block.
- Make gear fairings by sandwiching the wire between 1/32" x 1/8" strips of balsa and sand to a streamlined shape using a small emery board.
- Wheels: turn from balsa on a Dremel Moto-Tool; use aluminum tubing for the center bearings.
- Rigging between the landing gear: monofilament fishing line.
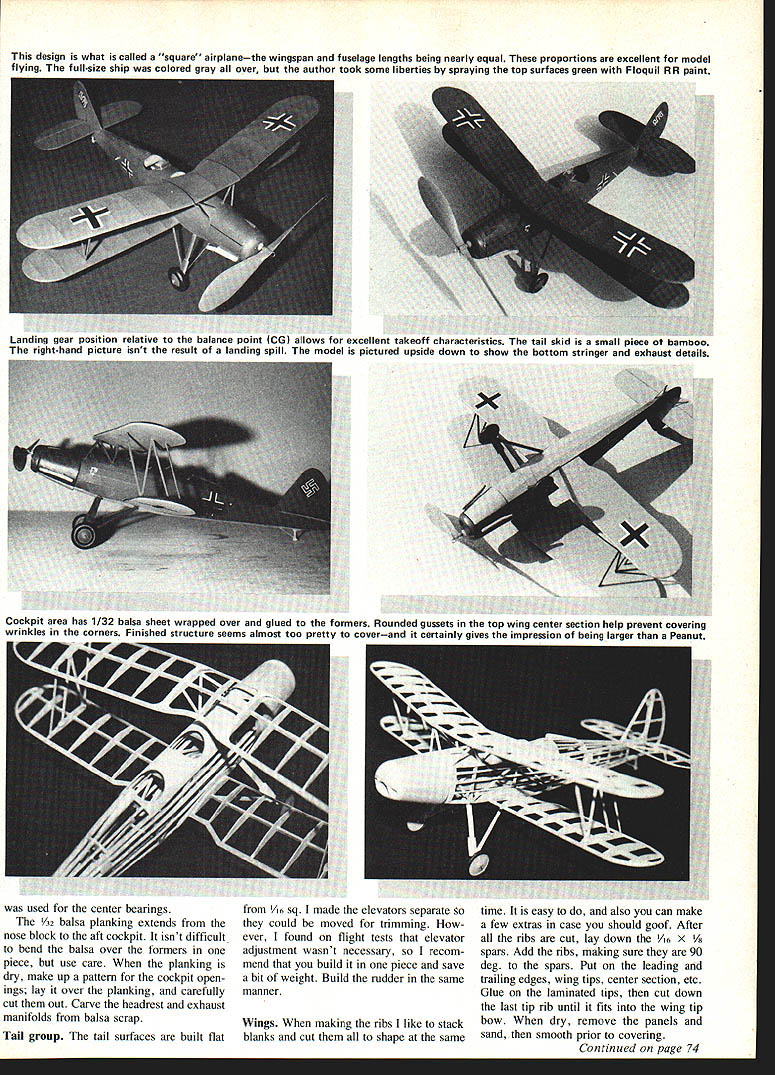
- 3/32" balsa planking extends from the nose block to the aft cockpit. It can be bent over the formers in one piece—use care.
- Make a pattern for cockpit openings, lay over the planking, and carefully cut out. Carve headrests and exhaust manifolds from balsa scrap.
Tail group
- Build tail surfaces flat from 1/16" sq. stock.
- Elevators were made separate on the prototype to allow trimming, but flight tests showed adjustment was unnecessary. To save weight, consider building the stabilizer and elevators as one piece.
- Build the rudder similarly.
Wings
- Stack rib blanks and cut them to shape together; this is efficient and allows spares.
- Lay down 1/16" x 1/8" spars, add ribs, ensuring they are square (90°) to the spars.
- Install leading and trailing edges, wing tips, center section, laminated tips, and center/butt ribs per plan.
- After drying, remove panels, sand, and smooth prior to covering.
- Wing struts, cabane, and interplane struts: coffee stirring sticks cut and sanded to streamlined section—very light and strong.
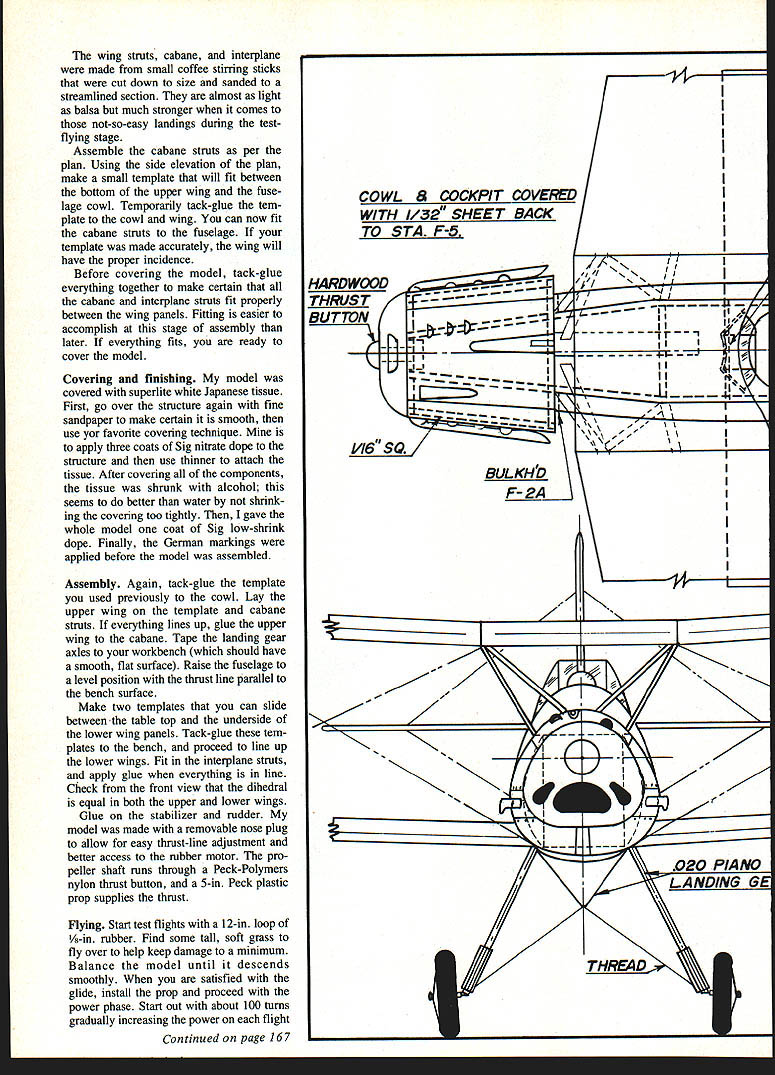
- Assemble cabane struts per plan. Make a small template (using the side elevation on the plan) that fits between the bottom of the upper wing and the fuselage cowl. Tack-glue this template to the cowl and wing to accurately fit cabane struts and set proper incidence.
- Before covering, tack-glue everything together to ensure cabane and interplane struts fit properly between wing panels. Fitting is much easier at this stage.
Covering and finishing
- Sand the structure smooth with fine sandpaper before covering.
- Covering used on the prototype: Superlite white Japanese tissue.
- Apply three coats of Sig nitrate dope to the structure first. Use dope thinner to attach the tissue.
- Shrink the tissue with alcohol (preferred over water to avoid over-shrinking).
- Apply one coat of Sig low-shrink dope after shrinking.
- Apply German markings before final assembly.
Assembly
- Tack-glue the cabane template to the cowl. Lay the upper wing on the template and cabane struts; if it lines up, glue the upper wing to the cabane.
- Tape landing gear axles to a smooth, flat workbench surface and raise the fuselage to level with the thrust line parallel to the bench.
- Make two templates to slide between the table top and the underside of the lower wing panels. Tack-glue them to the bench.
- Line up the lower wings, pin the interplane struts, and glue when everything is in line. From the front, check that dihedral is equal for both upper and lower wings.
- Glue on stabilizer and rudder.
- The prototype used a removable nose plug for easy thrust-line adjustment and access to the rubber motor. The propeller shaft runs through a Peck-Polymers nylon thrust button; a 5-inch Peck plastic prop supplies the thrust.
Flying
- Start test flights with a 12-in. loop of 1/8-in. rubber.
- Fly over tall, soft grass to minimize damage.
- Balance the model until it descends smoothly. When glide is satisfactory, install the prop and begin power flights.
- Start with about 100 turns and gradually increase on subsequent flights.
- The prototype flies in left circles of about 30-ft. diameter, with smooth transition from power to glide. Outdoor flights of 35–40 seconds are typical.
- Keep the model light; for less weight consider leaving the tissue unpainted.
Notes and tips
- Rounded gussets on the top wing center section help prevent covering wrinkles at corner joints.
- The cockpit area can be covered with 1/32" balsa sheet wrapped over glued formers.
- A small piece of bamboo makes a good tailskid.
- The Gotha 145 is an eye-catching subject; attention to structure and markings adds realism.
Summary: Keep it light, build carefully, and enjoy a finely detailed Peanut Scale biplane that flies well.
Transcribed from original scans by AI. Minor OCR errors may remain.

