

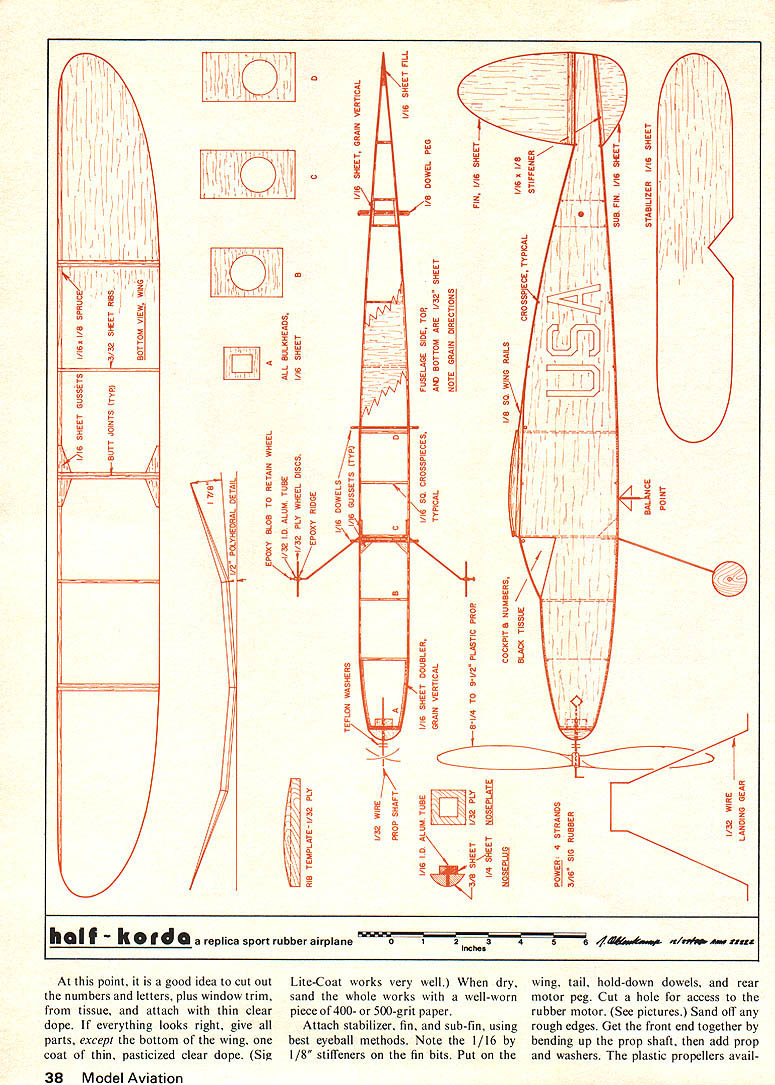


HALF KORDA
All-balsa half-scale model of one of history's most famous machines will do 30 seconds half wound.
Preparations:
From the plans and photos, it is obvious that this is going to be a fairly simple and short building task. Carefully select wood that is both light and straight. Wing and tail pieces should be from warp-free A-grain (note pictures) stock. Two 3 x 36" sheets will make these and the various formers, bulkheads, gussets, etc. The fuselage sides may come out of a single sheet of 1/32" stock, if you don't mind a little patchwork at the rear of the side. It should be fairly firm wood, the swirly quarter-grained stuff being the best choice.
A lot has been written lately about glues and adhesives for model work — which is best for which job, the heaviest, and so on, but how exactly to use each one is seldom covered in any detail. So before we go tearing up that beautiful wood, lets get into glueing for a moment: It is my view that strong, light, and neat-appearing models, particularly the kind we are dealing with here, are best assembled with Titebond, or an equivalent aliphatic resin product. But big globs of it running all over the place do very little good. This glue is non-filleting, and develops its true character only when used in relatively thin amounts, two applications being better than one heavy one. The technique is known as double-glueing. It takes a small additional amount of time to do, but saves endless grief later on, if you hit the wall, so to speak.
Do it this way: thin Titebond with a few drops of water, shake it up thoroughly, and repeat, until the stuff looks like evaporated milk in viscosity — not too thick, not too thin. Put a thin coat on all mating surfaces with a brush. Work from a small puddle poured into a saucer or piece of Saran Wrap. Always try to do both sides of the joint, even if you have to wiggle into some tight places at times. Let dry — ten minutes is average for even the dampest days. Now, when you are ready to assemble whatever pieces at hand, apply a second, very thin coat, again, to both sides of the joint, and push them together.
Titebond has excellent "grab" potential, so you will find that one good side-benefit of double-glueing everything is that many operations can be done in hand, or "in the air," and need be held only a few seconds, or with drafting tape, to maintain alignment. This whole procedure is fast, strong, light, and very neat-appearing.
Doing It:
Make up patterns for wing, tail group, and fuselage sides by Xeroxing or tracing, and transfer to filing card stock or similar material. Glue the 1/16 by 1/8" spruce stock to the wing blank leading edge. Flat-sand all material before cutting with successive grades of 220- and 400-grit sandpaper. (A third of a sheet around a 3/8 by 1 1/2" piece of batten wood works well for this.) Mark outlines and important verticals for wing breaks and bulkheads.
SCALING DOWN and structuring this model was a genuine treat. I was barely seven years old when Dick Korda blew everyone off the field with his 45-minute-plus flight at the 1938 Wakefield competition, and have wanted ever since to make a duplicate. His design still wins a lot of contests — both as an Old Timer (pre-1941), and under AMA Unlimited Rubber rules. It was also named among the Best Ten Models of the Year in 1973 by the National Free Flight Society (NFFS).
All of this may be in the "Wow" category, but I can say that our half-size replica flew absolutely perfectly from ROG (rise off ground) the very first time. It's a pleasing model.
Weighing about an ounce and powered by four strands of Sig 3/16" Contest rubber, the ship is capable of slow, right-circling flights of 30 seconds or better, when wound to only half-capacity. (Thirty seconds is an eternity, that's for sure.) So it is an ideal schoolyard and ballpark project. On full winds in thermal proximity, be sure to affix a return address! with something like a BIC Banana pen. Give the bottom of the wing blank one coat of thinned clear dope, right over the markings. Sand smooth.
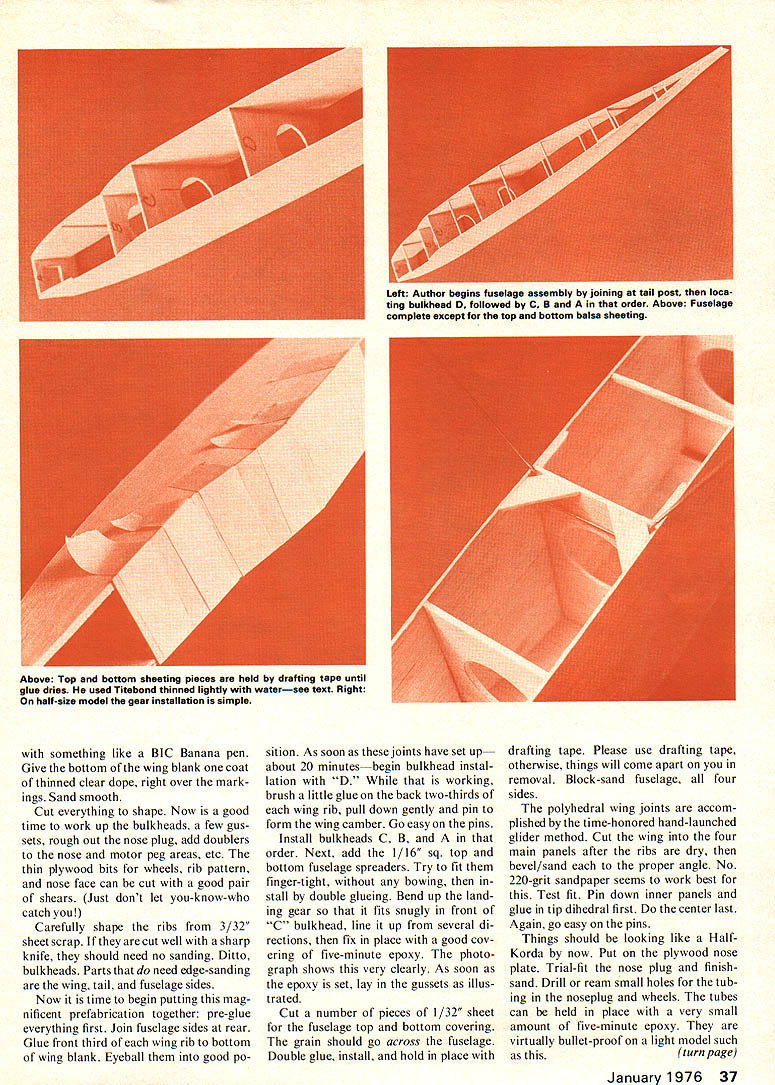
Cut everything to shape. Now is a good time to work up the bulkheads, a few gussets, rough out the nose plug, add doublers to the nose and motor peg areas, etc. The thin plywood bits for wheels, rib pattern, and nose face can be cut with a good pair of shears. (Just don't let you-know-who catch you!) Carefully shape the ribs from 3/32" sheet scrap. If they are cut well with a sharp knife, they should need no sanding. Ditto, bulkheads. Parts that do need edge-sanding are the wing, tail, and fuselage sides.
Now it is time to begin putting this magnificent prefabrication together: pre-glue everything first. Join fuselage sides at rear. Glue front third of each wing rib to bottom of wing blank. Eyeball them into good position. As soon as these joints have set up—about 20 minutes—begin bulkhead installation with "D." While that is working, brush a little glue on the back two-thirds of each wing rib, pull down gently and pin to form the wing camber. Go easy on the pins.
Install bulkheads C, B, and A in that order. Next, add the 1/16" sq. top and bottom fuselage spreaders. Try to fit them finger-tight, without any bowing, then install by double gluing. Bend up the landing gear so that it fits snugly in front of the "C" bulkhead, line it up from several directions, then fix in place with a good covering of five-minute epoxy. The photograph shows this very clearly. As soon as the epoxy is set, lay in the gussets as illustrated.
Cut a number of pieces of 1/32" sheet for the fuselage top and bottom covering. The grain should go across the fuselage. Double glue, install, and hold in place with drafting tape. Please use drafting tape, otherwise things will come apart on you in removal. Block-sand fuselage, all four sides.
The polyhedral wing joints are accomplished by the time-honored hand-launched glider method. Cut the wing into the four main panels after the ribs are dry, then bevel/sand each to the proper angle. No. 220-grit sandpaper seems to work best for this. Test fit. Pin down inner panels and glue in tip dihedral first. Do the center last. Again, go easy on the pins.
Things should be looking like a Half-Korda by now. Put on the plywood nose plate. Trial-fit the nose plug and finish sand. Drill or ream small holes for the tubing in the noseplug and wheels. The tubes can be held in place with a very small amount of five-minute epoxy. They are virtually bullet-proof on a light model such as this. At this point, it is a good idea to cut out the numbers and letters, plus window trim, from tissue, and attach with thin clear dope. If everything looks right, give all parts, except the bottom of the wing, one coat of thin, plasticized clear dope. (Sig Lite-Coat works very well.) When dry, sand the whole works with a well-worn piece of 400- or 500-grit paper.
Attach stabilizer, fin, and sub-fin, using best eyeball methods. Note the 1/16 by 1/8" stiffeners on the fin bits. Put on the wing, tail, hold-down dowels, and rear motor peg. Cut a hole for access to the rubber motor. (See pictures.) Sand off any rough edges. Get the front end together by bending up the prop shaft, then add prop and washers. The plastic propellers available from the hobby shops will do nicely. The props are freewheeling, so a simple 90° bend is all that is required to finish the job.
Outings:
Make up a four-strand motor from 3/16" rubber. It should be a little longer than motor peg to nose distance. Refer to Sport Modeler, Sept., 1974 for Clarence Mather's excellent advice on this operation. Fish the motor into place and secure. Use a winding hook at the front so that the model can be safely wound with the prop off. (See photograph.) Check balance point indoors: be certain that it is plus or minus no more than an eighth of an inch aft of the spar.
Half-Korda
inch from the plan location. Add clay fore or aft to set it right.
Now the fun part: Try a few gentle hand glides from about knee high and slightly nose-down. This airplane is no soarer, but should proceed in a stable fashion about eight or ten feet without any pronounced corks. Take a little time for the balance check and gliding procedures. Incidentally, I believe that first flights should be ROG, so crank in about 200 turns (with a winder), get a fix on the wind, and let her rip either directly into it, or very slightly to the right side off-wind.
The Half-Korda, along with its big brothers, flies almost crash-proof if forced a little bit to the right under power. Our prototype did so naturally, but if you are worried about it ahead of time, put in a little right- and down-thrust, either when you drill the nose plug, or by adding a paper match stick on the top and left side of the nose plug before launch. Glue in place if flight trim is normal. Glide may be right, left, or straight ahead: better to let the model seek its own way at first.
The motor we used will take about 500-550 turns, but things are generally still fun and less tense at about 400. Even at 350 turns ROG, climb was still steep and flights very satisfying.
Small models like this are always losing their front ends, it seems; after the rubber.
Half-Korda/Oldenkamp
winds down and the free-wheeling begins, particularly if the shaft gets bent a little from a landing knock and vibration sets in. An easy way to cure this, since the nose plug gets a lot of wear and simply can't be made to fit forever, is to coat it with five-minute epoxy, slip it in place, pull out and let dry.
If that doesn't work, put a piece of masking tape on the top outer joint just after winding. The point being that the nose plug should be free to fall out if your airplane hits something or gets upset upon landing.
References: Balsa and plywood, spruce, music wire, rubber strip, dowels, tubing, tissue, Lite-Coat dope, rubber lubricant, etc., all available directly from Sig Manufacturing Co., Montezuma, Iowa, or from most local hobby shops.
Sandpaper, Titebond glue, Five-Minute Epoxy glue — from variety and hardware stores.
Plastic Propellers: Peck-Polymers has some excellent units up to 9½" diameter. Peck-Polymers, P.O. Box 2498, La Mesa, Calif. 92041.
Rubber Winding Hook: Jim Crockett Replicas, 1442 N. Fruit Ave., Fresno, Calif. 93728.
Transcribed from original scans by AI. Minor OCR errors may remain.

