

Hand-Launched Gliders: Part II
Jim Haught
Part I of this how-to dealt with construction of the Tiny Piglet, a beginner's HLG. Instructions are for right-handed persons; reverse the directions for southpaws.
Now it's time to get your new glider ready for flight. A number of preflight checks should be made before you head out to the flying field.
Preflight checks and balance (CG)
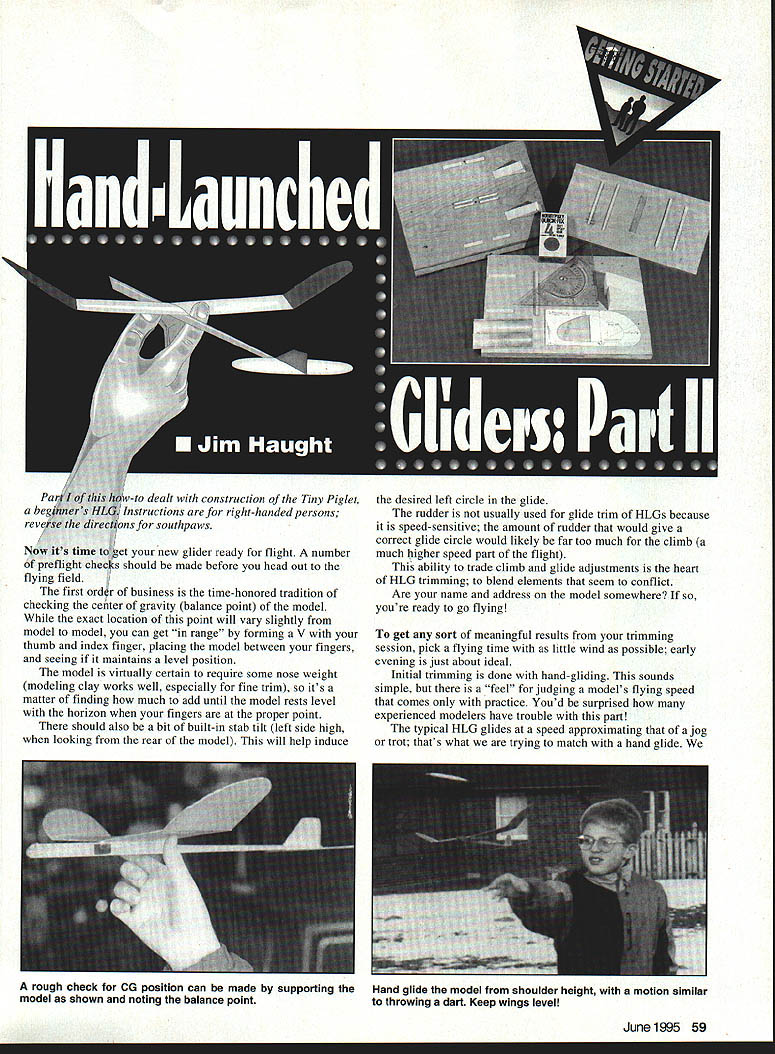
- Check the center of gravity (balance point) by forming a V with your thumb and index finger, placing the model between your fingers, and seeing if it maintains a level position.
- Most models will require some nose weight (modeling clay works well, especially for fine trim). Add small amounts until the model rests level with the horizon when supported at the proper point.
- Add a bit of built-in stabilizer tilt (left side high, when looking from the rear) to help induce the desired left circle in the glide.
- Avoid using the rudder for glide trim; it is speed-sensitive. The rudder amount that would give a correct glide at low speed would likely be too much for the climb (a much higher-speed part of the flight).
- Make sure your name and address are on the model.
Pick a flying time with as little wind as possible; early evening is ideal for trimming.
Hand-gliding: basic feel and speed
Initial trimming is done with hand-gliding. There is a “feel” for judging a model's flying speed that comes only with practice. Typical HLG glide speed approximates that of a jog or trot; match that speed with your hand glide.
Hand-glide technique:
- Support the model on your fingers just behind the balance point to check CG roughly.
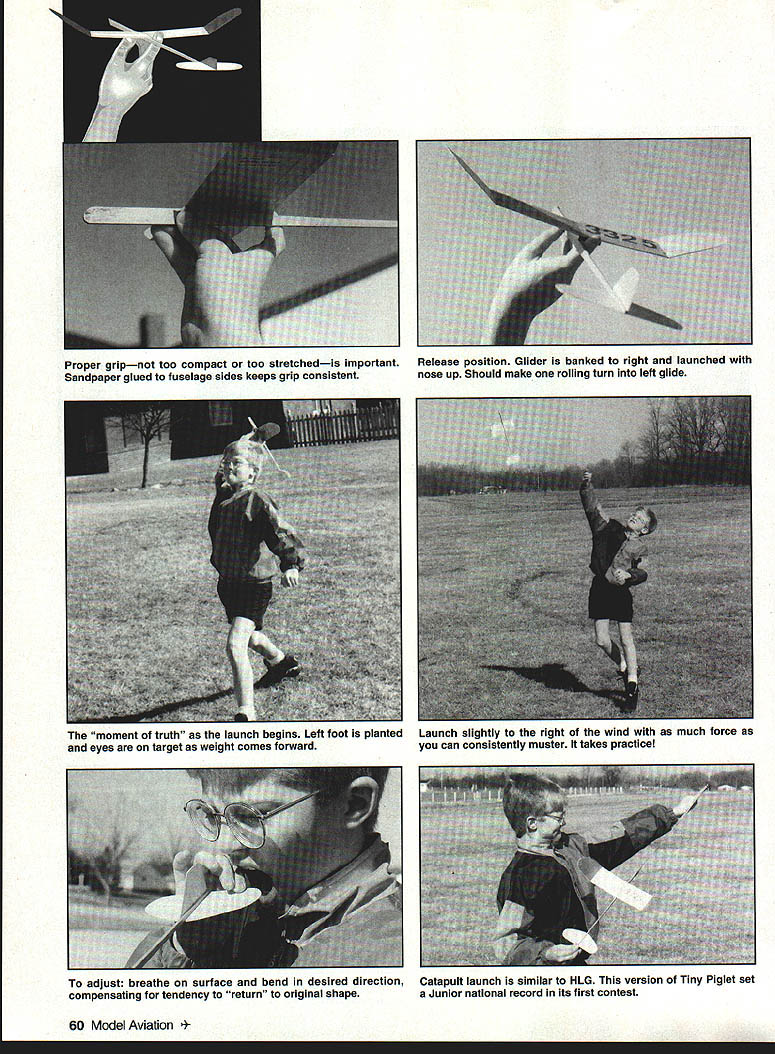
- Grasp the glider between thumb and forefinger at a point just behind the CG — almost where you would prepare to throw a dart. Be sure the wings are level and the fuselage is parallel to the horizon.
- Hold the glider at eye level, take two or three brisk steps forward, and gently push the model ahead. The force should be small — imagine replacing a book on a shelf at eye level.
- Release at about 25 feet aiming for a smooth left-hand circle.
Grip notes:
- Proper grip — not too compact, not too stretched — is important. Sandpaper glued to the fuselage sides helps keep the grip consistent.
- Maintain repeatable, comfortable grip to preserve “feel.”
Release position and launch basics:
- Release with the glider slightly banked to the right and the nose up so it rolls into a left-hand glide.
- Launch slightly to the right of the wind. It takes practice to match the model’s flying speed; mismatched launches make trimming results invalid.
Troubleshooting hand-glide results
If the glide is steep or the model dives:
- Probable causes: too much nose weight or too little angular difference between wing and stabilizer.
- Solution: remove a very small amount of nose weight (about the size of a pencil eraser) and try again. If the dive continues and the balance point is correct, add some up to the stabilizer.
Adding up to the stabilizer:
- Make very small adjustments. Bend the rearmost ~1/2 inch of the stabilizer up slightly (a few thousandths of an inch — e.g., about 1/32") and test again.
- Wood resists permanent change; you may need to make small bends two or three times to achieve the desired effect.
- To make subtle bends, hold the surface and gently bend while breathing on it (as you would fog a lens) to warm and slightly soften the wood. Make tiny, progressive changes and allow for some “return” to the original shape.
If the glider stalls (pitches up sharply and hits the ground):
- Confirm the balance point is correct.
- Confirm the model was launched level.
- If those are OK, the stabilizer may have too much up built in. Carefully add very small amounts of down to the stabilizer.
- Before large structural changes, try adding a bit of nose weight first; small trim changes can have a big effect.
Trim is progressive. When learning, it’s better to have the glider a bit “mushy” (near stall) than aggressively trimmed. As you learn, you can progress to more aggressive, full-power launches.
From flip-up to full-power launch
Getting the glider up 15–20 feet with a gentle “flip” into its circle lets you see the glide clearly and judge circle size (you should see a shallow arc up and to the left, perhaps with one stall as it transitions). From altitude you can see perhaps a half-circle and better evaluate adjustments.
When you are satisfied with low-power trim, prepare for full-power launches. Remember:
- A glider’s trim is speed-sensitive. A model trimmed for low-power can fly past its adjustment point at full power, sometimes stopping nose-up then spiraling down.
- Warm up your throwing arm before launching hard — sudden, unprepared maximum throws risk rotator cuff and other injuries.
Full-power launch components:
Aim
- Pick a focal point in the sky slightly to the right of the prevailing breeze that will give a launch angle of about 60°. Throw as if trying to hit that point.
Grip
- Place the index finger against the right side of the fuselage, roughly between the first joint and the first knuckle. Thumb and middle finger grasp the fuselage sides.
- Allow some spread in the grip for power, but do not over-stretch. Comfort and repeatability are key.
Footwork
- Face perpendicular to the target (like a quarterback dropping back). Two or three steps are usually sufficient.
- Reach the launch point with the glider banked right (right wing down about 20°) and ready to step forward with your left foot while pushing off with your right.
Timing
- When timed correctly, the right bank counters the built-in left-turn adjustments and the model will make one right spiral, roll over, and enter the left glide.
- The launch should be a coordinated whoosh: weight shifts, push from the legs, shoulders rotate, and the glider whips forward and up. A sharp, ringing whistle indicates a strong launch.
- Avoid early release (weak launch) or late release (loopy launch or throwing into the ground). Practice the timing until it’s repeatable.
If the glider lags behind your feet (early release), the launch will be weak. If it gets ahead of your feet (late release), you risk poor trajectories or damage.
Additional notes
- Catapult launch is similar to HLG. The Tiny Piglet, in a catapult variant, set a Junior national record in its first contest.
- For a smaller circle, twist the rear of the fuselage slightly (just in front of the stabilizer) so the left side comes up; allow for the material’s return and hold the twist for 5–10 seconds while setting the shape.
- If you are uncertain about trimming, keep the glider a bit stally until you become comfortable with full-power launches. A glider with too much nose weight or too much wing/stab angle difference will fly like a dart: straight up and straight back down.
Each design has its own sensitivity to adjustments. Practice with several designs to find one suited to your arm strength and style. HLGs teach fundamentals of model flight and trim and can provide hours of enjoyment.
If you have questions about HLG construction and trim, seek out a local expert or write to me c/o Model Aviation.
Transcribed from original scans by AI. Minor OCR errors may remain.

