
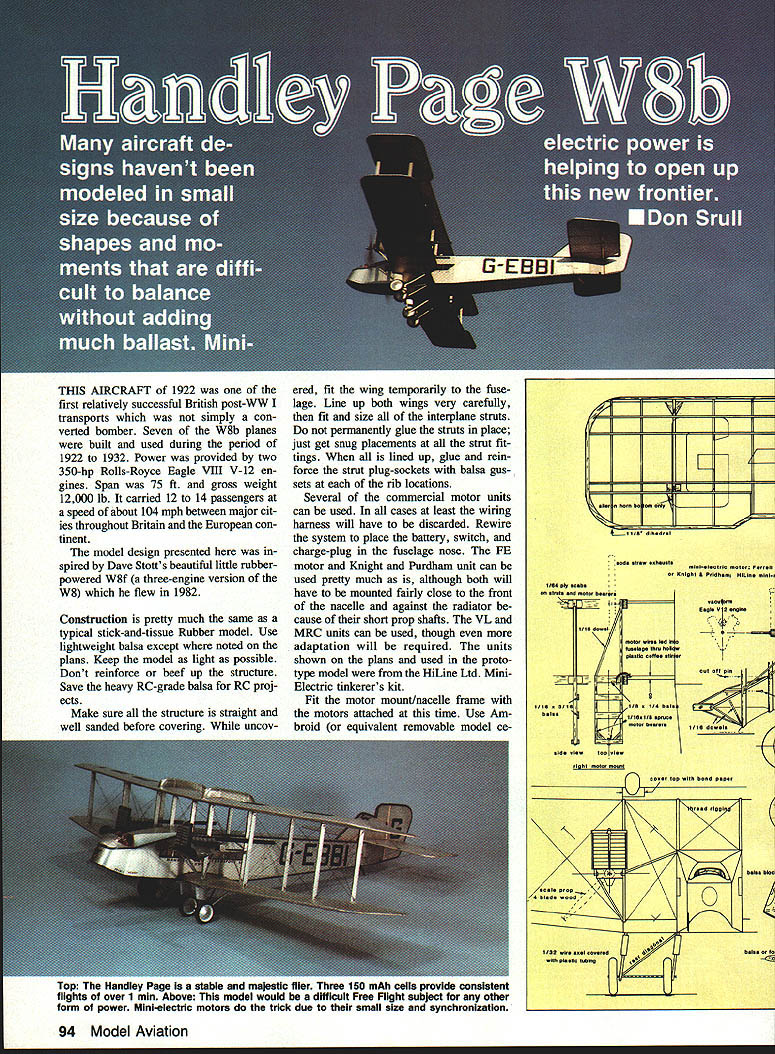
Handley Page W8b
By Don Srull
Many aircraft designs haven't been modeled in small size because of shapes and moments that are difficult to balance without adding much ballast. Mini-electric power is helping to open up this new frontier.
This aircraft of 1922 was one of the first relatively successful British post‑WWI transports that was not simply a converted bomber. Seven W8b aircraft were built and used from 1922 to 1932. Power was provided by two 350‑hp Rolls‑Royce Eagle VIII V‑12 engines. Span was 75 ft and gross weight 12,000 lb. It carried 12 to 14 passengers at a speed of about 104 mph between major cities throughout Britain and the European continent.
The model design presented here was inspired by Dave Stott’s beautiful little rubber‑powered W8f (a three‑engine version of the W8) which he flew in 1982.
Construction
Construction is essentially the same as a typical stick‑and‑tissue rubber model. Use lightweight balsa except where noted on the plans. Keep the model as light as possible. Do not reinforce or beef up the structure—save heavier RC‑grade balsa for RC projects.
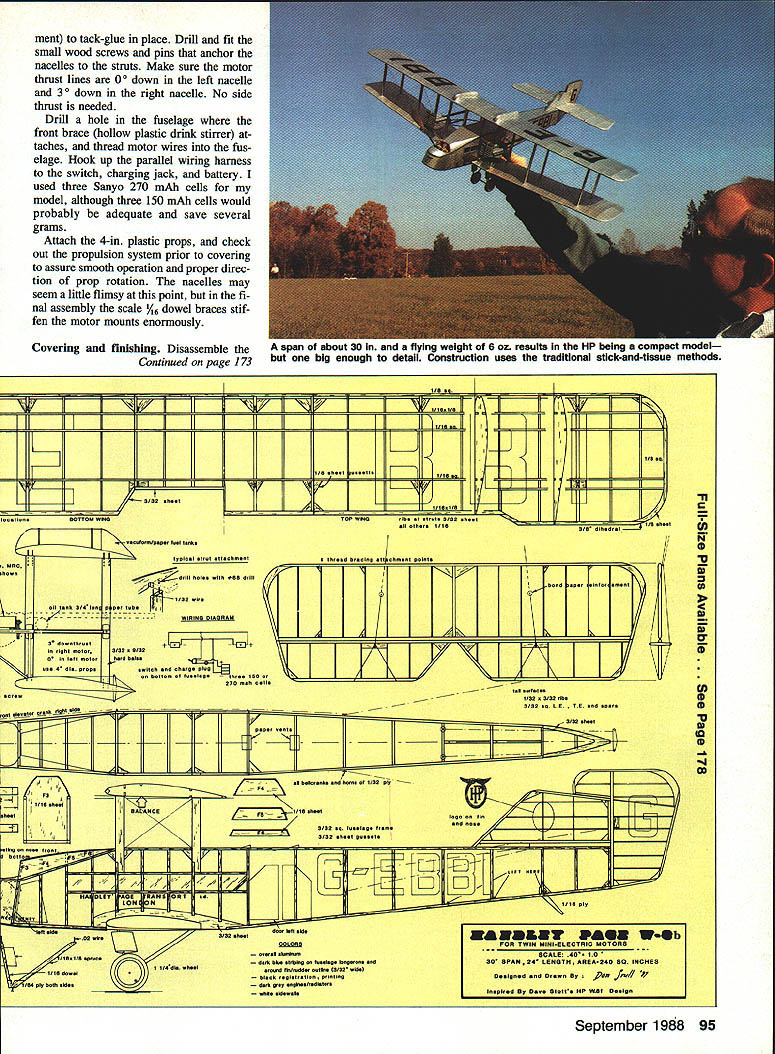
Make sure all structure is straight and well sanded before covering. While uncovered, fit the wing temporarily to the fuselage. Line up both wings very carefully, then fit and size each of the interplane struts. Do not permanently glue the struts in place; just get snug placements at all the strut fittings. When all is lined up, glue and reinforce the strut plug‑sockets with balsa gussets at each of the rib locations.
Power system and motor installation
Several commercial motor units can be used. In all cases at least the wiring harness will have to be discarded. Rewire the system to place the battery, switch, and charge plug in the fuselage nose.
- The FE motor and the Knight & Purdham unit can be used pretty much as is, although both must be mounted fairly close to the front of the nacelle and against the radiator because of their short prop shafts.
- The VL and MRC units can be used but will require more adaptation.
- The units shown on the plans and used in the prototype model were from the HiLine Ltd. Mini‑Electric tinkerer’s kit.
Fit the motor mount/nacelle frame with the motors attached at this time. Use Ambroid (or equivalent) removable model cement. Drill and fit the small wood screws and pins that anchor the nacelles to the struts. Make sure the motor thrust lines are 0° down in the left nacelle and 3° down in the right nacelle. No side thrust is needed.
Drill a hole in the fuselage where the front brace (a hollow plastic drink stirrer) attaches, and thread the motor wires into the fuselage. Hook up the parallel wiring harness to the switch, charging jack, and battery. For the prototype model three Sanyo 270 mAh cells were used, although three 150 mAh cells would probably be adequate and save several grams.
Attach the 4‑in plastic props and check the propulsion system prior to covering to ensure smooth operation and proper prop rotation. The nacelles may seem a little flimsy at this point, but in the final assembly the scale 1/16‑in dowel braces stiffen the motor mounts enormously.
Covering and finishing
Disassemble the pieces and cover them with lightweight white Japanese tissue. Lightly water‑spray the tissue for shrinkage, and when dry brush on three or four thin coats of non‑shrinking dope such as Sig Lite Coat brushing or clear brushing lacquer. When you are sure all paper and wood surfaces are sealed, spray on a couple of very light coats of silver dope or lacquer. There is no need to build up a thick opaque finish; a light, uniform coverage is adequate.
The particular aircraft modeled, G‑EBBI, has a somewhat tricky but attractive trim. A dark blue stripe edges the fuselage longerons and outlines the vertical fin/rudder assembly. Mask the stripes with a drafting pen filled with thinned blue enamel, then brush on the interior stripes with a fine brush. This is tedious, but it looks good. Registration letters can be masked and sprayed on or cut from black tissue. Other fuselage lettering may be from rub‑on dry transfers or drawn with pen and ink and a letter guide. The Handley Page logos on the fin and nose were inked onto a piece of silver‑doped tissue which was then stuck on with double‑sided tape.
Wait until after the initial test flights before permanently attaching the 1/16‑in dowel motor nacelle braces (lightly glue them with Ambroid at first) and before adding the radiators and vacuum‑formed engines. This will enable minor thrust adjustments more easily.
Lastly, carve some foam pilot figures and add as much of the rigging and control cables as you like.
Flying
Make sure all surfaces are unwarped and that the balance point is as shown on the plans. The first test flights should be in very calm weather and over the softest surface you can find (green grass is ideal). Test‑charge the flight battery several times to learn how long a charge is needed to get an 8‑ to 10‑sec motor run. Since glide cannot really be tested with this model initially, use short runs to sort things out.
Put in a tweak of about 1/16 in of right rudder. Charge the motor for an 8‑ to 10‑sec run and carefully launch the model. Remove any noticeable turn, dive, or stall tendency with the rudder and elevator. These surfaces are large, so make only small changes at a time. Aim for a straight power glide or almost level flight with no tendency to slow down and hang on the props.
When short hops are satisfactory, begin to lengthen the charge to gain five to ten additional seconds of power. Remember that as you lengthen the charge the initial power level will increase somewhat. By the time you reach 20 to 30 seconds of power you should get a very slight initial climb and then a level cruise. Keep turns very wide and gentle. When power is exhausted the model will descend in a slow but fairly steep glide—this is not a thermal soarer.
Do not allow the model to climb nose‑high and near a stall, especially in gusty weather. Trim for a relatively shallow, penetrating climb. When you are satisfied with the short power runs, charge up and enjoy one of the prettiest free‑flight flights you're likely to see.
Transcribed from original scans by AI. Minor OCR errors may remain.

