
Hangar 9 Sukhoi SU-26MM SE
Bill Pritchett
The Man
The first time I met Mike McConville was at an RC Aerobatics (Pattern) contest in the late 1980s at the Plainfield, Indiana, flying site—at a home for wayward boys. His name was well known then, and I recall thinking what a great weekend this would be: my first Pattern contest and getting to watch Mike McConville fly.
I wasn't disappointed. For good reason, I felt as if I were in the presence of a "rock star."
Mike won his first US Pattern Nats in 1981, when he was only 16 years old, and since then he has dominated at nearly every level of competition. He is an eight-time Tournament of Champions competitor and two-time finalist, an International Miniature Aerobatic Club (IMAC) US Nationals champion, a six-time US F3A (FAI Pattern) Team Trials competitor, a Giant Scale Pylon Racing World Champion, and a winner of more than 200 Pattern and IMAC events.
Although Mike has competed primarily in Aerobatics and Racing, he has a love for all aspects of model aviation and enjoys flying all types of models, both fixed wing and helicopters. A Cincinnati, Ohio, native with more than 20 years of experience in the hobby industry, Mike moved to Champaign, Illinois, in 1996 to design and develop airplanes for Horizon Hobby.
He has designed more than 60 aircraft, including Horizon's latest release of the Sukhoi: the SU-26MM SE (Mike McConville Special Edition), also now available in a 170cc size. Mike continues to design outstanding models that many pilots look forward to flying and that remind me of that memorable Pattern contest long ago.
Specifications
- Type: RC Aerobatic
- Experience level: Advanced
- Wingspan: 97 inches
- Overall length: 91 inches
- Wing area: 1,762 square inches
- Flying weight: 21.5–24.0 pounds
- Engine: 58cc–85cc gas
- Radio: Seven channels
- Servos: Five high-torque digitals, one standard
- Propeller: 24 x 10–27 x 10
- Spinner: 4¼ inches
- Covering: UltraCote
Pluses and Minuses
- Extremely visible and attractive.
- Wonderful attention to detail includes a terrific-looking pilot figure, dashboard in the cockpit, and many cool graphics.
- Well-written instructions.
- Superb intro to gas and the "bigger is better" concept.
- Easy and honest to fly; capable of precision and extreme 3-D flying.
- This is such a good-looking and -flying model that some pilots will want to use their own servos—or at least have the option.
- The well-written instructions are somewhat difficult to see because the ink contrast to the paper is poor.
Assembly
The first thing you have to do is maybe one of the toughest: unpack the Sukhoi! It is extremely well packaged, and it takes time and space to neatly remove all of the protective materials inside the boxes. My airplane had zero damage from shipping, so it's obviously worth it to pack so carefully.
Take a few moments to familiarize yourself with the instructions and the methods of assembly you're asked to do. The model is built from laser-cut balsa and plywood and then covered in UltraCote.
The landing gear, wing tube, and stabilizer tube are painted aluminum, while the tail wheel assembly is carbon. The fiberglass cowl and wheel pants are nicely painted and match the covering very well.
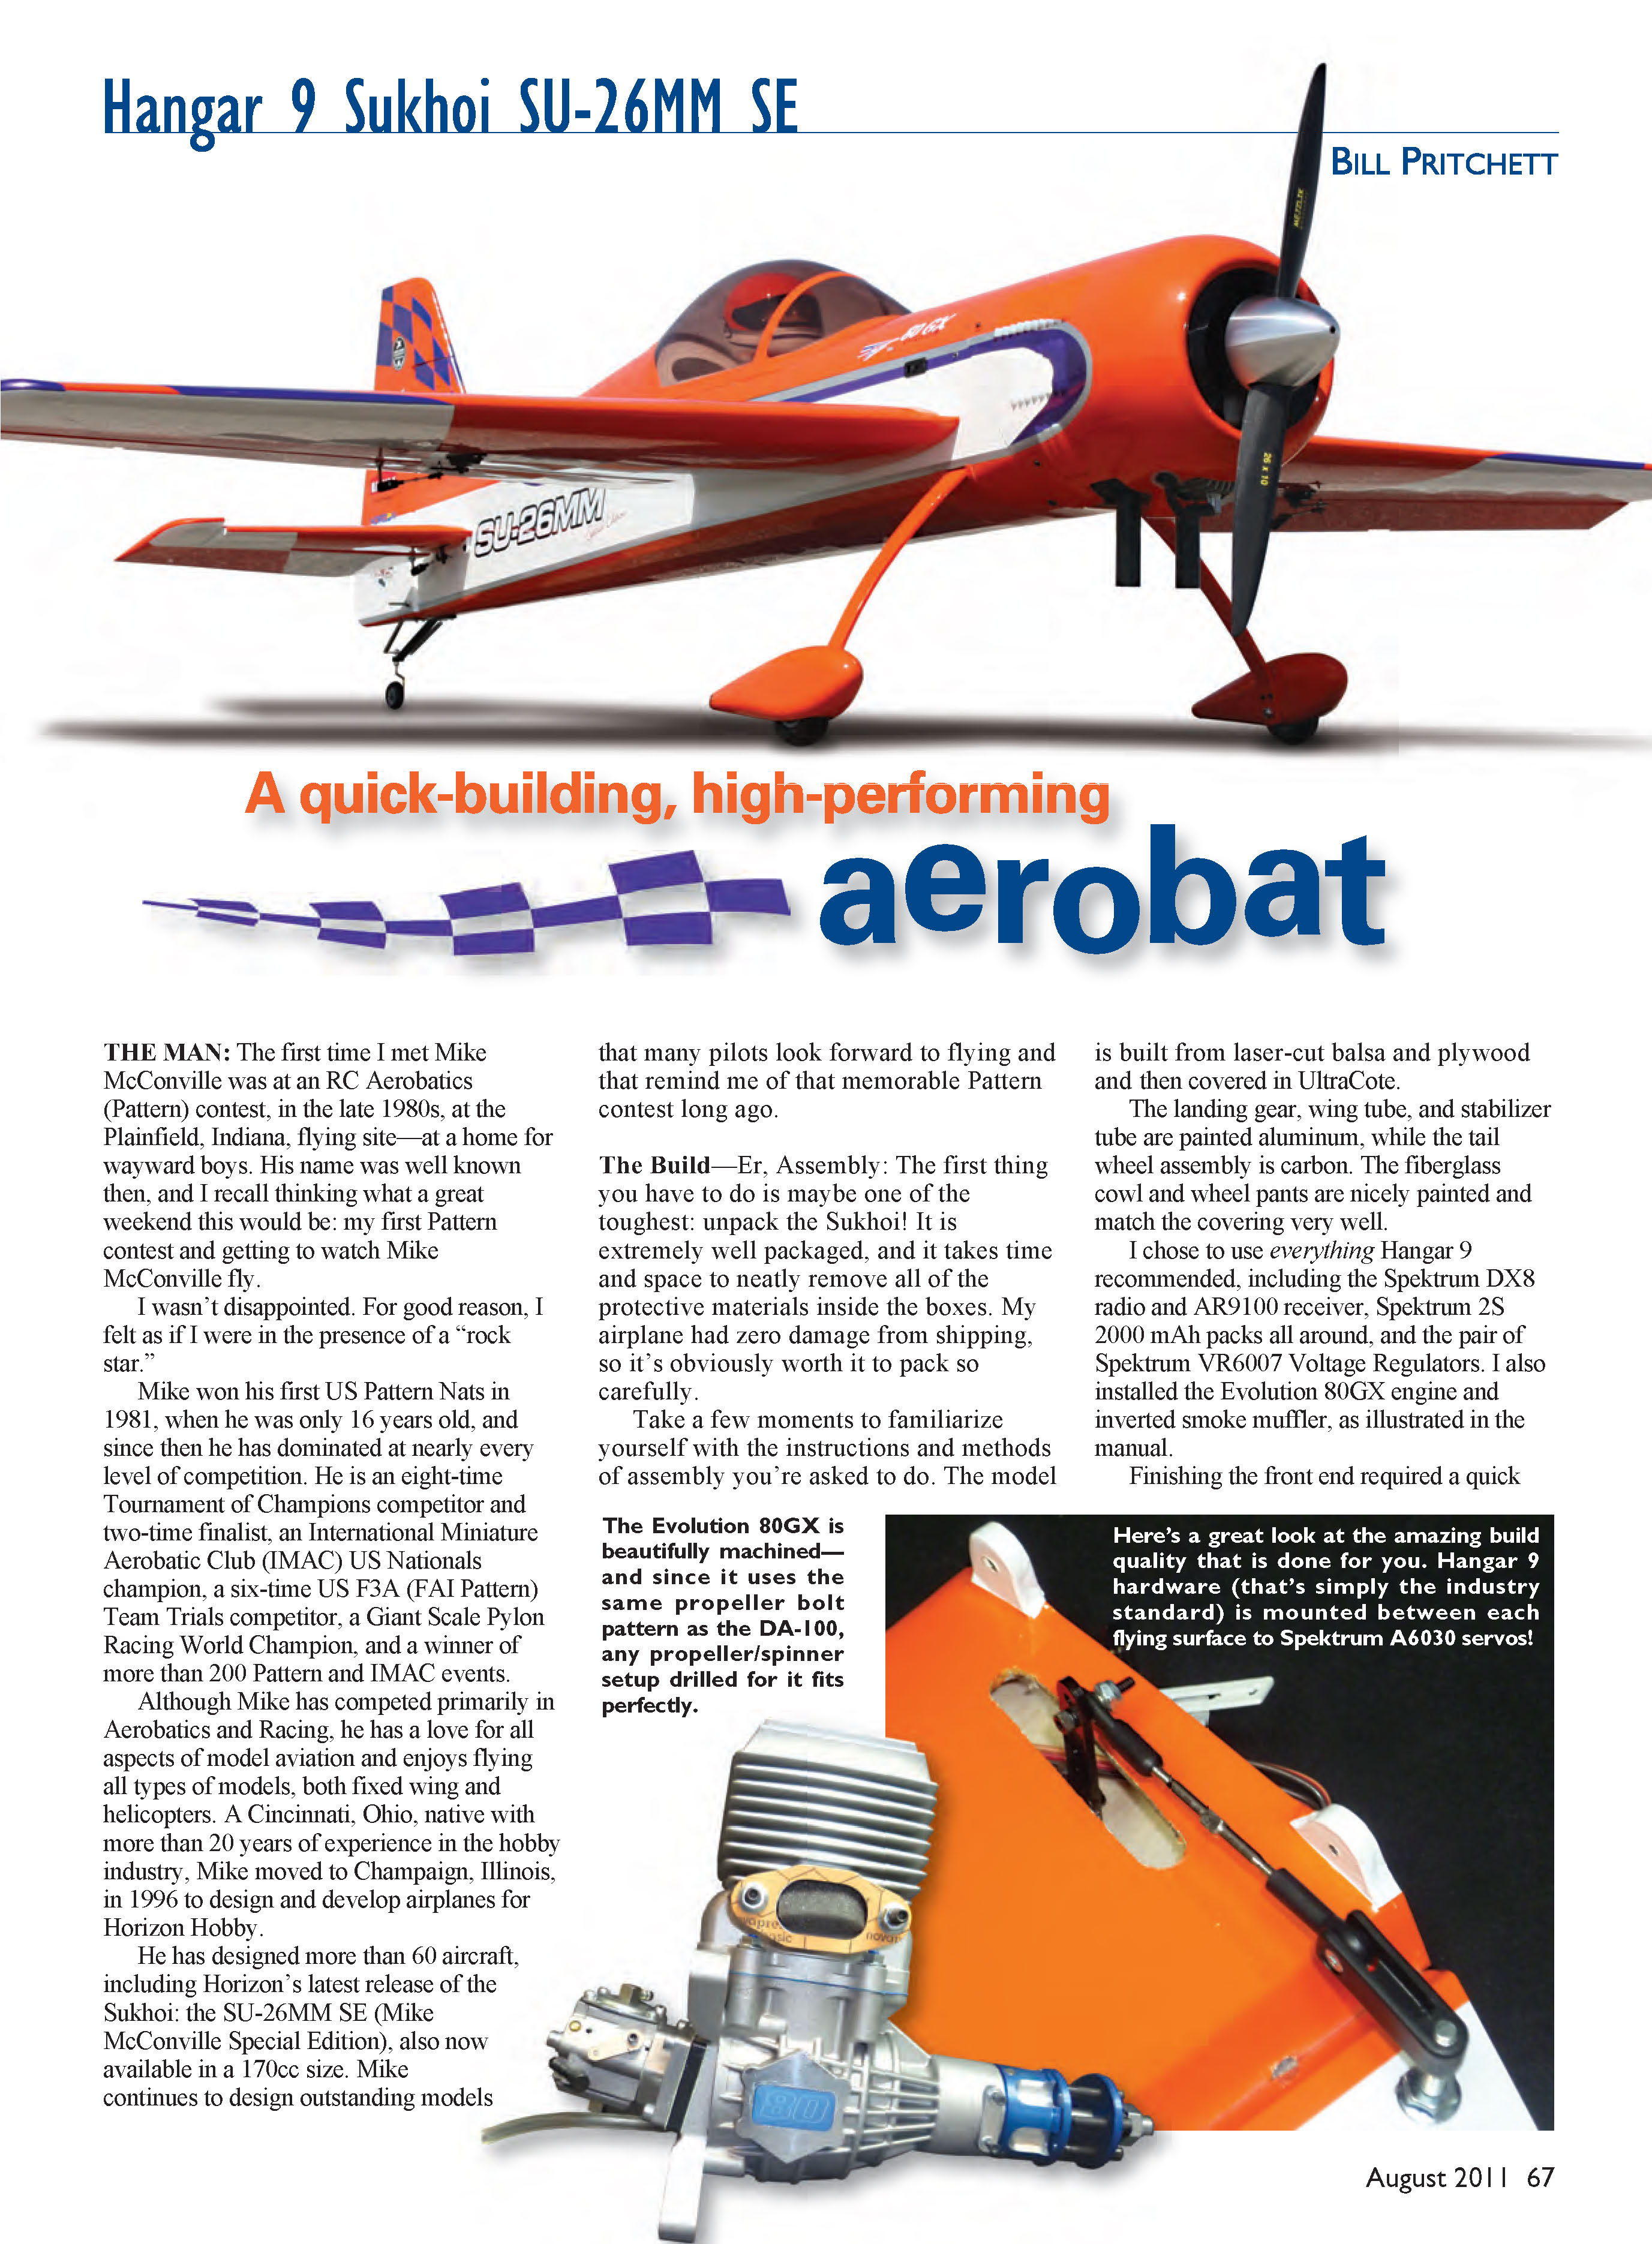
I chose to use everything Hangar 9 recommended, including the Spektrum DX8 radio and AR9100 receiver, Spektrum 2S 2000 mAh packs all around, and a pair of Spektrum VR6007 voltage regulators. I also installed the Evolution 80GX engine and inverted smoke muffler, as illustrated in the manual.
One of my favorite things about this airplane is how easy it is to see. On takeoff for the initial test flight, it literally flew by itself. Allow these bigger airplanes to gain ground speed, and they climb out smoothly. It’s also a must for the “cool factor” to keep it on the ground a bit after the tail comes off the runway—and that won’t take long!
I wanted an excuse to replace my old gas can and figured this was it. I called Dean at Jersey Modeler, and he hooked me up with his great product that is extremely well thought out and manufactured. Dean makes it easy to have a completely sealed fill/drain setup—no more gas fumes in your vehicle or angering other club members by killing the grass!
If you’ve ever considered getting a big airplane but were concerned about the radio installation/setup or plumbing for a gas engine, I have great news for you. It’s all done in the SU-26MM!
In fact, I would be hard-pressed to know many local fliers, myself included, who would do a better job of putting servos and linkages in a large gas aircraft. Everywhere you look is professionally installed Hangar 9 Titanium Pro-Links—what I would have used. It’s the right stuff installed the right way.
All flying surfaces are prehinged and installed except the rudder. For that, all the hinges are installed and you simply have to attach it with the included steel pin. The instruction steps are incredibly well organized and basically in logical order.
I use both a stand on the bench and the landing gear to handle the model during assembly, so I did put the landing gear on earlier than instructed. One thing I really appreciate is that hardware that was not already permanently installed arrived loosely installed where it belonged. There was no searching through a bag of hardware, measuring, fitting, counting, and trying to figure that all out!
As the instructions indicate, using a thread-locking adhesive on all metal-to-metal hardware that doesn’t come permanently fitted or that uses self-locking hardware is a must. The tank is installed, the hose setup for the vent is already looped on top, and all cutouts for switches are there waiting on you.
Your basic install is the radio (receiver!) and engine. That’s it.
In addition to instructions for installing the 80GX, there are directions for installation of the DA-85, as well as accommodations for a canister or tuned-pipe setup. There’s plenty of room in the fuselage if you choose to go that way.
The suggested Pitts-style muffler that goes with the Evolution power plant should be perfect for most fliers. Although the hardware is included and instructions are to use a servo-driven choke, I chose to make that simple and manual. Even mounts for the 80GX ignition are preinstalled for a soft-mount setup on the side of the motor box where it belongs.
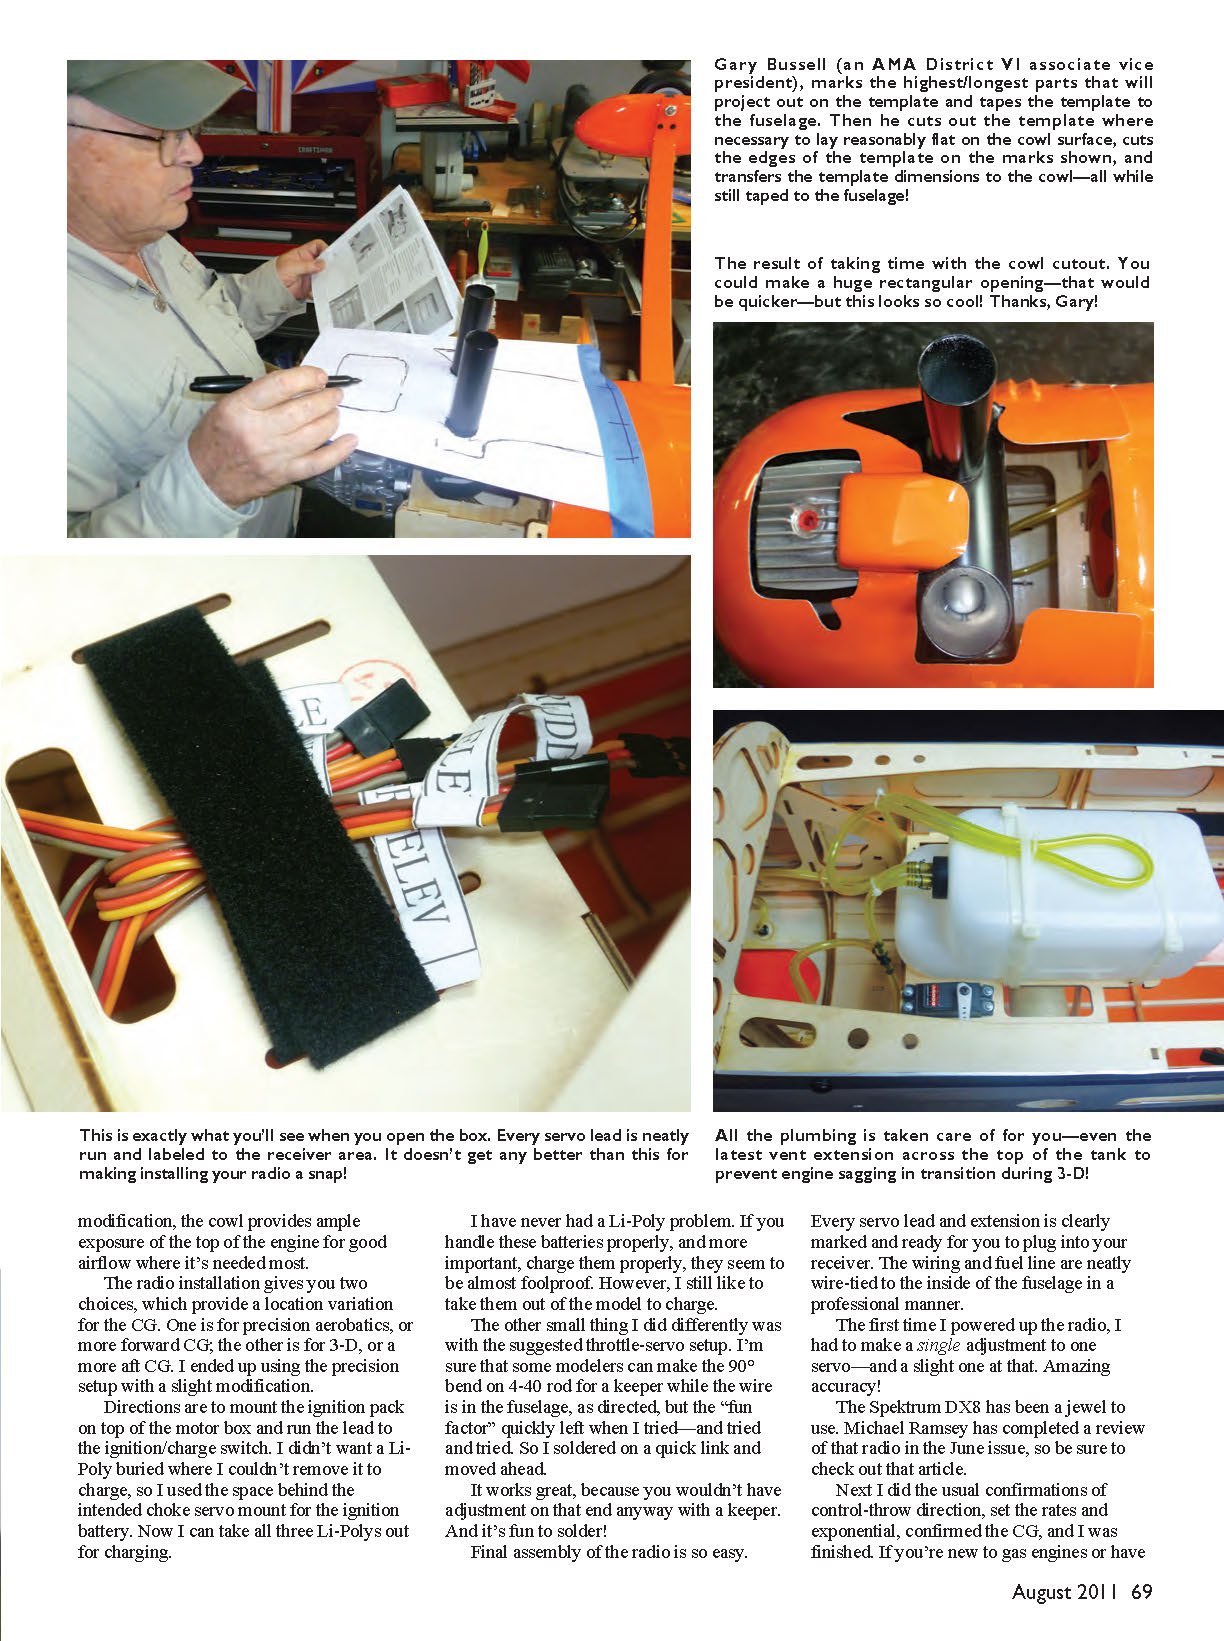
The cowl mounts with four bolts that fit perfectly. In my experience, the things that will take you some time with this project are the unpacking and the cowl. As I mentioned, the Sukhoi is extraordinarily well packaged for shipping.
When you have the engine and muffler mounted and it’s time to make clearance accommodations in the cowl bottom, you might want to remove a bunch of the bottom of the cowl. Then it won’t take long at all! I spent an entire evening doing this to take off as little as possible while giving adequate clearance. Without modification, the cowl provides ample exposure of the top of the engine for good airflow where it's needed most.
The radio installation gives you two choices, which provide a location variation for the CG. One is for precision aerobatics, or a more forward CG; the other is for 3-D, or a more aft CG. I ended up using the precision setup with a slight modification.
Directions are to mount the ignition pack on top of the motor box and run the lead to the ignition/charge switch. I didn't want a Li-Poly buried where I couldn't remove it to charge, so I used the space behind the intended choke-servo mount for the ignition battery. Now I can take all three Li-Polys out for charging.
I have never had a Li-Poly problem. If you handle these batteries properly, and more important, charge them properly, they seem to be almost foolproof. However, I still like to take them out of the model to charge.
The other small thing I did differently was with the suggested throttle-servo setup. I'm sure that some modelers can make the 90° bend on 4-40 rod for a keeper while the wire is in the fuselage, as directed, but the "fun factor" quickly left when I tried—and tried and tried. So I soldered on a quick link and moved ahead. It works great, because you wouldn't have adjustment on that end anyway with a keeper. And it's fun to solder!
Final assembly of the radio is so easy. Every servo lead and extension is clearly marked and ready for you to plug into your receiver. The wiring and fuel line are neatly wire-tied to the inside of the fuselage in a professional manner.
The first time I powered up the radio, I had to make a single adjustment to one servo—and a slight one at that. Amazing accuracy!
The Spektrum DX8 has been a jewel to use. Michael Ramsey has completed a review of that radio in the June issue, so be sure to check out that article.
Next I did the usual confirmations of control-throw direction, set the rates and exponential, confirmed the CG, and I was finished. If you're new to gas engines or have lots of experience, you will be pleased with the Evolution. It handles easily, draws fuel well, and, as is any good engine, is predictable.
The ignition works exactly as advertised and has a great safety feature: it shuts down if you don't flip it for 90 seconds. Simply turn it off and back on, and it's ready to go again.
Give these power plants a great deal of respect. Always ensure that the airplane is tied down and that you have a friend hold for you. Make sure the wings are mounted every time you run the engine; they absorb an amazing amount of vibration that the fuselage won't handle by itself.
Do run the power plant on the ground. I suggest 15–20 minutes of low-speed ground time with occasional throttle increases and rpm variations. Include a range check, as the manufacturer of your radio suggests (with the engine on), and you're ready to fly!
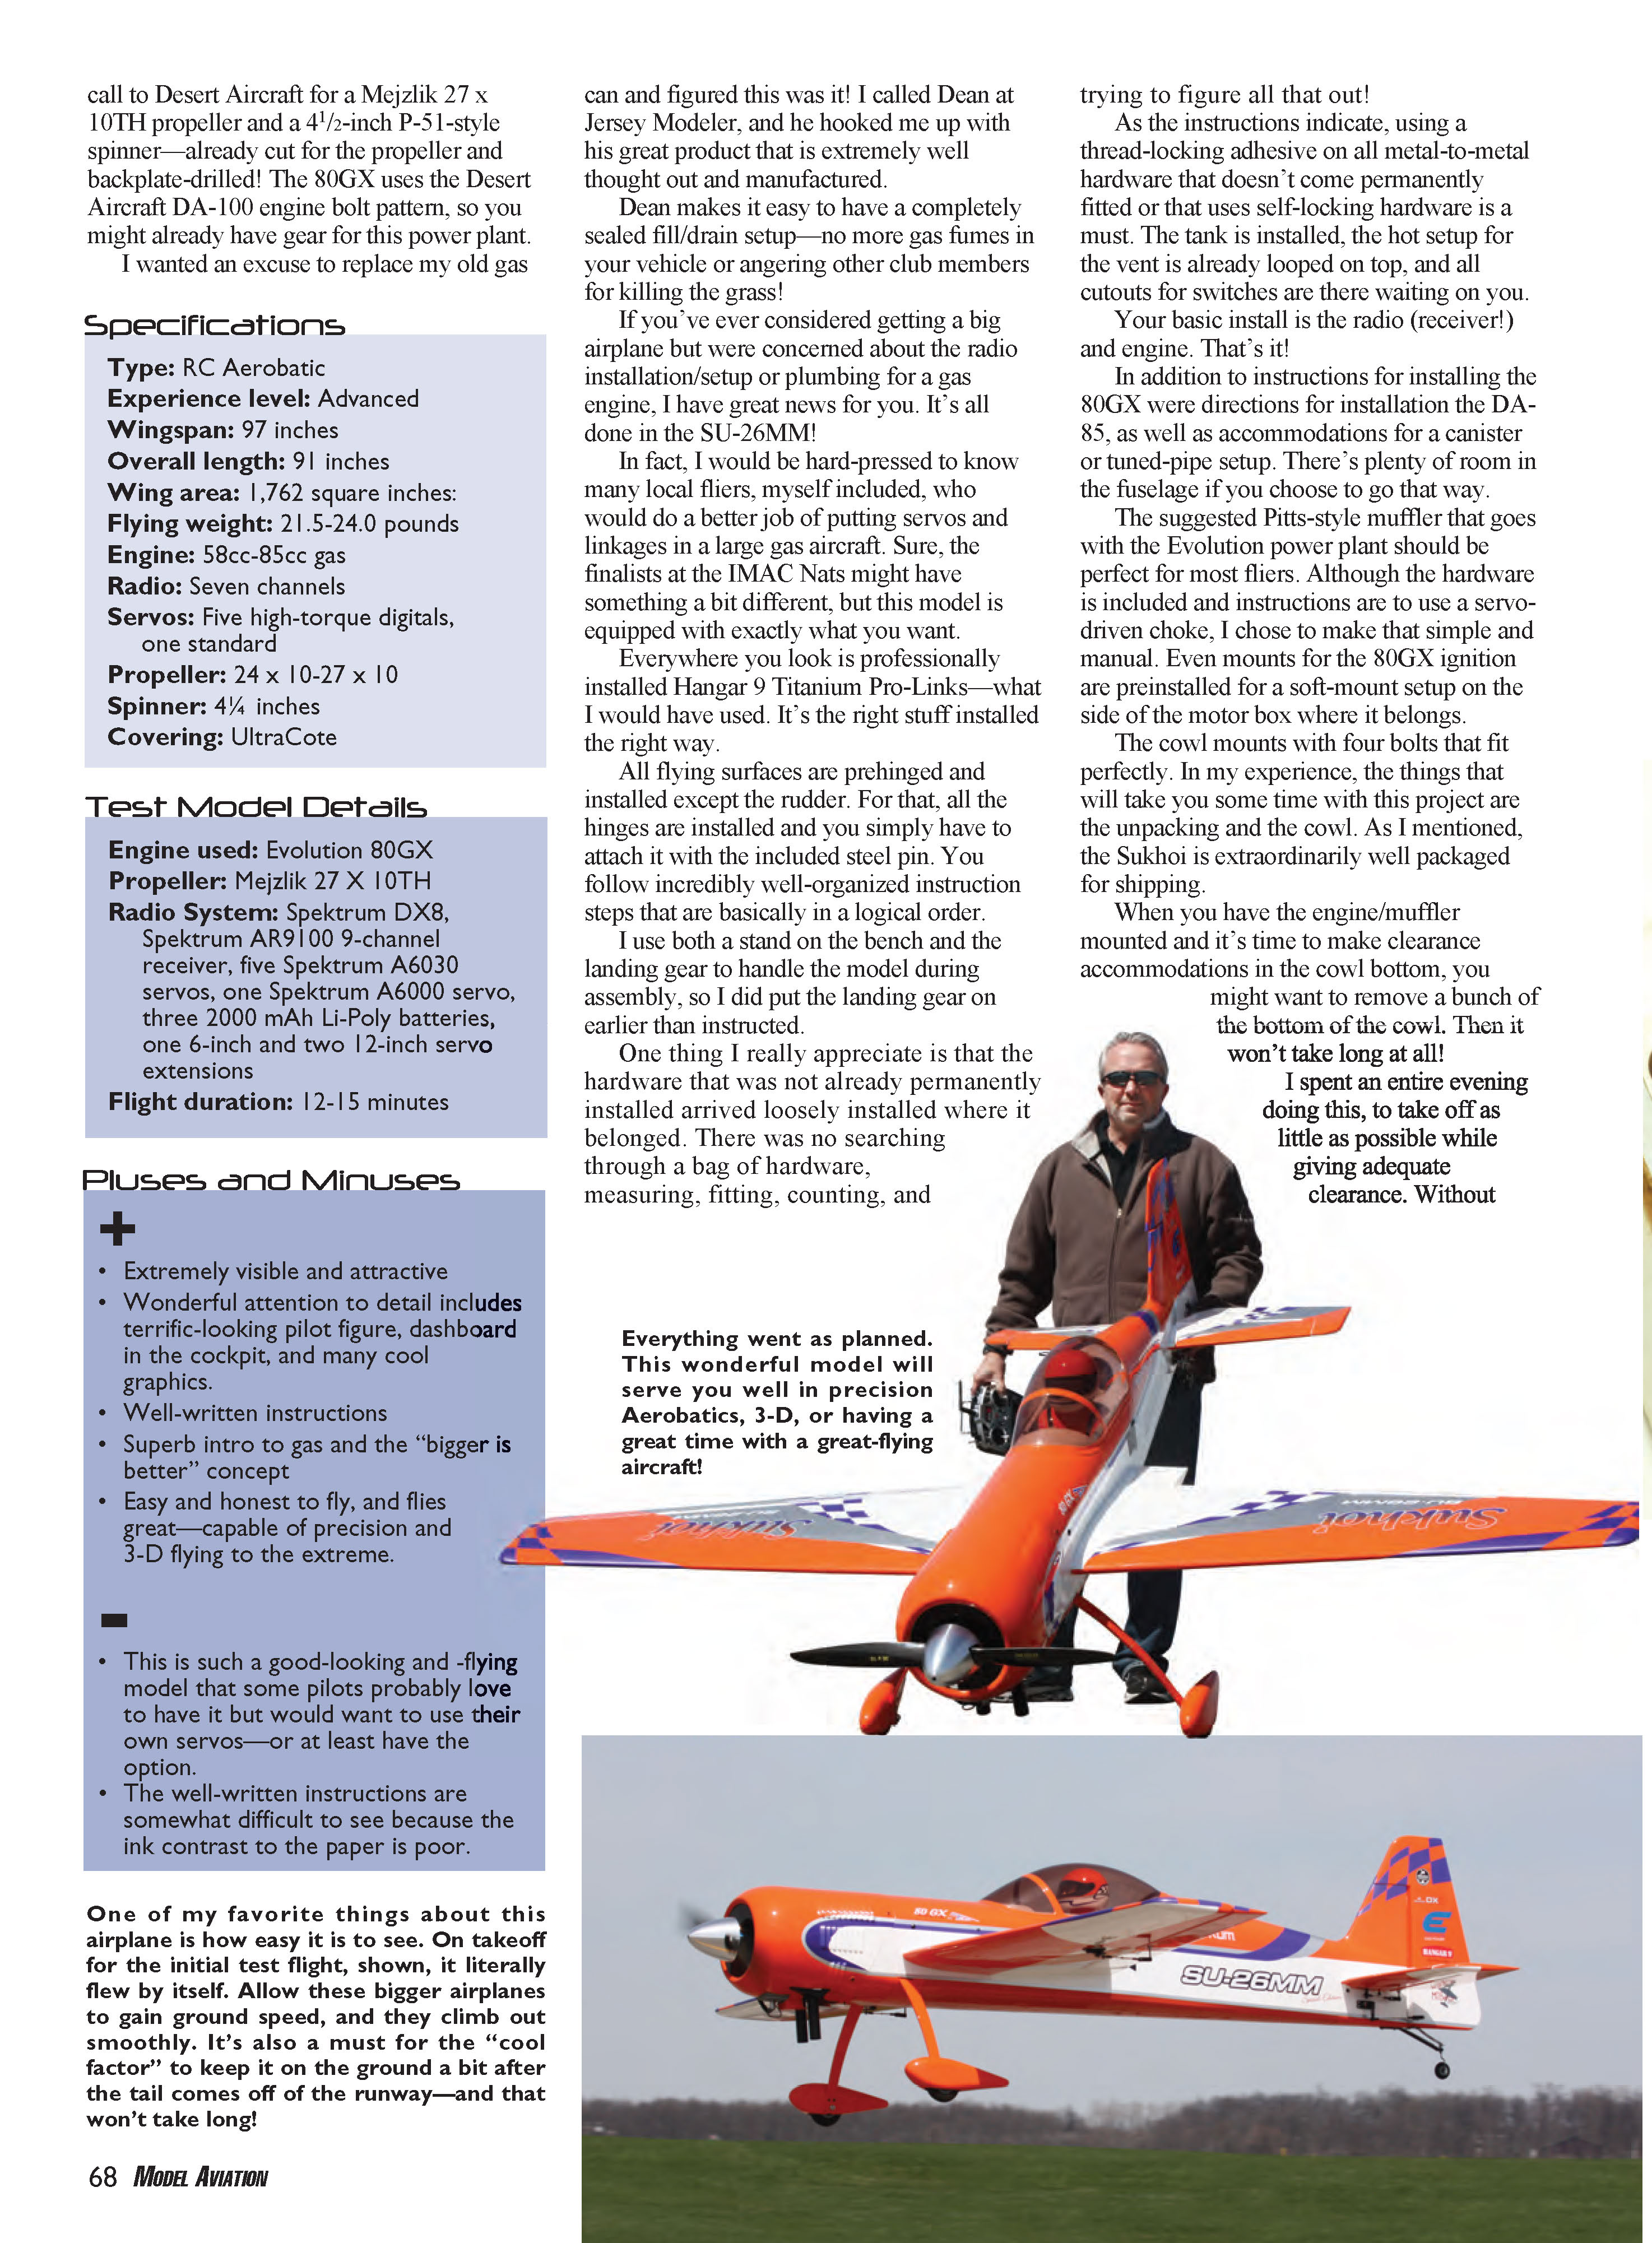
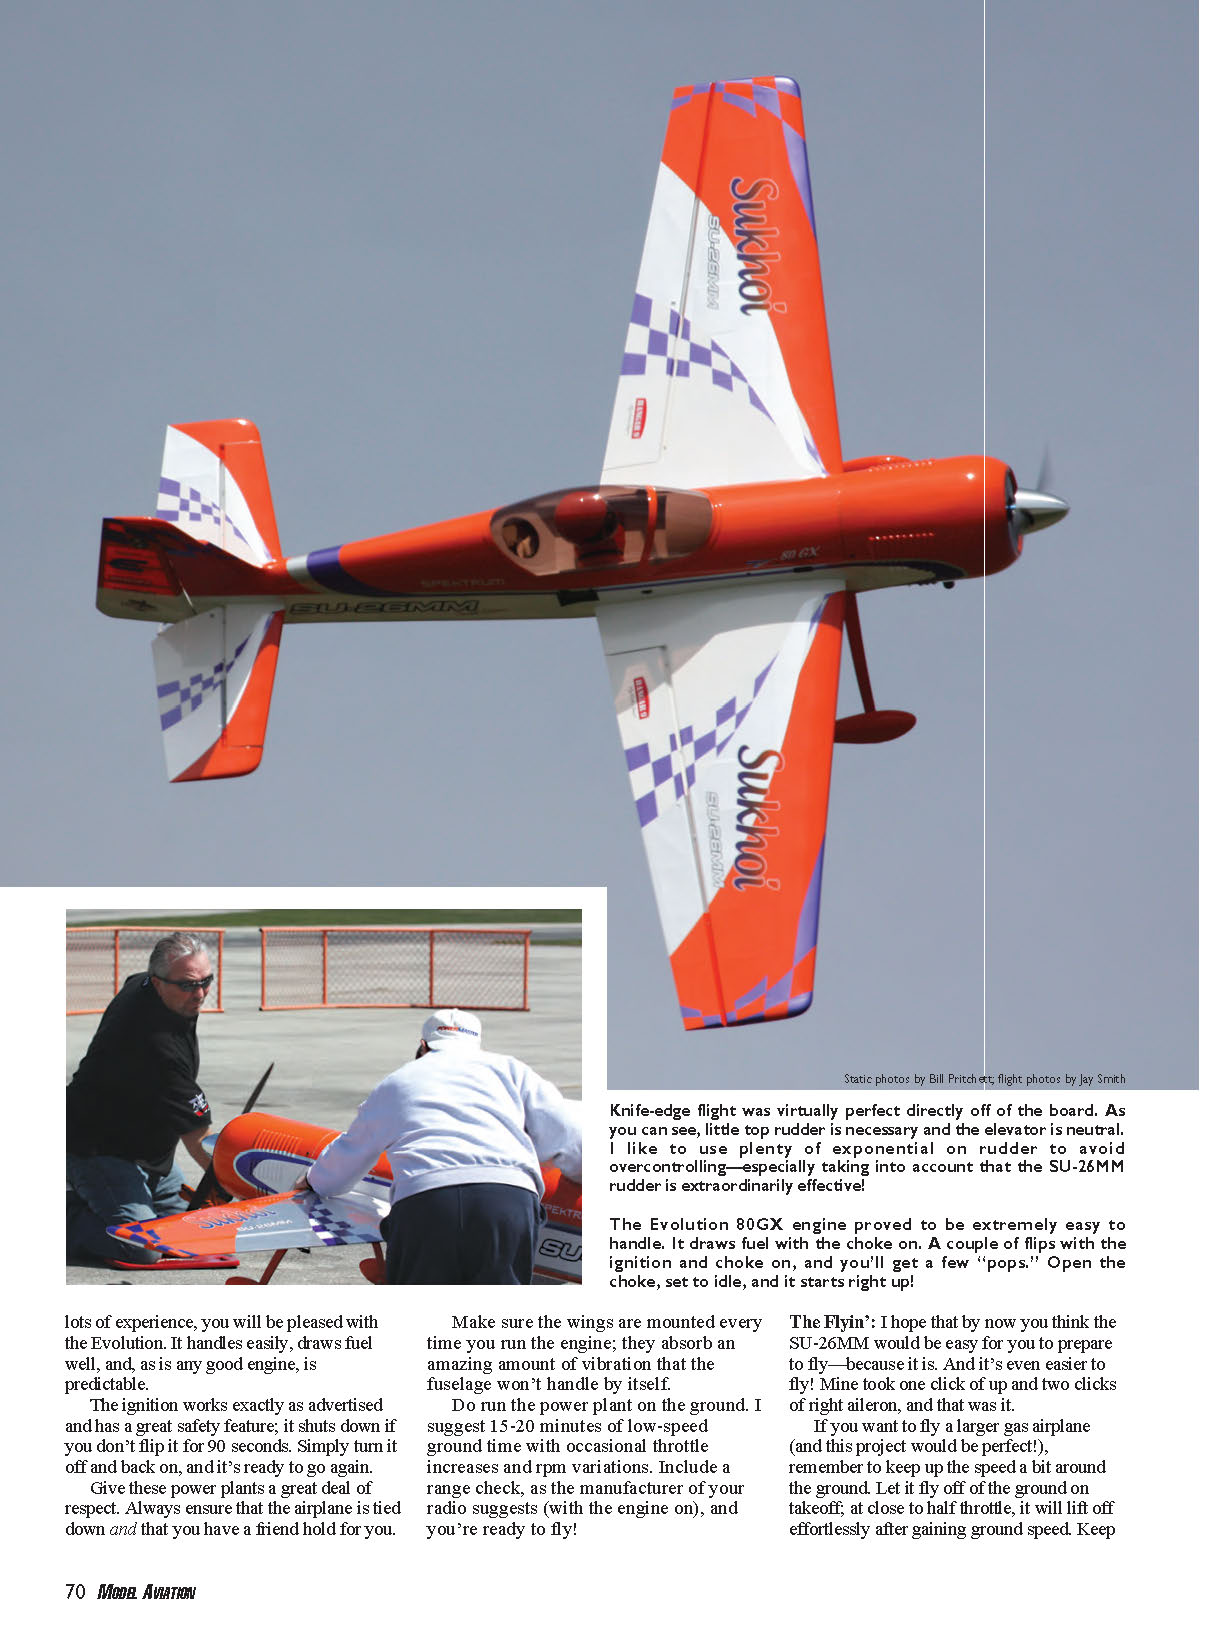
Knife-edge flight was virtually perfect directly off the board. Little top rudder is necessary and the elevator is neutral. I like to use plenty of exponential on rudder to avoid overcontrolling—especially taking into account that the SU-26MM rudder is extraordinarily effective!
The Evolution 80GX engine proved to be extremely easy to handle. It draws fuel with the choke on. A couple of flips with the ignition and choke on, and you'll get a few "pops." Open the choke, set to idle, and it starts right up!
Flying
I hope that by now you think the SU-26MM would be easy for you to prepare to fly—because it is. And it's even easier to fly! Mine took one click of up and two clicks of right aileron, and that was it.
If you want to fly a larger gas airplane (and this project would be perfect!), remember to keep up the speed a bit around the ground. Let it fly off the ground on takeoff; at close to half throttle, it will lift off effortlessly after gaining ground speed. Keep the speed up on landing approaches. If you try to creep it into the ground, it will bounce. Use brisk approaches and set it down—don't flare it. With some speed on approach, it’s a greased landing every time.
The biggest difference between this Sukhoi and your 60-size aircraft is that you can’t cut the throttle at 10 feet and start pulling on the elevator; let it fly!
On low rates, this airplane will fly similar to a 60-size “second” airplane. On high rates, let your imagination run wild. It has great power-to-weight and will do anything you can do.
One of the things I like most about this model is how easy it is to see. The color scheme is perfect for my eyes, and others who have seen it fly say the same; it looks great in the air!
The flying report is short for a reason: there’s not much to report. I have my Sukhoi set up with a CG that calls for a slight push when inverted, and I love it.
Do not be intimidated by the size of this airplane. It has all the great flying characteristics of the “bigger is better” concept and none of the bad. Did I mention how good it looks in the air?
Tips
- Carburetor: If you are new to running gas power plants with a Walbro carburetor, note that the fuel line from the clunk should go to the black plastic inlet. The metal inlet on top is an atmospheric vent, and the bottom inlet is the pump diaphragm that is connected to the crankcase tap.
- Fuel line: The plumbing on the clunk side is cool—but unnecessary in my experience. I removed close to a foot of that line and ran straight into the motor box from the fill-line T-connection.
- RTV: I like to use room-temperature vulcanizing (RTV) silicone on hardware that I don’t want to come off but will want to take off sometime. Loctite is great on engine mounts, propeller bolts, etc. However, this will decompose in time. Because you occasionally check those anyway, it’s okay—clean the bolts and put on more Loctite when needed.
I like to use RTV, or pure clear silicone, on hardware for tasks such as mounting the cowl. Vibration will not take out that adhesive, and it won’t decompose rapidly.
On this project I made a small seal of silicone over the former, below the back of the cowl. I ran a bead, covered it with Saran Wrap, installed the cowl, and let it dry for 24 hours. Now there’s no chance of vibration chafing that large area!
I also like to protect the spark lead from any contact with the cowl. I cut out an area that gives the lead room to move a bit and line it with fuel line; slice it on one side and attach with RTV. It works great, looks great, and truly protects that critical lead to the plug.
- Wing bolts: I learned this from the Pattern community, and it’s a great method. Cut doughnuts of 80-grit sandpaper the size of the wing-bolt backs. Make a hole the size of your bolt and, using that RTV you just bought, glue them on. Now when you install wing bolts, you’re assured—with the 80-grit paper up against the inside of the fuselage—that they will not vibrate loose. —MA
Bill Pritchett billp@modelaircraft.org
Sources
- Horizon Hobby — (800) 338-4639 — www.horizonhobby.com
- Jersey Modeler — (732) 240-0138 — www.jerseymodeler.com
- Spektrum — (800) 338-4639 — www.spektrumrc.com
- Tru-Turn — (281) 479-9600 — www.truturn.com
- Mejzlik / Desert Aircraft — (520) 722-0607 — www.desertaircraft.com
- Loctite — (800) 624-7767 — www.loctiteproducts.com
Transcribed from original scans by AI. Minor OCR errors may remain.

