
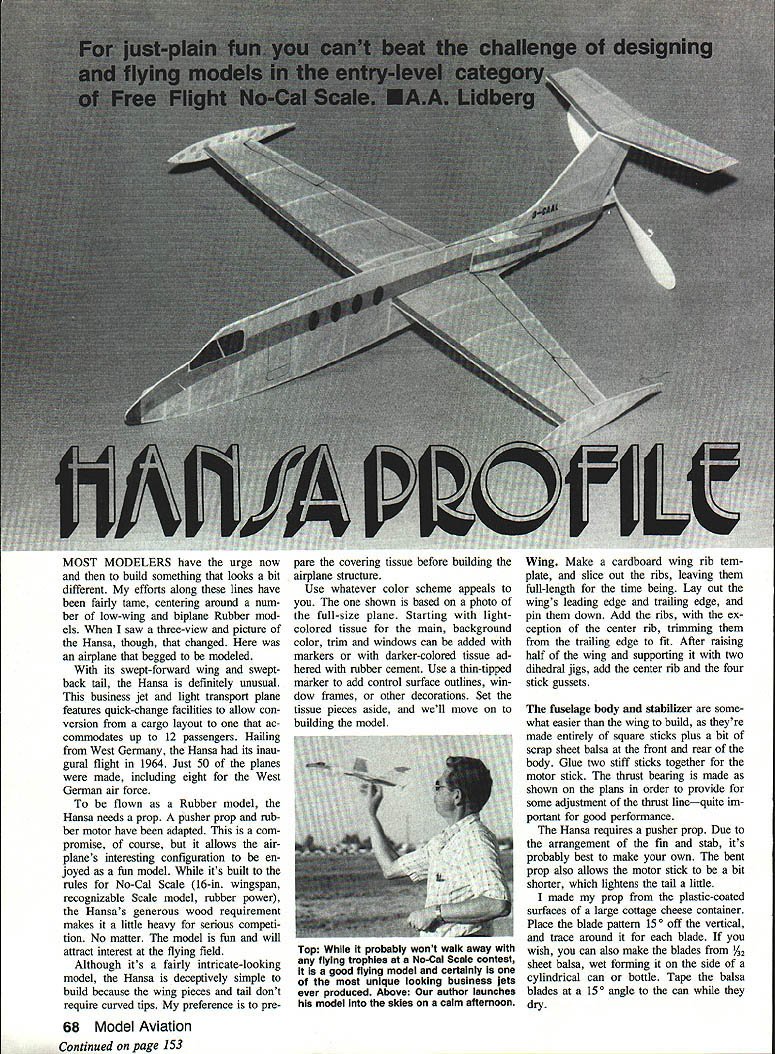

HANSA PROFILE
Most modelers have the urge now and then to build something that looks a bit different. My efforts along these lines have been fairly tame, centering around a number of low‑wing and biplane rubber models. When I saw a three‑view and a picture of the Hansa, though, that changed. Here was an airplane that begged to be modeled.
With its swept‑forward wing and swept‑back tail, the Hansa is definitely unusual.
This business jet and light transport features quick‑change facilities to allow conversion from a cargo layout to accommodations to carry up to 12 passengers. Hailing from West Germany, the Hansa had its inaugural flight in 1964. Just 50 of the planes were made, including eight for the West German air force.
To be flown as a rubber model, the Hansa needs a prop. A pusher prop and rubber motor have been adapted. This is a compromise, of course, but it allows the airplane's interesting configuration to be enjoyed as a fun model. While it's built to the rules for No‑Cal Scale (16‑in. wingspan, recognizable scale model, rubber power), the Hansa's generous wood requirement makes it a little heavy for serious competition. No matter—the model is fun and will attract interest at the flying field.
Although it's a fairly intricate‑looking model, the Hansa is deceptively simple to build because the wing pieces and tail don't require curved tips. My preference is to prepare the covering tissue before building the airplane structure.
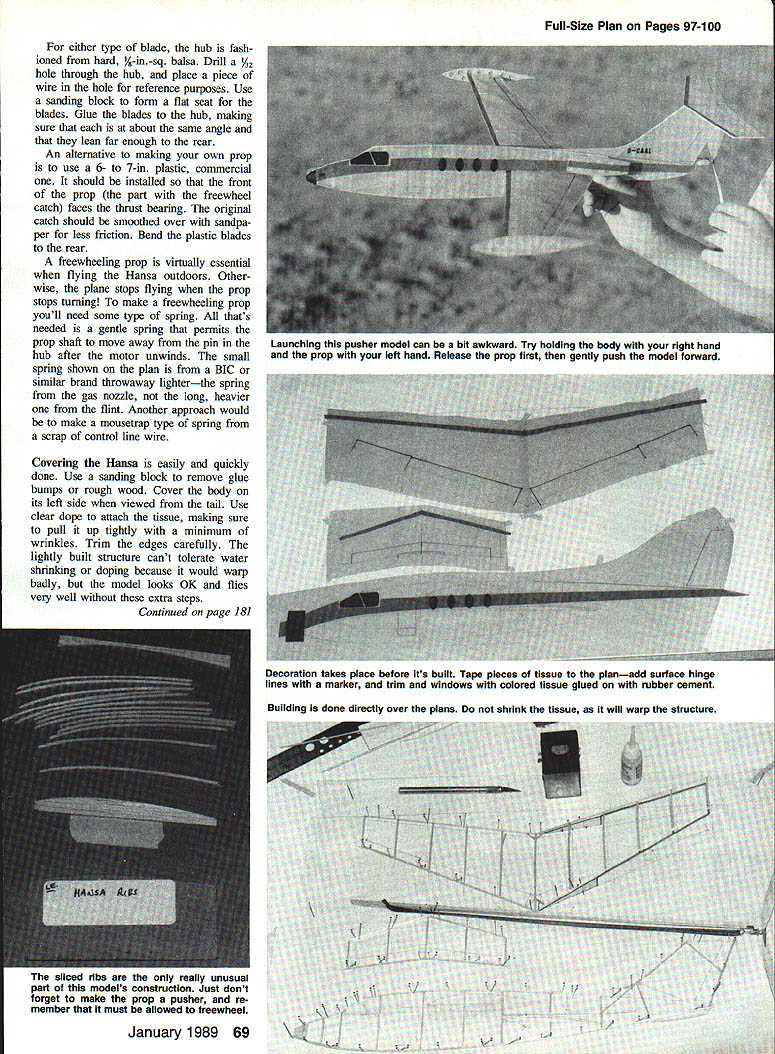
Use whatever color scheme appeals to you. The one shown is based on a photo of the full‑size plane. Starting with light‑colored tissue for the main background color, trim and windows can be added with markers or with darker‑colored tissue adhered with rubber cement. Use a thin‑tipped marker to add control surface outlines, window frames, or other decorations. Set the tissue pieces aside, and we'll move on to building the model.
Wing
Make a cardboard wing rib template and slice out the ribs, leaving them full length for the time being. Lay out the wing's leading edge and trailing edge, and pin them down. Add the ribs, with the exception of the center rib, trimming them from the trailing edge to fit. After raising the half‑wing and supporting it with two dihedral jigs, add the center rib and the four stick gussets.
Fuselage and stabilizer
The fuselage body and stabilizer are somewhat easier than the wing to build, as they're made entirely of square sticks plus a bit of scrap sheet balsa at the front and rear of the body. Glue two stiff sticks together for the motor stick. The thrust bearing is made as shown on the plans in order to provide for some adjustment of the thrust line—quite important for good performance.
The Hansa requires a pusher prop. Due to the arrangement of the fin and stab, it's probably best to make your own. The bent prop also allows the motor stick to be a bit shorter, which lightens the tail a little.
Propeller
I made my prop from the plastic‑coated surfaces of a large cottage‑cheese container. Place the blade pattern 15° off the vertical and trace around it for each blade. If you wish, you can also make the blades from 1/32" sheet balsa, wet‑forming them on the side of a cylindrical can or bottle. Tape the balsa blades at a 15° angle to the can while they dry.
For either type of blade, fashion the hub from hard 1/8‑in.‑square balsa. Drill a small hole (about 3/32") through the hub and place a piece of wire in the hole for reference purposes. Use a sanding block to form a flat seat for the blades. Glue the blades to the hub, making sure they are at about the same angle and lean far enough to the rear.
An alternative to making your own prop is to use a 6–7" plastic commercial prop. Install it so that the front part (the part with the freewheel catch) faces the thrust bearing; smooth the faces of the thrust bearing or original catch with sandpaper for less friction. Bend the plastic blades rearward.
A freewheeling prop is virtually essential for flying the Hansa outdoors; otherwise the plane stops flying when the prop stops turning. To make a freewheeling prop you'll need a gentle spring that permits the prop shaft to move away from the pin in the hub after the motor unwinds. The small spring shown on the plan is the long, light spring from a throwaway lighter (not the heavier flint spring). Another approach is to make a mousetrap‑type spring from scrap control‑line wire.
Covering
Covering the Hansa is easily and quickly done. Use a sanding block to remove glue bumps and rough wood. Cover the body from its left side (viewed from the tail). Use clear dope to attach the tissue, making sure to pull it up tightly with a minimum of wrinkles. Trim edges carefully—the lightly built structure can't tolerate water‑shrinking dope because it would warp badly. The model looks OK and flies very well without extra steps.
Hansa No‑Cal/Lidberg
Lay the body down on its left, covered side, and glue on the motor stick, making sure not to place the stick where the wing must fit. Add the stabilizer and wing. If you haven't already done so, make up the tip tanks and add the "jet" engine.
Make lightening holes for the sheet balsa parts using a piece of sharpened brass tubing or the eraser holder from an old wooden pencil; cover these parts and glue them in place. Attach a loop of rubber, and check the balance. Add clay at the front of the body as necessary to obtain the balance point shown on the plan.
Check the plane over for any warps, using dry heat (an electric stove burner or space heater) to straighten them out. Try a test glide, making sure that the prop freewheels in the air. Some adjustment by adding or removing clay may be necessary for an optimal glide.
Try some power flights. Use about 100 turns (making sure to wind in the correct direction). Power adjustments are made largely by using the bendable thrust bearing:
- If the model stalls, add a bit more downthrust.
- If it won't climb, reduce downthrust, add more turns, and/or remove some clay.
This airplane seems happiest with a wide climb turn. If you're ready to turn a few heads at the flying field, the Hansa is a surefire way to have some fun doing it.
Transcribed from original scans by AI. Minor OCR errors may remain.

