
HAPPY DAYS
— Jim Kostecky
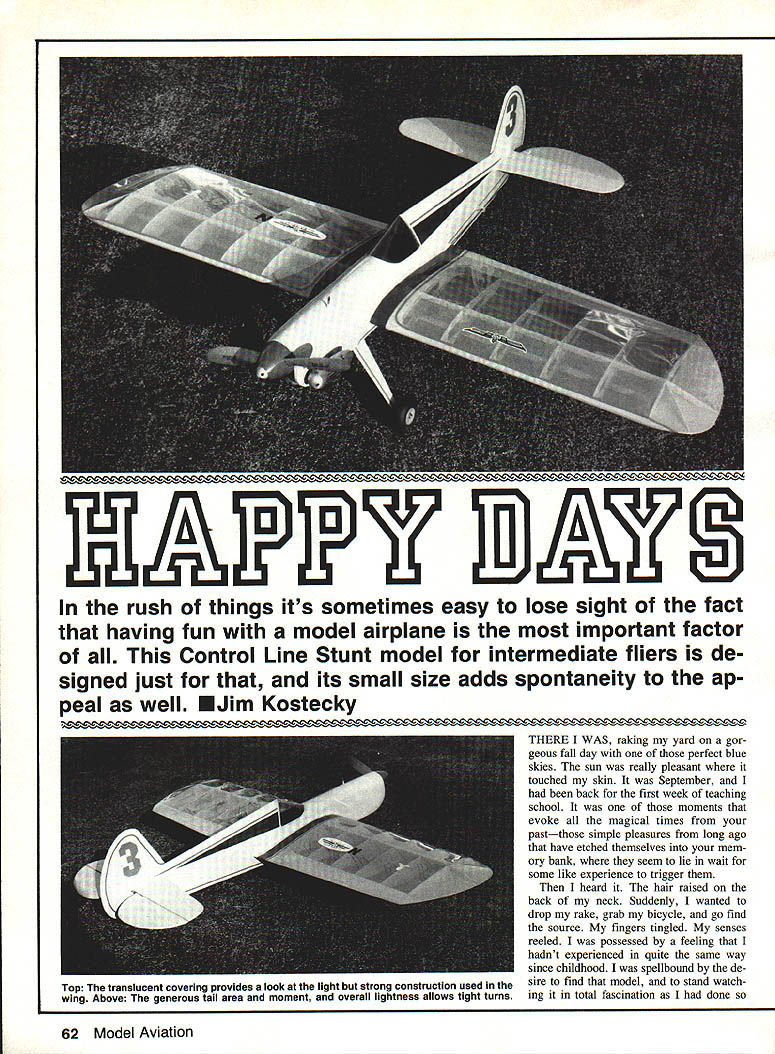
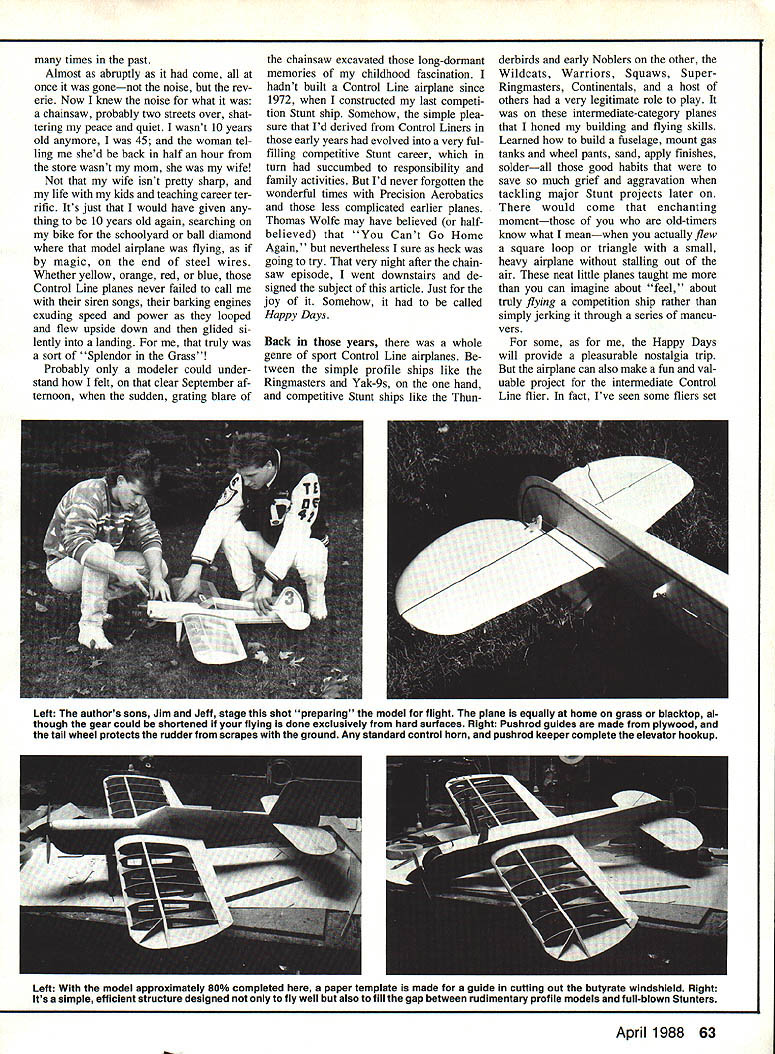
In the rush of things it's sometimes easy to lose sight of the fact that having fun with a model airplane is the most important factor of all. This Control Line Stunt model for intermediate fliers is designed just for that, and its small size adds spontaneity to the appeal as well.
There I was, raking my yard on a gorgeous fall day with one of those perfect blue skies. The sun was really pleasant where it touched my skin. It was September, and I had been back for the first week of teaching school. It was one of those moments that evoke all the magical times from your past—those simple pleasures from long ago that have etched themselves into your memory bank, where they seem to lie in wait for some like experience to trigger them.
Then I heard it. The hair raised on the back of my neck. Suddenly, I wanted to drop my rake, grab my bicycle, and go find the source. My fingers tingled. My senses reeled. I was possessed by a feeling that I hadn't experienced in quite the same way since childhood. I was spellbound by the desire to find that model, and to stand watching it in total fascination as I had done so many times in the past.
Almost as abruptly as it had come, all at once it was gone—not the noise, but the reverie. Now I knew the noise for what it was: a chainsaw, probably two streets over, shattering my peace and quiet. I wasn't 10 years old anymore. I was 45; and the woman telling me she'd be back in half an hour from the store wasn't my mom, she was my wife! Not that my wife isn't pretty sharp, and my life with my kids and teaching career terrific. It's just that I would have given anything to be 10 years old again, searching on my bike for the schoolyard or ball diamond where that model airplane was flying, as if by magic, on the end of steel wires. Whether yellow, orange, red, or blue, those Control Line planes never failed to call me with their siren songs, their barking engines exuding speed and power as they looped and flew upside down and then glided silently into a landing. For me, that truly was a sort of "Splendor in the Grass"!
Probably only a modeler could understand how I felt, on that clear September afternoon, when the sudden, grating blare of the chainsaw excavated those long-dormant memories of my childhood fascination. I hadn't built a Control Line airplane since 1972, when I constructed my last competition Stunt ship. Somehow, the simple pleasure that I'd derived from Control Liners in those early years had evolved into a very fulfilling competitive Stunt career, which in turn had succumbed to responsibility and family activities. But I'd never forgotten the wonderful times with Precision Aerobatics and those less complicated earlier planes. Thomas Wolfe may have believed (or half-believed) that "You Can't Go Home Again," but nevertheless I sure as heck was going to try. That very night after the chainsaw episode, I went downstairs and designed the subject of this article. Just for the joy of it. Somehow, it had to be called Happy Days.
Back in those years, there was a whole genre of sport Control Line airplanes. Between the simple profile ships like the Ringmasters and Yak-9s on the one hand, and competitive Stunt ships like the Thunderbirds and early Noblers on the other, the Wildcats, Warriors, Squaws, Super-Ringmasters, Continentals, and a host of others had a very legitimate role to play. I learned how to build a fuselage, mount gas tanks and wheel pants, sand, apply finishes, solder—all those good habits that were to save so much grief and aggravation when tackling major Stunt projects later on. There would come that enchanting moment—those of you who are old-timers know what I mean—when you actually flew a square loop or triangle with a small, heavy airplane without stalling out of the air. These neat little planes taught me more than you can imagine about "feel," about truly flying a competition ship rather than simply jerking it through a series of maneuvers.
For some, as for me, the Happy Days will provide a pleasurable nostalgia trip. But the airplane can also make a fun and valuable project for the intermediate Control Line flier. In fact, I've seen some fliers use this type of ship to bridge that gap. A summer spent flying the dickens out of this airplane will pay big dividends later on. It's lighter than a similar-sized profile model and flies considerably better. Barring a chance meeting with the ground, it will last forever, thanks to its ability to absorb vibration.
I soon found that in going back to design my "blast from the past," I could take some really great new technology with me. Adhesives such as the Titebond/Elmer's variety of carpenter's glues were certainly a plus. Cyanoacrylates (CYA) would have been a miracle to the 14-year-old kid who started a Flite Streak bird with model airplane glue and silkspan, but didn't get to fly it until Sunday afternoon. These airplanes may have looked pretty good, but unfortunately many of them met an untimely end literally before all the glue was dry.
Epoxy would have been useful, too. Iron-on coverings would have spared me countless admonitions, scowls, and downright threats from my long-suffering family as they endured a house full of dope fumes. Mixing some Oil of Wintergreen into my clear dope did appease my gasping parents a little—but only for a while. So as I got into the task of creating an intermediate Control Line model adapted for today's flier, I was reminded of how far we've come in the area of building materials.
On the other hand, while those early, simpler-but-clumsier days were clearly no modeler's Eden, there is a kind of lost innocence that we can never recapture. Today's modeler faces two realities that didn't exist back then: noise, and the lack of convenient flying sites in our litigation-prone society.
Noise was once the flier's trumpet call. The big, brazen sounds of our models boring through the skies kicked in a special surge of excitement that many of us vividly remember. Nowadays, it's a different story. The high dB levels we once took for granted are an assault to our neighbors' ears; noise jeopardizes our flying sites. So it was mandatory that some sort of noise control feature be included in this Happy Days, and it was.
Also, the current scarcity of flying sites convenient to modelers' homes is, at least in part, a direct result of the noise issue. As a kid, I could have walked to any one of a half-dozen flying sites. Now, I'm forced to drive 15 miles to a field that could be closed at any moment by a phone call from anyone who takes exception to my noise pollution. This model would need a durable landing gear suited to the rough terrain found at many of these outlying fields.
The Happy Days design I came up with is a joy to build—simple and straightforward, yet challenging to the intermediate builder. But the whole point really is the flying; and here I'm gratified to say that it outperforms most of its ancestors. The long tail moment eliminates the jerkiness and high-speed stalling you might get from horsing a Ringmaster through a 120° corner. Also, owing mostly to the fact that the builder can select his balsa, it's a lightweight ship. (I can remember balsa of the approximate weight, density, and flexibility of concrete in some of the old kits I built as a kid. What did I know? It had to be good if it was in a kit, right?)
Finally, don't forget to use some kind of muffler.
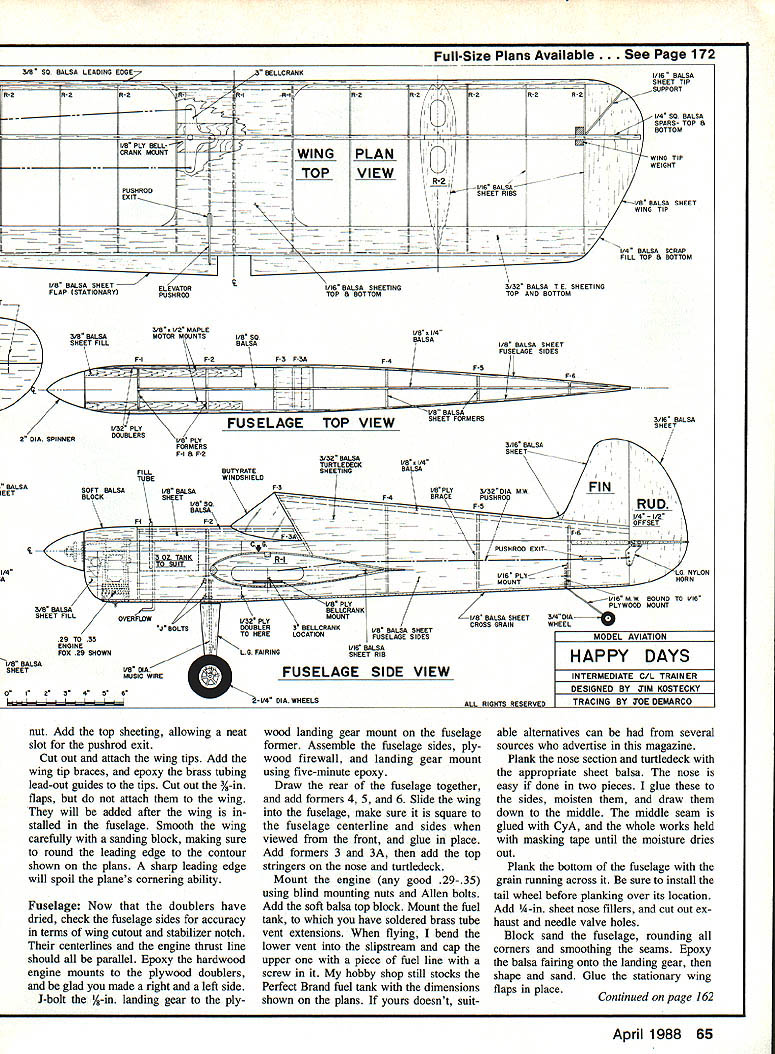
Construction — Overview
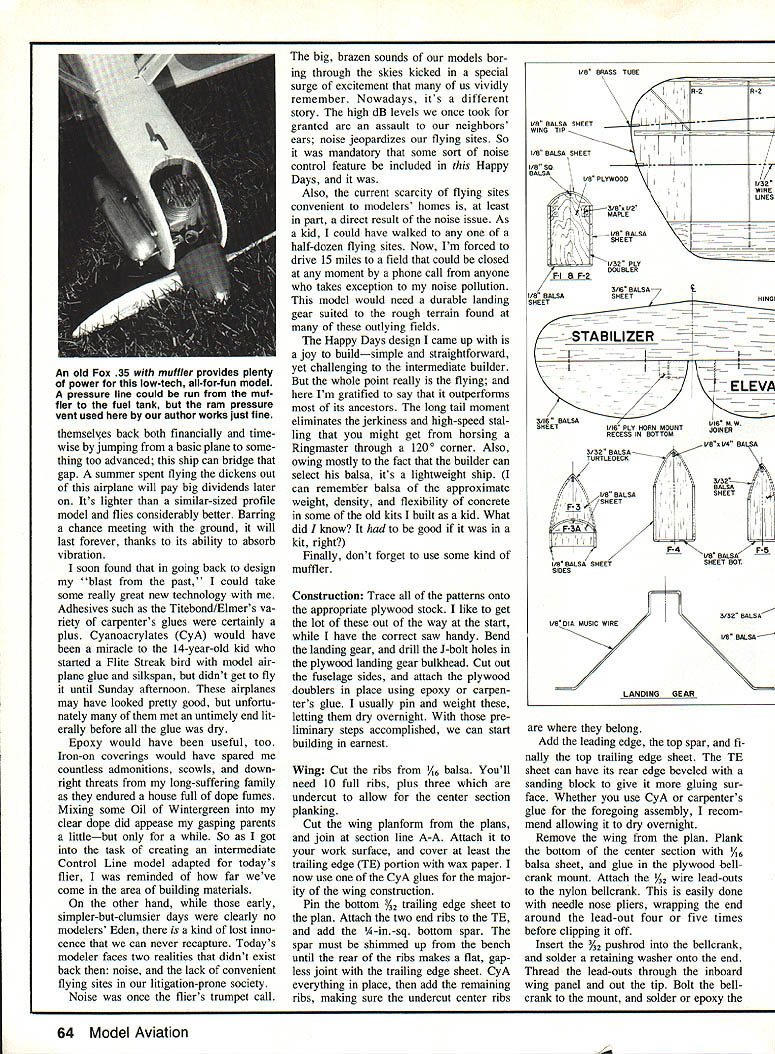
Trace all of the patterns onto the appropriate plywood stock. I like to get a lot of the little pieces out of the way at the start, while I have the correct saw handy. Bend the landing gear, and drill the J-bolt holes in the plywood landing gear bulkhead. Cut out the fuselage sides, and attach the plywood doublers in place using epoxy or carpenter's glue. I usually pin and weight these, letting them dry overnight. With those preliminary steps accomplished, we can start building in earnest.
#### Wing
- Cut the ribs from 1/16" balsa. You'll need 10 full ribs, plus three that are undercut to allow for the center section planking.
- Cut the wing platform from the plans, and join at section line A-A. Attach it to your work surface, and cover at least the trailing edge (TE) portion with wax paper.
- Pin the bottom 3/32" trailing edge sheet to the plan. Attach the two end ribs to the TE, and add the 1/4" sq. bottom spar.
- Shim the spars up from the bench until the rear of the ribs makes a flat, gapless joint with the trailing edge sheet. CA everything in place, then add the remaining ribs, making sure the undercut center ribs are where they belong.
- Add the leading edge, the top spar, and finally the top trailing edge sheet. The TE sheet can have its rear edge beveled with a sanding block to give it more of a rounded surface. Whether you use CYA or carpenter's glue for the foregoing assembly, allow it to dry overnight.
- Remove the wing from the plan. Plank the bottom of the center section with 1/16" balsa sheet, and glue in the plywood bellcrank mount.
- Attach the 1/32" plywood outserts to the nylon bellcrank. This is easily done with needle-nose pliers, wrapping the end of the lead-out wire around the outsert four or five times before clipping it off.
- Insert the 3/32" pushrod into the bellcrank, and solder a retaining washer onto the end. Thread the lead-outs through the inboard wing panel and out the tip.
- Bolt the bellcrank to the mount, and solder or epoxy the crank to the mount. Add the top sheeting, allowing a neat slot for the pushrod exit.
- Cut out and attach the wing tips. Add the wing tip braces, and epoxy the brass tubing lead-out guides to the tips.
- Cut out the 3/8" flaps, but do not attach them to the wing. They will be added after the wing is installed in the fuselage.
- Smooth the wing carefully with a sanding block, making sure to round the leading edge to the contour shown on the plans. A sharp leading edge will spoil the plane's cornering ability.
#### Fuselage
- Now that the doublers have dried, check the fuselage sides for accuracy in terms of wing cutout and stabilizer notch. Their centerlines and the engine thrust line should all be parallel.
- Epoxy the hardwood engine mounts to the plywood doublers, and be glad you made a right and a left side.
- J-bolt the 1/8" landing gear to the plywood landing gear mount on the fuselage former. Assemble the fuselage sides, plywood firewall, and landing gear mount using five-minute epoxy.
- Draw the rear of the fuselage together, and add formers 4, 5, and 6. Slide the wing into the fuselage, make sure it is square to the fuselage centerline and sides when viewed from the front, and glue in place.
- Add formers 3 and 3A, then add the top stringers on the nose and turtledeck.
- Mount the engine (any good .29–.35) using blind mounting nuts and Allen bolts. Add the soft balsa top block.
- Mount the fuel tank, to which you have soldered brass tubing vent extensions. When flying, I bend the lower vent into the slipstream and cap the upper one with a piece of fuel line with a screw in it. My hobby shop still stocks the Perfect Brand fuel tank with the dimensions shown on the plans. If yours doesn't, suitable alternatives can be had from several sources who advertise in this magazine.
- Plank the nose section and turtledeck with the appropriate sheet balsa. The nose is easy if done in two pieces. Glue these to the sides, moisten them, and draw them down to the middle. The middle seam is glued with CYA, and the whole works held with masking tape until the moisture dries out.
- Plank the bottom of the fuselage with the grain running across it. Be sure to install the tail wheel before planking over its location. Add 1/4" sheet nose fillers, and cut out exhaust and needle valve holes.
- Block sand the fuselage, rounding all corners and smoothing the seams. Epoxy the balsa fairing onto the landing gear, then shape and sand. Glue the stationary wing in place.
Tail surfaces
Cut them from light C‑grain balsa. Add the 1/16" plywood control horn mount to the elevator, and join the elevators with wire joiner. Round all edges, and taper the rudder and elevators. Hinge the stab and elevator; I used nylon RC piano‑type hinges. Glue the stabilizer assembly into the fuselage slot. Add the fin, then add the rudder with about 1/4" to 1/8" offset.
Covering and finishing
- Glue 3/8 oz. of weight to the outboard tip.
- Attach the control horn, and bend the elevator pushrod. Slide the plywood fair‑lead onto the pushrod, and epoxy it to the fuselage. For really fastidious or industrious builders, the controls could be enclosed in the fuselage, but attaching them externally is quicker and easier.
- Remove the horn, and start the finishing process.
There are a multitude of options for finishing, from dope‑and‑silkspan to epoxy and iron‑ons. If you're planning to build a stunt ship and need experience with dopes, this plane's size doesn't rule out the dope‑and‑silkspan method. If, like me, you want quick results without sacrificing durability, do the following:
- Sand everything with 400 wet-or-dry paper used dry. Vacuum the structure.
- Cover the wing with MonoKote. Mask the wing covering about 1/8" from the edge where it meets the planking, so that the finish you apply overlaps the seam and seals it.
- Apply a heavy coat of K&B epoxy primer. When this is dry, sand smooth with 400 paper. If too much grain is showing, repeat the filler coat and sand again.
- If you're fastidious, spray a coat of K&B epoxy on the whole thing. I found a can of Black Baron Epoxy under my bench and brushed one coat of yellow on. It came out looking acceptable—certainly not concours quality, but far better than my planes of 20 years ago.
- Some striping tape and MonoKote trim, as well as an acetate cockpit, finished the job.
Don't hesitate to experiment with all kinds of miscellaneous extras on this one: wheel pants, enclosed controls, and cockpit detail to name a few. Learning these techniques can be aggravating, but you can transfer the experience to more advanced projects later on.
Attach the elevator horn, then solder on a retaining washer and a set of wheels. Add a piece of fuel line and a filter, and once the engine and muffler have been bolted on, we're ready to go.
Flying
This model is just a pleasant, smooth, forgiving plane to fly. It'll do the whole Precision Aerobatics pattern, although not competitively.
Check the center‑of‑gravity. I can't imagine the CG coming out anything other than nose‑heavy initially. Fly it that way at first, adding tail weight until it responds to your taste. Sixty‑foot lines and a 10" six‑pitch propeller were used on the original.
Was taking on the challenge of designing and building this Happy Days worth it? You bet. Every once in a while, when weather, schedule, and mood all click, I drag it out and go flying. For a brief, shining spell I'm a 14‑year‑old kid again, savoring the moment as I did then. And that kid on his bike tripping over my lines? And that one . . . and that one? Each of them is me, back in those happy days, those golden halcyon days of Control Line flight.
Transcribed from original scans by AI. Minor OCR errors may remain.

