
Hatz Biplane
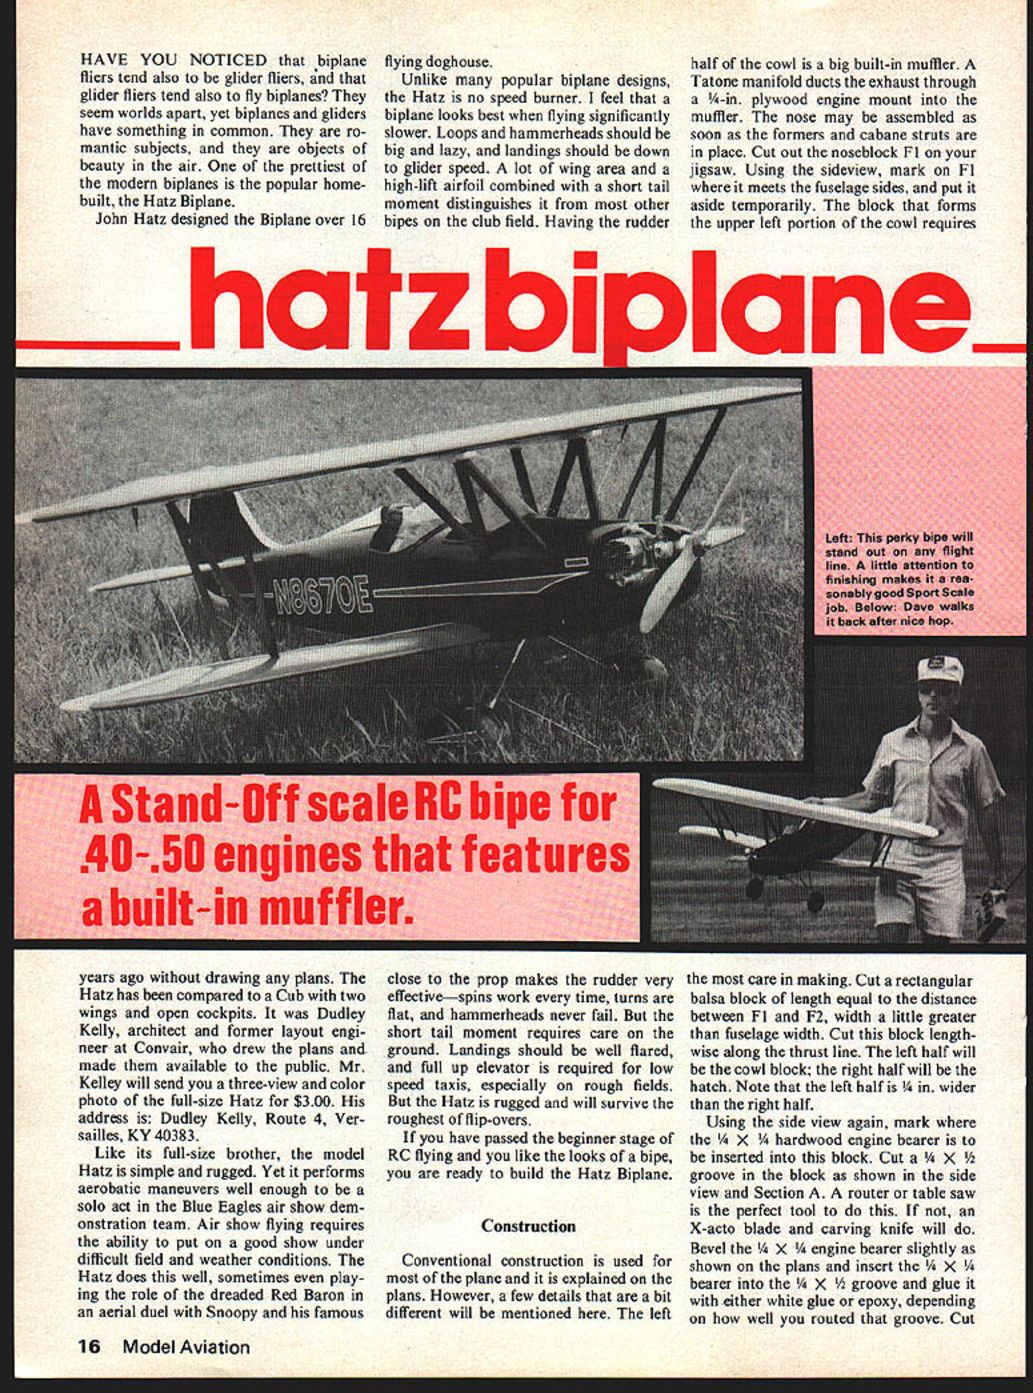
HAVE YOU NOTICED that biplane fliers tend also to be glider fliers, and that glider fliers tend also to fly biplanes? They seem worlds apart, yet biplanes and gliders have something in common. They are romantic subjects, and they are objects of beauty in the air. One of the prettiest of the modern biplanes is the popular home-built, the Hatz Biplane.
John Hatz designed the Biplane over 16 years ago without drawing any plans. Unlike many popular biplane designs, the Hatz is no speed burner. I feel that a biplane looks best when flying significantly slower. Loops and hammerheads should be big and lazy, and landings should be down to glider speed. A lot of wing area and a high-lift airfoil combined with a short tail moment distinguishes it from most other bipes on the club field. Having the rudder close to the prop makes the rudder very effective—spins work every time, turns are flat, and hammerheads never fail. But the short tail moment requires care on the ground. Landings should be well flared, and full up elevator is required for low speed taxis, especially on rough fields. The Hatz is rugged and will survive the roughest of flip-overs.
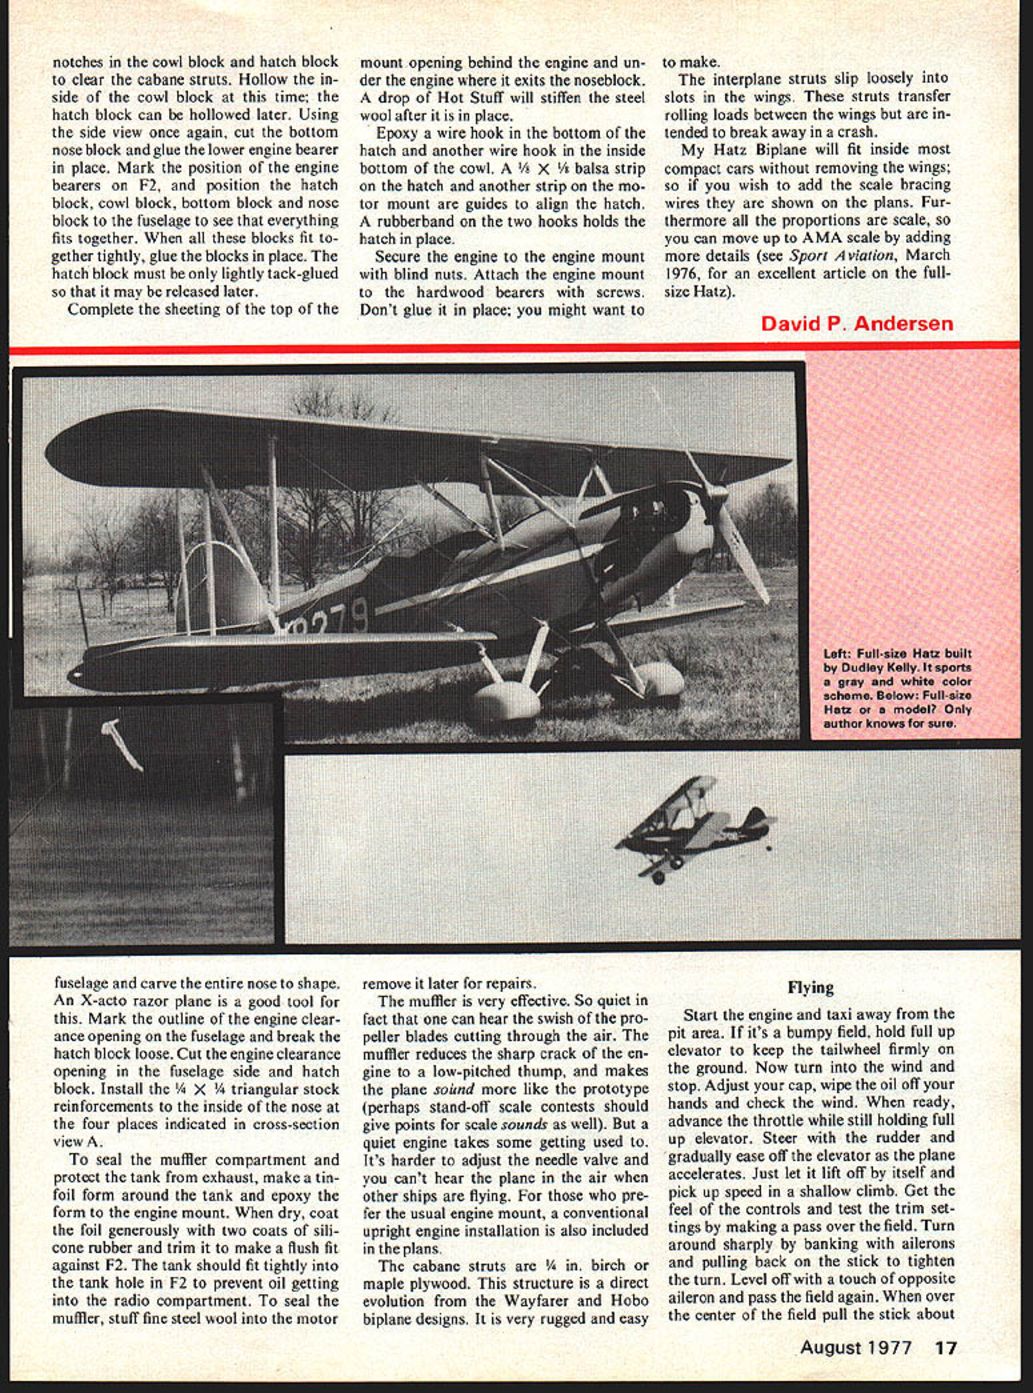
The Hatz has been compared to a Cub with two wings and open cockpits. It was Dudley Kelly, architect and former layout engineer at Convair, who drew the plans and made them available to the public. Mr. Kelley will send you a three-view and color photo of the full-size Hatz for $3.00. His address is: Dudley Kelly, Route 4, Versailles, KY 40383.
Like its full-size brother, the model Hatz is simple and rugged. Yet it performs aerobatic maneuvers well enough to be a solo act in the Blue Eagles air show demonstration team. Air show flying requires the ability to put on a good show under difficult field and weather conditions. The Hatz does this well, sometimes even playing the role of the dreaded Red Baron in an aerial duel with Snoopy and his famous flying doghouse.
If you have passed the beginner stage of RC flying and you like the looks of a bipe, you are ready to build the Hatz Biplane.
Construction
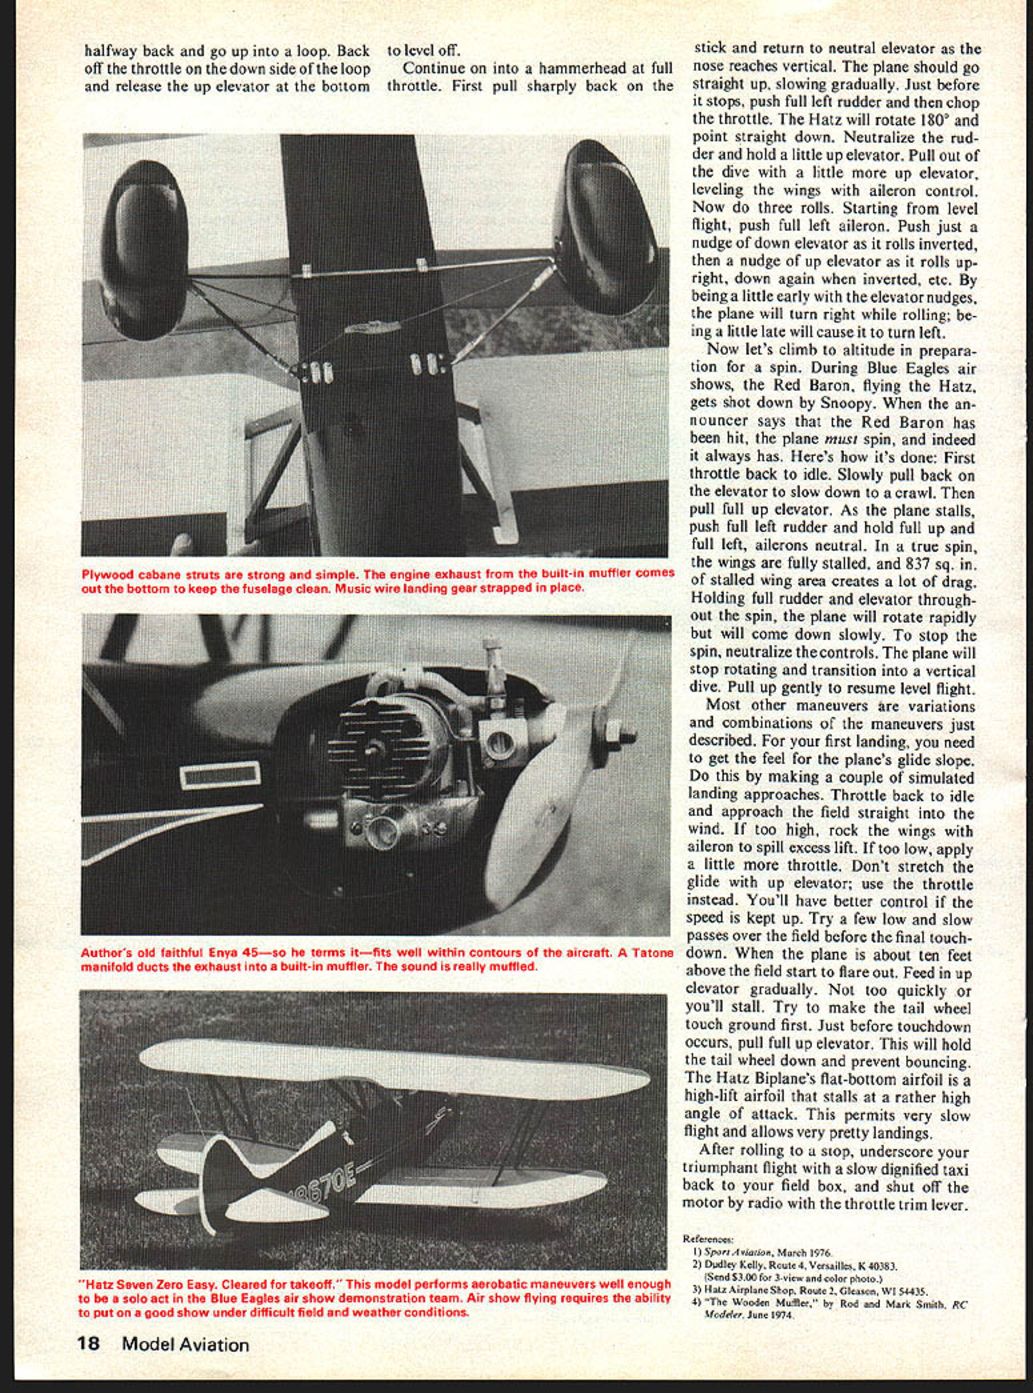
Conventional construction is used for most of the plane and it is explained on the plans. However, a few details that are a bit different will be mentioned here. The left half of the cowl is a big built-in muffler. A Tatone manifold ducts the exhaust through a 1/4-in. plywood engine mount into the muffler. The nose may be assembled as soon as the formers and cabane struts are in place. Cut out the noseblock F1 on your jigsaw. Using the side view, mark off F1 where it meets the fuselage sides, and put it aside temporarily. The block that forms the upper left portion of the cowl requires the most care in making. Cut a rectangular balsa block of length equal to the distance between F1 and F2, width a little greater than fuselage width. Cut this block lengthwise along the thrust line. The left half will be the cowl block; the right half will be the hatch. Note that the left half is 1/4 in. wider than the right half.
Using the side view again, mark where the 1/4 x 1/4 hardwood engine bearer is to be inserted into this block. Cut a 1/4 x 1/2 groove in the block as shown in the side view and Section A. A router or table saw is the perfect tool to do this. If not, an X-acto blade and carving knife will do. Bevel the 1/4 x 1/4 engine bearer slightly as shown on the plans and insert the 1/4 x 1/4 bearer into the 1/4 x 1/2 groove and glue it with either white glue or epoxy, depending on how well you routed that groove. Cut notches in the cowl block and hatch block to clear the cabane struts. Hollow the inside of the cowl block at this time; the hatch block can be hollowed later. Using the side view once again, cut the bottom nose block and glue the lower engine bearer in place. Mark the position of the engine bearers on F2, and position the hatch block, cowl block, bottom block and nose block to the fuselage to see that everything fits together. When all these blocks fit together tightly, glue the blocks in place. The hatch block must be only lightly tack-glued so that it may be released later.
Complete the sheeting of the top of the mount opening behind the engine and under the engine where it exits the noseblock. A drop of Hot Stuff will stiffen the steel wool after it is in place.
Epoxy a wire hook in the bottom of the hatch and another wire hook in the inside bottom of the cowl. A 1/8 x 1/8 balsa strip on the hatch and another strip on the motor mount are guides to align the hatch. A rubberband on the two hooks holds the hatch in place.
Secure the engine to the engine mount with blind nuts. Attach the engine mount to the hardwood bearers with screws. Don't glue it in place; you might want to make the interplane struts slip loosely into slots in the wings. These struts transfer rolling loads between the wings but are intended to break away in a crash.
My Hatz Biplane will fit inside most compact cars without removing the wings; so if you wish to add the scale bracing wires they are shown on the plans. Furthermore all the proportions are scale, so you can move up to AMA scale by adding more details (see Sport Aviation, March 1976, for an excellent article on the full-size Hatz).
David P. Andersen
fuselage and carve the entire nose to shape. An X-acto razor plane is a good tool for this. Mark the outline of the engine clearance opening on the fuselage and break the hatch block loose. Cut the engine clearance opening in the fuselage side and hatch block. Install the 1/4 x 3/4 triangular stock reinforcements to the inside of the nose at the four places indicated in cross-section view A.
To seal the muffler compartment and protect the tank from exhaust, make a tin-foil form around the tank and epoxy the form to the engine mount. When dry, coat the foil generously with two coats of silicone rubber and trim it to make a flush fit against F2. The tank should fit tightly into the tank hole in F2 to prevent oil getting into the radio compartment. To seal the muffler, stuff fine steel wool into the motor and remove it later for repairs.
The muffler is very effective. So quiet in fact that one can hear the swish of the propeller blades cutting through the air. The muffler reduces the sharp crack of the engine to a low-pitched thump, and makes the plane sound more like the prototype (perhaps stand-off scale contests should give points for scale sounds as well). But a quiet engine takes some getting used to. It's harder to adjust the needle valve and you can't hear the plane in the air when other ships are flying. For those who prefer the usual engine mount, a conventional upright engine installation is also included in the plans.
The cabane struts are 1/4 in. birch or maple plywood. This structure is a direct evolution from the Wayfarer and Hobo biplane designs. It is very rugged and easy to make.
Flying
Start the engine and taxi away from the pit area. If it's a bumpy field, hold full up elevator to keep the tailwheel firmly on the ground. Now turn into the wind and stop. Adjust your cap, wipe the oil off your hands and check the wind. When ready, advance the throttle while still holding full up elevator. Steer with the rudder and gradually ease off the elevator as the plane accelerates. Just let it lift off by itself and pick up speed in a shallow climb. Get the feel of the controls and test the trim settings by making a pass over the field. Turn around sharply by banking with ailerons and pulling back on the stick to tighten the turn. Level off with a touch of opposite aileron and pass the field again. When over the center of the field pull the stick about halfway back and fly a normal circuit and landing. Keep plenty of up elevator on touchdown and use full up on the roll-out to keep the tail down; as speed drops release the up elevator gradually. For those unfamiliar with slow-flying biplanes, don't try to show off close to the ground — fly them like a glider on landing; slower is safer. halfway back and go up into a loop. Back off the throttle on the down side of the loop and release the up elevator at the bottom to level off.
Continue on into a hammerhead at full throttle. First pull sharply back on the stick and return to neutral elevator as the nose reaches vertical. The plane should go straight up, slowing gradually. Just before it stops, push full left rudder and then chop the throttle. The Hatz will rotate 180° and point straight down. Neutralize the rudder and hold a little up elevator. Pull out of the dive with a little more up elevator, leveling the wings with aileron control. Now do three rolls. Starting from level flight, push full left aileron. Push just a nudge of down elevator as it rolls inverted, then a nudge of up elevator as it rolls upright, down again when inverted, etc. By being a little early with the elevator nudges, the plane will turn right while rolling; being a little late will cause it to turn left.
Now let's climb to altitude in preparation for a spin. During Blue Eagles air shows, the Red Baron, flying the Hatz, gets shot down by Snoopy. When the announcer says that the Red Baron has been hit, the plane must spin, and indeed it always has. Here's how it's done: First throttle back to idle. Slowly pull back on the elevator to slow down to a crawl. Then pull full up elevator. As the plane stalls, push full left rudder and hold full up and full left, ailerons neutral. In a true spin, the wings are fully stalled, and 837 sq. in. of stalled wing area creates a lot of drag. Holding full rudder and elevator throughout the spin, the plane will rotate rapidly but will come down slowly. To stop the spin, neutralize the controls. The plane will stop rotating and transition into a vertical dive. Pull up gently to resume level flight.
Most other maneuvers are variations and combinations of the maneuvers just described. For your first landing, you need to get the feel for the plane's glide slope. Do this by making a couple of simulated landing approaches. Throttle back to idle and approach the field straight into the wind. If too high, rock the wings with aileron to spill excess lift. If too low, apply a little more throttle. Don't stretch the glide with up elevator; use the throttle instead. You'll have better control if the speed is kept up. Try a few low and slow passes over the field before the final touchdown. When the plane is about ten feet above the field start to flare out. Feed in up elevator gradually. Not too quickly or you'll stall. Try to make the tail wheel touch ground first. Just before touchdown occurs, pull full up elevator. This will hold the tail wheel down and prevent bouncing. The Hatz Biplane's flat-bottom airfoil is a high-lift airfoil that stalls at a rather high angle of attack. This permits very slow flight and allows very pretty landings.
After rolling to a stop, underscore your triumphant flight with a slow dignified taxi back to your field box, and shut off the motor by radio with the throttle trim lever.
References: 1) Sport Aviation, March 1976. 2) Dudley Kelly, Route 4, Versailles, KY 40383. (Send $3.00 for 3-view and color photo.) 3) Hatz Airplane Shop, Route 2, Gleason, WI 54435. 4) "The Wooden Muffler," by Rod and Mark Smith, RC Modeler, June 1974.
Hatz Biplane
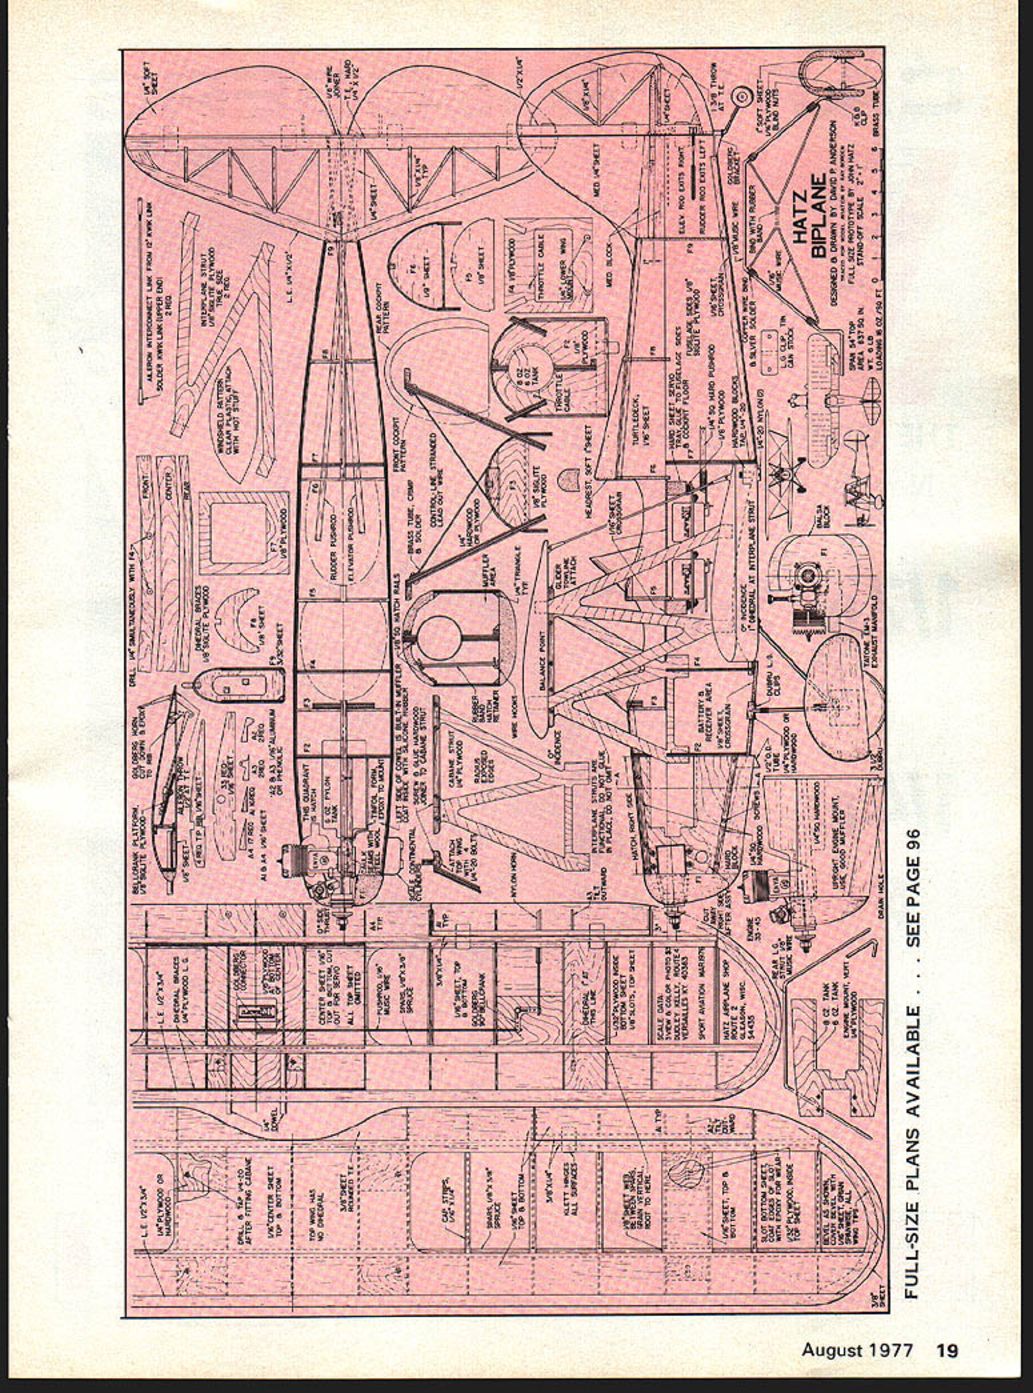
FULL-SIZE PLANS AVAILABLE - SEE PAGE 96
Transcribed from original scans by AI. Minor OCR errors may remain.

