

HELI-FLI
"SEE, I TOLD YOU THESE EGG BEATERS AREN'T DIFFICULT TO FLY—JUST DIFFERENT."
(With comments and advice from John Simone, Jr.)
Part 1. Tom Burdin
PRELUDE
FLY A Radio Control model Helicopter? Not me—it's too difficult! Well, I thought so, also, except that my experience with developing FLI for fixed-wing aircraft told me that any skill can be learned if a systematic progressive learning program can be developed. As a new flier of RC Helicopters, I knew that I had to teach myself to fly the machine. Note that I said "teach myself." I had to develop a program for myself, the unskilled student. The program that I used to learn to fly a Helicopter is the real meat of this whole article.
To begin with, I looked back at the basic principles of FLI to see if they were still valid. I suggest, if you have not heard of or read FLI, that you refer to the October 1979 issue of Model Aviation, and read at least the prelude. My re-examination of the basic principles yielded the following observations for Helicopters:
- Based upon graduated skill levels of defined tasks with clear definitions. This basic principle is still the heart of any progressive training program.
- Skill levels must be progressively harder, with each building on the last and leading to the next. No problem here, either, except FLI depended upon an instructor to evaluate progress. In a Helicopter program, it is my opinion that it is essentially self-taught, so that the differential between skill levels needs to be finer to allow easier transition between levels.
- Clear measurement of the student's progress. Once again, no basic problem except that, in FLI, the measurement values were given to an instructor to define—i.e., judgment. With the Helicopter, the values must be self-measuring and more clearly defined.
- Clear definition of the final end point of training. In FLI, safe solo flight was the goal. With the Helicopter, each flight is a solo from the beginning, so a new goal statement is needed.
After doing this re-examination of the initial FLI concepts, I decided that this "self-taught" thing is a real issue. The instructor is more than a demonstrator of maneuvers and saviour of errant flying machines. The instructor supplies the little pieces of information that turn a problem into a solution. He provides those gems of knowledge that make a flying lesson sparkle. The instructor is a mentor or guide. No one can substitute for a good one-on-one interaction when trying to solve a problem or learn a skill. I recognized that my club, and more than likely yours, is not blessed with an abundance of "whirlybird gurus." What club, you say? Exactly my point.
How can we satisfy the very basic needs for an instructor in a learning process which is primarily self-taught? I can't hope to supply each of you an instructor included with this magazine, or even a toll-free number for a "chopper expert," but I think I can provide some insight into the subtleties of the learning process through a "mentor in writing." Our expert will be John Simone, Jr., former U.S. Champion and well known flier and manufacturer of RC Helicopters. John will comment throughout the program, drawing on his experience base to enhance the basic program. John's advice will be identified by the symbol (JS) at the beginning and ending of his comments.
(JS): I'll interject my first comment here. The RC Helicopter sport has been wandering too long in finding a way to train its new devotees. This program fills that void and should encourage those who are a little hesitant to give it a try. Learning to fly a Radio Control model Helicopter is not hard—it's just different. It's a discipline of orientation between self and machine, and not between machine and surroundings, such as in fixed-wing flying. It's different, but it can be learned with effort. (JS)
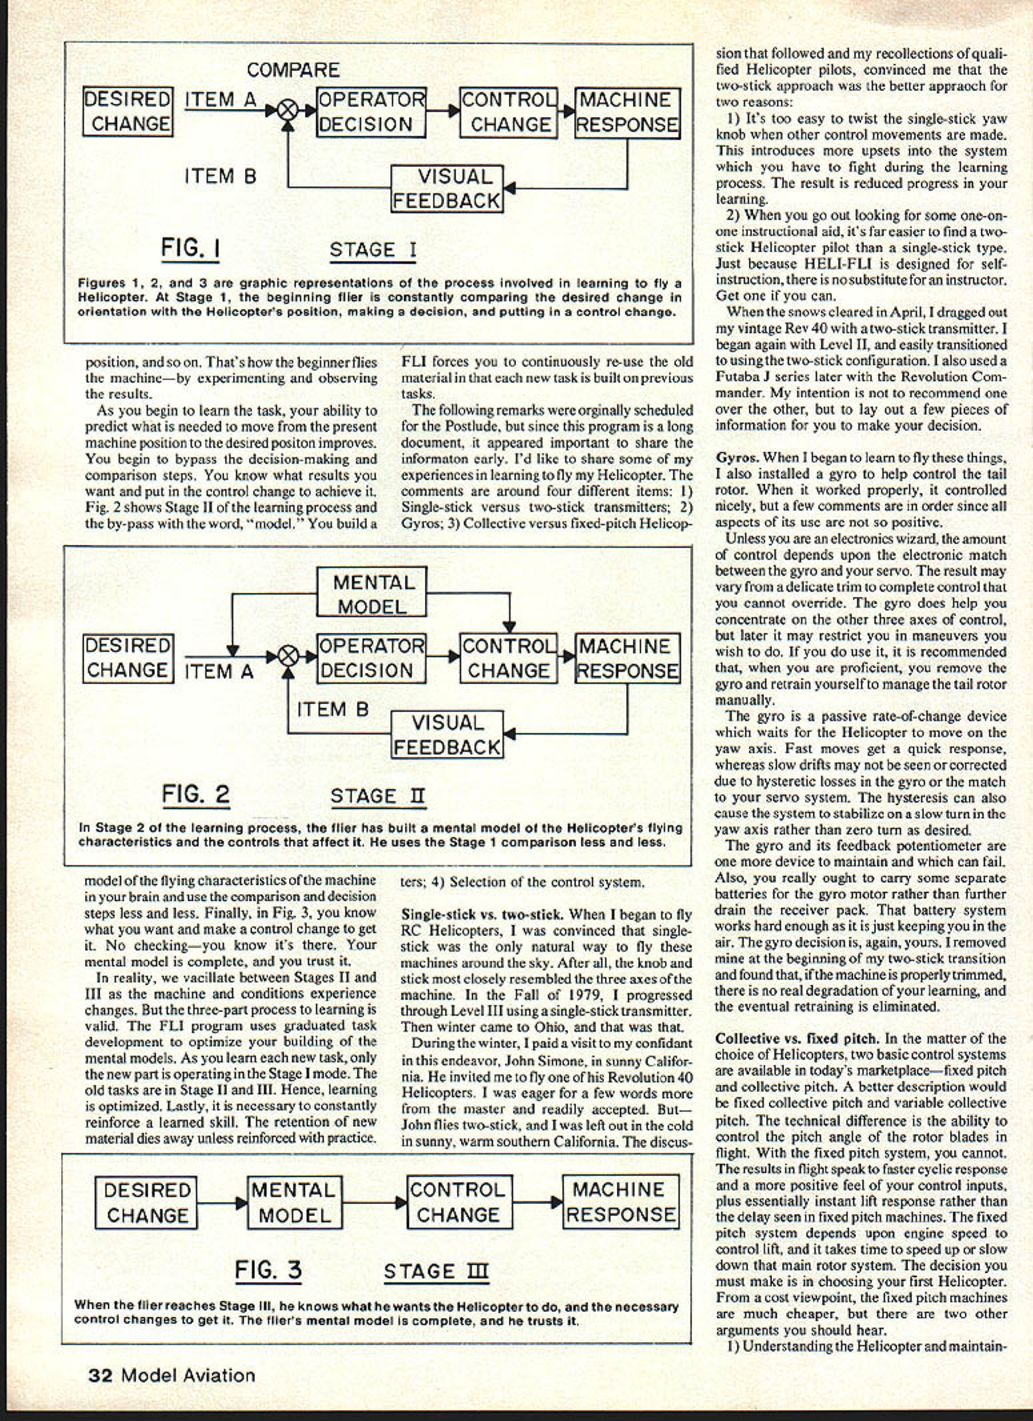
I'd like to take a quick look at the process involved in learning to fly. Refer to Figures 1, 2, and 3. The 0 indicates the comparison of two items. In Fig. 1, the two items to be compared are the desired change of the Helicopter's orientation and your visual image of where it presently is. You compare the two pictures, make a decision, and put in a control change. The output is the machine response to your control input. The Stage I process then continues as you compare the current machine position to the desired position, and so on. That's how the beginner flies the machine—by experimenting and observing the results.
As you begin to learn the task, your ability to predict what is needed to move from the present machine position to the desired position improves. You begin to bypass the decision-making and comparison steps. You know what results you want and put in the control change to achieve it. Fig. 2 shows Stage II of the learning process and the by-pass with the word "model." You build a model of the flying characteristics of the machine in your brain and use the comparison and decision steps less and less. Finally, in Fig. 3, you know what you want and make a control change to get it. No checking—you know it's there. Your mental model is complete, and you trust it.
In reality, we vacillate between Stages II and III as the machine and conditions experience changes. But the three-part process to learning is valid. The FLI program uses graduated task development to optimize your building of the mental models. As you learn each new task, only the new part is operating in the Stage I mode. The old tasks are in Stage II and III. Hence, learning is optimized. Lastly, it is necessary to constantly reinforce a learned skill. The retention of new material dies away unless reinforced with practice.
FLI forces you to continuously re-use the old material in that each new task is built on previous tasks.
The following remarks were originally scheduled for the Postlude, but since this program is a long document, it appeared important to share the information early. I'd like to share some of my experiences in learning to fly my Helicopter. The comments are around four different items: 1) Single-stick versus two-stick transmitters; 2) Gyros; 3) Collective versus fixed-pitch Helicopters; 4) Selection of the control system.
Single-stick vs. two-stick. When I began to fly RC Helicopters, I was convinced that single-stick was the only natural way to fly these machines around the sky. After all, the knob and stick most closely resembled the three axes of the machine. In the Fall of 1979, I progressed through Level III using a single-stick transmitter. Then winter came to Ohio, and that was that.
During the winter, I paid a visit to my confidant in this endeavor, John Simone, in sunny California. He invited me to fly one of his Revolution 40 Helicopters. I was eager for a few words more from the master and readily accepted. But—John flies two-stick, and I was left out in the cold in sunny, warm southern California. The discussion that followed and my recollections of qualified Helicopter pilots convinced me that the two-stick approach was the better approach for two reasons:
- It's too easy to twist the single-stick yaw knob when other control movements are made. This introduces more upsets into the system which you have to fight during the learning process. The result is reduced progress in your learning.
- When you go out looking for some one-on-one instructional aid, it's far easier to find a two-stick Helicopter pilot than a single-stick type. Just because HELI-FLI is designed for self-instruction, there is no substitute for an instructor. Get one if you can.
When the snows cleared in April, I dragged out my vintage Rev 40 with a two-stick transmitter. I began again with Level II, and easily transitioned to using the two-stick configuration. I also used a Futaba J series later with the Revolution Commander. My intention is not to recommend one over the other, but to lay out a few pieces of information for you to make your decision.
Gyros. When I began to learn to fly these things, I also installed a gyro to help control the tail rotor. When it worked properly, it controlled nicely, but a few comments are in order since all aspects of its use are not so positive.
Unless you are an electronics wizard, the amount of control depends upon the electronic match between the gyro and your servo. The result may vary from a delicate trim to complete control that you cannot override. The gyro does help you concentrate on the other three axes of control, but later it may restrict you in maneuvers you wish to do. If you do use it, it is recommended that, when you are proficient, you remove the gyro and retrain yourself to manage the tail rotor manually.
The gyro is a passive rate-of-change device which waits for the Helicopter to move on the yaw axis. Fast moves get a quick response, whereas slow drifts may not be seen or corrected due to hysteretic losses in the gyro or the match to your servo system. The hysteresis can also cause the system to stabilize on a slow turn in the yaw axis rather than zero turn as desired.
The gyro and its feedback potentiometer are one more device to maintain and which can fail. Also, you really ought to carry some separate batteries for the gyro motor rather than further drain the receiver pack. That battery system works hard enough as it is just keeping you in the air. The gyro decision is, again, yours. I removed mine at the beginning of my two-stick transition and found that, if the machine is properly trimmed, there is no real degradation of your learning, and the eventual retraining is eliminated.
Collective vs. fixed pitch. In the matter of the choice of Helicopters, two basic control systems are available in today's marketplace—fixed pitch and collective pitch. A better description would be fixed collective pitch and variable collective pitch. The mechanical difference is the ability to change the pitch angle of the rotor blades in flight. With the fixed pitch system, you cannot. The results in flight speak to faster cycle response and a more positive feel of your control inputs, plus essentially instant lift response rather than the delay seen in fixed pitch machines. The fixed pitch system depends upon engine speed to control lift, and it takes time to speed up or slow down that main rotor system. The decision you must make is in choosing your first Helicopter. From a cost viewpoint, the fixed pitch machines are much cheaper, but there are two other arguments you should hear.
- Understanding the Helicopter and maintenance are key ingredients in a successful learning process. The collective pitch model requires more understanding from you. You're not ready—even at the end of HELI-FLI—to flit about the sky like a hummingbird, so why do you need a machine to do so? Simplicity is the essence of beauty, so keep it simple and simplify your learning process.
- One key to successful Helicopter flying is in the mental model predicting the next needed input from you. The slower response of the fixed pitch design is in your favor, in that it forces you to be ahead of the machine. You will be a sharper pilot as a result of the experience. My recommendation is to start with a fixed pitch Helicopter, like the Mantis or Heli-Baby, and when you've completed HELI-FLI, move up to the collective models, like the Commander or Heli-Boy, and have a ball.
Control System. This has been a lot of reading before you get the beast into the air. Success in Helicopter flying is based on sound preparation as well as determination. For the final item on the list, I need to address the matter of radio system selection. The technological revolution is with us, and the day of the plain five-channel digital system is disappearing fast. If you are a new entry into the Radio Control Helicopter hobby, or an old-timer making a change of pace, you need to look to the future in your choice of radio systems. Yes, you can fly Helicopters on a five-channel system, but let me again relate my experience.
I began with the standard system, and installed the four servos dutifully. As I built my Commander, I was able to secure one of the Futaba J series systems and installed it in my new toy. I learned well on the old Rev 40, and was eager to move on to the Commander. The Futaba has all manner of knobs and switches on it, but in the early flights in the Commander, I decided to "rough it" and do without all the special features offered in the J series.
As I became more comfortable with the machine, I began to experiment with these special added attractions. First, I coupled the tail rotor (T/R) with the lift control such that the correct counter torque was present for each static lift condition. Static implies no change in progress. When changes in lift are made, more tail rotor control is required than for non-changing conditions. For that, Futaba has provided a differential input to the yaw control to give it that extra little kick required when you want a large or quick lift change and don't want the yaw axis to wander. This is great for transition from forward flight to a hover, or those inevitable saves that are required. It doesn't do everything, but it does keep it manageable.
Later, I installed a fifth servo for the throttle. Why? you may ask. Well, the horsepower of an engine increases proportionally with speed until the top end of the speed range, where it tails off a bit. In a collective pitch system, you are operating in this top end of the engine torque curve all the time. The horsepower required by the increasing blade pitch and speed just keeps on climbing as you advance the lift lever. The result can be a sagging engine when you need it most, as the horsepower needed exceeds that which is available from the power plant. Futaba helps this problem by allowing you to tailor the response of the pitch change servo to approximate that of the engine. That is to say, the pitch will continue to increase to a selectable point, and then it will increase at a slower rate as you continue to increase the lift lever. The result is a better engine/machine match.
There are all manner of other goodies available in the system to boggle your mind, but the point I'm going to make concerns the ability of the control system to deal with some of the routine problems confronting the Helicopter pilot. With the advance in integrated circuits, we will be seeing more and more of these advanced transmitter systems on the market. Futaba is on the market, and more are following already. These systems can minimize a lot of the housekeeping problems associated with flying the Helicopter, giving you more time to advance your skill. Of course, you should begin without them, for without the understanding of what they do, you may slow your progress rather than speed it up. As your skill advances, use the electronics to take over some of the drudgery, and let yourself go. Even though you won't use all the special features while executing HELI-FLI, buy the system with those features so that, as you advance to a collective pitch machine, your control system can advance with you.
Two final items. Unlike an airplane which flies only in a forward mode, the Helicopter flies forward and hovers. Therefore, the final goals for HELI-FLI will be two-fold:
- 1) Safe hover.
- 2) Safe forward flight and hover transition.
We will not develop other than the forward mode of flight. Lastly, HELI-FLI, like its predecessor, FLI, will not teach you to fly. It is an organized, progressive program that will allow you to learn to fly if you honestly follow the program. The key ingredient to success is you and your self-discipline.
Enough of all this philosophy. Let's get your HELI, and FLI!
HELI-FLI LEVEL 1
Task Description and Measurement Criteria
- The student will purchase a commercially available Helicopter and assemble it per the manufacturer's instructions.
- The student will repeatedly disassemble and completely rebuild the machine to the manufacturer's specifications until the operation can be done correctly without reference to the manufacturer's instructions.
- The student will assemble a flight-line kit to include appropriate tools and spares required to repair the aircraft in the field for the following anomalies:
- a) Broken main rotor (M/R) blades.
- b) Broken tail rotor (T/R) blades.
- c) Damaged flybar and paddles.
- d) Missing nuts, bolts, and fittings.
- Student will break in a new engine per the manufacturer's recommendations until reliable operation and idle are obtained.
- Student will balance and track the M/R blades to the manufacturer's tolerances.
Discussion
Your decision to learn to fly RC Helicopters has brought you to the most fascinating, challenging, and demanding sector of our hobby/sport. The learning process will require a great deal from you in terms of effort, patience, and tenacity. But with the pain comes the joy of mastering the beast, and like a wild horse, once tamed, it is a pleasure to show off.
One of the main differences between this whirling-wing machine and the fixed-wing flying variety is the necessity to maintain its mechanical soundness. The fixed-wing RC machine has its roaring power plant up front; but remove that growl, and the structure is a fairly straightforward construction of balsa, glass, and foam. It's fairly rigid and has airflow over its exterior. The Helicopter, on the other hand, is a construction of metal, wood and/or plastic bolted together with a conglomeration of gears, belts, and linkages all whirling at ridiculous speeds. A Helicopter takes a beating just hovering, let alone flying around. Hence, the ability to maintain the mechanics at their correct operating condition is one of the main differences between success and failure.
If the engine quits while you're training with a Futaba Trainer, you glide to an uneventful landing. If the same thing happens when you're learning to fly a Revolution or Commander, you'll take home a pile of metal, unless you are an expert at autorotation landings—and your machine is so equipped. Your first responsibility is to know your Helicopter inside out mechanically, and to keep it up to snuff. You can't learn to fly if you don't keep it mechanically sound.
Let's start at the beginning. In choosing a Helicopter, be sure you look at currently manufactured and actively represented machines. There are many models sold, but some are obsolete by today's standards; some no longer are manufactured; and there are some for which spare parts are no longer available. Also, don't ever consider a home-built design for your first machine. You're going to have enough problems learning to maintain and fly it, let alone re-design it as you go.
Along with the availability of parts, the availability of the manufacturer and/or local representative is a significant point. To have a "hot line" to talk to the factory could be the difference between success or failure when a problem occurs.
Finally, don't quickly try to modify the chopper per some local guru or article written in a magazine. Many of these changes are well designed and worthwhile to increase reliability and flying characteristics, but more are just pizzazz—or items to add a particular flight characteristic which may, in fact, decrease its value to you as a trainer. And right now, if you are just beginning, you know too little to be making value judgments about the relative merits of these modifications. I recommend that you contact the manufacturer or their knowledgeable representative prior to any modifications. They keep up with most of the "user mods" and can advise which ones you should consider for your machine—if any at all.
(JS): Of the phone calls I answer from customers, roughly 80% go into correcting the mistakes of the homebrewed wizards. The design of today's commercially available Helicopter underwent significant testing before reaching the market. The result is the best set of compromises required to give a good product to the customers. It's not perfect for everyone, but it's a good product. To make changes, you need to fully understand the flight characteristic design criteria and the aerodynamic design criteria. To make a change without knowing these details can do more damage than good. Wait until you're an expert flier before you become an expert Helicopter designer. (JS)
Once you've assembled your new machine, your ability to reassemble it in the field may have a significant effect on your learning curve. You're going to break rotor blades and bend flybars. It's a shame to give up a trip to the local flying site and the training time due to broken rotor blades. They are usually a quick fix item and should be do-able by you in the field.
This level of maintenance with its subsequent realignment is the Helicopter parallel to changing a propeller—only it's a lot more precise. Your self-discipline in doing these things precisely will decrease your learning time, since you're not always fighting the machine.
Take the thing apart a couple of times, and put it back together. Concentrate on really knowing where each part goes and what its alignment is relative to the rest of the machine. Essentially, you should memorize the assembly manual.
(JS): The precision of the assembly procedure will be enhanced and supported by the consistent manner in which you do it. Always rebuild it in the same manner, no matter where you start in the assembly. This consistency will improve the quality of your results and, hence, the repeatability of your setups. The bottom line result is a solid base to train on. The machine will always be the same. (JS)
There is day-to-day maintenance that needs to be done, also. I've developed a check list which should be accomplished before the first flight of the day, and after the last flight, to aid in assuring the existing setup and airworthiness—in addition to identifying any required repairs. It can also serve as a check-out after field repairs.
Speaking of repairs, you ought to assemble the tools necessary to do those field repairs plus the spare parts, linkages, collars, nuts, and bolts. Then remind yourself to take them along each time you go to fly. You can't use what you don't have with you!
Before you crank up the engine and try to leap into the air, I need to say a few words about that engine. Those words are—it must be reliable. There are many fine engines on the market which were designed primarily for the fixed-wing crowd. We are now seeing some early evidence of unique Helicopter engines, such as the O.S. Max .45H, but by and large you will have to choose from the engines available for utility use.
The key item to look for, whether a .40 size or .60, is reliability. Stick to the well known name, and I strongly recommend the use of a ball bearing engine with Schnuerle or PDP porting. These engines are the cream of the crop, in my opinion, and should hold you in good stead. Don't take the engine out of the box and mount it in the Helicopter—excluding construction and rebuild practice—but break it in thoroughly. You can't afford a sag or seizure when you are in a hover or flying along at 50 ft. altitude.
(JS): Please don't try to use one of your favorite old engines. The wear patterns on the bearings and cylinder parts are different for an engine in a fixed-wing machine than in a Helicopter. Your old sport flier favorite may fail quickly in a chopper. Do it right—buy a new mill. Don't plan on autorotation saving your machine. It is a neat thing to learn to do, but it is a learned skill—don't count on it during training. Other than a fuel filter, I also do not believe in pumps and regulators. Not that they can't work well, but fuel tank location is not a real problem in the typical chopper, so keep it simple. You've got enough moving parts as it is. (JS)
OK, time to crank up and start things turning, but before doing so, we really need to play with the main rotor blades a bit. Those things are typically turning at 1,800 rpm or so at lift off. If they are the least bit out of balance, you've built a lot of vibration into the beast. This can cause things to bend and break faster than they are supposed to. The blades provided by the manufacturer are of high quality but need to be checked for balance after you cover/paint them. Two basic checks are required:
- Overall weight.
- Center of gravity (C.G.). The center of gravity check is necessary to assure that the weight appears to be at the same location on each blade. A simple balance—make it yourself—is sufficient for weight checks, and the old razor blade balance is great for checking the C.G. The actual blade weight is unimportant as long as both are the same. Please don't use screws in the end of the blade for balancing. They could fly out and hurt someone. I use plastic trim tape, the heavy cloth stuff. Use contrasting colors, since it helps in tracking adjustments later—where you need to identify the individual blade.
Speaking of tracking adjustments, that needs to be done after each blade set change—never change just one blade—and rechecked each time you go out to fly. There are usually instructions included with each Helicopter kit as to how to track the blades. The necessity for tracking derives from stability, vibration, and lift—all of which contribute to your success.
(JS): Speaking of the C.G., it's time to check the overall Helicopter C.G., also. Just like fixed-wing varieties, the Helicopter has a specific C.G. location. It should balance directly on the main rotor shaft. Adjust the location of batteries, etc., to get this location. Don't change the CG location to accommodate for flying conditions as you would with a fixed-wing aircraft. In the Helicopter, the CG should always be under the main shaft, and flying conditions should be adjusted with trim. (JS)
A couple more comments before we FLI:
- 1) Your flying site should be smooth asphalt, not grass, for this training program. Early maneuvers require sliding across the surface, and when you do lift off, we don't want the grass snagging your skids as you struggle into the air.
- 2) Choose a flying site that gives you some peace to work without interruption from interested bystanders. You can't concentrate with people asking questions. And remember, you're a little dangerous while training. You don't deserve an audience yet, and you don't want one either.
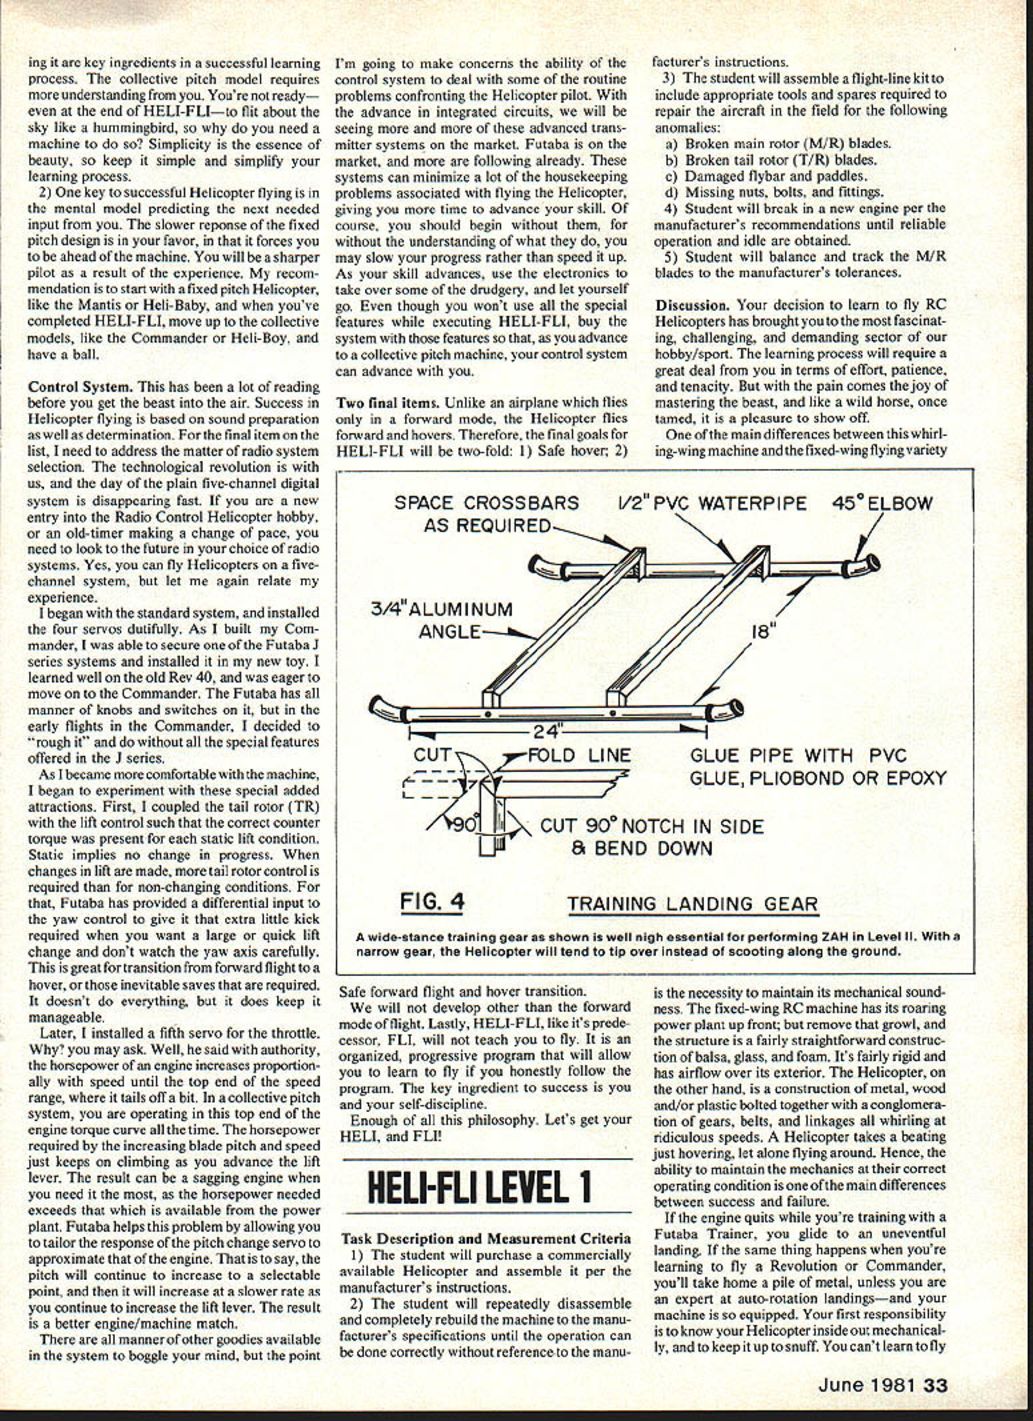
- 3) Most manufacturers have a wide stance landing gear that they recommend for training. My Revolution 40 assembly manual described a simple set of skids made out of 1/2-in. plastic water pipe. It's cheap and easily made into a strong fixture. The wide stance prevents many tip-overs in the early days of training which, in turn, saves rotor blades and Helicopters.
OK, into the air—almost!
Check List
Pre-flight
- 1. Flight kit stocked with spare parts and tools.
- 2. Radio—control and range check.
- 3. Radio—full battery charge.
- 4. Correct weather for flight.
- 5. Main rotor tracking.
- 6. Transmitter trim settings.
Post-flight
- 1. Check all nuts, bolts and linkages.
- 2. Main rotor coning angle, lead/lag, pitch—as required.
- 3. Tail rotor drive mechanism.
- 4. Servo mounts and condition.
- 5. Fuel system.
- 6. Bearing lubrication.
- 7. All other alignments.
HELI-FLI LEVEL 2
The maneuvers in this level are to be accomplished in calm air.
Task Descriptions and Measurement Criteria
- The student will trim the cyclic and yaw controls so as to allow a "zero altitude hover" (ZAH) with the transmitter trim levers in the neutral position.
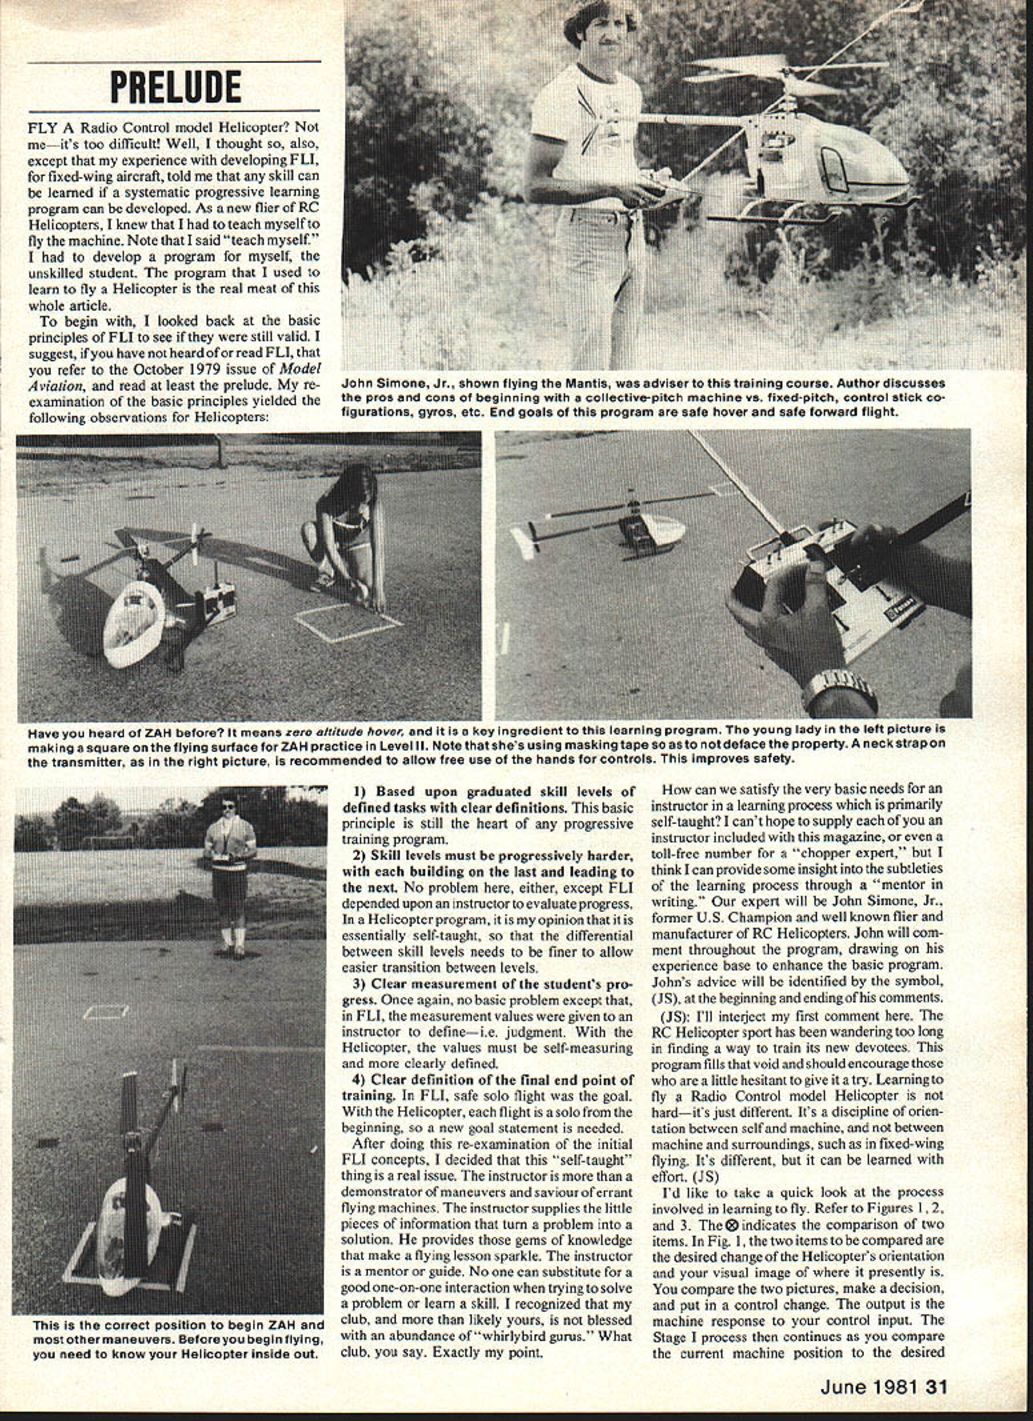
- The student will be able to maintain the position and orientation of the Helicopter within a 1-ft. square while executing the ZAH maneuver. Position and orientation will be maintained tail-in for a period of one minute.
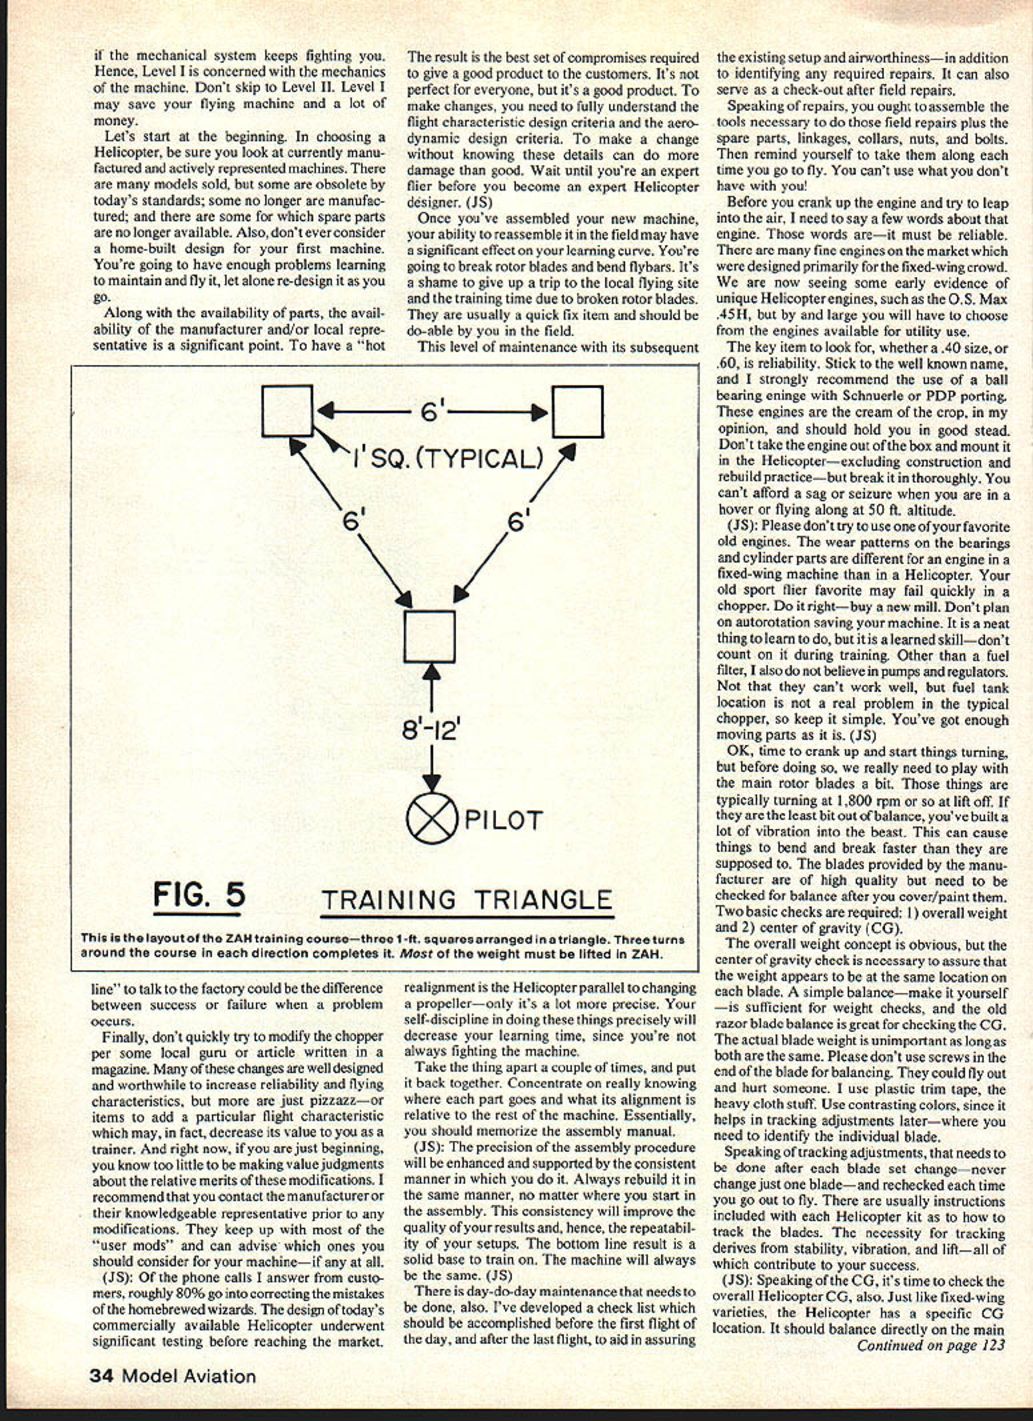
- The student will be able to maneuver the Helicopter over a triangular course, 6 ft. on a side, while maintaining ZAH—tail-in. The Helicopter will maintain a stable position over each corner square for a period of one-half minute in the ZAH tail-in orientation. The maneuver must be accomplished clockwise and counterclockwise. Three times around the course in each direction completes the maneuver.
Discussion
I suppose that, by now, you are sick and tired of operating a screwdriver and wrench while you learn your machine inside and out. Believe me, that effort will be worthwhile during the learning of these new flying skills. It would seem, however, that it is time to put the machine into the air. And correct you are—almost.
In the fixed-wing FLI program, we progressed from simple straight-and-level flying to the most demanding maneuver—the landing. When dealing with our friend, the Helicopter, the act of just getting off the ground is the most demanding exercise, and there's no instructor to get it into the air and give you the controls when all is stable. To make that first venture off the ground a successful venture, we need to develop some new skill levels. That necessary development will take place using a maneuver called "zero altitude hover"—ZAH.
ZAH is a maneuver in which the Helicopter is lifting 98–99 percent of its weight. The result is similar to the way the puck behaves on one of those air hockey games. The Helicopter will skid with very little friction as it rides on the bubble of air created by the rotor downwash. In this mode of flight, you can begin to learn the reactions of your Helicopter in a hover while at zero altitude—ZAH.
(JS): It's appropriate at this time to say a few words about the surface on which you will be practicing ZAH. Since you will be skidding, it is essential that the surface be smooth and free of obstacles that can snag your skids or wheeled undercarriage. The rotor plane is essentially a gyroscope, and any input upsetting that plane can result in unwanted and possibly disastrous movements. Although grass is a softer landing spot in case of trouble, ZAH cannot be done on other than a smooth surface. Those nice blades of grass can catch on the landing gear, and there is your unwanted input. Find a nice lonely macadam parking lot or street. (JS)
Before you actually try to perform ZAH, I need to say a few words about the landing gear. The maneuver is best performed with a wide "stance" or "training" gear installed for two reasons:
- With the narrow gear as installed on most Helicopters, the machine will tend to tip over rather than scoot along the ground. This is due to the skids being too close to the center of gravity. When a cyclic control is applied, the machine requires little force to tip over, since the point of contact with the ground is close to the lift center. The tipping force is reduced in effectiveness, and the Helicopter "scoots" in the direction called for, with the wider landing gear.
- By moving the skids outward, you have decreased the machine's sensitivity to yaw upsets — i.e., tail rotor pitch changes and engine torque changes. All the yaw relationships are still there, but they are reduced in sensitivity due to an increase in the angular moment of inertia around the vertical axis through the rotor shaft. The result is you have more time to think and react, plus a less sensitive machine in the yaw axis. Cyclic controls are damped a little, but the yaw is the most pronounced axis affected.
I've included a design for a simple "training" landing gear at the end of this level (Fig. 4). It is based on John Simone's design but beefed up a bit from my own experience. The cost is usually less than $10 for the parts at your local hardware store. You may choose not to use it, but I can assure less success with ZAH now, and with the hover maneuver later, if you don't. The wider landing gear will remain on through Level IV, so it will not be a waste of time. It's only an evening's work, and you may save weeks of learning time and a possible broken bird.
The first step in this learning process is to trim your machine so that it stays as close as possible to remaining in one spot as you begin to lift off. To do this, assure that your Helicopter is set up perfectly per the manufacturer's specifications, and that the CG is in the right spot. Now, relative to that setup, I strongly recommend that you set up the controls to "fly the nose." This means that a right yaw input on the transmitter gives a corresponding right movement to the nose. But even more basic than that, a right turn is a clockwise input, and regardless of the location of the nose, a right turn is a clockwise maneuver. So even in the beginning of the flying training, we can start associating with actually being in the Helicopter's pilot seat.
(JS): When setting up the engine mixture, I recommend that you set the engine a little bit on the rich side. This will cause a smoother transition when you change power levels. This softer response will give the appearance of a more docile engine. A finely tuned engine would decrease your learning, as you would be fighting its quick response. Easy does it for now. Also, when you set up the throws on the servos and swashplate, set it up so that you get about 1/4-in. throw on the swashplate in each direction. This is a beginning setting. You may find you need more throw due to slow servos or a Helicopter with sluggish response. (JS)
Now, back to work. Advance the lift control—throttle and/or collective—until the machine becomes skittish or light-footed. Typically, the Helicopter will drift without any control input from you. It is important that the lift advancing input be done slowly in case there is a significant drift—trim—problem or an unexpected lift-off.
When the drift is noticed, remember the direction, and immediately reduce lift. It is important to do this quickly, since any directional movement may cause the machine to become airborne due to the increased lift gained when translational movement occurs. More simply put, it may take off out of trim and break your machine. Correct the errant trim one axis at a time, using the adjustable connections to the servos. Don't use the transmitter trim tabs yet, as you'll use these later and need a good center point.
When left/right and fore/aft cyclic controls are in trim, check out the tail rotor, or yaw control, in the same manner. My own initial setup of the tail rotor places the pitch of the blades at zero relative to the tail boom when the control on the transmitter is at full counterclockwise (left when flying the nose). This setting is for a clockwise rotation of the main rotor. For a counterclockwise (CCW) M/R, set the pitch to zero at full right clockwise (CW) yaw control. For the dynamic setting of the tail rotor in ZAH, I have found that a slight CCW drift will later result in a good full lift setting (slight CCW drift for a CCW M/R).
(JS): It would be a wise thing to note and record these trim settings you've just developed. This will save you the time later if repairs are required. Check before the first flight of the day to assure the machine is as it was the last time you flew. You may notice that a little right cyclic is required in the swashplate of a CW main rotor Helicopter. This offset is necessary to counteract the left drift created by the T/R as it counters engine torque. The opposite trim is required for a CCW Helicopter. Finally, these trim settings are for ZAH, and will only be in the ballpark when we fly in Level III. (JS)
OK, you're in trim for ZAH and ready for flight. By trimming the Helicopter, we have really reduced your work. With fixed-wing aircraft, you have a fairly stable flight attitude if you neutralize the control sticks. This is not, for the Helicopter, the safety valve it is in fixed-wing flying, since the attitude you've trimmed for is not necessarily the attitude you always want. This will become evident later, but for Levels II, III, and IV flying, it will be a good friend.
We'll now begin to practice ZAH. In this maneuver, you will be essentially balancing on a bubble of air. The downwash from the rotor blades compresses the air between the plane of the blades and the flying surface, creating the bubble under the rotor plane. This compression is the result of the high pressure area created by the blades as they create lift. Any change in the distance between the rotor plane and the surface, such as tilting the rotor plane through control movements, quickly affects the lift in the bubble—hence the feeling of balancing a ball on a ball.
At two or three feet above the surface, the ground effect bubble is reduced greatly, and control sensitivity is relaxed. Thus, we are beginning our training under the worst conditions—on the bubble. But these are conditions that will sharpen your reactions, both those deliberately induced and, more importantly, those automatically done. These conditions also exist every time you land. The automatic reactions are the ones we want to train; even though the work may seem boring and time-consuming, it is highly productive, so don't cheat.
Using paint or masking tape, put down a triangle of squares as shown in Figure 5. Begin ZAH as you did in trimming, but now, consciously, try to maintain position and orientation of the machine inside one of the 1-ft. squares.
If the machine maintains its position in the square without control input, then one of two things has occurred:
- 1) You're a prodigy and have trimmed perfectly; or
- 2) You're cheating.
The latter is usually the case, and the likely cause is that you are not really lifting the majority of the weight.
When "on the bubble," the Helicopter will be very, very squirrely, so if you are doing the maneuver correctly, you should be working hard to maintain position. This is important so as to learn the machine's responses to your control inputs, and also to teach you to respond to changes in position and/or attitude. This is the ideal and reasonably safe time to learn these things, so move the Helicopter around in the square to maximize the learning. When you can maintain the position and orientation in the square for a minute while on the bubble, you are ready to move on.
(JS): During the ZAH maneuvers, I recommend that you remain 8–12 ft. behind the aircraft for three reasons: 1) It is safer, since you will have some distance between you and the Helicopter in case a blade or other rotating part separates from the machine. In Level III, we use only a 3-ft. hover so as to avoid lining up the rotor plane with your head. 2) Since you are safer, you will be more relaxed and can concentrate on flying. 3) You will have a better perspective of the Helicopter with its surroundings. When you are too close, you only see the copter and not the area around it where all the orientation clues are located. (JS)
For the next maneuver, begin ZAH on your original square. While maintaining tail-in orientation, translate, in a skid, to the next square. This will require a combination of cyclic controls to cause a drifting ZAH. The moving around you did in the single-square maneuver will now pay off as you move forward, backwards and sideways in combination to negotiate the course. The use of the triangle makes the work a little harder than a rectangular course due to the use of angular movements requiring combination inputs to controls.
Your first translational movements should be very slow, as rapid translation can upset stability by increasing lift. As you fly the course, concentrate on minimizing the control inputs to small adjustments. This will serve you well in Level III, where we will repeat these maneuvers in the air. Believe it or not, a well trimmed Helicopter is quite stable, and only small corrections are needed. You are also in the process of building some auto-reactions to aircraft anomalies. You are building that mental model. These reactions are not built with one or two practice sessions, so keep on practicing even though it may seem endless.
Finally, one more word on Level II. Don't trust yourself to measure your results. The task definitions are specific enough to allow accurate measurement of skill advancement. Use another person to test you against the Level II criteria. It will be better for your learning to do so. You can move on to Level III when you can go around the course three times in each direction, pausing 30 seconds in each square in ZAH — and don't cheat. The hard, serious work in Level II, now, may later save a Helicopter.
I told you these egg-beaters aren't difficult to fly — just different.
(JS): The RC Helicopter sport has been wandering too long in finding a way to train its new devotees. This program fills that void and should encourage those who are a little hesitant to give it a try. Learning to fly a Radio Control model Helicopter is not hard—it's just different. It's a discipline of orientation between self and machine, and not between machine and surroundings, such as in fixed-wing flying. It's different, but it can be learned with effort. (JS)
Transcribed from original scans by AI. Minor OCR errors may remain.

