

Heli-Fli - Part 2
If you got into Level II in last month's Part 1, you'll know what ZAH means, and hopefully you'll have had a chance to practice it. This month we continue and conclude the five-level structured program for learning to fly an RC helicopter. Part 2. Tom Burdin
(With comments and advice from John Simone, Jr.)
HELI-FLI LEVEL III
Task Description and Measurement Criteria
- The student will be able to raise the helicopter vertically to an altitude of 3 ft. and return directly to the 1-ft. square where the maneuver began. Orientation will be with the tail towards the pilot.
- The student will be able to raise the helicopter vertically to an altitude of 3 ft., maintain a 3-minute hover at that altitude, and remain within a radius of three feet of the lift-off square.
- The student will be able to raise the helicopter vertically to an altitude of 3 ft. and negotiate the Level II triangular course clockwise (CW) and counterclockwise (CCW), pausing 1 minute to hover over each square. Orientation must remain with the tail towards the pilot.
Discussion
If you think you spent a lot of time on Level II, you're about to establish a new record. This level is the real meat of the training, and your learning should be the greatest. As we have been doing up to now, we'll build slowly in difficulty to the point where you are in control of the craft—to the amazement of all around you.
First, we need to retrim the machine for airborne flight. The zero-altitude hovering (ZAH) required different trims, so we'll now trim for airborne and stay with that trim mode for a while. Again, note the settings for future rebuilds—yes, you will have that opportunity. It will be minimized if you follow this.
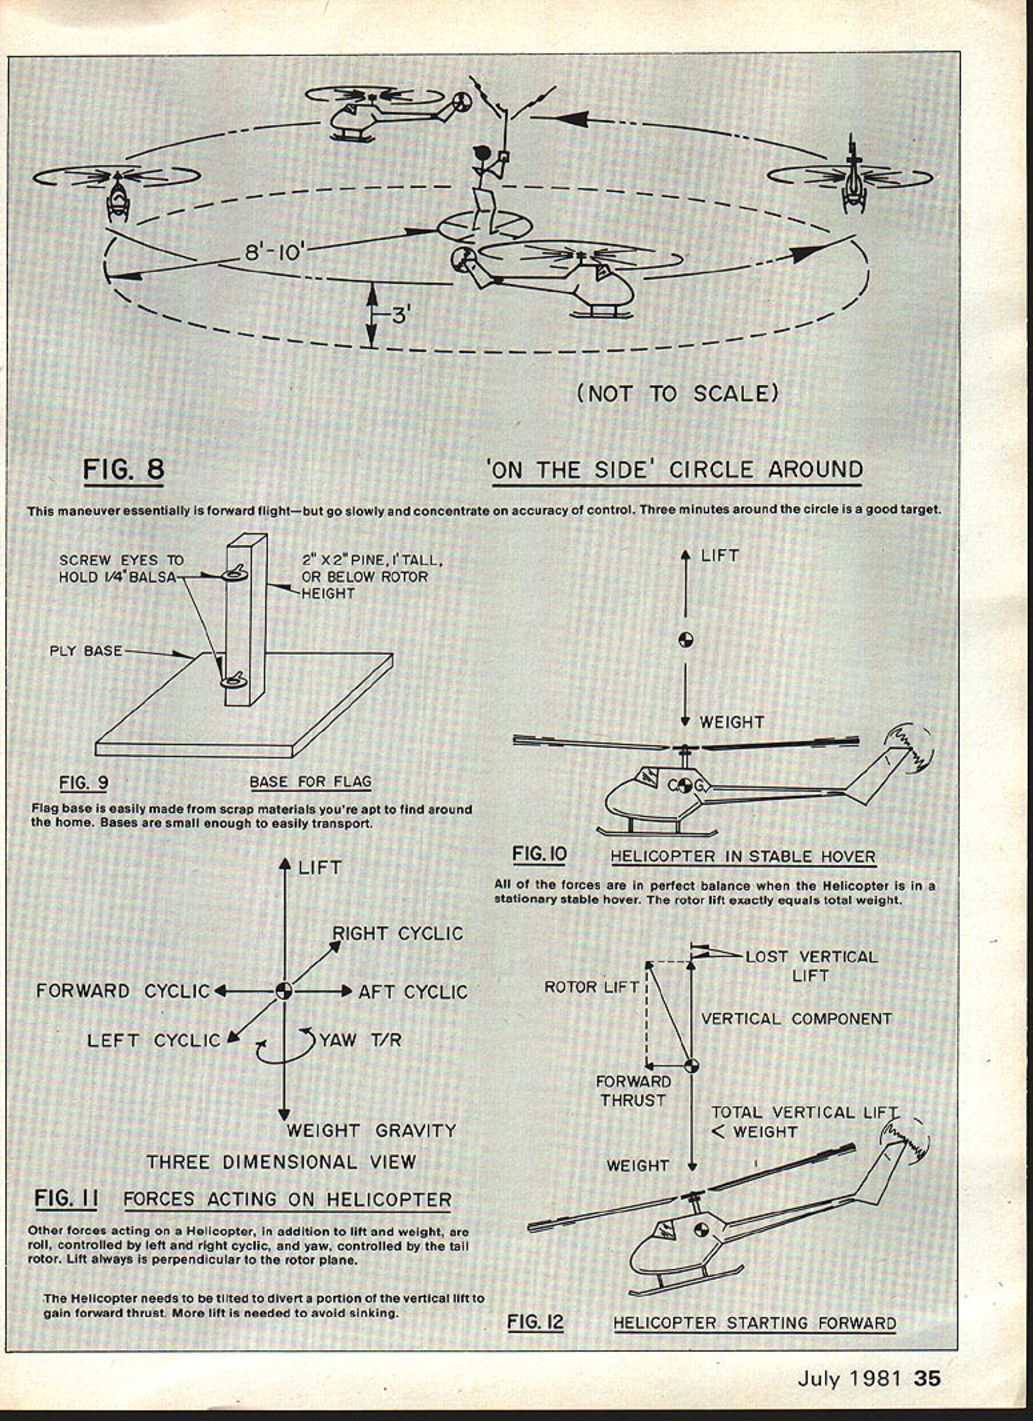
Markers are needed to define various practice courses. A flag supported by 1/4-sq. balsa is excellent as it won't break rotor blades. Fig. 9 shows how the flag base should be made.
Begin in our friendly square again, and go into ZAH. It should be easy and comfortable for you by now—little body English required. Take a deep breath, and get things stabilized. What we want to do is lift off to an altitude of 3 ft., and come right back down like a yo-yo—slowly. While doing this, we're going to notice the machine's reactions, and retrim one axis at a time. Slowly advance the lift control until you begin to climb; then reduce lift slowly, and settle back slowly to the ground.
(JS): Don't relax until you are solidly on the ground again, and rotor speed is reduced to a low level. You can tip the machine over on the ground at any time the rotor is creating enough lift to tilt itself. Usually, a high rotor speed can be a saving grace, in that you can maintain control even though not flying, but it has its "watch-outs" too. And don't chop the power if you get in trouble at altitude. That old fixed-wing safety valve is sure disaster in a helicopter. (JS)
Your first little bounce may be only a few inches—this is fine. Increase the height of the bounce a little more each time, noting and correcting trim at the servo connector. Start with the tail rotor (T/R) and proceed sequentially to the right/left cyclic and forward/aft cyclic. Continue this process of bouncing until you can observe the trim settings while at 3-ft. altitude. Your position behind the machine should still be 8–12 feet. It's OK to take up to a couple of tanks of fuel to get to the 3-ft. level. Pace yourself. No competition here—just solid learning. You may retrim more than one time during this process. This is OK also. Remember, you are here to learn safely with minimum aircraft damage, so don't hurry. You've completed this first maneuver when you can raise your helicopter straight up slowly to 3 ft. and return slowly to the pad. Your impartial, honest observer will verify this for you.
OK—so much for bouncing around. It's time to hover. This maneuver is no more than an extension of the previous maneuver. If you've trimmed out properly, you should now have confidence in the machine's stability, and your need to anticipate control inputs. Begin your bounce maneuver again, reach 3 ft., reduce power to start down, but only reduce to a level slightly above your normal descent power level—such that the machine seems to pause at 3 ft. momentarily. Then reduce the lift that last little bit, and return to terra firma.
You may be tempted to try this at a lower altitude. Resist the temptation. Control is much better at 3 ft. than at 1 ft. because you're out of ground effect. Also, take time to make corrections before you hit the ground. Now that you've learned the bounce maneuver and are going to master the maneuver slowly, you will simply extend the time at the 3-ft. altitude with hesitations.
(JS): As you stabilize the hover, more retrimming may be required. Keep in mind that even left/right (L/R) cyclic trim can upset the tail rotor trim. The tail rotor also contributes to L/R stability as well as countering torque. So, if you change the L/R trim on the main rotor, you will need to check the T/R trim as well. (JS)
During these early pauses in the air, you'll be learning control of the cyclic, lift, and tail rotor, and more importantly, the interrelationships between all of them. Those last two really are interactive in hover work. The tail rotor is the counter to the engine's torque as it creates the power to lift the helicopter. As you lift, more torque is required than is required to remain at the same altitude. Conversely, less is required to descend. The counter-torque required from the T/R will then mirror your lift commands, and it is important to build some auto-reaction on your part. (JS)
(JS): As you approach the ground in the descent, you should slow the descent prior to touchdown. Remember to add a little T/R correction to counter the torque. Again, anticipation of the need and smooth control movement pays off. (JS)
Throughout those hover and yo-yo maneuvers with a CW main rotor (M/R) helicopter, and flying the nose-in (the only mode that will be discussed from now on), right or CW tail rotor control is required when lift is increased, and CCW control when lift is decreased. The amount of T/R depends on the change in lift and the rate of change. For the hover, as you lift off, right T/R is required until you reach 3 ft. In the actual hover, neutral T/R control is required if your trim work was successful. A little left tail rotor is required to maintain orientation in the descent.
As you work to maintain altitude, you'll also be working to maintain the tail-in orientation. Your pauses at 3 ft. should become longer and longer as you become more proficient. Having someone noting the time or simply counting "time in hover" is very helpful to note your progress in this maneuver. Keep a record of your hover time, and you'll see those recorded times increase towards the three-minute mark.
Up to this point, we've stressed altitude and orientation. As you become more proficient in the hover, you need to become aware of your position over the square, and make cyclic corrections back to the center point. Make your corrections small, and be patient. Your goal is to remain at 3 ft. height and within 3 ft. of the center of the square for three minutes. Again, use a second person to verify your work, and don't worry if you burn up to a gallon of fuel getting to this point from the beginning of the hover practice. These basic maneuvers are needed to form that firm foundation of automatic reactions to build up our mental model of the machine's performance.
(JS): You'll notice that your first efforts should be on maintaining control in the hover, and not on your position over the square. It's too easy to get fixed on that square too early in the process and miss some important learning about basic control. (JS)
Now, it's time to move about a bit. In ZAH, we scooted and skidded along a triangular course. We're now going to repeat the maneuver while in a 3-ft. hover. If you have been practicing maintaining position in the hover, then you have developed the technique of nudging the machine left and right, fore and aft. We'll use this technique to maneuver around the triangular course in the early stages of this maneuver. Our goal, however, is a slow, controlled drift from point to point. I need to emphasize the slow drift, as we do not want to get fully into a forward flight mode—you're not ready for that yet. Just drift lazily from point to point. There is no time constraint on this maneuver.
To begin the maneuver, enter the now-famous 3-ft. hover—with tail oriented towards you, as usual. Now, nudge the cyclic in the direction you want to go, while maintaining orientation and altitude. As you ease over to the second square, do so in a series of short spurts—initially jerky. Our goal is to smooth out those spurts to produce the drifting motion mentioned earlier. As you reach the next square, pause and hover 1 minute at the 3-ft. altitude before proceeding to the next point of the triangle. When you feel comfortable drifting around CW and CCW, get your friend to verify your performance.
There is not a lot of discussion in this level. Don't let that lessen, in your mind, the necessity of a lot of hard work. This is foundation building, and the next levels require very strong foundations to move on.
HELI-FLI LEVEL IV
The maneuvers in this level are to be accomplished in calm air, except as noted in the body of the discussion.
Task Descriptions and Measurements
- The student will repeat Level III maneuvers in light wind conditions.
- The student will be able to accomplish the ZAH maneuver with the helicopter tail orientation 90 degrees left and right of the tail-in orientation accomplished in Level II. The pilot must directly face the side of the helicopter while maintaining position inside the 1-ft. square for 1 minute. ZAH with both side orientations must be demonstrated.
- The student shall negotiate the ZAH triangular course in the two orientations described above. Refer to the Level II description of the ZAH triangular course for further details.
- The student will be able to raise the helicopter vertically to an altitude of 3 ft. and hover while maintaining the 90-degree left and right orientation as per Task 2 above.
- The student shall negotiate the ZAH triangular course while hovering at 2 ft. Orientation will be as described in Task 2. Other parameters of the flight shall be as per the Level III maneuver description.
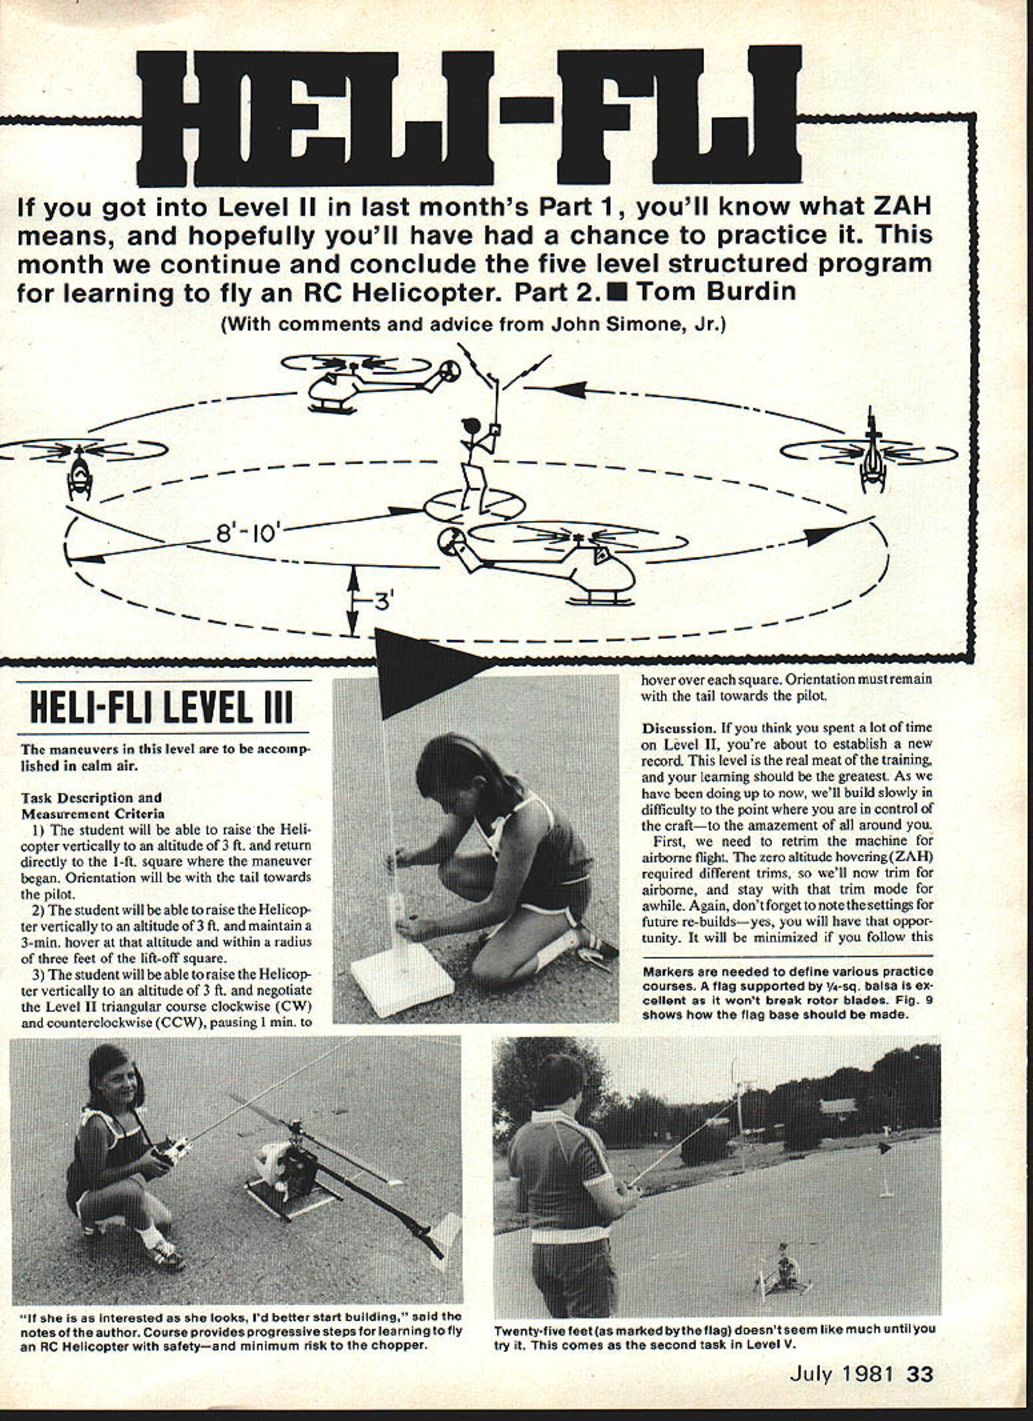
- The student will be able to fly a circle around himself in two modes while maintaining 3 ft. altitude and 8–10 ft. distance: 1) with tail-in orientation; 2) with "on the side" orientation, left and right. The maneuvers shall be flown clockwise and counterclockwise. The student should pivot with the machine position.
- The student will remove the training landing gear, reinstall the original factory equipment, and repeat the airborne parts of Levels III and IV.
Discussion
Before we get into the main body of Level IV, there is a bit of practice we need to accomplish—flying in the wind. To date, we have indicated that calm-air flying was the order of the day. It is not always calm. To get this practice, choose a day with light steady wind—not gusty. Begin by facing the machine into the wind.
In your now-familiar tail-in orientation, lift off and hover. Then accomplish the triangular course. You'll notice a little more forward cyclic required to maintain position. You'll need more directed energy to maintain position against the wind and, therefore, more power—which will result in the need for more tail rotor correction. The interdependency of the controls will now become more apparent.
When you are comfortable in the "nose on the wind" situation, orient such that the wind is first on one side of the helicopter and then the other. Finally, put the wind at your back. During all this practice, maintain the tail-in position. We will be moving about a bit in Level IV, but don't try to get ahead of the machine.
There is no need to accomplish this practice prior to any of the Level IV maneuvers, nor to have the usual impartial judge. Do accomplish the practice prior to completing the remaining Level IV maneuvers in the wind in a similar manner as above.
Up to now, we have concentrated on maneuvers that utilized a natural orientation—that is, left is left, forward is forward, etc., both from your viewpoint and the helicopter's. The reason that Level II and III maneuvers maintained this orientation was to maximize your learning around your reactions to changes in the helicopter's position, and your learning the helicopter's reactions to your control inputs.
But helicopters do not always fly in that orientation, unless their pilots are satisfied with crawling when they can learn to run. These other orientations, other than tail towards pilot, require you to learn to re-orient your way of thinking. Up to now, all your corrections have been done with you as the prime reference, and it has been convenient that the reference of the helicopter with the rest of the world has been constant with respect to you, also. We now need to move you, mentally, inside the helicopter.
(JS): The idea of moving your mind inside the helicopter is a key event that must take place before you can accomplish forward flight. In fixed-wing flying, you get the practice from the beginning, because forward is the only way to fly. You actually are trained now for tail-in flying due to Level II and III work, but you can't continue tail-in forever. You must turn around and come back. (JS)
Recall the three-stage learning model discussed earlier. At the end of Level III, you should have made it to Stage II of the process for the basic tail-in hover maneuvers. Your brain has created an internal model of our whirling flying machine and, to some extent, predicts what control inputs are necessary to correct an error without waiting to see the results of those inputs. In other words, you are ahead of the machine.
To facilitate your transition to other machine orientations, we need to return to Stage I of the learning process and retrain your brain—an obviously smarter brain by now. We'll do that by going back to ZAH and practicing in some new orientations as described in the task descriptions. A few salient comments follow.
- Make your transition to full side-on orientation slowly. Start 30 degrees off in both left and right presentations, and go no further until comfortable. Rotate back and forth from 30 degrees left to 30 degrees right. Don't stay only on one side before learning the other.
- Make yourself work to learn to use that tail rotor, and more importantly, get the feel of flying other than tail-in. Try thinking of yourself actually sitting in the cockpit, and reference all corrections from there.
- As proficiency increases, begin to concentrate on staying on or near the square just as in the earlier ZAH maneuvers. When you're feeling good about your flying, increase the angle to 45 or 60 degrees on each side, and repeat the above procedure. Make incremental changes at a rate you can best handle, but do continue to increase the angle. That last 30 degrees is a real "bear," but you must do it on both the left and right sides.
(JS): It's important not to cheat yourself by using a little body English. This re-adaptation to multiple relationships between pilot and helicopter is one of the real keys to flying a helicopter—if you plan to do more than hover tail-in. Make sure the machine is really 90 degrees to your body—look right at the side of that dude. To not cheat yourself will pay off later. (JS)
- Fly the ZAH triangle first at the shallow angles away from tail-in, then increase to the full broadside positions, both left and right. Pace and challenge yourself—work hard.
- As you move into hovering "on the side" and flying the hover triangle, follow the same conservative approach as you did in the ZAH maneuvers.
The last maneuver in Level IV is perhaps the most challenging in that it combines all of our learning to date. It is now that the learned technique of small corrections and a well-trimmed machine really pays off. You must feel very comfortable flying in a hover, and along the triangular course in all orientations learned up to now, prior to starting this maneuver.
(JS): A good self-test here is to go out to your local field and fly with other modelers watching. If you have the courage to do that, or to fly a demonstration of your skills for a skeptical friend, your skills are where they should be. (JS)
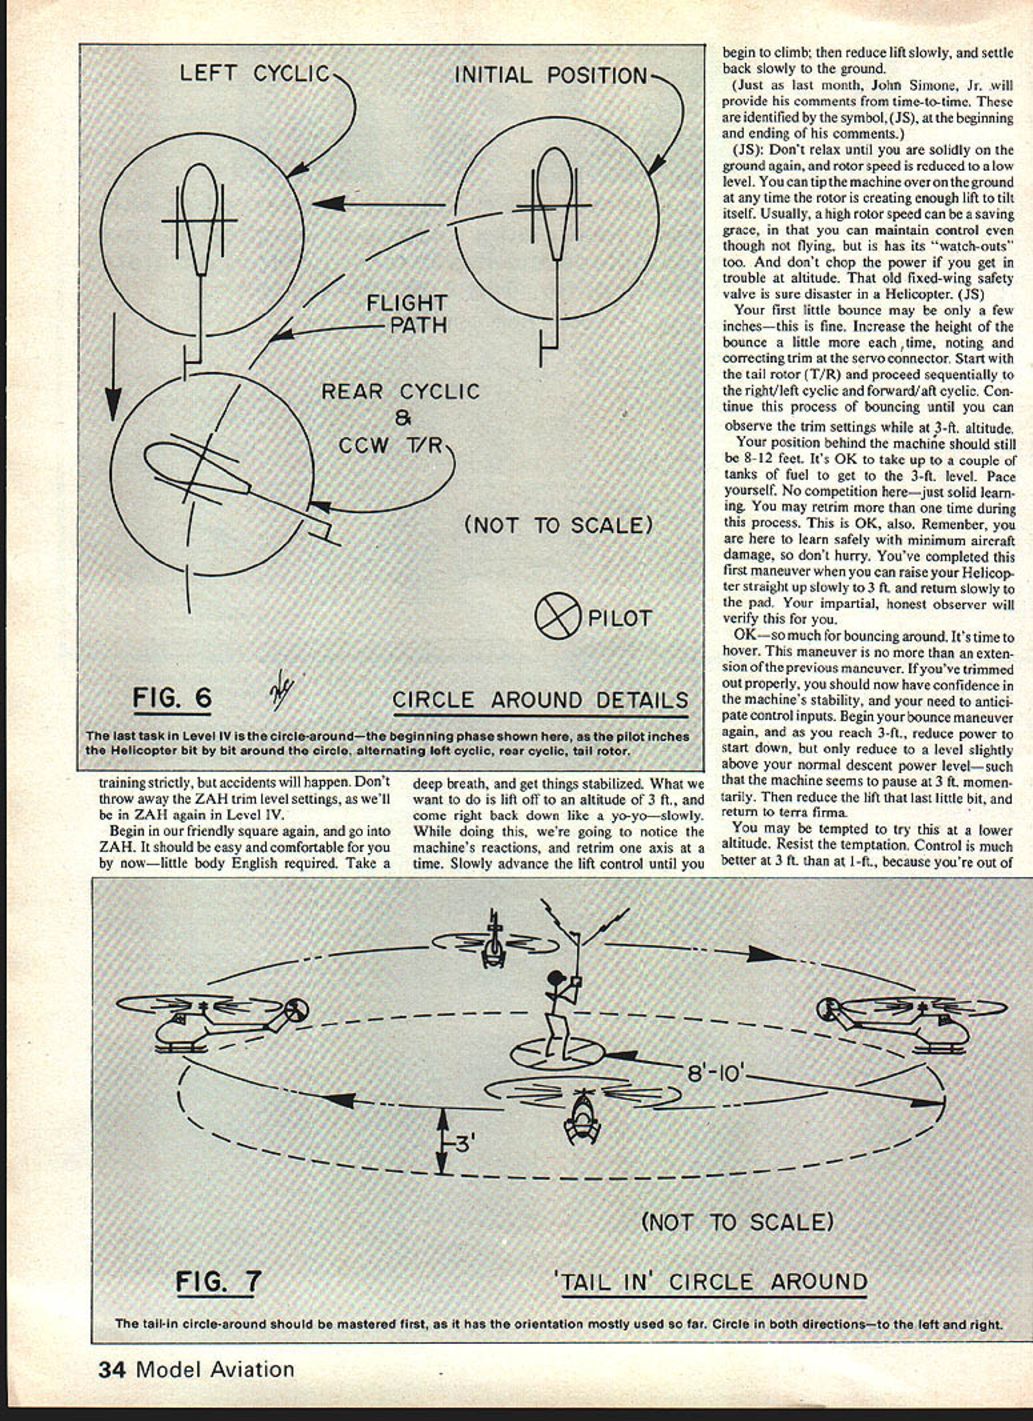
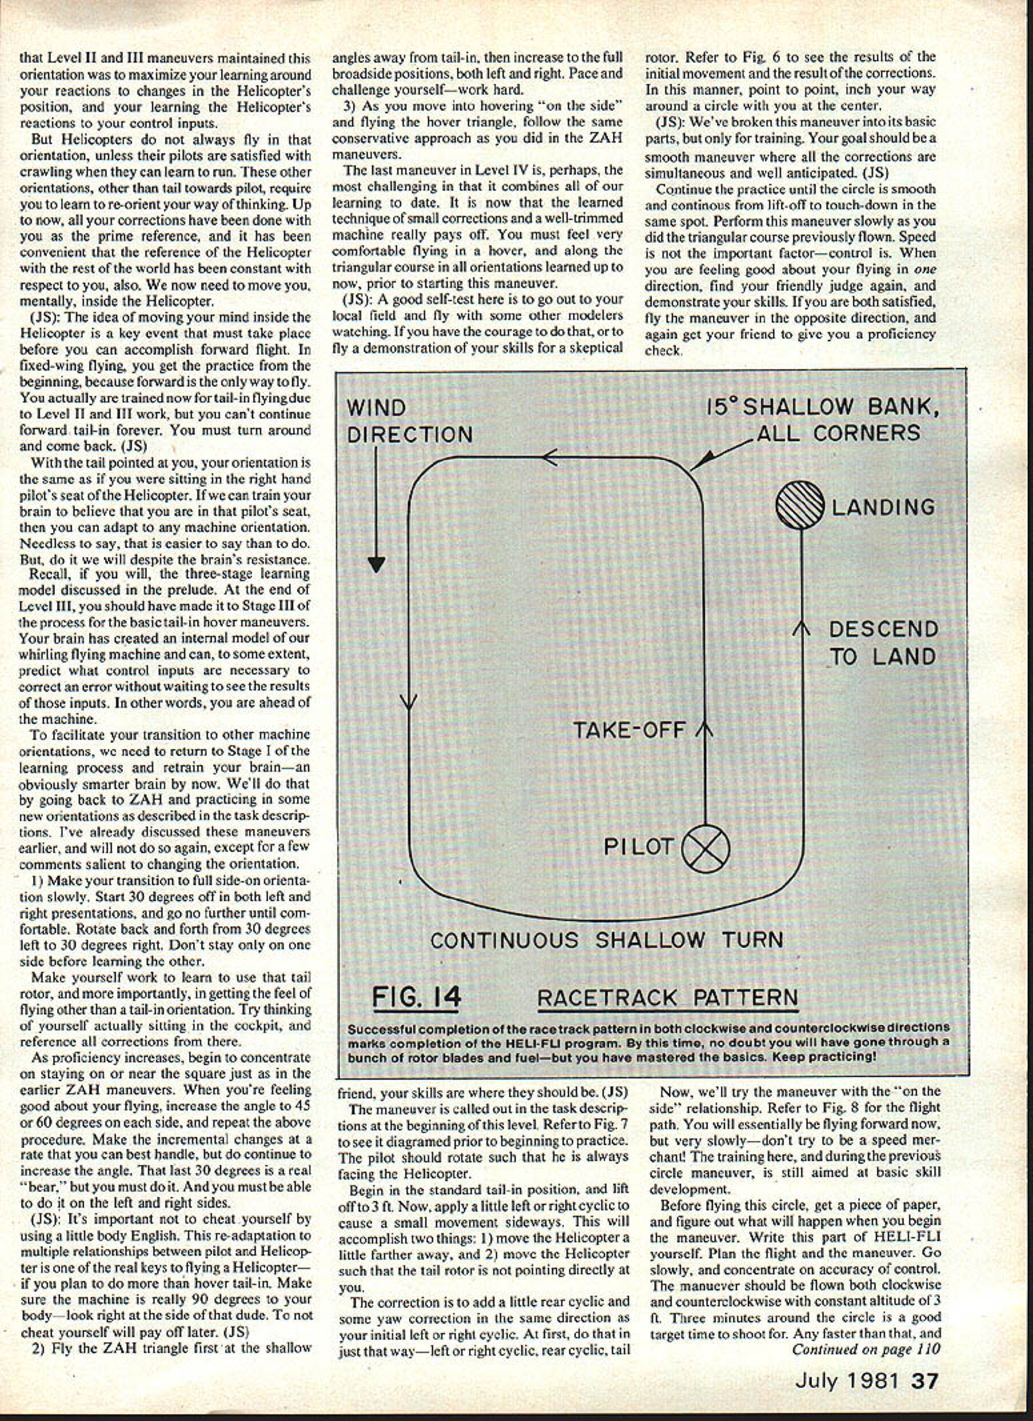
The maneuver is called out in the task descriptions at the beginning of this level. Refer to Fig. 7 to see it diagramed prior to beginning to practice. The pilot should rotate such that he is always facing the helicopter.
Begin in the standard tail-in position, and lift off to 3 ft. Now, apply a little left or right cyclic to cause a small movement sideways. This will accomplish two things: 1) move the helicopter a little farther away, and 2) move the helicopter such that the tail rotor is not pointing directly at you.
The correction is to add a little rear cyclic and some yaw correction in the same direction as your initial left or right cyclic. At first, do that in just that way—left or right cyclic, rear cyclic, tail rotor. Refer to Fig. 6 to see the results of the initial movement and the result of the corrections. In this manner, point to point, inch your way around a circle with you at the center.
(JS): We've broken this maneuver into its basic parts, but only for training. Your goal should be a smooth maneuver where all the corrections are simultaneous and well anticipated. (JS)
Continue practice until the circle is smooth and continuous and you can lift off to touch down in the same spot. Perform this maneuver slowly as you did the triangular course previously flown. Speed is not the important factor—control is. When you are feeling good about your flying in one direction, find your friendly judge again, and demonstrate your skills. If you are both satisfied, fly the maneuver in the opposite direction, and again get your friend to give you a proficiency check.
FIG. 14
RACETRACK PATTERN
Successful completion of the racetrack pattern in both clockwise and counterclockwise directions marks completion of the HELI-FLI program. By this time, no doubt you will have gone through a bunch of rotor blades and fuel—but you have mastered the basics. Keep practicing!
Now, we'll try the maneuver with the "on the side" relationship. Refer to Fig. 8 for the flight path. You will essentially be flying forward now, but very slowly—don't try to be a speed merchant! The training here, and during the previous circle maneuver, is still aimed at basic skill development.
Before flying this circle, get a piece of paper, and figure out what will happen when you begin the maneuver. Write this part of HELI-FLI down; plan the flight and the maneuver. Go slowly, and concentrate on accuracy of control. The maneuver should be flown both clockwise and counterclockwise with constant altitude of 3 ft. Three minutes around the circle is a good target time to shoot for. Any faster than that, and you'll get into trouble—don't rush it.
A note about changing landing gear and returning to factory equipment:
- The response to lift inputs will be more rapid with factory (lighter) equipment because of reduced mass. Don't rapidly advance the lift the first time you fly with the narrow gear, or you may have your hands full.
- Ground or ZAH cyclic response will tend to cause the machine to tip over rather easily until you get accustomed to how much lift is required to "scoot" along. The training gear protected you up to now, so be prepared once you remove it.
- Airborne cyclic response will improve somewhat due to a lighter pendulum under the rotor plane and less mass to move—tighter control.
- The biggest change will be in yaw. The training gear inertia slowed reactions to engine torque changes and your own tail rotor changes, giving you more think time. With the training gear removed, you will have to update your mental model of the yaw axis and learn to tighten up your control inputs. The key is smooth, early, and small changes in the control stick positions.
If changing the landing gear does nothing else for you, it should wake you up and get your attention prior to entering forward flight in Level V.
This level brings to a close the emphasis on basic conditioning. You've probably gone through quite a bit of fuel, rotor blades, and patience. It was worth it, though, because that good solid foundation will give you the confidence it takes to move into forward flight. If you have not given serious attention to these basic maneuvers and practice sessions, go back and do them again. Level V demands that your control of the helicopter be solid. If you are solidly in control, let's put the stick forward and move on.
HELI-FLI LEVEL V
Task Descriptions
- From a 3-ft. hover, the student will climb to 10–12 ft. and establish a hover. Then the student will begin a descent to a 3-ft. hover, followed by a landing. Descent time from the high hover should be 3 seconds maximum. Position over the square will be maintained throughout, as well as the lateral distance of 8–12 ft.
- From a 3-ft. hover, the student will fly forward, into the wind, a distance of 25 ft., returning to the 3-ft. hover at the end of the flight. Altitude will be kept between 3 and 6 ft. Orientation should remain tail-in. Forward speed should be limited to a fast walk, or about 10 seconds from lift-off to final hover.
- From a 3-ft. hover, the student will climb to a 10–12 ft. hover. Forward flight will proceed into the wind, to be terminated in a descending approach to a 3-ft. hover 50 ft. from the starting point. Orientation will be tail-in, and forward speed will be equal to a medium run.
- The student will fly the racetrack pattern as shown in Figure 14. The course will be flown clockwise and counterclockwise at a speed equal to a fast run.
Discussion
It's all on the line now. We've reached the end of the preliminaries, and need to take the big step to forward flight. In the previous levels, we have built a good solid foundation for the maneuvers that need to be discussed. But if you are honest with yourself and feel you're still a little shaky in Level IV, then go back and keep working until you're very, very comfortable with your helicopter in the previous maneuvers. If you don't have that level of confidence, then go back. You'll risk too much by going on.
In all the previous levels, John Simone has supplied his comments to add perspective and additional information to what we were doing. The course of study in this level is almost all John's method adapted to the FLI learning model. I've written this from his notes and added supportive data.
The end-point of this level is to be able to fly a racetrack course—no more. Beyond that is up to you. We'll approach that end in the same way that we have to this point—step by step.
First, we need to develop the skills necessary to stop a descent and transition into a hover, as this is the way all forward flight should end. As usual, start with the 3-ft. hover, and when stable, begin a vertical climb to about 10–12 ft., and establish a hover. By now, you should be able to handle the T/R adjustments required as you increase power to climb.
When you are stable in that high hover, reduce lift a little, and slowly drift down—stopping at 3 ft. in a hover. Continue this process until you can make a fairly rapid descent in about 3 seconds and stop in the 3-ft. hover.
It's important to be proficient in this simple maneuver, as it is used on every flight involving lateral motions and will often be used in a "rescue" mode early in forward-flight training. Keep in mind that, in descending vertically, you will be passing through your own rotor wash. You will descend through the turbulence created by the rotor blades. This will make the machine somewhat skittery, which is why you should have evaluated your basic skills. The situation is not dangerous, but you need to be on your toes.
At this time, I'll once again ask you to self-check your proficiency on maneuvers to this point, and to proceed only when you're honestly ready to do so.
You're now finished with the maneuvers which can be performed in a limited area and which require a hard smooth surface, so go out and find a field to continue training. Dimensions of 300 to 400 feet on a side would be about minimum size, and it should have a smooth area for takeoffs and landings. Also, make sure you still have your privacy.
From your initial landing zone (LZ), measure out about 25 feet or so. Set a marker down that you can see while standing 25 feet away (Fig. 9 shows a handy base for flag markers). We are going to need three of these 25-ft. pace-offs—in a straight line into the wind. For this maneuver, the wind should be light and steady. Each practice day will require a new pace-off, unless you have a meteorological anomaly where the wind is always from the same direction.
Here's what we're going to do: From a 3-ft. hover, we are going to fly forward to the next LZ while maintaining between 3 and 6 ft. altitude. Pause at the next zone in a 3-ft. hover while you walk up to the helicopter, and then continue to the next LZ in the same manner. At the last LZ, do a 180° tail-in circle-around, as in Level IV, and walk the machine back to the initial LZ. Perform another circle-around, and land into the wind. Maintain the tail-in orientation throughout the maneuver. We'll start the maneuver very slowly, and work up to the speed of a fast walk.
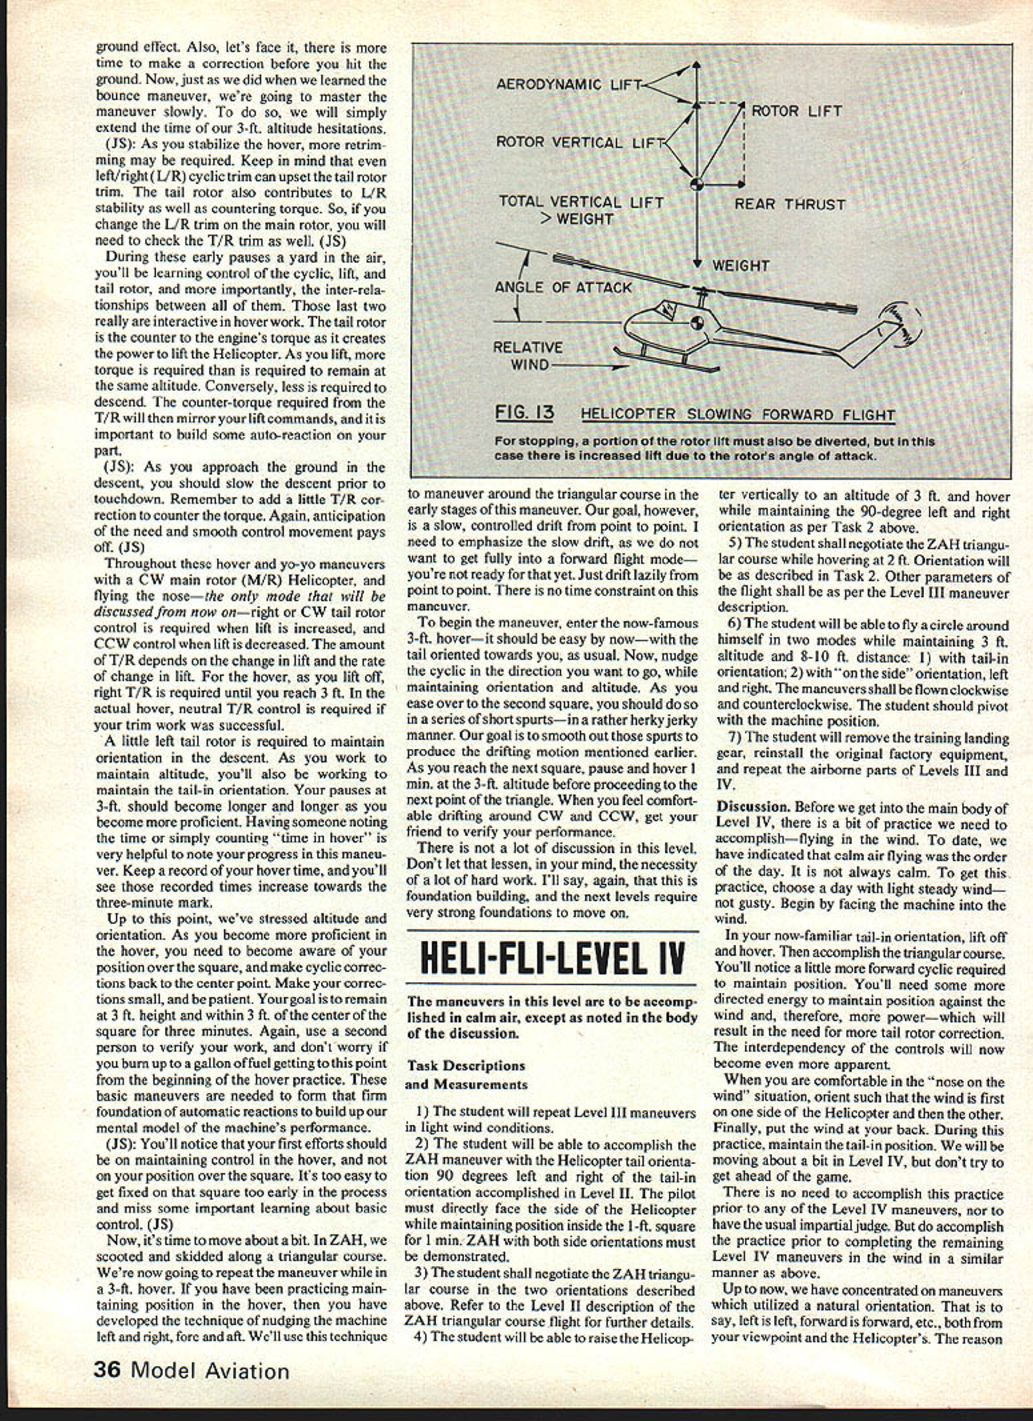
Now, a bit of theory to put into practice. Refer to Fig. 10 and notice that in a helicopter in a hover all forces are equalized to maintain overall system balance. We'll look at two of these forces—lift/gravity and fore/aft—though the other axes (L/R cyclic and T/R) remain essential.
If the machine is to move forward, we must unbalance the forces so that there is more forward force than rearward. Fig. 12 shows the exaggerated forward tilt of the machine required to divert a portion of the vertical lift rearward so as to gain forward thrust. But if we divert some vertical lift rearward, we give up vertical lift and the helicopter will sink. Therefore, we need a little more lift to avoid sinking to the ground.
As the machine moves forward another force comes into play—translational lift. As the machine moves, the forward speed is added to the rotor airflow and lift is developed, much as with a fixed-wing aircraft. Thus, once moving forward, less power is required, and we must reduce power again.
To put this learning to practice and begin forward flight: add a small amount of power to cause a slow climb from a stable 3-ft. hover. This provides the additional lift needed at the beginning of forward flight to avoid sinking. When the machine begins to climb and gain forward speed, bring the cyclic forward and begin slow forward flight. If the altitude begins to increase beyond what you want, and translational lift occurs, reduce power to hold altitude.
Proceed gradually and practice until forward flight and recovery maneuvers are smooth and predictable. Completion of the racetrack pattern in both directions marks the successful end of the HELI-FLI program. Keep practicing!
Transcribed from original scans by AI. Minor OCR errors may remain.

