
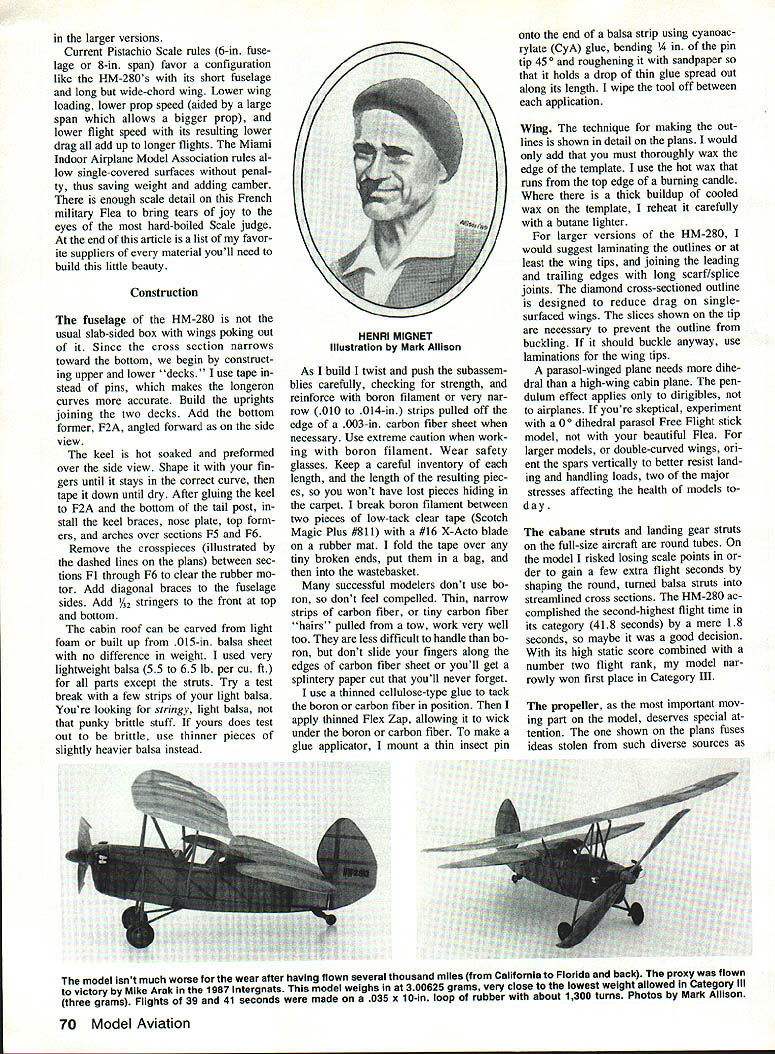
HM-280 Pou du Ciel
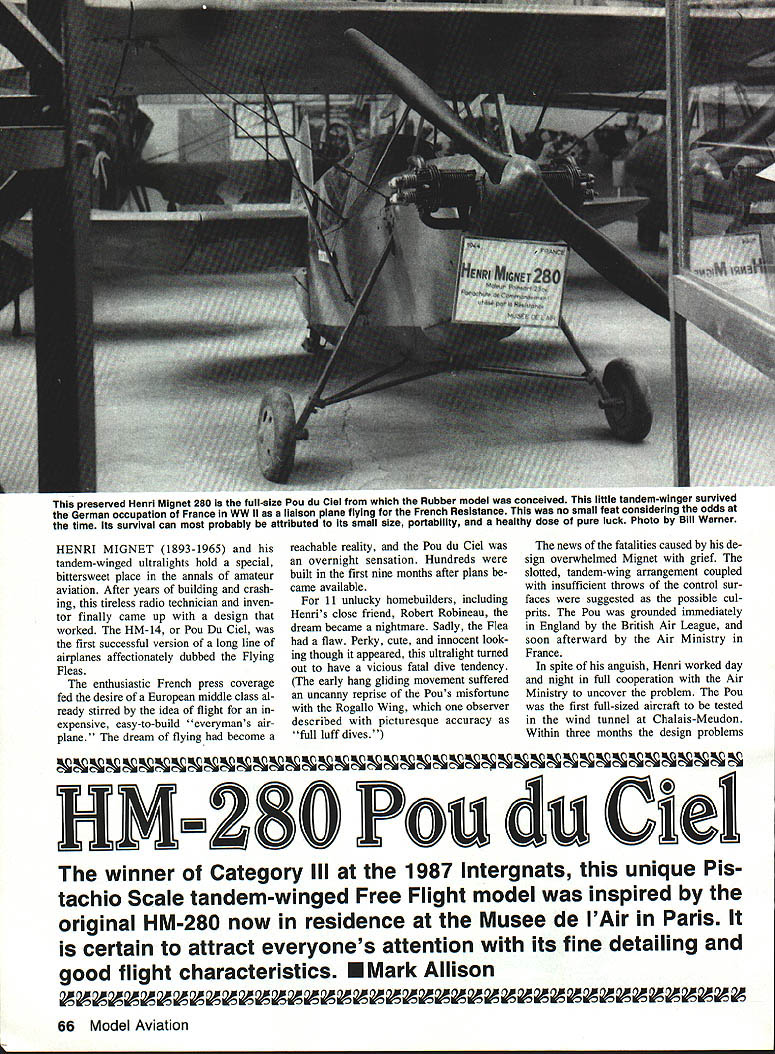
Henri Mignet (1893–1965) and his tandem‑winged ultralights hold a special, bittersweet place in amateur aviation. After years of building, crashing, and experimenting, Mignet produced a design that worked: the HM‑14 Pou du Ciel (Flying Flea). Enthusiastic press coverage turned the idea of an inexpensive, easy‑to‑build "everyman's airplane" into a craze — hundreds were built in the first nine months after plans became available.
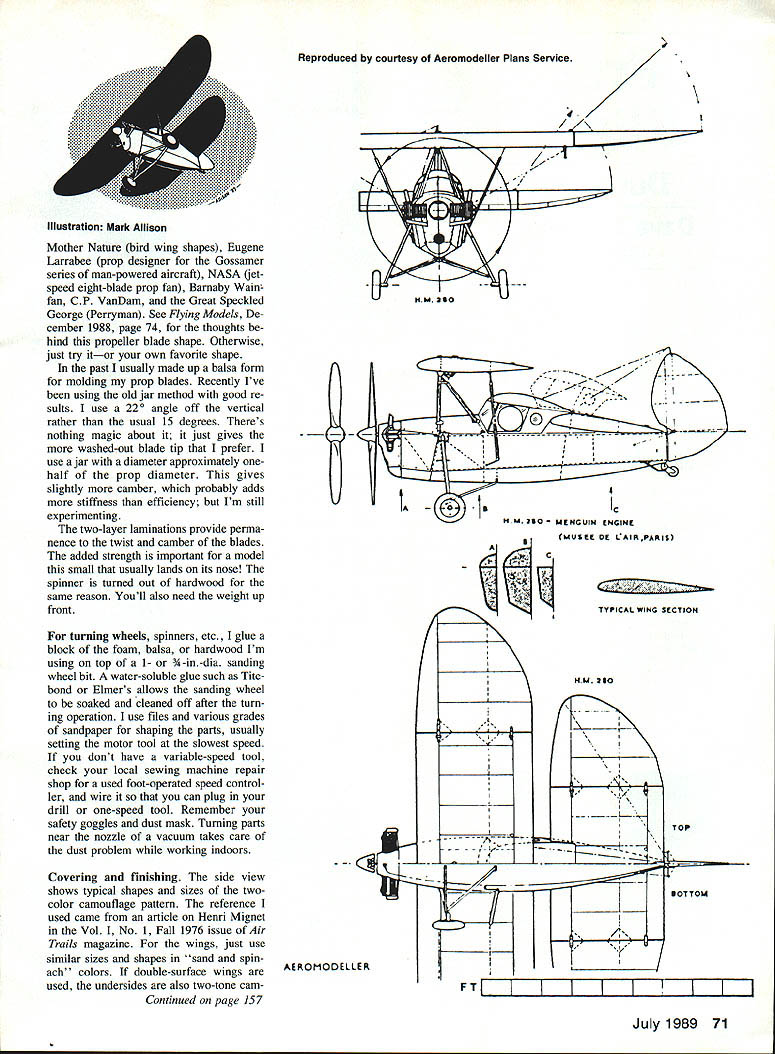
Tragically, a serious design flaw in early Fleas produced a fatal dive tendency that claimed eleven homebuilders, including Mignet’s friend Robert Robineau. The slotted tandem‑wing arrangement combined with insufficient control throws was suspected. The Pou was grounded in England by the British Air League and soon after by the French Air Ministry. Mignet cooperated fully with authorities; the Pou was the first full‑size airplane tested in the Chalais‑Meudon wind tunnel, and within three months the design problems were identified and addressed. Despite fixes and no further fatalities, public confidence had been shaken. An HM‑280 later served as a liaison aircraft for the French Resistance during WWII; one example is preserved at the Musée de l'Air, Paris.
HM‑280 Pou du Ciel (Model)
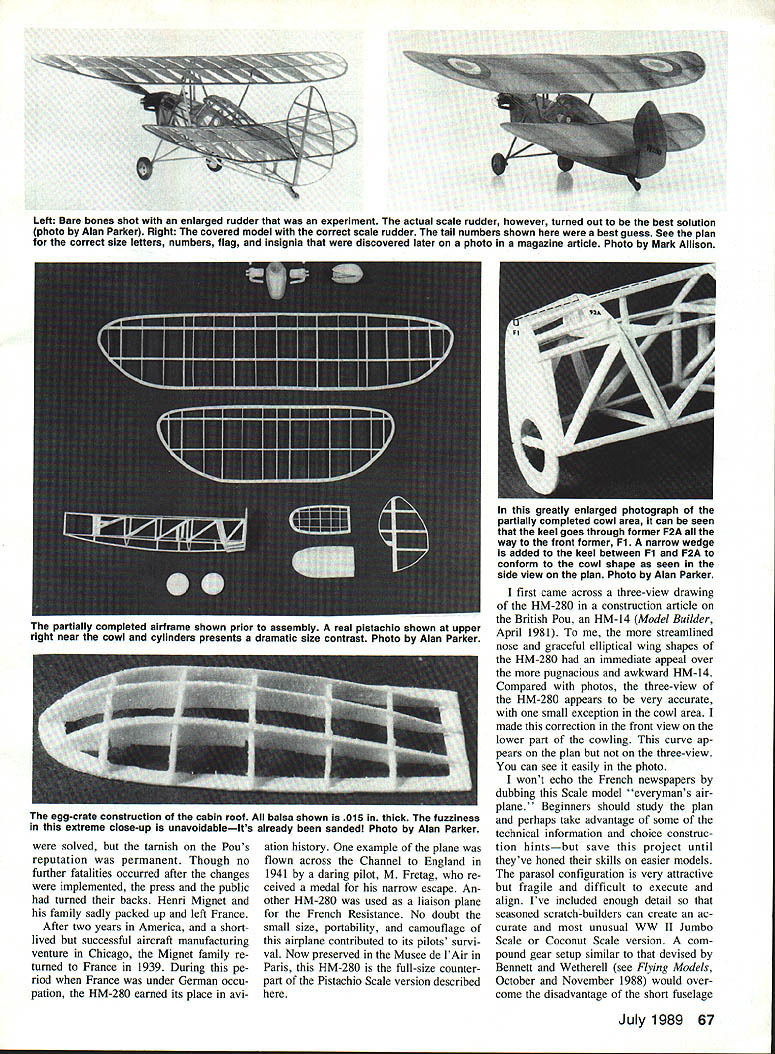
The HM‑280 is a streamlined, tandem‑winged variant of Mignet’s Pou. The 1940s military variant inspired a Pistachio Scale tandem‑wing free‑flight model that won Category III at the 1987 Intergnats. The model is notable for its graceful elliptical wings, streamlined nose, good flight characteristics, and fine scale detailing.
Beginners should study the plans carefully and attempt easier models first. The parasol configuration is attractive but fragile and difficult to execute and align. Seasoned scratch‑builders can scale up details for jumbo or coconut scale versions. A compound gear setup (Bennett/Wetherell style) can overcome the short‑fuselage disadvantages.
Materials & Basic Specifications
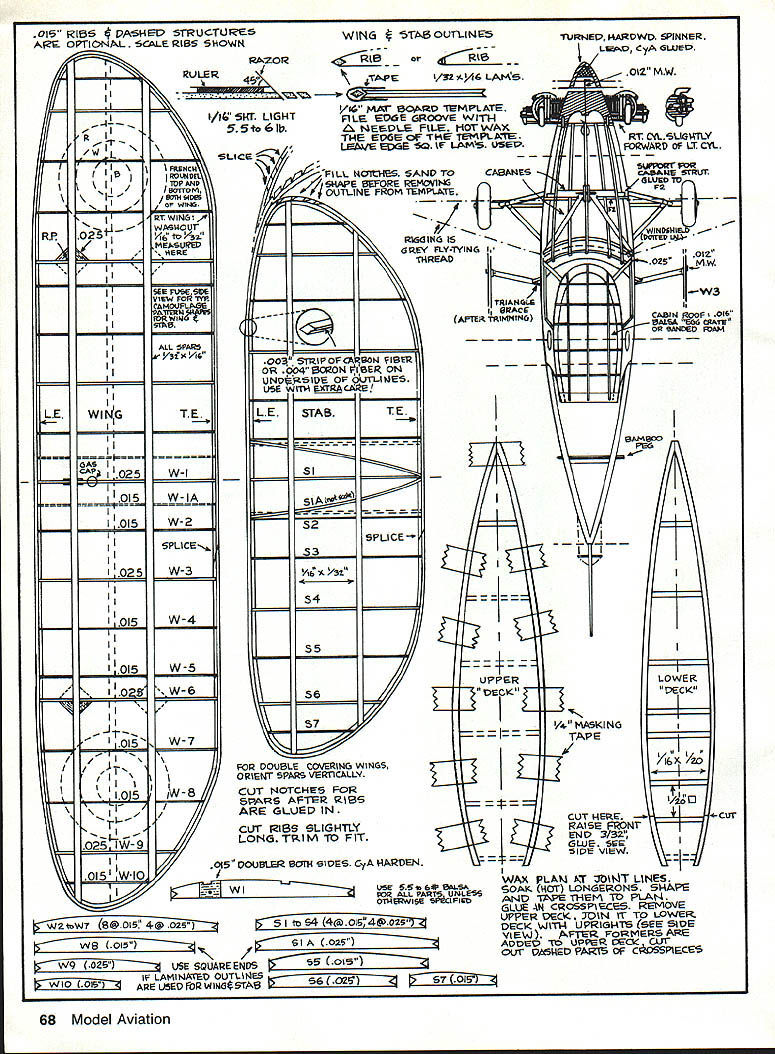
- Use 5.5 to 6 lb/ft³ balsa for most parts unless otherwise specified.
- All spars: 1/32" x 1/16".
- Optional ribs: .015" and .025" sheet stock (scale ribs shown).
- Leading/trailing edge doublers: .95" both sides; CYA harden where noted.
- Use .003" strip of carbon fiber or .004" boron fiber on underside of outlines (use extreme care with boron).
- For double covering wings, orient spars vertically; cut notches for spars after ribs are glued in. Cut ribs slightly long and trim to fit.
- Use a 1/16" to 3/32" washout on the right wing as shown (measure per plan).
- Use hot wax on templates and plans at joint lines to prevent sticking.
- For laminations, soak (hot) longerons, shape, tape to the plan, glue crosspieces, and remove upper deck to join to lower deck with 1/8" springs (see side view on plan).
Wing & Stabilizer Outlines (Notes)
- Thoroughly wax the edge of templates (candle wax works well). Reheat thick wax buildup carefully with a butane lighter.
- Diamond cross‑section outline reduces drag on single‑surface wings.
- Tip slices prevent outline buckling; laminate tips if buckling occurs.
- For larger or double‑curved wings, laminate outlines and join L.E. and T.E. with long scarf/splice joints.
- For double covering wings, orient spars vertically and use scale ribs if desired.
- Use a .003" carbon fiber strip or .004" boron fiber on the underside of outlines for reinforcement (handle boron with extreme care; wear safety glasses).
- Rigging: grey flying thread.
- When laminating leading/trailing edges, use 1/32 x 1/16 laminations and square ends for laminated outlines.
- If using laminated outlines, use .012" motor wire (M.W.) and appropriate doublers at join points.
Construction — Fuselage (Summary)
- Build upper and lower "decks" first (cross section narrows toward the bottom).
- Use tape instead of pins for longeron curves to get more accurate shapes.
- Construct uprights joining the decks; add bottom former F2A angled forward per side view.
- Hot‑soak and preform the keel over the side view. Shape by hand until it holds curve; tape to dry.
- Glue keel to F2A and the bottom of the tail post. Install keel braces, nose plate, top formers, and arches over sections F5 and F6.
- Remove crosspieces between F1–F6 where dashed on the plan to clear rubber motors.
- Add diagonal braces to fuselage sides and 1/32" stringers front top and bottom.
- Cabin roof: carve from light foam or build from .015" balsa sheet — little weight difference.
- Use lightweight balsa (5–6.5 lb/ft³). Test breaks to ensure springiness; if brittle, use thinner pieces of slightly heavier balsa.
- Reinforce with boron filament or narrow carbon fiber strips as needed. Handle boron carefully (safety glasses, manage scrap).
Working with Boron/Carbon Fiber
- Many modelers avoid boron; thin carbon fiber strips or pulled carbon fiber "hairs" work well and are easier to handle.
- To bond boron/carbon: tack in position with thinned cellulose glue, then wick thinned Flex Zap (cyanoacrylate) under the fiber.
- Make a glue applicator: mount a thin insect pin on a balsa strip with CYA, bend the pin tip ~45°, roughen to hold a drop of thin glue. Wipe between applications.
- Break boron filament between two pieces of low‑tack tape with an X‑Acto blade; fold tape over tiny broken ends and discard in a bag.
Wing (Construction Notes)
- Follow the plan detail for making outlines; wax templates thoroughly.
- For larger models, laminate outlines or at least wing tips; join L.E. and T.E. with long scarf/splice joints.
- Use slices on tips to prevent buckling. If buckling occurs, reinforce with laminations.
- Parasol wing requires more dihedral than a high‑wing cabin airplane.
- Orient spars vertically for larger/double‑curved wings to resist landing and handling loads.
- Streamline balsa struts rather than leaving them round to gain flight seconds (may sacrifice a few scale points).
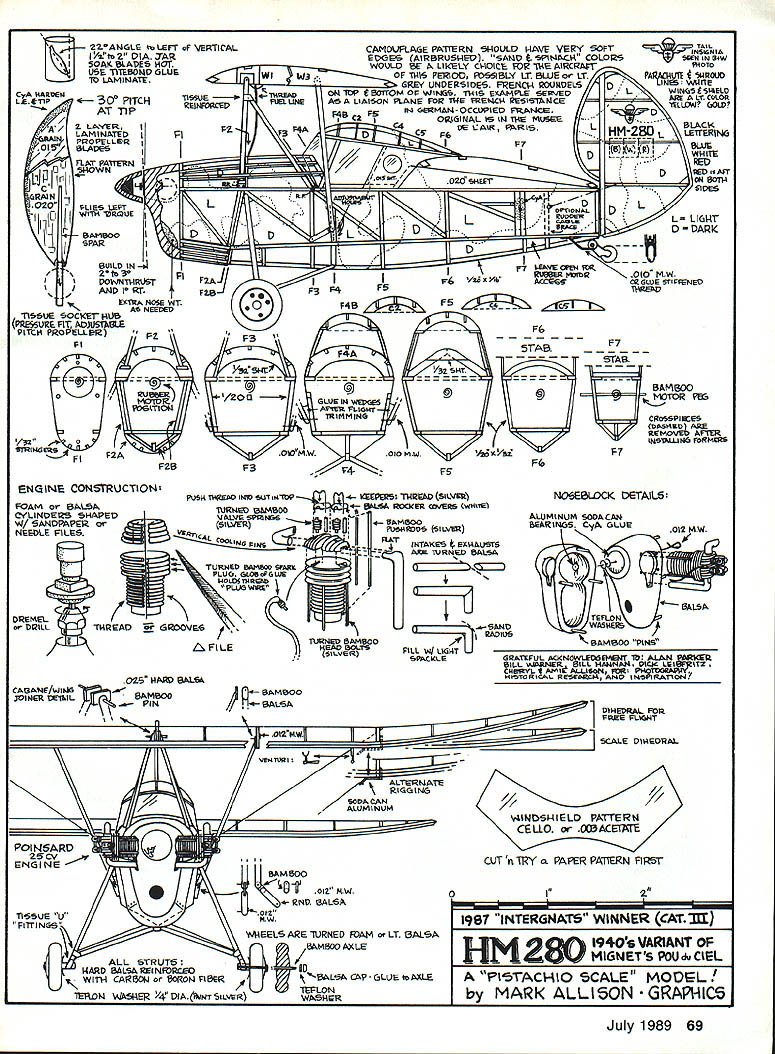
Propeller, Noseblock & Engine Construction
- Prop: two‑layer laminations for permanence of twist and camber; important because small models often land on their nose.
- Jar method for blade molding:
- Use a jar 1/2 the prop diameter for slightly more camber (experiment; the author uses a 22° angle off vertical for mounting blades).
- Laminate blades in two layers for stiffness and twist retention.
- Spinner: turned from hardwood for durability and to add nose weight.
- Noseblock details:
- Foam, balsa, or hardwood can be shaped with sandpaper or needle files.
- Use Dremel or drill for shaping; finish with fine files.
- Bearings, Teflon washers, bamboo pins, and small turned parts glued with CYA where shown.
- Fill gaps with light spackle if needed.
- For turning wheels/spinners: glue workpiece to a 1" or 3/4" sanding wheel bit with water‑soluble glue (Tite‑Bond / Elmer’s) so it can be soaked off when finished. Use variable speed or a foot‑controlled speed controller for safety and control. Wear safety goggles and a dust mask.
Covering & Finishing
- Camouflage: "sand & spinach" (soft‑edged airbrushed patterns). Upper surfaces two‑tone; undersides light gray or light blue.
- French roundels on top and bottom of wings. This HM‑280 example represented a liaison plane for the French Resistance.
- Method:
- Tape condenser paper over paper with wing/stab outlines and camouflage pattern drawn.
- Use an artist's airbrush with opaque watercolors (designer’s colors) to color and preshrink covering in one operation.
- Fuselage covering:
- Cover with separate pieces for sides, lower sides, upper cowl, lower cowl, and cabin roof.
- Trial fit cabanes, landing gear, and cabin side panels; remove them before covering.
- Paint pieces separately, then glue to completed fuselage.
- Windshield: use RC‑56 glue along the cabin roof edge and prepainted windshield posts. Glue rear edges of the windshield first; the front bottom edge may be left unglued.
- Engine painting:
- Base gloss black for cylinders and cooling fins.
- Drybrush silver + a little copper + dark gray across cooling fins to highlight edges, give oily/rusted look.
- Intakes/exhausts similar treatment. Headbolts and pushrods silver; spark plugs and rocker covers white. Prop blades and tires flat black or dark gray.
Competition Notes — Pistachio Scale & Weight Strategy
- Pistachio Scale rules (MIAMA / Miami Indoor Airplane Model Association) favor configurations like the HM‑280: short fuselage, long wide‑chord wing.
- Lower wing loading + larger span = lower prop speed, lower flight speed, lower drag = longer flights.
- MIAMA weight categories (Pistachio Scale):
- Category I: under 2 grams
- Category II: 2 to 3 grams
- Category III: over 3 grams
- Strategy: build to the lowest weight allowed in a category. Concentrate scale detail and weight toward the front (engine, spinner, gas cap) to please judges while keeping the tail light.
Safety & Practical Tips
- Wear safety glasses when working with boron or carbon fibers.
- Keep a careful inventory of small reinforcing pieces to avoid losing them in carpet.
- Do not run fingers along raw carbon fiber sheet edges to avoid painful splinters.
- Use thinned adhesives and fine applicators for delicate work.
- Test balsa pieces for appropriate springiness before committing to parts.
Provenance
A preserved full‑size Henri Mignet HM‑280 served as a WWII liaison plane with the French Resistance and survived the German occupation. One example now resides in the Musée de l'Air, Paris. The HM‑280 model described here was inspired by that original and won Category III at the 1987 Intergnats.
Transcribed from original scans by AI. Minor OCR errors may remain.

