
How About a Windsock?
By Alvin Johnson
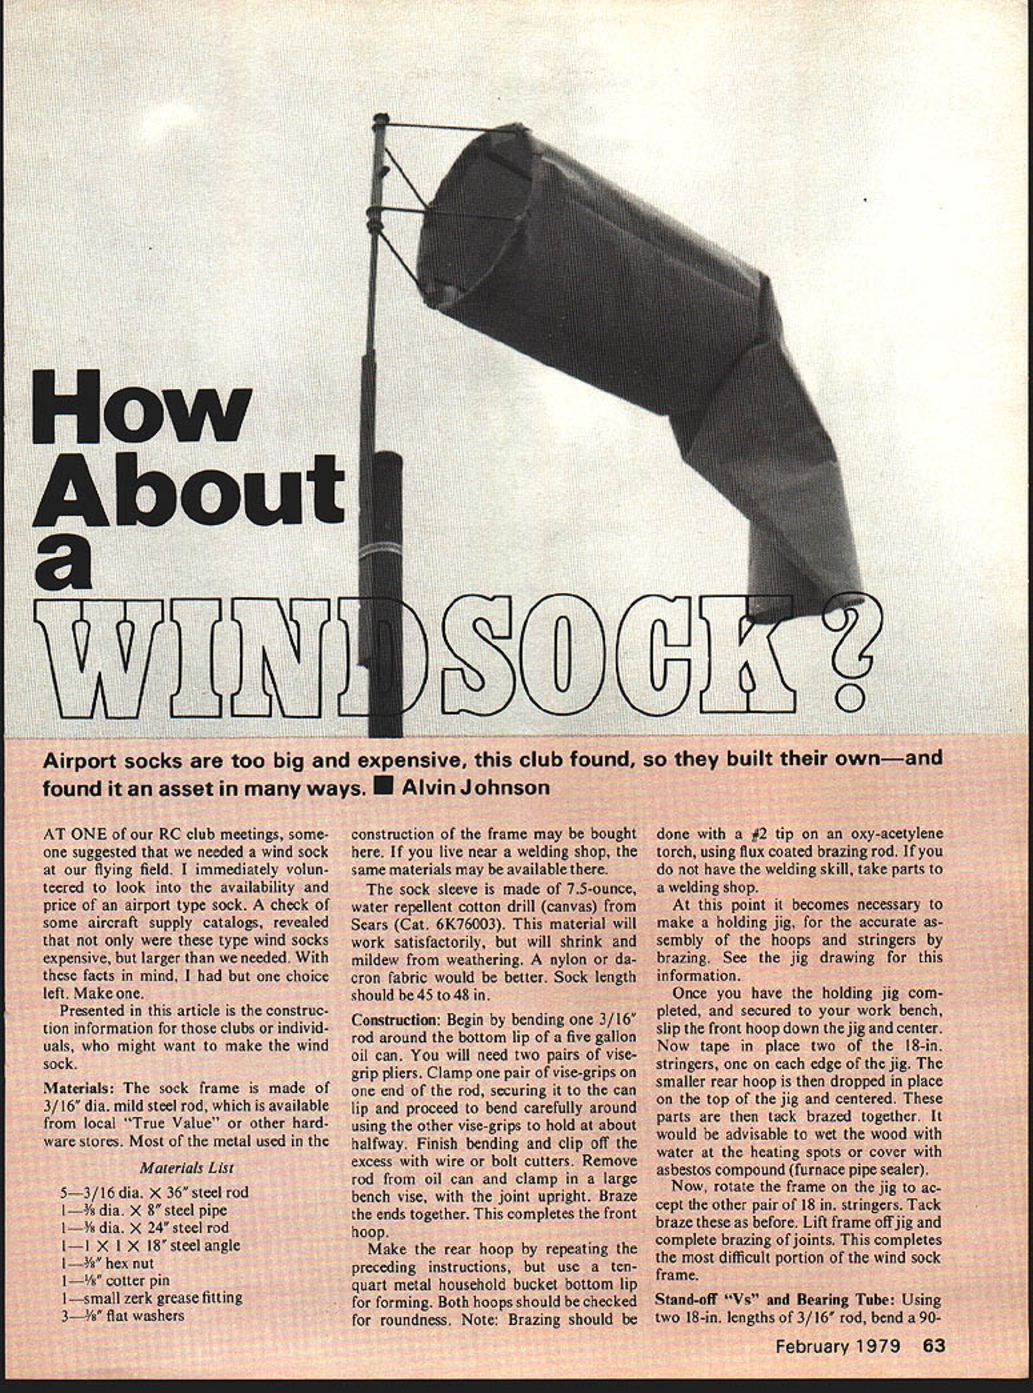
At one of our R/C club meetings, someone suggested that we needed a wind sock at our flying field. I volunteered to check availability and price of an airport-type sock. A review of aircraft supply catalogs showed that these airport windsocks were not only expensive but larger than we needed. With that in mind, I had but one choice left: make one.
Presented here is the construction information for clubs or individuals who might want to make a windsock.
Materials List
- 5 — 3/16" dia. x 36" steel rod
- 1 — 3/8" dia. x 8" steel pipe
- 1 — 5/8" dia. x 24" steel rod
- 1 — 1" x 1" x 18" steel angle
- 1 — 3/8" hex nut
- 1 — 1/8" cotter pin
- 1 — small zerk grease fitting
- 3 — 3/8" flat washers
Materials: The sock frame is made from 3/16" diameter mild steel rod, available from local hardware stores (True Value or similar). Most of the metal used for the frame may be bought there; welding shops may also supply these materials.
The sock sleeve is made from 7.5-ounce water-repellent cotton drill (canvas) — Sears Cat. 6K76003. This material will work satisfactorily but will shrink and mildew with exposure to weather. Nylon or Dacron fabric is a better choice. Sock length should be 45–48 inches.
Construction
Begin by bending one 3/16" rod around the bottom lip of a five-gallon oil can. You will need two pairs of vise-grip pliers. Clamp one pair of vise-grips on one end of the rod, securing it to the can lip, and proceed to bend carefully around using the other vise-grips to hold at about halfway. Finish bending and clip off the excess with wire or bolt cutters. Remove the rod from the oil can and clamp it in a large bench vise with the joint upright. Braze the ends together. This completes the front hoop.
Make the rear hoop by repeating the preceding instructions, but use a ten-quart metal household bucket bottom lip for forming. Both hoops should be checked for roundness.
Note: Brazing should be done with a 1/2 tip on an oxy-acetylene torch, using flux-coated brazing rod. If you do not have the welding skill, take parts to a welding shop.
At this point it becomes necessary to make a holding jig for accurate assembly of the hoops and stringers by brazing. Once the holding jig is completed and secured to your workbench, slip the front hoop down the jig and center it. Tape in place two of the 18-inch stringers, one on each edge of the jig. Drop the smaller rear hoop in place on top of the jig and center. Tack-braze these parts together. It is advisable to wet the wood with water at the heating spots or cover with asbestos compound (furnace pipe sealer).
Rotate the frame on the jig to accept the other pair of 18-inch stringers and tack-braze these as before. Lift the frame off the jig and complete brazing of joints. This completes the most difficult portion of the windsock frame.
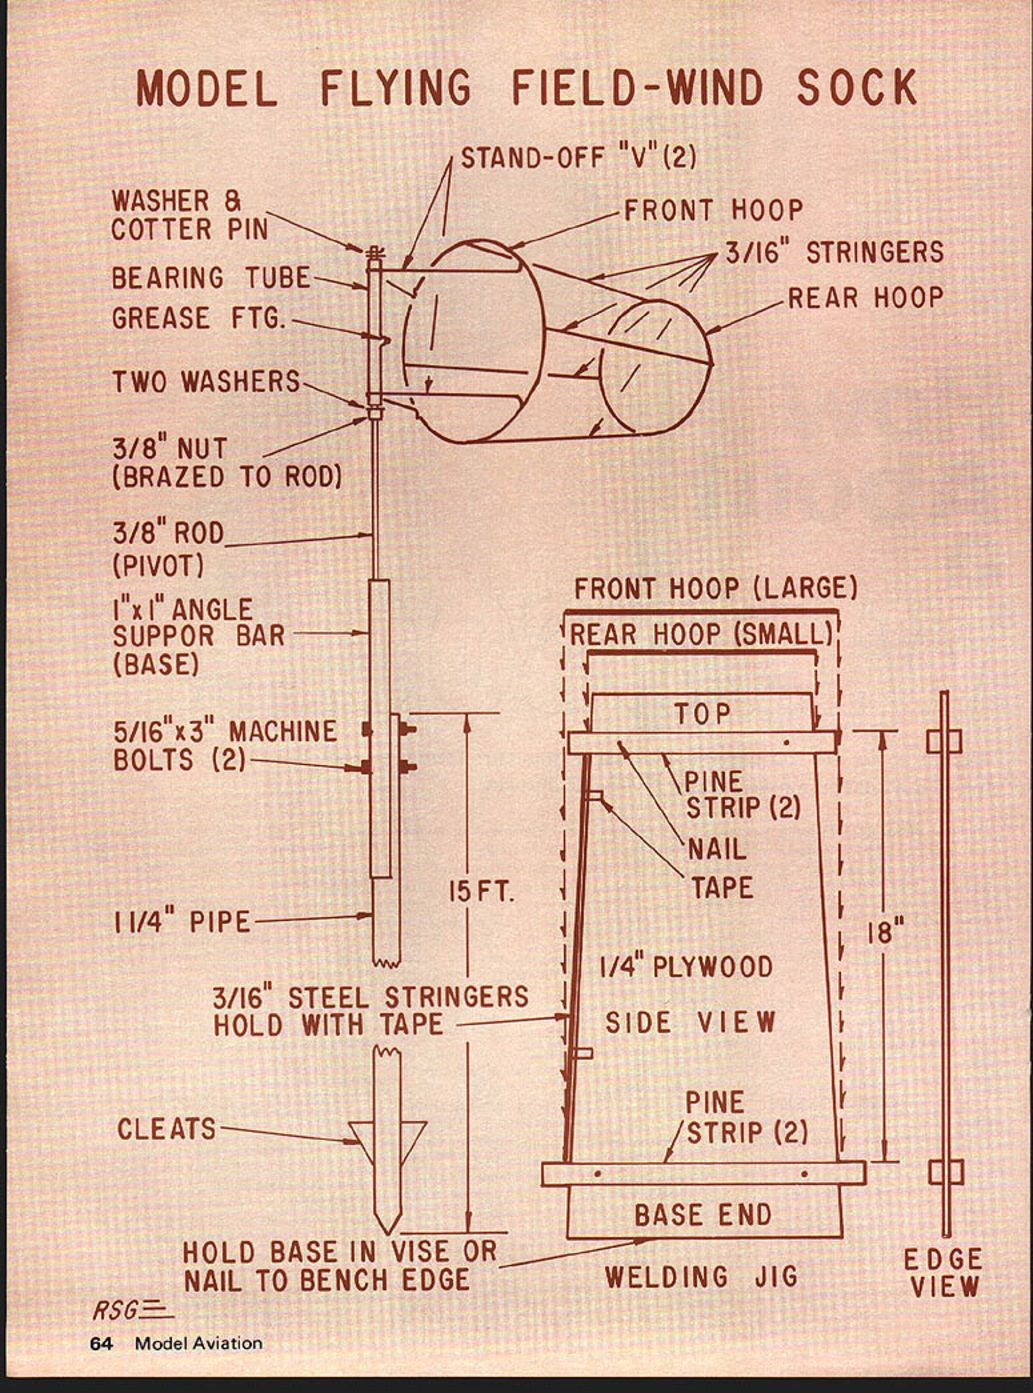
Model Flying Field — Wind Sock (diagram labels / parts)
- Stand-off "V" (2)
- Washer & cotter pin
- Bearing tube
- Grease fitting
- Two washers
- 3/8" nut (brazed to rod)
- 3/8" rod (pivot)
- 1" x 1" angle support bar (base)
- 5/16" x 3" machine bolts (2)
- 1 1/4" pipe (15 ft.)
- 3/16" steel stringers (hold with tape)
- Cleats
- Hold base in vise or nail to bench edge
- Front hoop (large)
- 3/16" stringers
- Rear hoop (small)
- Top
- Pine strip (2)
- Nail
- Tape
- 1/4" plywood
- Side view / edge view (welding jig)
- Base end
- 18" stringers
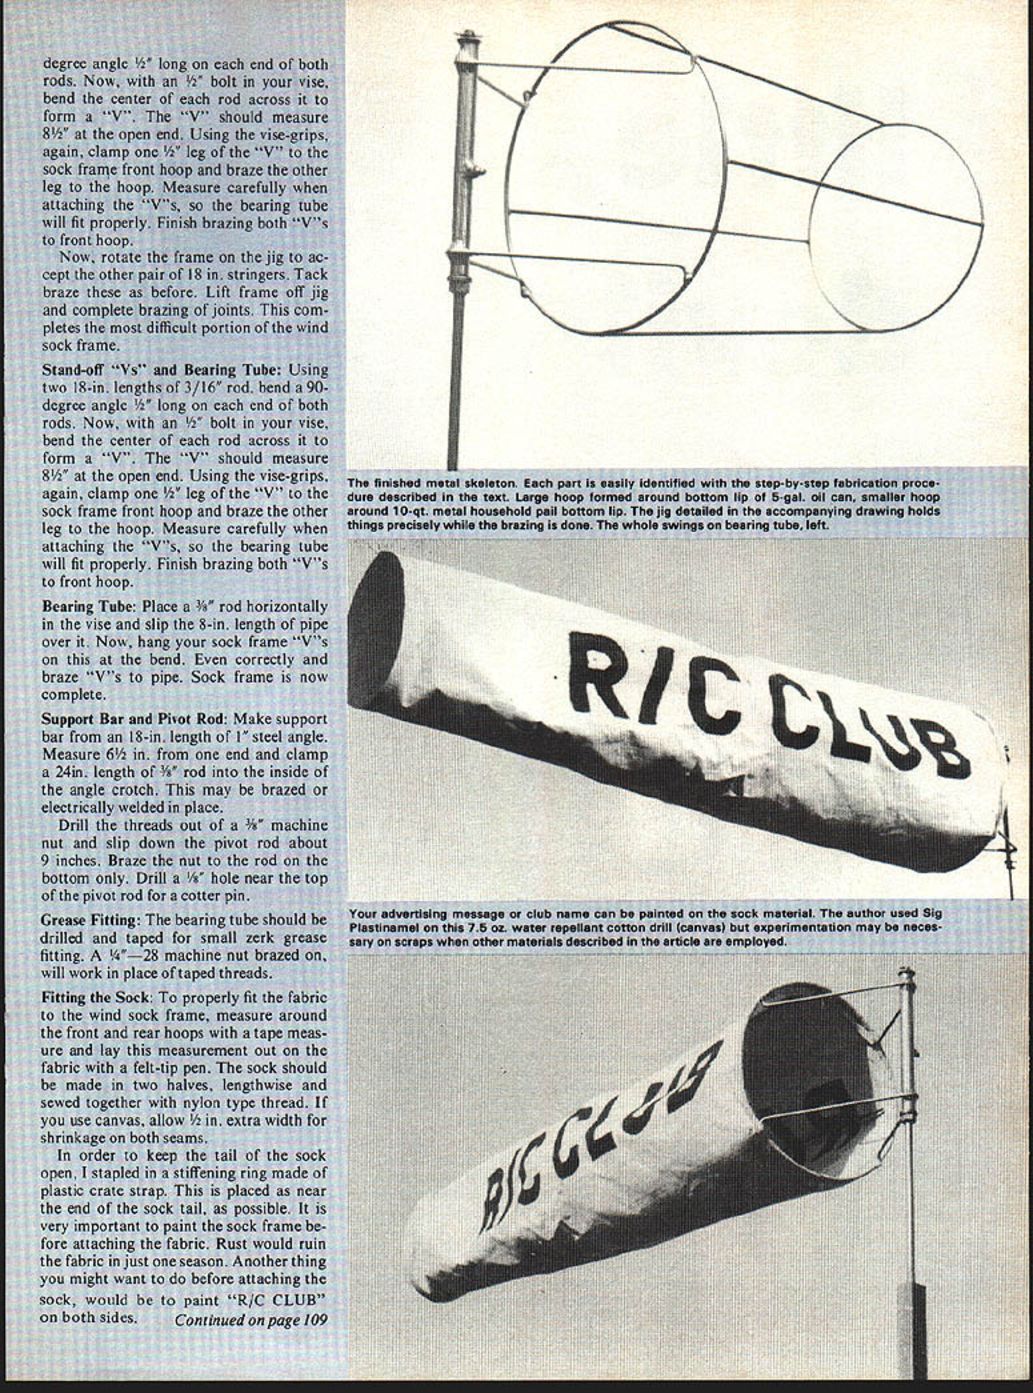
Stand-off "V"s
Using two 18-inch lengths of 3/16" rod, bend a 90-degree angle about 1/2" long on each end of both rods. Now, with a 1/2" bolt in your vise, bend the center of each rod across it to form a "V". The "V" should measure 8-1/2" at the open end. Using vise-grips, clamp one 1/2" leg of the "V" to the sock frame front hoop and braze the other leg to the hoop. Measure carefully when attaching the "V"s so the bearing tube will fit properly. Finish brazing both "V"s to the front hoop.
Bearing Tube
Place a 3/8" rod horizontally in the vise and slip the 8-inch length of pipe over it. Hang your sock frame "V"s on this at the bend. Even up correctly and braze the "V"s to the pipe. The sock frame is now complete.
Support Bar and Pivot Rod
Make the support bar from an 18-inch length of 1" steel angle. Measure 6-1/2 inches from one end and clamp a 24-inch length of 3/8" rod into the inside of the angle crotch. This may be brazed or electrically welded in place.
Drill the threads out of a 3/8" machine nut and slip it down the pivot rod about 9 inches. Braze the nut to the rod on the bottom only. Drill a 1/8" hole near the top of the pivot rod for a cotter pin.
Grease Fitting
The bearing tube should be drilled and tapped for a small zerk grease fitting. A 1/4"-28 machine nut brazed on will work in place of tapped threads.
Fitting the Sock
To fit the fabric to the windsock frame, measure around the front and rear hoops with a tape measure and lay these measurements out on the fabric with a felt-tip pen. The sock should be made in two halves, lengthwise, and sewn together with nylon-type thread. If you use canvas, allow 1/2" extra width for shrinkage on both seams.
To keep the tail of the sock open, staple in a stiffening ring made of plastic crate strap placed as near the end of the sock tail as possible. It is very important to paint the sock frame before attaching the fabric — rust would ruin the fabric in one season. You might also want to paint "R/C CLUB" on both sides.
Mounting Sock Base and Bearing
Measure down 9-3/8" from the top of the base angle and drill two 5/16" holes, 6" apart, in the center of the angle crotch. Two 5/16" x 3" machine bolts with lock nuts are used to secure the base to a 15-foot, 1-1/4" steel pipe.
Slip two 3/8" washers onto the pivot rod, then slip on the bearing tube, followed by another washer and the cotter pin. A cap from a plastic detergent bottle can be used to cover the top of the bearing tube to keep out rain. Grease the bearing tube thoroughly.
Erecting the Pole and Attaching Sock Base
The 1-1/4" pole can be made from two or more pieces with pipe connectors, but one piece is recommended. Form a point at the bottom and weld cleats near the bottom to make easy removal by vandals difficult. Drive the pipe into the ground about 36 inches using a post driver rather than a sledgehammer.
Attach the sock base, with the sock intact, using the 5/16" bolts and lock nuts. I remove the sock and base one week before Halloween and replace them after Easter the next spring.
Keep your sock bearing lubricated — and happy flying!
Editor's Note
After two summers of exposure, the light canvas originally used in this windsock had almost decayed. The replacement material proved a perfect choice — lightweight, easily lifted by the wind, tough to the point of being impossible to tear with bare hands, and expected to weather indefinitely. Bright orange, it is 1.9 oz. K-Kote rip-stop nylon. It was mail-ordered from I. Goldberg Co., 902 Chestnut St., Philadelphia, PA 19107; catalog No. 1-KRSN, price $2.50 a yard. Sewing can be done with polyester thread on a household sewing machine.
Transcribed from original scans by AI. Minor OCR errors may remain.

