


How to: Convert a Glow RC Kit to Electric
Ever considered converting a kit built for a glow engine to an electric-powered model? This article describes how it was done on a Midwest Champion and provides many hints on how you can accomplish the same with this and other suitable kits. —Bill Winter
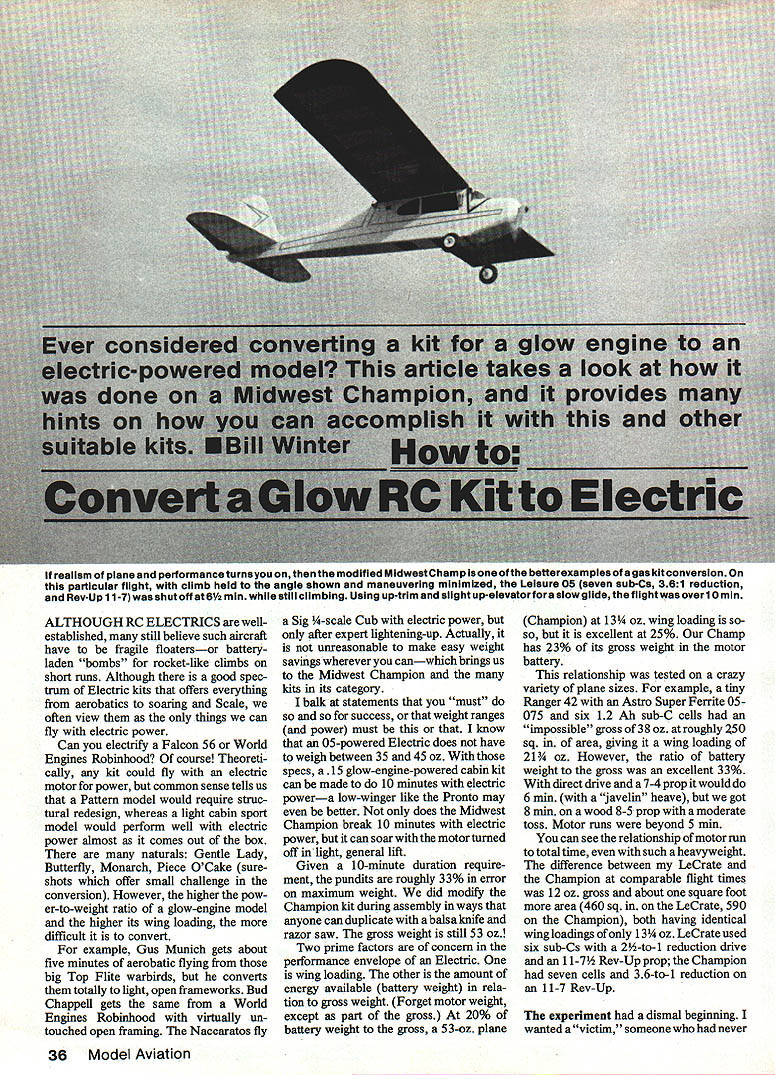
If realism of plane and performance turns you on, the modified Midwest Champ is one of the better examples of a gas-kit conversion. On one flight, with the climb held to a shallow angle and maneuvering minimized, the Leisure .05 (seven sub-C cells, 3.6:1 reduction, and Rev‑Up 11‑7 prop) was shut off at 6½ minutes while still climbing. Using up-trim and slight up-elevator for a slow glide, the flight exceeded 10 minutes.
Overview: Electrics vs. Glow Kits
Although RC electrics are well established, many still believe such aircraft must be fragile floaters or battery-laden “bombs” that rocket-climb. In fact, electrics cover a broad spectrum—from aerobatics to soaring and scale—and you can electrify most glow kits with sensible modifications.
- Theoretically any kit can fly with an electric motor, but high-performance pattern models may require structural redesign. Light cabin sport models often perform well on electric power with minimal changes.
- Natural conversion candidates include Gentle Lady, Butterfly, Monarch, Piece O’Cake, and many trainers and sport models.
- The higher the original power-to-weight ratio and wing loading, the more difficult the conversion.
Two prime performance factors for electrics are wing loading and the percentage of gross weight made up by the battery. Motor weight matters only as part of the gross weight.
Example: the converted Champion grossed 53 oz and had roughly 23% of its gross weight in the motor battery. At that ratio, its performance was excellent for duration and even light soaring.
Performance and Weight Relationships
We tested a variety of plane sizes to see how battery ratio and wing loading affected flight time:
- A tiny Ranger 42 with an Astro Super Ferrite 05075 and six 1.2-Ah sub-C cells grossed 38 oz with ~250 sq. in. area (wing loading ≈ 21.5 oz/sq. ft). Battery-to-gross ratio was 33%. With direct drive and a 7x4 prop it would do about 6 minutes on a moderate toss; motor runs exceeded 5 minutes.
- The LeCrate and the Champion achieved comparable flight times despite 12 oz difference in gross and about one square foot difference in wing area—both had similar wing loading (13.25 oz/sq. ft). The LeCrate used six sub-Cs with a 2.5:1 reduction and 11‑7 Rev‑Up prop; the Champion used seven cells and a 3.6:1 reduction with an 11‑7 Rev‑Up.
Given a 10‑minute duration target, many pundits overestimate the maximum weight. Reasonable weight savings during build can make a glow kit perform very well as an electric.
Test Conversion: The Champ Experiment
I wanted a “victim”—someone with little experience in electrics and limited flying skills—to try a converted kit. The subject was my son, Mike, and his Midwest Champion.
Mike’s background: He enjoyed simple glow models (Cox .049 Gentle Lady) and flew three-channel Ace Air Scout and a Midwest Champion, both with O.S. .15 engines. He accepted a Leisure motor and later received a Midwest Champion kit to try electrifying.
Flight development:
- Initial flights: short flights (3½ minutes) and some tree strikes.
- Improvements over two months: 4, 5, then 5½ minutes.
- Contacted Roland Boucher of Leisure: he sent a motor with a 3.6:1 reduction and recommended seven cells with an 11‑7 prop. He noted the original motor had a rotated rear case and retarded timing, giving only ~80% power.
- The Champ was later flown to 8:15 on a hot, humid day when it briefly weighed 59 oz; motor ran ~5:16 minutes on that flight.
- Subsequent weight reductions and refinements brought the gross to 53 oz and a later flight to 13:30, including a short soaring period.
Practical notes from flying:
- On heavier Champs (59 oz) seven cells with 3.6:1 gave a rather hot battery after 5½ min. Later flights were limited to safe 4½ to occasional 5-minute runs.
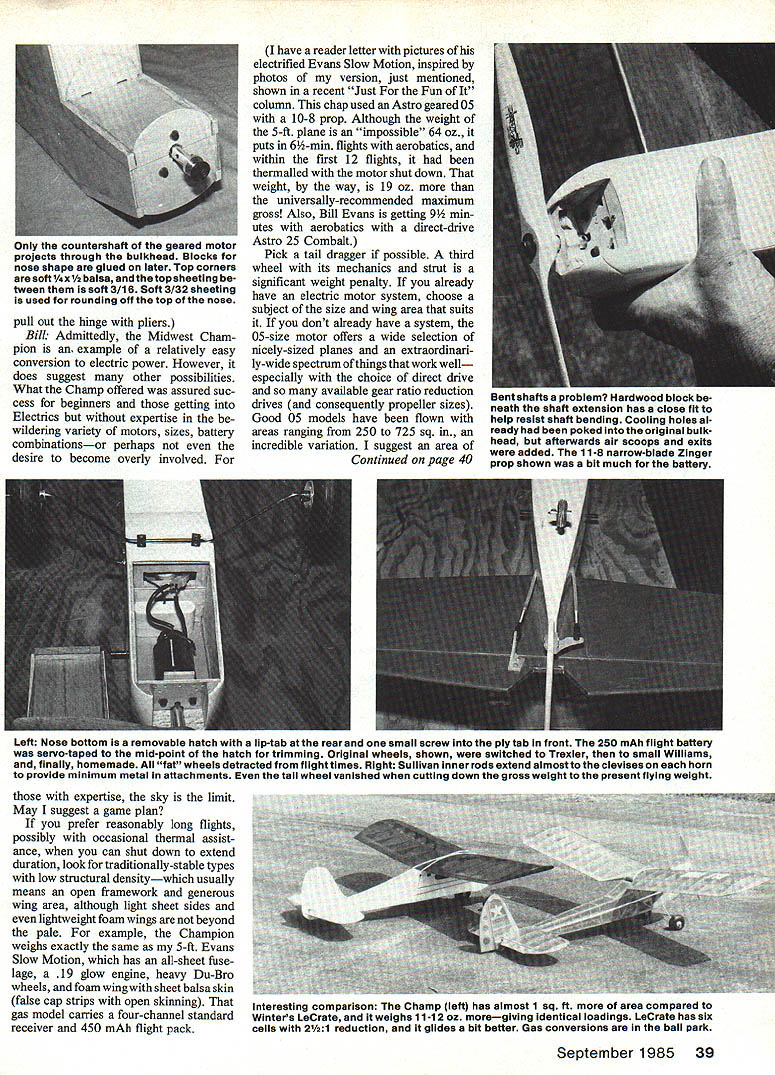
- Improvements such as opening cooling passages and reducing wheel size extended battery life; by keeping a shallow climb and minimizing control inputs, the motor still had power after 6½ minutes and the battery was only lukewarm.
- Charging to about 1.4–1.6 V per cell (a bit less than peaking) worked well. Smaller thin wheels reduced drag and weight.
Aerodynamic and Structural Changes Made to the Champion
One important aerodynamic alteration was reducing the angular incidence between wing and tail. The original design used considerable angular difference for stability and thrust-line effects. We reduced that angular difference by about 50% by re‑sloping the cabin top for less drag under power. This made the model more efficient under power while retaining acceptable glide characteristics with up-trim.
Note on landing behavior: With the decreased incidence, a late attempt to push the nose down on a slow final (while holding up trim) can dump lift and produce a hard landing. A premature relaxation of up during a recovery with throttle also dumps lift—similar to full-size Cubs—so beware during low, slow recovery.
Specific structural/lightening changes (Mike’s work)
- Large elongated lightening holes cut in the 3/32" sheet fuselage sides.
- Replace aircraft plywood with 1/16" sheet where possible.
- Narrow cabin to 3" width.
- Taildragger gear with two torsion struts instead of sheet metal; trike gear remains an option.
- Removed sheet skin on the stab, leaving only the basic frame; lightening holes in fin, rudder, and elevators.
- Use 1/16" sheet on fuselage bottom.
- Reduce wing saddle timbers to 3/16"x3/8".
- Replace full-depth sheet wing spar with 3/16" square top and bottom spars joined with webbing. (D-tube sheeting could be eliminated if 1/8" square spars were used.)
- Covering: MonoKote.
- Hinges: Rocket City strip nylon hinges (very light—install by slitting with an X‑Acto #11; secure with a drop of Hot Stuff on each side after insertion).
Game Plan: Choosing a Subject and Power System
If you want reasonably long flights and occasional thermal soaring, look for traditionally stable types with low structural density—open-framework models with generous wing area are ideal, but light sheet sides and foam wings can also work.
- Pick taildraggers if possible; a nose wheel and its mechanics add weight.
- If you already have an electric system, choose a plane to suit it. If not, the .05-size motor is a great starting point—many planes (direct drive or geared) suit it.
- Suggested wing area for a .05: 450–500 sq. in. for duration flying.
- In general: smaller planes are more likely to need direct drive and high RPM with small props; larger planes tend to use reduction drives and larger props.
Goal: minimize wing loading and maximize percentage of battery weight to gross weight. Structural design determines how much rework is needed.
How to Lighten a Glow Kit for Electric Power
Flight loads on electrics are generally much less than on fast aerobatic glow models—so much of the typical gas-model structure is overkill. Don’t overbuild the plane for electric use.
Concrete lightening measures:
- Replace thicker sheet sides: 1/8" → 3/32", 3/32" → 1/16" (use lightweight balsa).
- Cut large lightening holes in sides and bulkheads.
- Reduce bulky members and crosspieces in size.
- Replace 1/4" x 1/2" spars with medium 3/16" x 3/8" or 3/16" square.
- Replace aircraft plywood parts with Lite Ply or balsa where possible. A 1/4" aircraft-ply firewall can be 1/8" or even 3/32".
- Hollow large blocks or replace with sheet construction; use Lite Ply for landing gear supports and front cabin bulkheads.
- Use smaller/thinner gussets and avoid epoxy—cyanoacrylate glues are ideal for lightweight construction.
- Run top and bottom fuselage sheeting at 45° grain for stiffness, even on boxy fuselages.
- Wings: large weight savings are possible. If you’re not doing aerobatics:
- Reduce spar sizes and rib sizes (e.g., from 3/32" sq. to 1/16" where feasible).
- Leading-edge sheeting often not needed at this scale for electric flight.
- Narrow trailing edges; use 1/16" web sheeting for spar webs.
- Spar joiners: one full-depth joiner of 1/32" ply on a deep joiner is sufficient; you don’t need multiple thick joiners. Corner gussets at dihedral joints can let you use one joiner instead of several.
- Tail surfaces: sheet tails beyond 1/8" get heavy. For .05-size:
- Use open-framework tails with 1/8" leading edge and spar strips, adding diagonal crosspieces for rigidity.
- Consider butt-joining two soft lightweight pieces spanwise so the spar runs diagonally across the front piece and the rear piece takes spar loads; add a medium balsa leading edge strip.
- Control surfaces: use open construction for large surfaces; otherwise use soft sheet balsa with lightening holes.
- Hinges: avoid heavy epoxy hinges; use strip hinges (Nylon strip with Hot Stuff) or Rocket City style.
- Pushrods: balsa pushrods can be 3/16" square; 1/4" sq. usually unnecessary unless the model is large/heavy. Minimize wire extension lengths. Plastic flexible pushrods are fine.
- Spar joiners for a Champion-size model: 3/16" square over-and-under spars replace larger 1/4" square timbers.
Radio and Power System Recommendations
- Use the smallest reasonable receiver and servos (minis if affordable). Servo tape is fine—rails are unnecessary.
- Radio battery: 250 mAh packs are often adequate; I’ve used them successfully. If you have a cycler, check pack capacity occasionally and discard any pack that has lost 20% capacity on a full cycle.
- For the type of flying described (shallow climbs, limited control input), you don’t need a proportional throttle. A servo-driven micro-switch (on/off) is satisfactory.
- Keep cooling in mind: add air exits and intake scoops for motor and battery cooling when needed.
Practical Advice and Final Thoughts
- Don’t overbuild for strength—you’ll end up with a heavy, sluggish model. Electrically powered models are forgiving; many survive cartwheels with only superficial damage.
- Select good, straight-grained, lightweight wood everywhere.
- Replace heavy wheels, hardware, and unnecessary details to save ounces.
- For beginners: the Champion is a good starter conversion because it’s forgiving and predictable. For experienced builders, the possibilities are unlimited.
- If you prefer long flights with opportunities to shut down the motor and soar, choose stable, low-density designs with generous wing area.
Our converted Midwest Champion started sluggish and ugly but became a pleasant performer through careful lightening, aerodynamic refinement, and matching power and battery to the airframe. There are many used plans and kits out there that will convert nicely—have fun and experiment.
Transcribed from original scans by AI. Minor OCR errors may remain.

