
Build an Affordable Trailer
FRED CRONENWETT
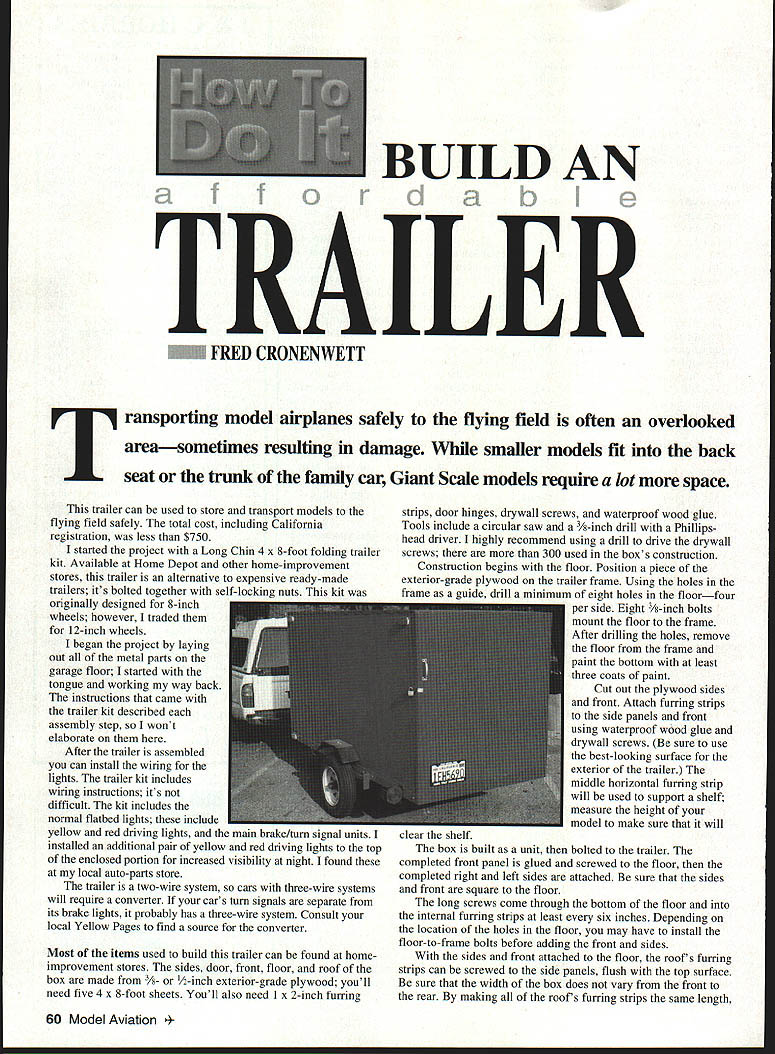
Transporting model airplanes safely to the flying field is often overlooked and can result in damage. While smaller models fit into the back seat or trunk of a car, Giant Scale models require much more space. This enclosed trailer stores and transports models safely. Total cost, including California registration, was less than $750.
Trailer kit and initial assembly
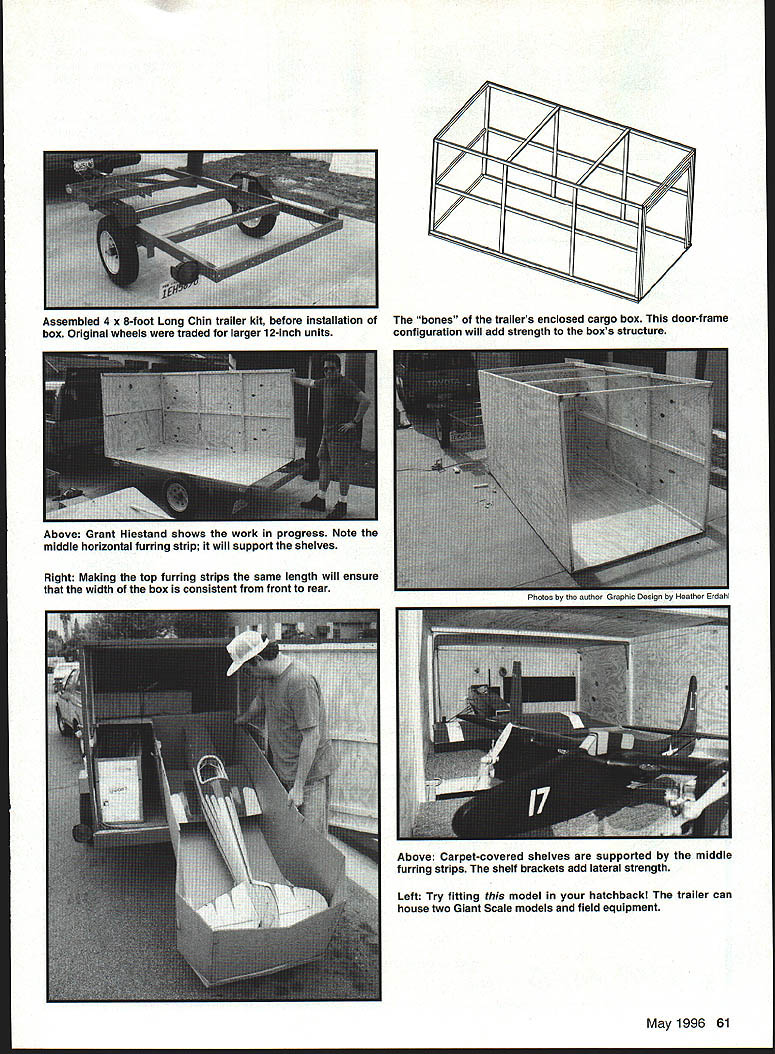
I started with a Long Chin 4 x 8-foot folding trailer kit (available at Home Depot and other home-improvement stores). This kit is an economical alternative to ready-made trailers and is bolted together with self-locking nuts. The kit was originally designed for 8-inch wheels; I upgraded them to 12-inch wheels.
Lay out all metal parts and begin assembly with the tongue, working back. The kit instructions describe each assembly step, so I won’t repeat those details here.
Wiring and lights
After assembly, install the wiring for the lights (the kit includes wiring instructions). The kit provides standard flatbed lights: yellow and red running lights and the main brake/turn-signal units. I added an extra pair of yellow and red running lights to the top of the enclosed portion for increased nighttime visibility (found at auto-parts stores).
Note: The trailer is a two-wire system. Cars with three-wire systems (separate turn signals and brake lights) require a converter. Consult local listings for converters if needed.
Materials
Most items can be found at home-improvement stores:
- 5 sheets of 4 x 8-foot exterior-grade plywood (3/8- or 1/2-inch) for sides, door, front, floor, and roof
- 1 x 2-inch furring strips
- Door hinges
- Drywall screws (more than 300 are used)
- Waterproof wood glue
- Metal shelf brackets (optional)
- Metal corner trim
- Carpet remnant and carpet tacks
- Paint and primer
- Bolts (eight 3/8-inch bolts for floor-to-frame; additional long screws for internal furring strips)
Tools
- Circular saw
- Drill (recommend a drill to drive drywall screws)
- 3/8-inch drill (for frame holes) with Phillips-head driver
- Screwdriver or driver bits
- Paint brushes or sprayer
- Carpet tacks or staple gun
Construction — floor and box
- Position a piece of exterior-grade plywood on the trailer frame as the floor. Using the holes in the frame as a guide, drill at least eight holes in the floor (four per side). Eight 3/8-inch bolts mount the floor to the frame.
- After drilling, remove the floor and paint the bottom with at least three coats of paint.
- Cut out the plywood sides and front. Attach 1 x 2-inch furring strips to the side panels and front using waterproof wood glue and drywall screws. Use the best-looking surface for the exterior.
- The middle horizontal furring strip will support a shelf—measure the height of your model to ensure it clears the shelf.
- Build the box as a unit: glue and screw the completed front panel to the floor, then attach the right and left sides. Ensure sides and front are square to the floor.
- Long screws should come through the bottom of the floor into the internal furring strips at least every six inches. Depending on hole locations, you may need to install the floor-to-frame bolts before adding front and sides.
- Move the assembled box onto the trailer frame and bolt it in place (this typically requires at least two people). Tighten bolts.
Roof
- Screw roofing furring strips to the side panels flush with the top surface. Make all roof furring strips the same length so the box width remains consistent from front to rear.
- Trim the roof to match the width and length of the box, then attach it using plenty of waterproof glue and drywall screws.
- Move the completed box to the trailer frame and bolt in place (again, at least two people). Tighten all bolts.
Door and shelves
- Cut and construct the door frame; glue and screw furring strips on the inside of the frame, then attach the frame to the box.
- For additional lateral support, add metal shelf brackets to the corners if desired.
- Cut the door to size, glue and screw furring strips in place. Alternate door configurations (as shown in the original drawings) can increase box strength.
- Shelves are constructed like the sides and roof but are removable. Three removable shelves are held in place with metal straps screwed to the furring strips.
Sealing, painting, and interior
- Seal box edges with metal corner trim: apply a strip of glue or silicone, then screw the metal corner in place.
- Since the best-looking side of the plywood is on the exterior, minimal preparation may be needed before painting. Paint the enclosed box with at least three coats of paint—choose a color to match your car or club colors.
- Line the interior with remnant carpeting and secure with carpet tacks. The carpet helps protect models and prevents knuckle scrapes when working inside the trailer.
Maintenance and care
- Keep the trailer protected from snow and rain when not in use.
- If the enclosed box needs replacement, it can be unbolted from the frame.
- Tighten all bolts yearly and check and lubricate wheel bearings as necessary.
Time and performance
- This project took approximately 32 hours to complete.
- The trailer is light enough that a four-cylinder Toyota pickup can tow it uphill without issue. Two Giant Scale models fit easily inside.
Transcribed from original scans by AI. Minor OCR errors may remain.

