
Mounting the On/Off Switch
Ivan Munninghoff
Unless your radio's on/off switch is mounted in one of those plastic trays commonly provided by the manufacturer when the radio is purchased, finding a good, easy, and secure way to hang it in your model can be quite difficult.
For some reason, switches tend to be one of the most easily destroyed items in the event of a crash. Finding a good way to mount the switch may prevent some of that damage. There are several commercially available switch mounts, but this one is much simpler and cheaper.
Why you shouldn't mount the switch directly to the fuselage
One method you definitely don't want to use is mounting the switch directly to the side of the fuselage with the screws normally provided. The hole in the fuselage works like a funnel to suck in all sorts of garbage from the outside: fuel, exhaust residue, cleaning fluids, dirt, and who knows what else. Any of this contamination can lead to dirty contacts and switch failure.
The fuselage hole also creates a stress concentration; in a crash, the fuselage will tend to fail at the switch hole. If you don't believe it, look closely at the next couple of wrecks at your field.
Inside-the-fuselage switch with a wire extension
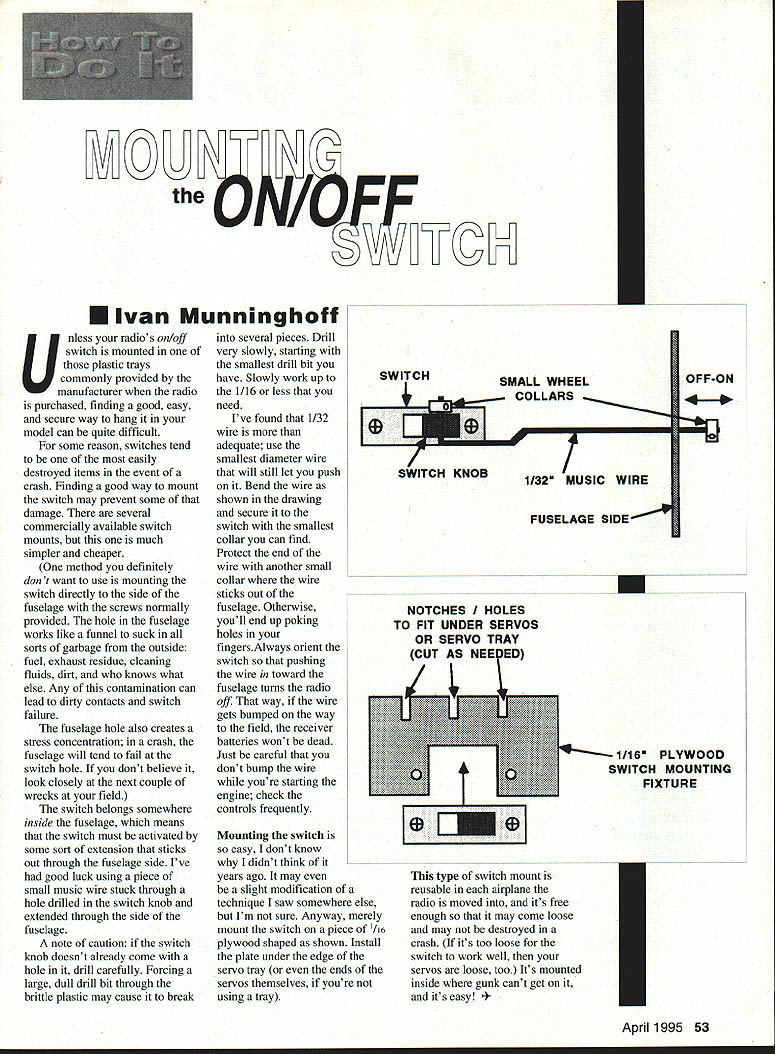
The switch belongs somewhere inside the fuselage, which means that the switch must be activated by some sort of extension that sticks out through the fuselage side. I've had good luck using a piece of small music wire stuck through a hole drilled in the switch knob and extended through the side of the fuselage.
Drilling the knob — caution
A note of caution: if the switch knob doesn't already come with a hole in it, drill carefully. Forcing a large, dull drill bit through the brittle plastic may cause it to break into several pieces.
- Drill very slowly, starting with the smallest drill bit you have.
- Slowly work up to the 1/16" or less that you need.
Wire and collar details
- I've found that 1/32" wire is more than adequate; use the smallest diameter wire that will still let you push on it.
- Bend the wire as shown in the drawing and secure it to the switch with the smallest collar you can find.
- Protect the end of the wire with another small collar where the wire sticks out of the fuselage; otherwise you'll end up poking holes in your fingers.
Switch orientation and checks
Always orient the switch so that pushing the wire in toward the fuselage turns the radio off. That way, if the wire gets bumped on the way to the field, the receiver batteries won't be dead. Just be careful that you don't bump the wire while you're starting the engine; check the controls frequently.
Mounting plate
Mounting the switch is so easy, I don't know why I didn't think of it years ago. Merely mount the switch on a piece of 1/16" plywood shaped as shown. Install the plate under the edge of the servo tray (or even under the ends of the servos themselves, if you're not using a tray).
This type of switch mount is reusable in each airplane the radio is moved into, and it's cheap enough so that it may come loose and may not be destroyed in a crash. If it's too loose for the switch to work well, then your servos are loose, too. It's mounted inside where gunk can't get on it, and it's easy!
Transcribed from original scans by AI. Minor OCR errors may remain.

