
How To Install Individual
Norman Franzino
I'm always interested in how other builders construct their model aircraft. I survey their construction techniques for good ideas. There are many good builders out there — look at their work and get ideas that you can incorporate in your next model. I also read many construction articles, even if I'm not going to build that particular aircraft. A good idea may be hidden in the article!
I have seen many aileron servos installed with the servo arm on the outside of the wing. I've never understood this; it looks so unprofessional. Servos should be inside the aircraft — not sticking out in the open.
I install separate servos for each aileron on a monoplane, and for a biplane I install the ailerons in the lower wing only. This gives better control with a minimum of end play at the ailerons. Install the servo in the wing panel closest to the middle of the aileron. With the servo at the midpoint of the aileron, chances of flutter will be reduced or eliminated.
Now that you have a good reason to install your servos in each wing panel, let's discuss how to do this. You may have to improvise a little because of variations among different models. The models I'm using for this article are the Goldberg Extra 300 and the Goldberg Ultimate biplane. They are my favorite models because of their size and cost — one fits my car, and the other fits my wallet.
Before covering
Always install the aileron servos (and the wiring harnesses) before covering. This makes things easier.
At this point you must make a decision: are you going to use a single radio channel to control the ailerons, or are you using a computer radio with separate channels to operate the right and left aileron servos? Separate channels give you the capability to program differential throw to control the up-and-down movement of the ailerons. Always install more up movement than down; this will give you a better axial roll with minimal down-stick input when your aircraft is inverted. This may be done with separate channels or by mechanical linkage.
The access hatch, as well as the control horn, will be installed on the bottom of the wing. This keeps the control linkages out of sight when your aircraft is in the pit area.
Servo placement and orientation
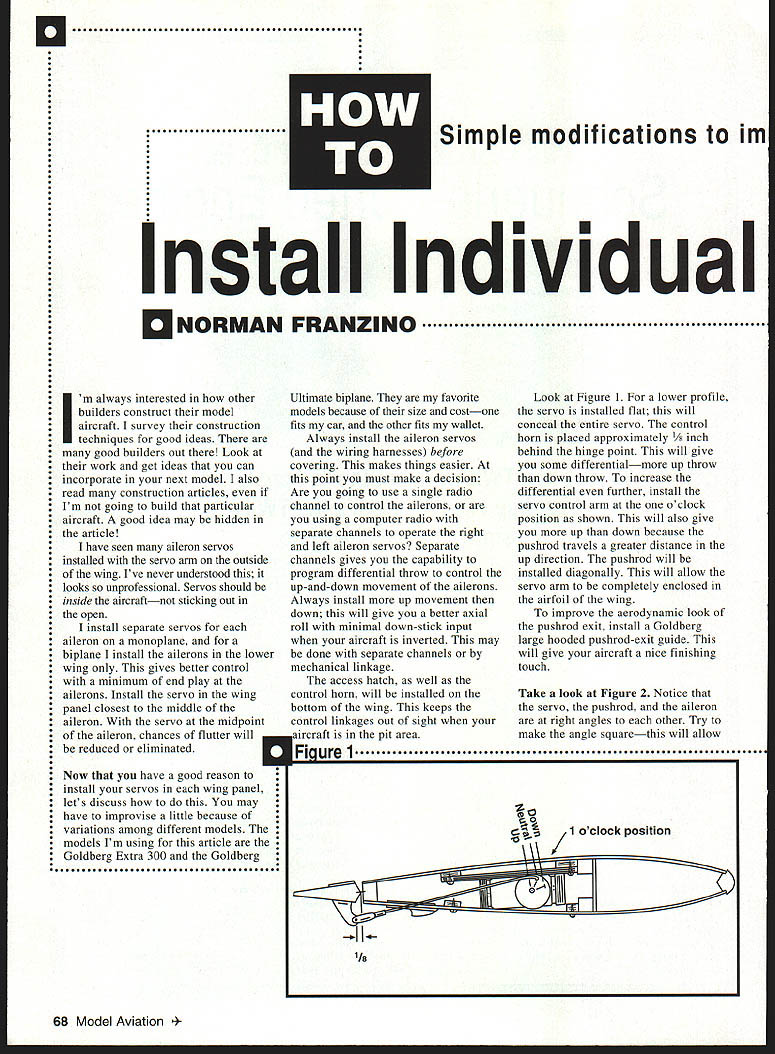
For a lower profile, the servo is installed flat; this will conceal the entire servo. The control horn is placed approximately 1/8 inch behind the hinge point. This will give you some differential — more up throw than down throw. To increase the differential even further, install the servo control arm at the one o'clock position. This will also give you more up than down because the pushrod travels a greater distance in the up direction. The pushrod will be installed diagonally. This will allow the servo arm to be completely enclosed in the airfoil of the wing.
To improve the aerodynamic look of the pushrod exit, install a Goldberg large hooded pushrod-exit guide. This will give your aircraft a nice finishing touch.
Alignment
Notice that the servo, the pushrod, and the aileron should be at right angles to each other. Try to make the angle square — this will allow transfer of the maximum amount of power from the servo to the aileron and will prevent binding in the linkages.
Mounting methods
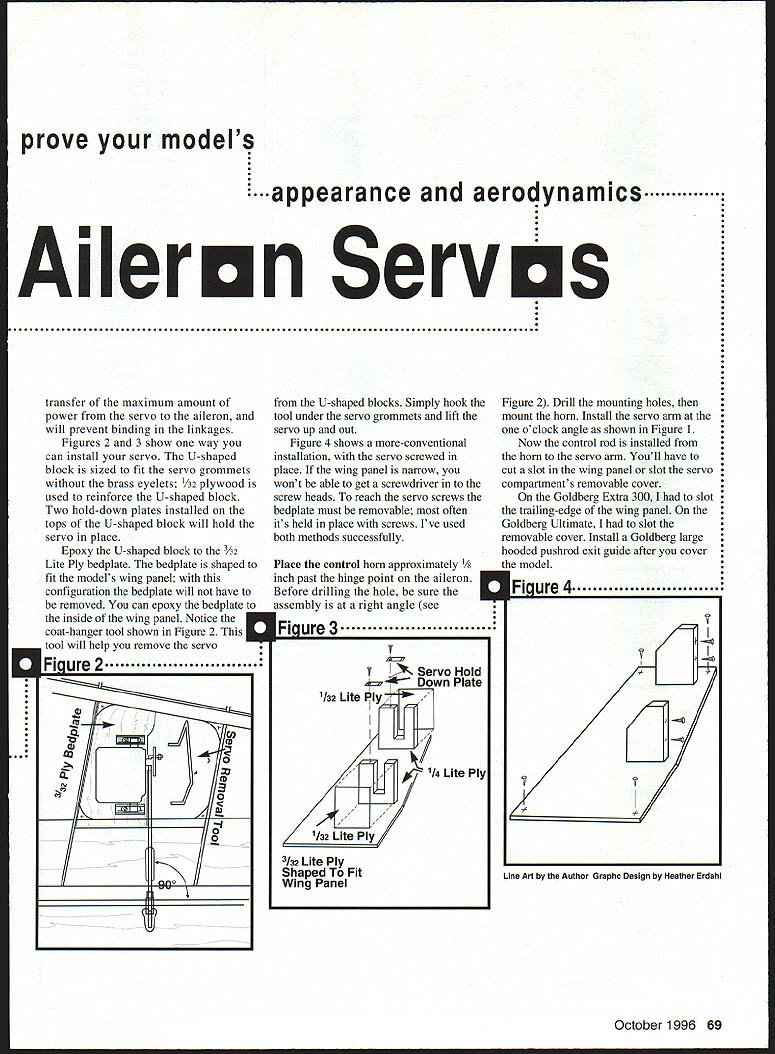
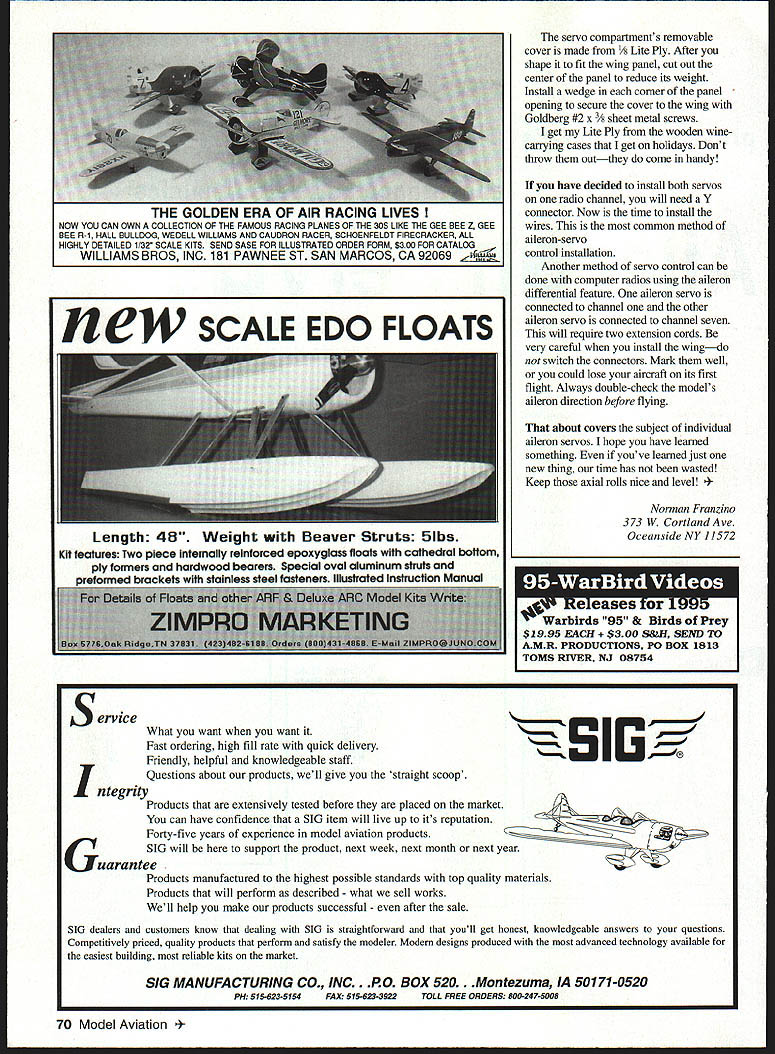
Figures 2 and 3 (referenced) show one way you can install your servo. The U-shaped block is sized to fit the servo grommets without the brass eyelets; 1/32" plywood is used to reinforce the U-shaped block. Two hold-down plates installed on the tops of the U-shaped block will hold the servo in place.
- Epoxy the U-shaped block to a 3/32" Lite Ply bedplate. The bedplate is shaped to fit the model's wing panel; with this configuration the bedplate will not have to be removed. You can epoxy the bedplate to the inside of the wing panel.
- Use a coat-hanger tool to help remove the servo from the U-shaped blocks: simply hook the tool under the servo grommets and lift the servo up and out.
A more conventional installation screws the servo in place. If the wing panel is narrow, you might not be able to get a screwdriver in to the screw heads. To reach the servo screws the bedplate must be removable; most often it's held in place with screws. I've used both methods successfully.
Control horn, pushrod and cuts
Place the control horn approximately 1/8 inch past the hinge point on the aileron. Before drilling the hole, be sure the assembly is at a right angle. Drill the mounting holes, then mount the horn. Install the servo arm at the one o'clock angle as described.
Now the control rod is installed from the horn to the servo arm. You'll have to cut a slot in the wing panel or slot the servo compartment's removable cover. On the Goldberg Extra 300, I had to slot the trailing edge of the wing panel. On the Goldberg Ultimate, I had to slot the removable cover. Install a Goldberg large hooded pushrod-exit guide after you cover the model.
Servo compartment cover
The servo compartment's removable cover is made from 1/8" Lite Ply. After you shape it to fit the wing panel, cut out the center of the panel to reduce its weight. Install a wedge in each corner of the panel opening to secure the cover to the wing with Goldberg #2 x 3/8" sheet metal screws.
I get my Lite Ply from the wooden wine-carrying cases that I get on holidays. Don't throw them out — they do come in handy!
Wiring options and precautions
If you have decided to install both servos on one radio channel, you will need a Y connector. Now is the time to install the wires. This is the most common method of aileron-servo control installation.
Another method of servo control can be done with computer radios using the aileron differential feature. One aileron servo is connected to channel one and the other aileron servo is connected to channel seven. This will require two extension cords. Be very careful when you install the wing — do not switch the connectors. Mark them well, or you could lose your aircraft on its first flight. Always double-check the model's aileron direction before flying.
Final notes
That about covers the subject of individual aileron servos. I hope you have learned something. Even if you've learned just one new thing, our time has not been wasted! Keep those axial rolls nice and level!
Norman Franzino 373 W. Cortland Ave. Oceanside, NY 11572
Transcribed from original scans by AI. Minor OCR errors may remain.

