
How to Make Wheels & Tires
Harry C. Shoaf
If you substitute funny-looking wheels on your otherwise perfect scale job, why not consider making your own—Pre-WWI, WWII, and for the 1920s and 1930s? In this installment I describe making tires up to 2 1/4" diameter. Next month I really get rolling with any-size tires, and the making of wheels to go with them—up to 7 1/2" diameter.
ONE OF the most frustrating problems the scale modeler often faces is locating or making the proper wheel and tire—especially the tire. It would seem by now that the wheel-manufacturing companies would have a complete line of kinds and sizes. True, one can find a fair selection of air‑wheel types but only a few of the others like pre‑World War I, World War I, and the 1920s and 1930s. I wonder why?
One of my pet model areas is WWI flying scale, usually around 1" = 1'. Years ago I thought that the "O"‑ring people would surely have the sizes I wanted. No luck. If the tire diameter was right, the section size would be too thin. I usually ended up with 1/4" rubber tubing and a lousy joint using a slug of dowel. I finally discovered a good joining method, however. It consisted of searing the tubing ends with a hot iron, then dipping the ends in an acid—sulphuric acid, I think—and finally applying some sort of glue and letting it dry in a jig for a day or so. It made a very good joint and I still have a D.VII and Nieuport 27 equipped with tires made by this method that I used about 25 years ago. But the method is troublesome and one of the problems using tubing, aside from joining it, is getting a proper size needed, which sort of eliminates it from much use.
A few years ago I stumbled on a way to make my tires exactly like I wanted. The method has worked fine for the sizes I have done so far. They range from 1 5/8" O.D. to 3 3/4" O.D. Very simply put, the tire material used is silicone rubber, and the tire mold is plaster of Paris. After making a number of different tires, I have sort of standardized my procedure. Although the method is not 100% foolproof—in that the tire sometimes sticks to the mold or may not quite fill out—you do get the size and type you want.
I have selected a WWI‑type tire as a subject to describe the method step‑by‑step. At one‑inch scale, the tire will be 2 1/4" outside diameter by 1/4" cross section diameter.
Make the tire template
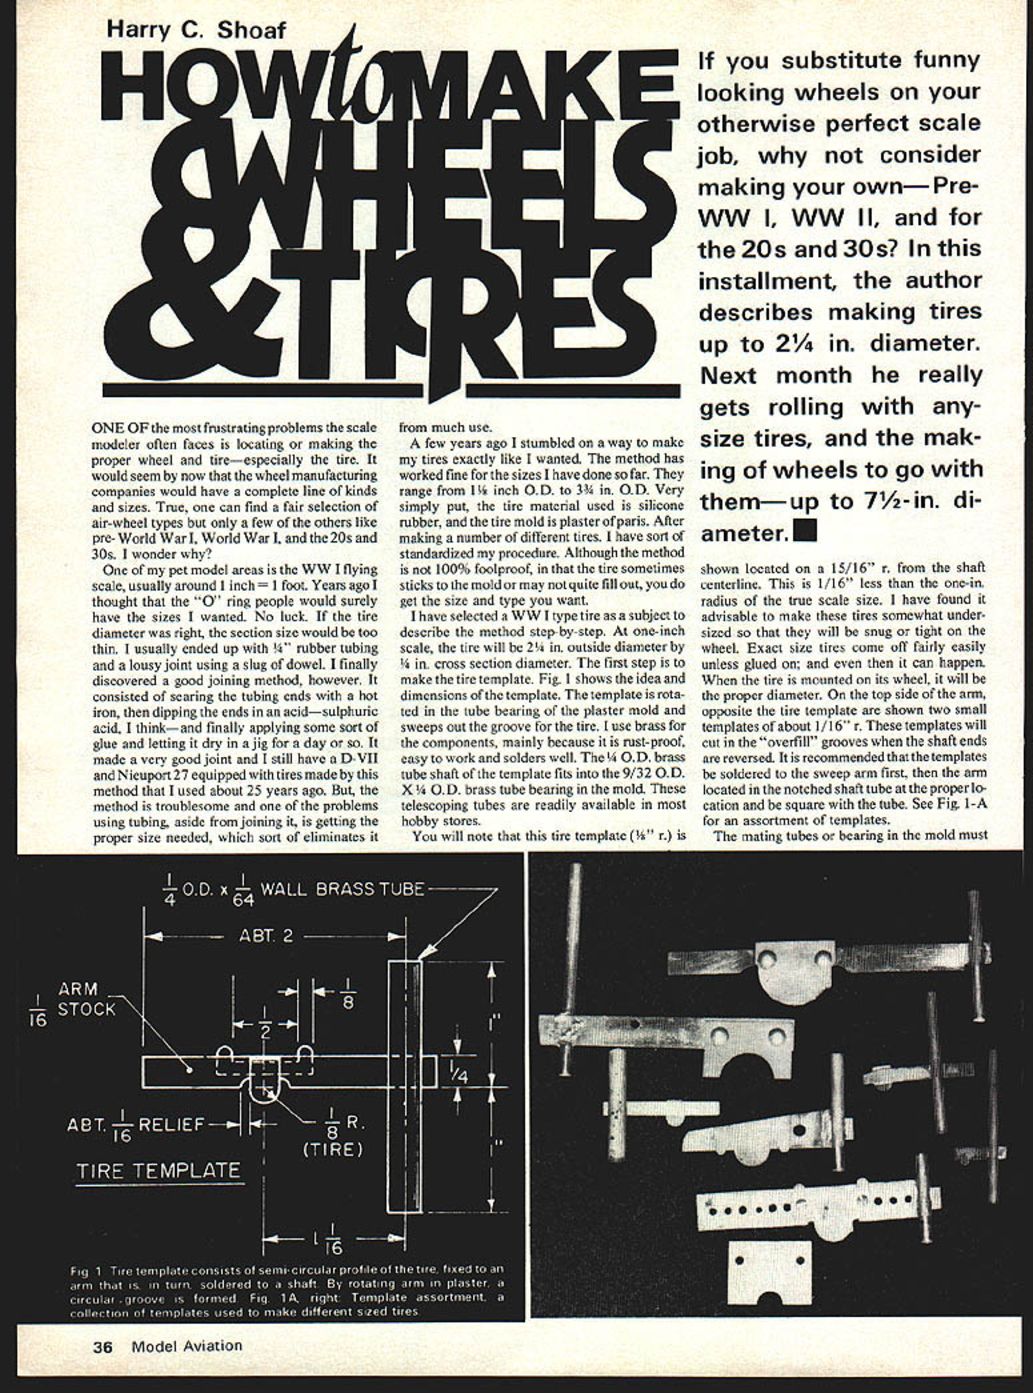
The first step is to make the tire template. Figure 1 shows the idea and dimensions of the template. The template is rotated in the tube bearing of the plaster mold and sweeps out the groove for the tire. I use brass for the components, mainly because it is rust‑proof, easy to work, and solders well. The 1/4" O.D. brass tube shaft of the template fits into a 9/32" O.D. brass tube bearing in the mold. These telescoping tubes are readily available in most hobby stores.
You will note that this tire template (1/16" radius) is shown located on a 15/16" radius from the shaft centerline. This is 1/16" less than the one‑inch radius of the true scale size. I have found it advisable to make these tires somewhat undersized so that they will be snug or tight on the wheel. Exact‑size tires come off fairly easily unless glued on; and even then it can happen. When the tire is mounted on its wheel, it will be the proper diameter.
On the top side of the arm, opposite the tire template, are shown two small templates of about 1/16" radius. These templates will cut in the "overfill" grooves when the shaft ends are reversed. It is recommended that the templates be soldered to the sweep arm first, then the arm located in the notched shaft tube at the proper location and be square with the tube. See Fig. 1‑A for an assortment of templates.
Install the bearing in the mold
The mating tubes or bearing in the mold must be square with the surface of the mold so that the arm of the template can rotate in the plane of the mold surface reasonably well. There are two ways to install the bearing.
- First: allow the mold to cure out for several days and drill the hole for the bearing tubes in a drill press, thus ensuring a vertical hole. One must be careful not to use a 9/32" drill for the 9/32" O.D. bearing, because the drill will make an oversize hole in plaster, causing a very sloppy fit. Try a 7/32" drill and ream for a good fit. Glue the bearing tube in place using white glue or Hot Stuff if the plaster is dry enough. This method is all right to use on small tires since the amount of hard, dry plaster is not too great to scrape out. It can be a problem on bigger tires, if not impossible.
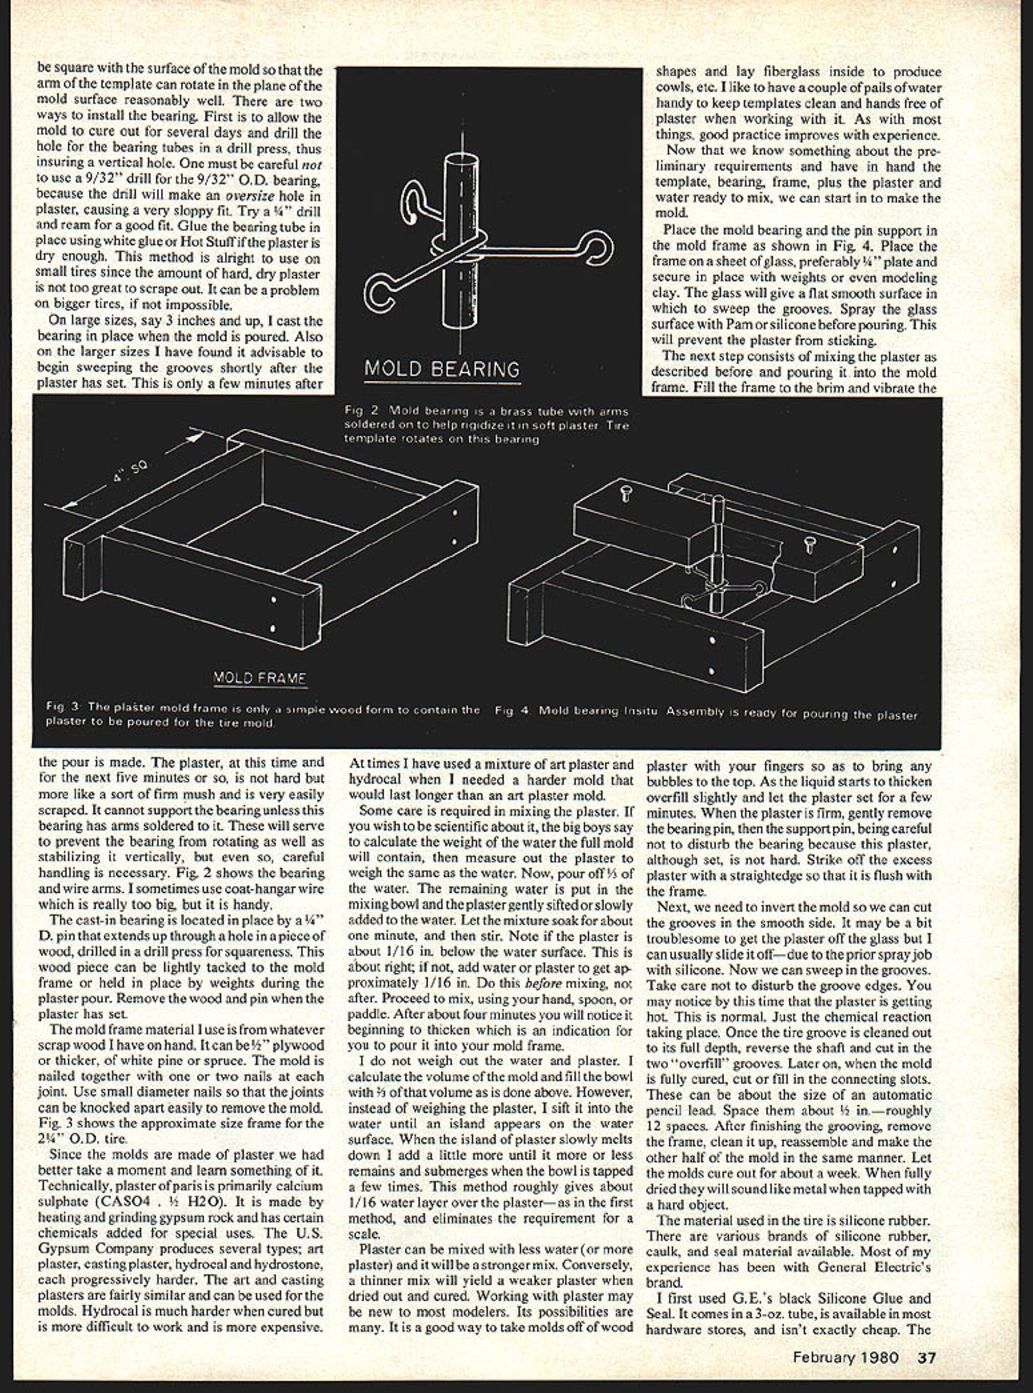
- Second (preferred for large sizes): cast the bearing in place when the mold is poured. On larger sizes (say 3" and up) I have found it advisable to begin sweeping the grooves shortly after the plaster has set—only a few minutes after the pour is made. The plaster at this time and for the next five minutes or so is not hard but more like a firm mush and is very easily scraped. It cannot support the bearing unless this bearing has arms soldered to it; these will prevent the bearing from rotating as well as stabilize it vertically. Even so, careful handling is necessary. Fig. 2 shows the bearing and wire arms. I sometimes use coat‑hanger wire, which is really too big, but it is handy.
The cast‑in bearing is located in place by a 1/4" diameter pin that extends up through a hole in a piece of wood, drilled in a drill press for squareness. This wood piece can be lightly tacked to the mold frame or held in place by weights during the plaster pour. Remove the wood and pin when the plaster has set.
The mold frame material I use is whatever scrap wood I have on hand. It can be 1/2" plywood or thicker, or white pine or spruce. The mold is nailed together with one or two nails at each joint. Use small‑diameter nails so that the joints can be knocked apart easily to remove the mold. Fig. 3 shows the approximate size frame for the 2 1/4" O.D. tire.
About plaster of Paris
Since the molds are made of plaster we had better take a moment and learn something of it. Technically, plaster of Paris is primarily calcium sulfate (CaSO4·1/2H2O). It is made by heating and grinding gypsum rock and has certain chemicals added for special uses. The U.S. Gypsum Company produces several types: art plaster, casting plaster, Hydrocal and hydrostone, each progressively harder. The art and casting plasters are fairly similar and can be used for the molds. Hydrocal is much harder when cured but is more difficult to work and is more expensive.
At times I have used a mixture of art plaster and Hydrocal when I needed a harder mold that would last longer than an art plaster mold.
Some care is required in mixing the plaster. If you wish to be scientific about it, the big boys say to calculate the weight of the water the full mold will contain, then measure out the plaster to weigh the same as the water. Now, pour one‑third of the water into a bowl. Put the remaining water in the mixing bowl and gently sift or slowly add the plaster to the water. Let the mixture soak for about one minute, and then stir. Note if the plaster is about 1/16" below the water surface. This is about right; if not, add water or plaster to get approximately 1/16". Do this before mixing, not after. Proceed to mix, using your hand, spoon, or paddle. After a minute you will notice it beginning to thicken—this indicates it is time to pour it into your mold frame.
I do not weigh out the water and plaster. I calculate the volume of the mold and fill the bowl with 3/4 of that volume as is done above. However, instead of weighing the plaster, I sift it into the water until an "island" appears on the water surface. When the island of plaster slowly melts down I add a little more until it more or less remains and submerges when the bowl is tapped a few times. This method typically gives about 1/16" water over the plaster and eliminates the requirement for a scale.
Plaster can be mixed with less water (or more plaster) and it will be a stronger mix. Conversely, a thinner mix will give a weaker plaster when dried and cured. Working with plaster may be new to most modelers. Its possibilities are many. It is a good way to take molds off of wood shapes and lay fiberglass inside to produce cowls, etc. I like to have a couple of pails of water handy to keep templates clean and hands free of plaster when working with it. As with most things, good practice improves with experience.
Making the mold and cutting the grooves
Now that we know something about the preliminary requirements and have in hand the template, bearing, frame, plus the plaster and water ready to mix, we can start to make the mold.
- Place the mold bearing and the pin support in the mold frame as shown in Fig. 4. Place the frame on a sheet of glass, preferably 1/4" plate, and secure in place with weights or even modeling clay. The glass will give a flat smooth surface in which to sweep the grooves. Spray the glass surface with Pam or silicone before pouring. This will prevent the plaster from sticking.
- Mix the plaster as described above and pour it into the mold frame. Fill the frame to the brim and vibrate the plaster with your fingers so as to bring any bubbles to the top. As the liquid starts to thicken, let the plaster set for a few minutes. When the plaster is firm, gently remove the bearing pin, then the support pin, being careful not to disturb the bearing because this plaster, although set, is not hard. Strike off the excess plaster with a straightedge so that it is flush with the frame.
- Invert the mold so you can cut the grooves in the smooth side. It may be a bit troublesome to get the plaster off the glass but usually you can slide it off—thanks to the prior spray job with silicone. Now sweep in the grooves. Take care not to disturb the groove edges. You may notice by this time that the plaster is getting hot. This is normal—the chemical reaction is taking place.
- Once the tire groove is cleaned out to its full depth, reverse the shaft and cut in the two "overfill" grooves. Later on, when the mold is fully cured, cut or fill in the connection slots. These can be about the size of an automatic pencil lead. Space them about 1/8" in.—roughly 12 spaces. After finishing the grooving, remove the frame, clean it up, reassemble and make the other half of the mold in the same manner.
- Let the molds cure out for about a week. When fully dried they will sound like metal when tapped with a hard object.
Tire material: silicone rubber
The material used for the tire is silicone rubber. There are various brands of silicone rubber, caulk, and sealant available. Most of my experience has been with General Electric (G.E.) products.
- G.E.'s black Silicone Glue and Seal comes in a 3‑oz. tube and is available in most hardware stores. The only thing I dislike about it is that the tube must be rolled, like toothpaste, to get the compound out, making a steady flow difficult.
- G.E.'s Silicone Rubber caulk is packaged in about an 11‑oz. cartridge and requires an ordinary caulking gun to apply. The caulk material is about half the cost of the seal material per unit volume. I cannot distinguish any major difference in the cured material, except that the seal may cure faster than the caulk.
Pouring and curing the tire
When the molds are dry we are ready to try the first tire. Prepare an alignment pin to line up each mold by its bearing like an axle. Have a couple of C‑clamps ready as well as some plywood backs for the molds. Before laying in the rubber, spray the mold with silicone spray—give it a couple of coats since it soaks into the plaster pretty well.
Whichever rubber material you opt to use, fill each mold to its full, even level as best as you can judge. Try to fill the groove full in the first pass, pushing the material out ahead of the nozzle so that no air is trapped under the material. Be careful when you come back to the starting point that no air is trapped at the juncture. Trapped air leaves a dent in the finished tire and causes a loud gnashing of teeth and dire mutterings of mayhem, for the author, at least. The stuff isn't too easy to smooth over though a wet spatula works somewhat. Try and add a tad more to the fill so that some overflow will occur and prevent a starved tire groove.
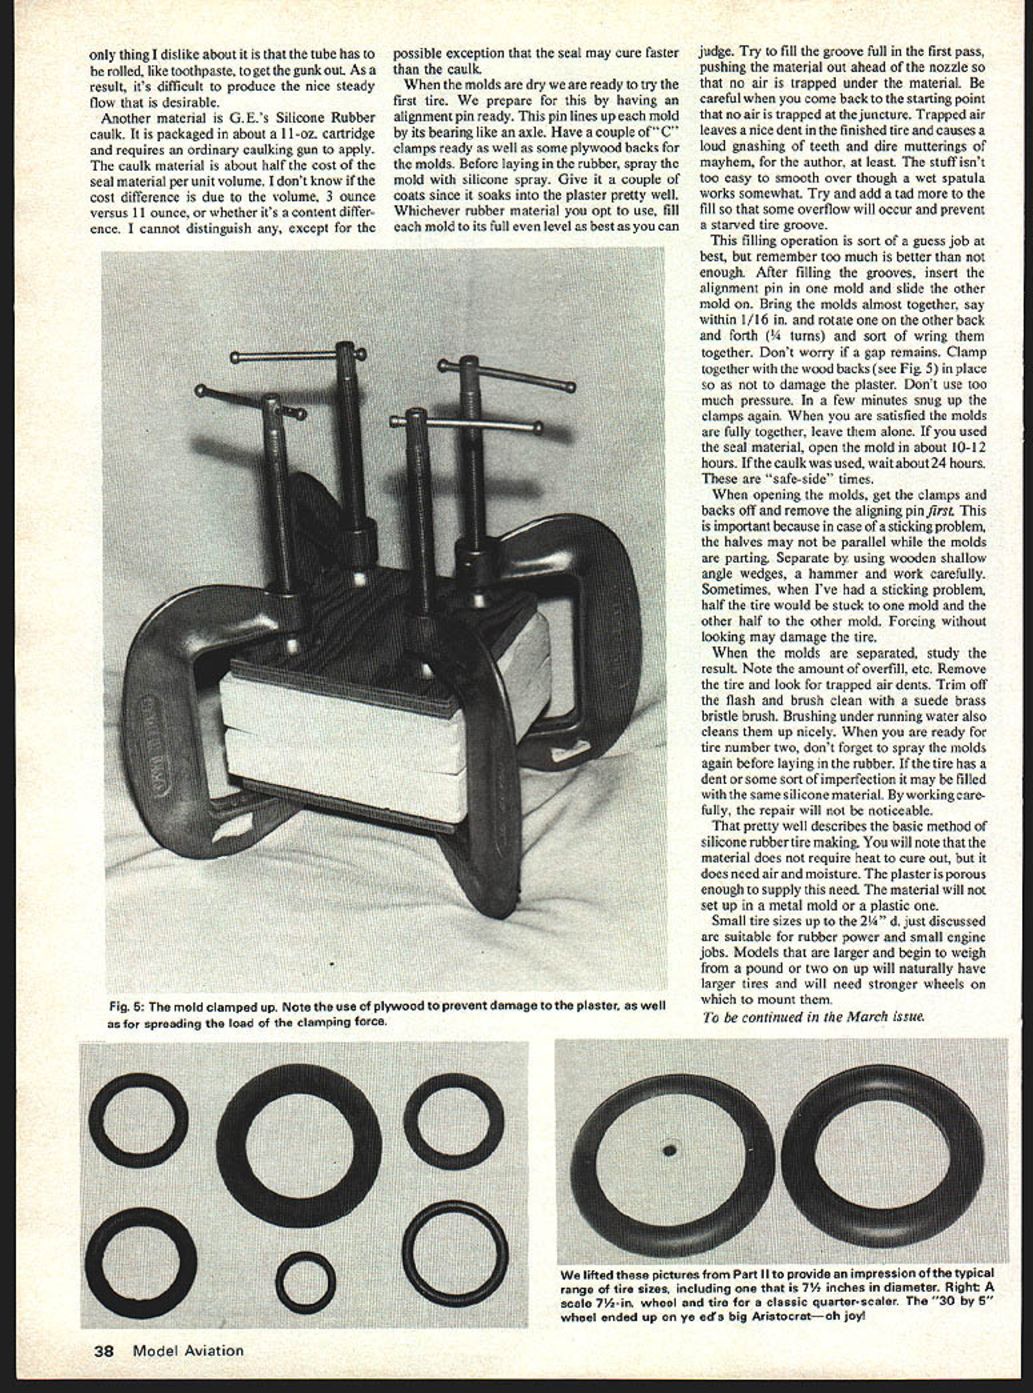
This filling operation is largely by feel, but remember: too much is better than not enough. After filling the grooves, insert the alignment pin in one mold and slide the other mold on. Bring the molds almost together—say within 1/16"—and rotate one on the other back and forth (quarter turns) and sort of wring them together. Don't worry if a gap remains. Clamp together with the wood backs (see Fig. 5) in place so as not to damage the plaster. Don't use too much pressure. In a few minutes snug up the clamps again. When you are satisfied the molds are fully together, leave them alone.
- If you used the seal material, open the mold in about 10–12 hours.
- If the caulk was used, wait about 24 hours.
These are "safe‑side" times.
When opening the molds, get the clamps and backs off and remove the aligning pin first. This is important because in case of a sticking problem, the halves may not be parallel while the molds are parting. Separate by using wooden shallow angle wedges, a hammer, and work carefully. Sometimes, when I've had a sticking problem, half the tire would be stuck to one mold and the other half to the other mold. Forcing without looking may damage the tire.
When the molds are separated, study the result. Note the amount of overfill, etc. Remove the tire and look for trapped‑air dents. Trim off the flash and brush clean with a suede brass bristle brush. Brushing under running water also cleans them up nicely. When you are ready for tire number two, don't forget to spray the molds again before laying in the rubber. If the tire has a dent or some imperfection it may be filled with the same silicone material. By working carefully, the repair will not be noticeable.
That pretty well describes the basic method of silicone‑rubber tire making. You will note that the material does not require heat to cure, but it does need air and moisture. The plaster is porous enough to supply this need. The material will not set up in a metal mold or a plastic one.
Small tire sizes up to the 2 1/4" diameter just discussed are suitable for rubber‑powered and small‑engine jobs. Models that are larger and begin to weigh a pound or two and up will naturally have larger tires and will need stronger wheels on which to mount them.
To be continued in the March issue.
Transcribed from original scans by AI. Minor OCR errors may remain.

