
How to Mold Fiberglass Props
Text and Photos by Tom Hail and Larry Fagan
Part 2
Materials
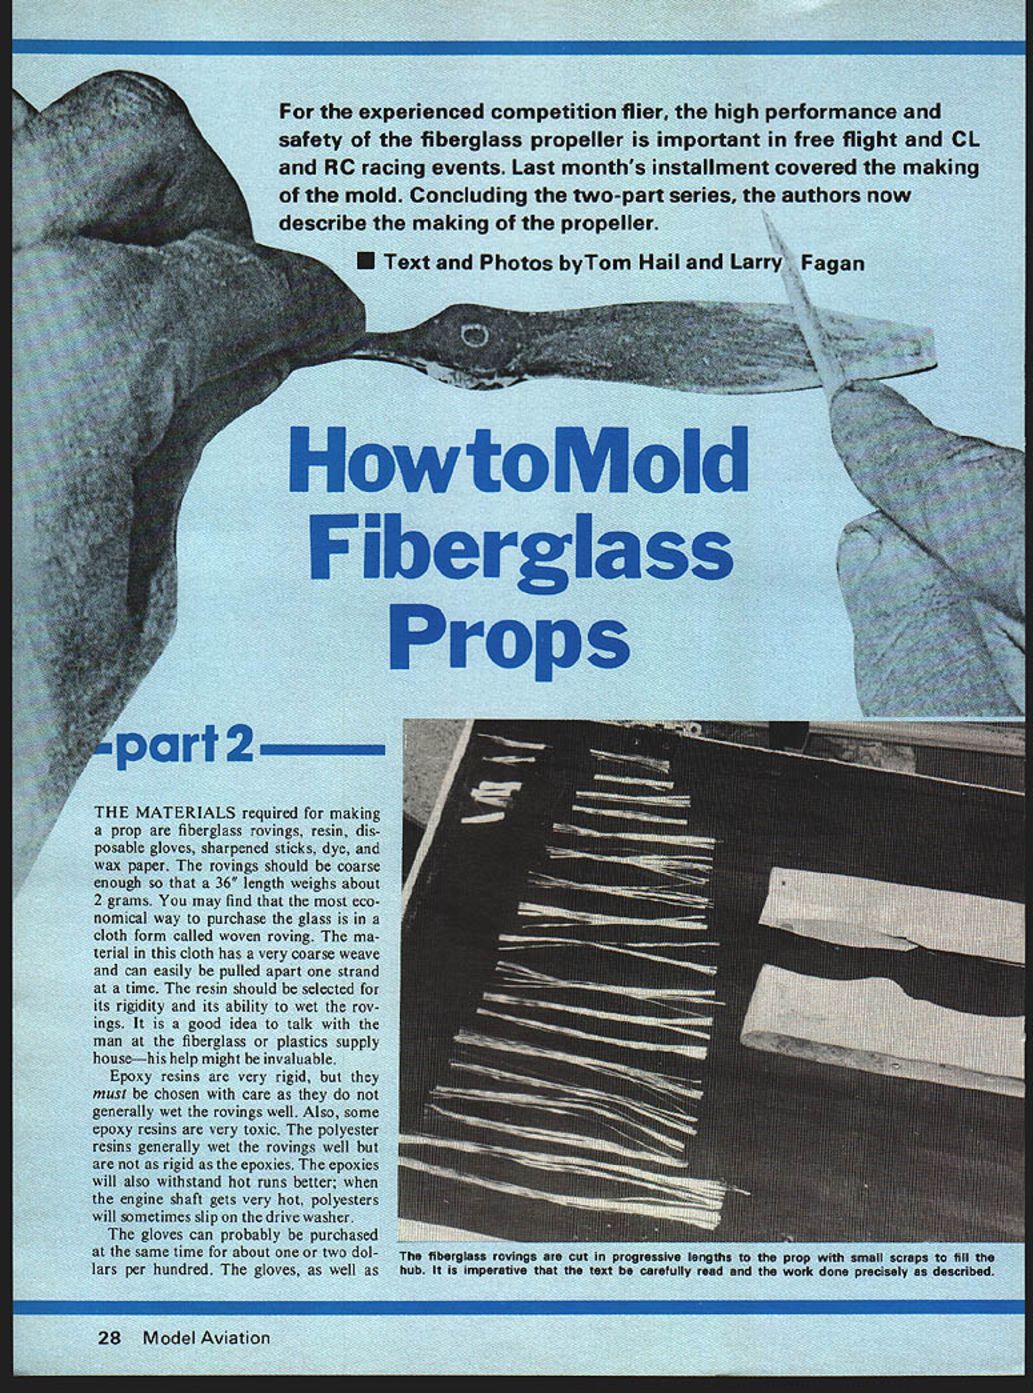
The materials required for making a prop are fiberglass rovings, resin, disposable gloves, sharpened sticks, dye, and wax paper. The rovings should be coarse enough so that a 36" length weighs about 2 grams. You may find the most economical way to purchase the glass is in a cloth form called woven roving. The material in this cloth has a very coarse weave and can easily be pulled apart one strand at a time.
The resin should be selected for rigidity and its ability to wet the rovings. Epoxy resins are very rigid but must be chosen with care because they do not generally wet the rovings well and some epoxies are very toxic. Polyester resins generally wet the rovings well but are not as rigid as epoxies. Epoxies will also withstand hot runs better; when the engine shaft gets very hot, polyesters will sometimes slip on the drive washer. Talk with the supplier at the fiberglass or plastics supply house—his help can be invaluable.
Disposable gloves can probably be purchased at the same time for about one or two dollars per hundred. The gloves, as well as adequate ventilation, are safeguards against the toxicity of some resins. Three-inch pieces of either 1/8" x 1/4" or 1/8" x 3/8" spruce spars are fine for the sticks. We recommend a transparent dye for the prop because this allows a visual examination of the interior of the finished prop for flaws, such as air bubbles, that would not be detectable with an opaque dye.
Preparing the glass and mold
Begin production by coating the mold with PVA mold release. While allowing the mold release to dry, cut your glass rovings into progressive lengths—starting with a length about an inch longer than the prop. Progress with smaller lengths, about a half inch shorter each time, until you reach one-half the length of the prop. Set aside a few very short lengths in the range of 1/4" to 1" to pack into the hub area. If you lay the rovings out and proportion your cuttings as described, you should get a good distribution of glass in the prop.
Do not be conservative—the glass gives the prop strength; the resin merely binds the glass strands into the shape of a prop. If in doubt, put in more glass as any excess will squeeze out later.
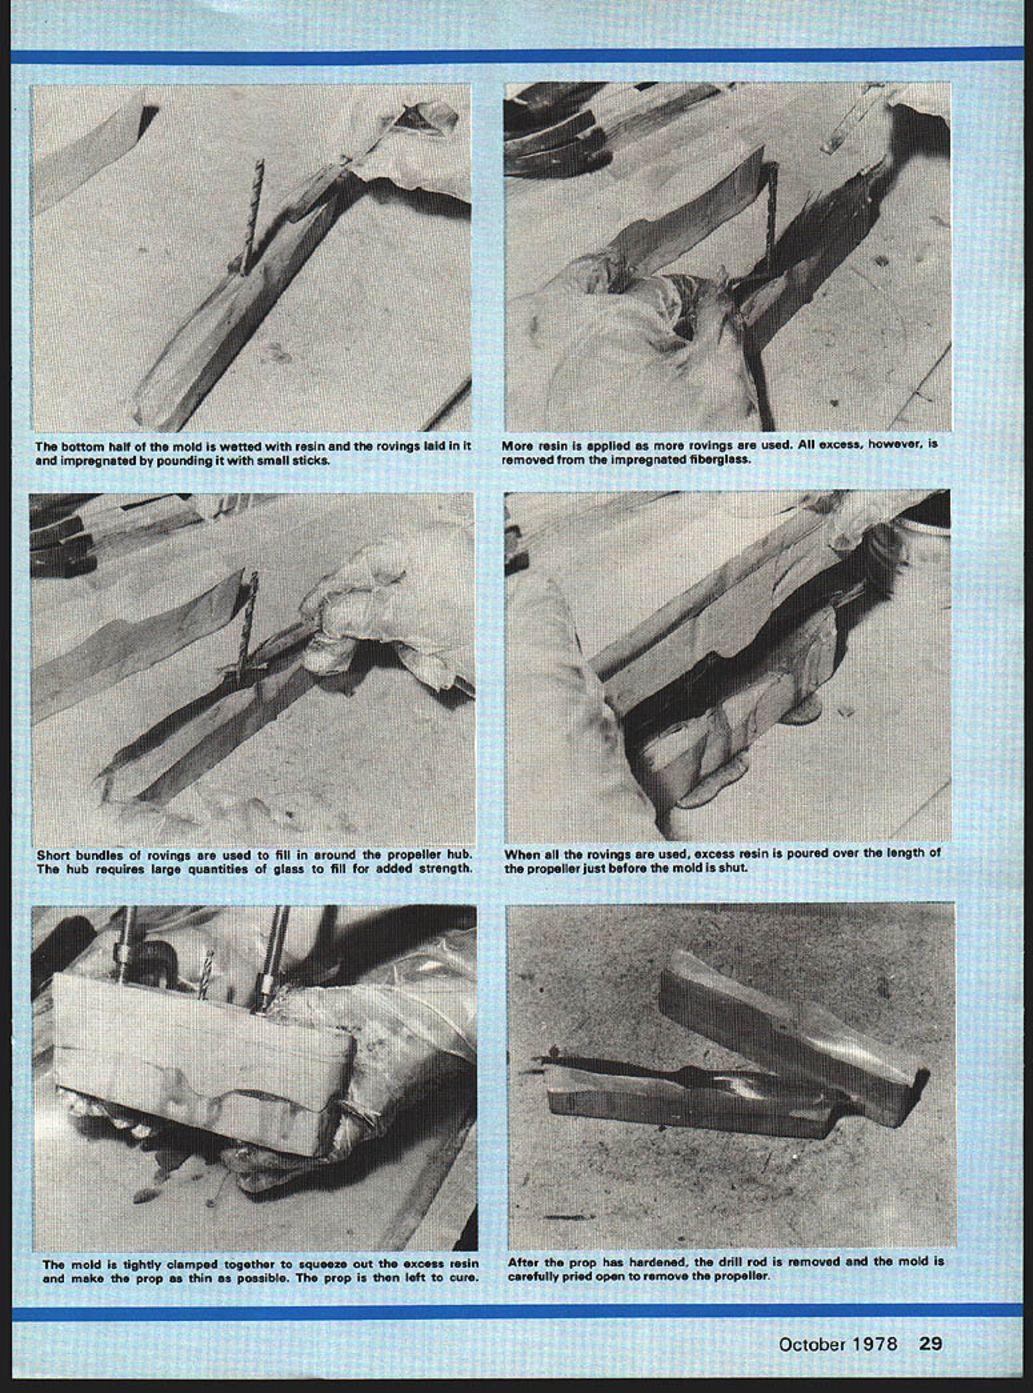
Now give the entire mold a second coat of mold release and insert the drill rod into the bottom half of the mold. While waiting for this coat to dry, thoroughly mix your dye into approximately 2–3 tablespoons of resin and set this mixture aside to allow air bubbles to dissipate. Lay out wax paper, gloves, and sticks. As soon as the mold release is completely dry, mix the catalyst into the remaining resin—sparingly. You do not want the resin to set up while you are laying up the prop.
Laying up the prop
Begin by wetting the mold with a minimum amount of resin. Use the least possible amount whenever resin is applied because this will provide more room for glass. A trick for strengthening the prop tips is to lay a 1/3 to 2/3 oz. piece of glass cloth in the last 1/8" of the blade portion of the mold before starting to lay in the glass strands.
Next, start laying in the strands of glass, alternating sides of the drill rod. Start with the longest lengths and work toward the shortest. Whenever the hub looks a little shy of glass, fill it in with the very short pieces. You want to finish using the very short pieces just before you apply the last longer lengths; this will hold the short pieces in place as you close the mold.
A few rules to keep in mind:
- Wear disposable gloves and provide good ventilation in the working area.
- Try to center the individual strands in the mold—this will ease balancing later.
- Carefully work each new strand until it is completely wetted with resin before proceeding to the next strand. This will ease the expulsion of bubbles that crop up in each layer as the strand wets.
- Try to spread the fibers of each strand across the full width of the blade. This adds strength while reducing the tendency of the prop to twist when you sand; it will not "fray" if you "kiss" the prop on takeoff.
- Go as lightly as possible on the resin. The ratio of 60% glass to 40% resin by weight is the goal. It is hard to obtain, but well worth the effort. Never use a prop with less than 40% glass; this should be no problem because it is fairly easy to accomplish 50% glass.
After you have used all the glass, pour the remaining resin along the length of the prop, giving extra attention to the hub area. Now put the top of the mold on the drill rod and prepare to close. This is the best time to check the mold markings and turn the top to match the bottom—check carefully to avoid closing the mold the wrong way. Now clamp the mold quickly and firmly together and take a break.
Curing and demolding
It will be easy to tell when the resin is set—the strands of glass at the ends will be very stiff. If they are not, do not open the mold. Always remove the drill rod first; otherwise the mold could break across the hub. Heat the mold in water as hot as you can stand before opening, because this will soften the mold release and make separation easier.
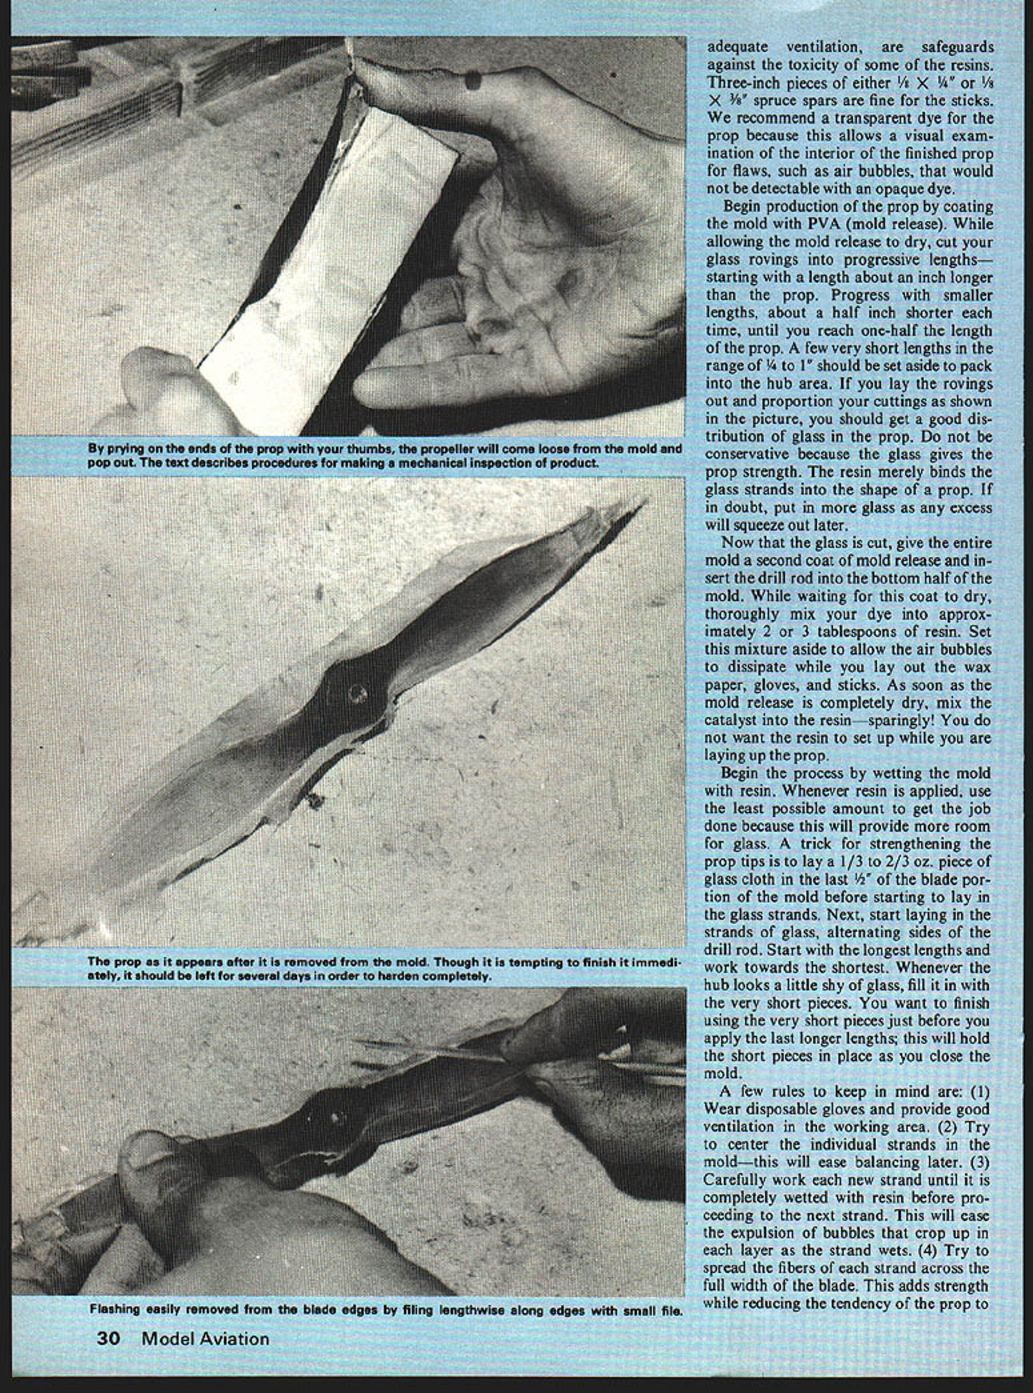
Carefully pry open the mold and remove the propeller. Clean the mold thoroughly; resin drippings will grip the mold tenaciously if not fully coated with release.
Finishing and testing
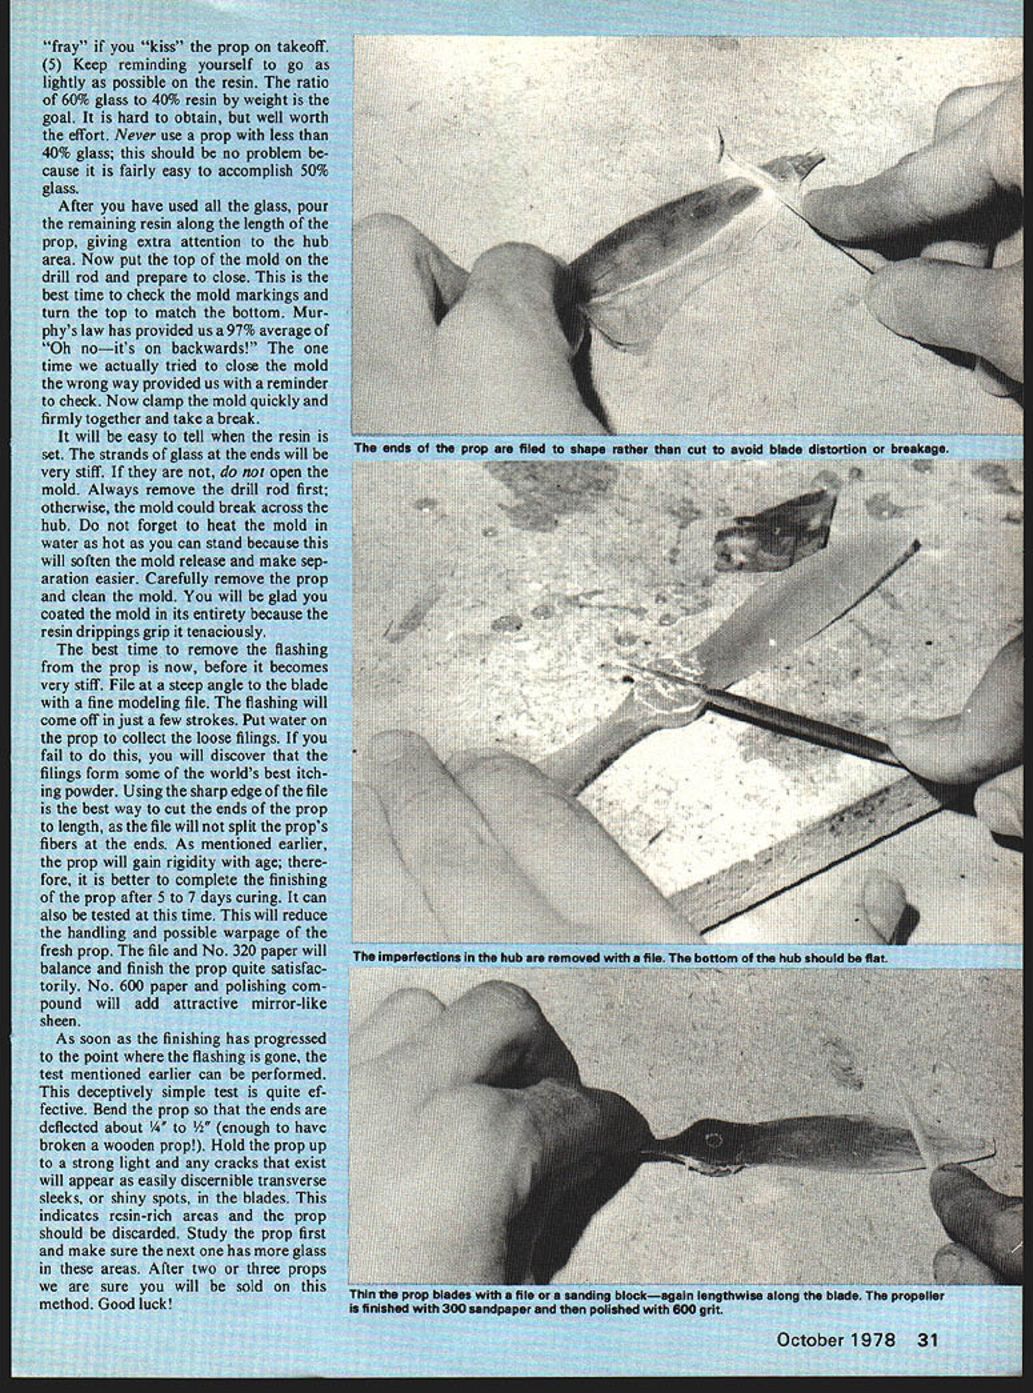
The best time to remove the flashing from the prop is now, before it becomes very stiff. File at a steep angle to the blade with a fine modeling file. The flashing will come off in just a few strokes. Put water on the prop to collect the loose filings—otherwise the filings will make a very effective itching powder. Using the sharp edge of the file is the best way to cut the ends of the prop to length, as the file will not split the prop's fibers at the ends.
The prop will gain rigidity with age; it is better to complete the finishing after 5 to 7 days of curing. This reduces handling and possible warpage of the fresh prop. The file and No. 320 paper will balance and finish the prop quite satisfactorily. No. 600 paper and polishing compound will add an attractive mirror-like sheen.
As soon as the flashing is gone, perform this simple test: bend the prop so the ends are deflected about 1/4" to 1/2" (enough to have broken a wooden prop). Hold the prop up to a strong light—any cracks will appear as distinct transverse streaks or shiny spots in the blades. These indicate resin-rich areas and the prop should be discarded. Study the prop and make sure the next one has more glass in these areas. After two or three props you will see the value of this method.
Good luck!
Transcribed from original scans by AI. Minor OCR errors may remain.

