

How to: Mold Filament-Reinforced Props
While taking the time to cast your own props may seem like a lot of trouble, it equates to a tailor-made suit as compared to one from off the rack. Nothing can fit your specific needs any better. — Bob Dunham
Using procedures developed by serious Control Line and Free Flight fliers, this article describes how to make reinforced plastic propellers using a split mold. The procedure has been refined to the point where consistent, reliable results can be produced without great difficulty.
A propeller with tip-to-tip fiberglass and/or carbon fiber (FG/CF) rovings or tows is almost a necessity if you are using a high-revving, Schnuerle-ported engine turning at speeds approaching or in excess of 28,000 rpm. It is important to maintain both blade pitch (for efficiency) and structural integrity (for safety). Even at lower rpm, the forces on some propellers — both outward and twisting — can cause blade shedding; failure usually occurs in the hub area and can endanger people within a 30-ft radius. Even with FG/CF (or any reinforcement) unexpected blade separation can sometimes occur. Always use protective eye gear and carefully check the prop after each flight for landing damage or over-stressing.
Advantages of making your own FG/CF props:
- You can reproduce nonstandard or original prop shapes that are not stocked by shops.
- You can thin, repitch, reshape, or otherwise modify an existing prop and reproduce the modified shape.
- Molds described here are suitable for fiberglass, carbon fiber, or a combination. Kevlar has been used by others but is not covered from personal experience.
- Materials to produce several molds and enough epoxy and strand material to make 30–40 props will cost in the neighborhood of $75 (prices and sources noted below).
Safety and general notes:
- Use PVA release agent (polyvinyl alcohol) for mold release — it is vital. PVA is a green-tinted, water-soluble liquid applied with a brush; it dries rapidly.
- Work in a well-ventilated area, wear disposable gloves and protective glasses, and heed safety labels on all materials.
- If you have allergies to resins, do not attempt this project.
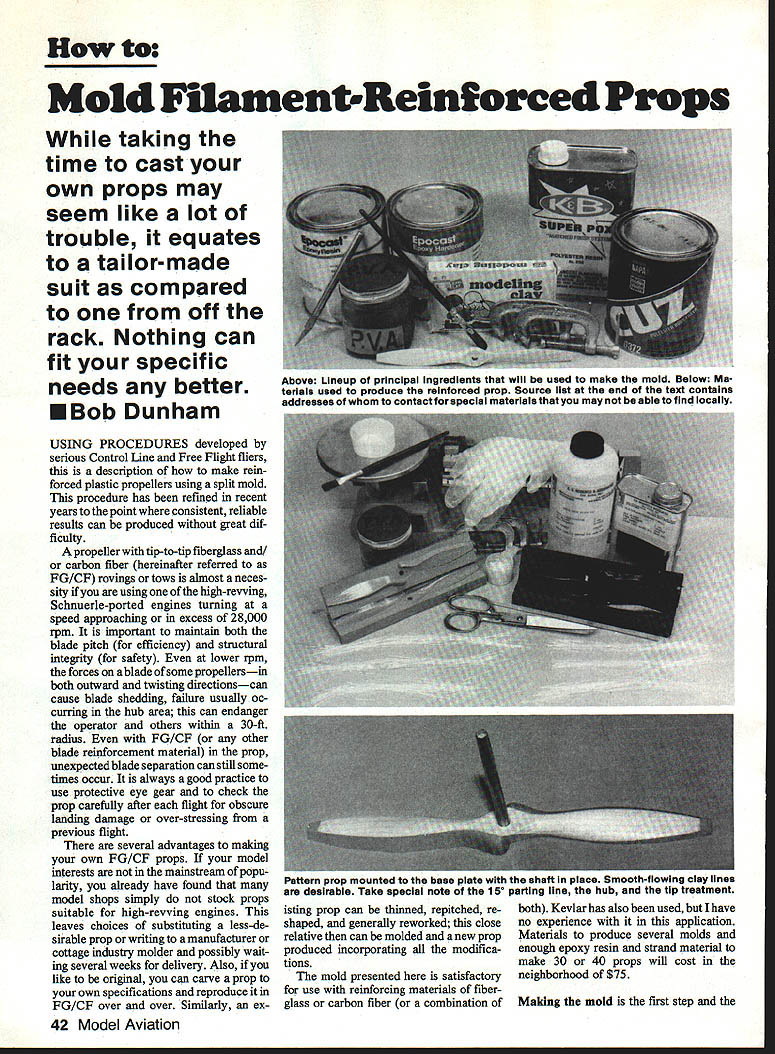
Materials, tools and supplies
- Metal base plate, flat and smooth, about 1/8 in thick and at least 2 in × 12 in
- 3-in length steel rod to fit the prop shaft hole as a center post
- Mold side frames: 1/4-in plywood or yardstick strips (two long sides about 1 in longer than the prop diameter; two end pieces about 1/2 in long)
- Polyvinyl alcohol (PVA) release agent
- Polyester resin (for thinning body filler)
- Auto body filler (polyester-based) or steel-filled epoxy for mold matrix
- EPON 815 epoxy resin and TETA catalyst for prop lay-up
- Fiberglass rovings (gun roving) and/or carbon fiber rovings
- 5-minute epoxy, mixing cups, disposable brushes, clamps (C-clamps), vice-grip pliers
- Drill press, sandpaper, files, razor or X-Acto knife, clay or modeling clay, acetone, paper towels
- Accurate beam scale (or good small scale) for weighing resin, catalyst and strands
Preparing the pattern prop
- Choose a prop to reproduce. If varnished wood, remove the finish by sanding and washing with acetone.
- Thin the blades: sand about five thousandths of an inch (0.005 in) from the top (curved) side to allow for strand thickness and mold faces.
- Apply two light coats of epoxy paint to seal the grain and prevent absorption; spraying is preferred to brushing to minimize buildup. (If molding from fiberglass or plastic, thin the blades the same way but do not paint them.)
- Check that the pattern has no nicks, scratches, brush marks, or obvious grain — all imperfections will be reproduced.
Making the mold — overview
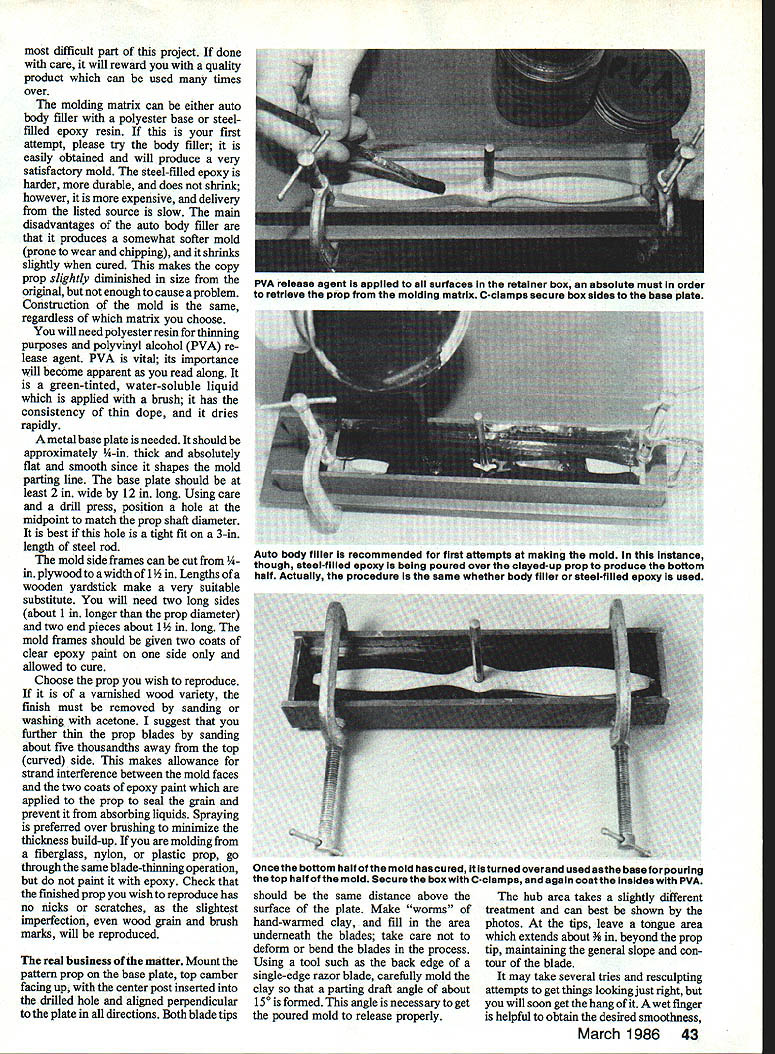
You can use auto body filler (polyester-base) or steel-filled epoxy as the molding matrix. For a first attempt, use body filler: it is available, easy to work with, and produces satisfactory molds. Steel-filled epoxy is harder and more durable but expensive and slower to obtain. Body filler molds will be somewhat softer, prone to wear and slight shrinkage (making copies slightly smaller), but generally acceptable for many uses.
The construction steps are the same for either matrix:
- Mount and clay up the pattern on the base plate.
- Build a wooden frame around the prop, coat everything with PVA, and pour the bottom half of the mold.
- After curing, separate, clean, reassemble with PVA, and pour the top half.
- Separate the halves, clean out PVA and clay, trim tongues for alignment, and mark matching ends.
Making the mold — detailed procedure
- Prepare the base plate and frame:
- Drill a hole in the plate at the midpoint to match the prop shaft diameter; the hole should be a tight fit for a 3-in length steel rod (center post).
- Cut mold frames from 1/4-in plywood or yardstick material. Give the inside-facing surfaces two coats of clear epoxy paint and allow to cure.
- Mount the prop and clay up:
- Insert the center post in the plate and mount the pattern prop with the top camber facing up. Align perpendicular to the plate so both blade tips are the same height above the plate.
- Warm small amounts of clay and fill the area underneath each blade, taking care not to deform or bend the blades.
- Sculpt the clay under the blades so a parting draft angle of about 15° is formed. This angle helps the poured mold release.
- At the tips, leave a tongue area that extends about 3/8 in beyond the prop tip, maintaining blade slope and contour. These tongues will provide registration and allow rovings to run full length.
- When finished sculpting, wash oil and clay smears from the plate with acetone.
- Assemble the mold box and apply PVA:
- Assemble the wooden frame around the clayed-up prop and secure to the base with C-clamps. The end pieces should just barely enclose the clayed prop.
- Brush two coats of PVA onto all inside surfaces of the box, the post, the prop, and the clay. Allow to dry thoroughly and avoid disturbing the fresh PVA skin.
- Mix and pour the bottom half matrix (body filler example):
- For an 8-in diameter prop mold, mix about 7 oz (200 g) of body filler with about 1 oz (28 g) of polyester resin to a milkshake-like consistency. Discard the paste catalyst that came with the filler and use the polyester resin catalyst (liquid) instead — it is easier to measure. For this quantity add about 3 drops of catalyst (adjust per manufacturer).
- Mix thoroughly, pour into the mold box to cover the clay tongues, tap the box to release air, and allow to cure.
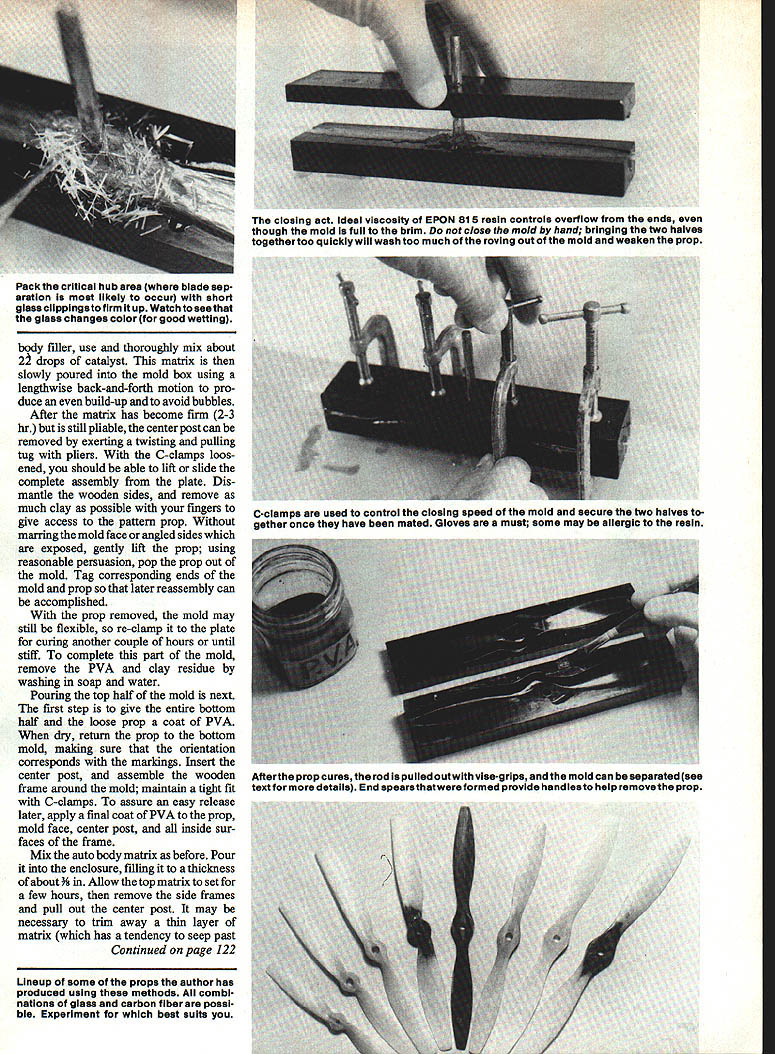
- Separate and clean:
- After curing, remove clamps and separate mold halves. Peel out the clay tongues and wash the mold halves with warm water and soap to remove PVA and residual clay.
- Clean any flash or roughness with fine sandpaper. Leave the small tongue keys at blade tips to allow full-length run of rovings and to provide additional strength and alignment.
- Mark corresponding ends on mold halves to prevent accidental reversal.
- Pour the top half:
- Coat the entire bottom half and the loose prop with PVA. When dry, return the prop to the bottom half in the correct orientation and insert the center post.
- Reassemble the wooden frame and apply a final coat of PVA to the prop, mold face, post, and inside surfaces.
- Mix the matrix as before and pour into the enclosure to a thickness about 3/8 in. Let set for a few hours. Remove frames and pull out the center post.
- If matrix has seeped past framing edges, trim the thin layer to reveal the parting line.
- Tap tentatively at several points along the parting line with a sharp-edged tool and a few light hammer blows to split the mold halves cleanly. If they don’t separate, allow more cure time and try again.
- Remove the prop, reassemble and re-clamp the halves, and allow the mold to cure fully to reduce bowing. Wash to remove all PVA traces.
- Relieve the tongue ends so the gap is approximately 1/32 in — enough for strands to extend beyond the ends while still allowing the mold to close tightly. Leave a slight ridge near the blade surface to provide an outline for removing flash.
Preparing for lay-up (cutting rovings etc.)
- Cut reinforcing strands to length before wetting with resin. Once wetted they become sticky and hard to handle.
- Cut the strands in pairs starting with the longest lengths. Longest rovings should extend at least 1 in beyond the mold so they protrude beyond the end relief slots.
- Prepare progressively shorter lengths in roughly 1-in increments until near the hub area.
- Arrange rovings in order near the mold so they are handy during lay-up: longest first, then progressively shorter.
Making the prop — materials and mix ratios
- Use EPON 815 epoxy resin mixed with TETA (Triethylenetetramine) catalyst for lay-up. TETA at about 15–20% of resin weight (≈17% ideal) gives a workable pot life (~1 hour at room temperature) and good wetting properties.
- Example: for an 8-in prop, assume 22 g EPON; add 3.75 g TETA (≈17%), total ≈25.75 g. Mix thoroughly and allow bubbles to settle for about 10 minutes.
- Fiberglass rovings (gun roving bundles of ~30–40 filaments) are easiest to handle. Use chrome/silane-sized strands for good wetting. Carbon fiber can be used alone or with FG; CF gives greater stiffness and lower weight but is more brittle and costly.
- Keep a good scale to weigh resin, catalyst and strands accurately. Guessing is not sufficient for small quantities.
Lay-up and curing
- Prepare the bottom mold trough by giving it a heavy coat of mixed epoxy resin.
- Lay in the longest rovings first, straddling the center post and keeping strands centered lengthwise to help with balance. Use a small stick with a rounded end (about 1/8 × 1/4 in) to spread filaments and cover blade area.
- Add more resin and progressively lay shorter lengths, working from hub toward tips and keeping fibers within mold contours (do not let them slip into the closing faces).
- Add short 1-in and shorter strippings to fill the hub area, keeping everything wet with resin. Strands will appear silver or translucent when properly wetted.
- When the trough is filled and all fibers wetted, coat the top mold face with resin and carefully slide it down onto the center post. Verify mold match marks are aligned.
- Bring the top mold down manually to within about 1/8 in of closing, then position clamps evenly around the mold and tighten them very slowly and evenly until the faces close tightly.
- Expect some loss of glass and oozing of resin between faces; clean excess with acetone or epoxy thinner. Excessive glass loss indicates overstuffing or closing too rapidly.
- Lay the mold level and allow to cure. At normal room temperature the epoxy will firm in about 5–6 hours (faster in sun or warm oven). Check stiffness at the ends.
- When firm, loosen clamps and remove the center post by twisting with vice-grip pliers. Trim washed-out rovings on the sides if necessary but leave end spears until the mold is opened.
- To separate the mold: a five-minute soak in very hot water can help; insert a thin knife or screwdriver along the parting line and separate the halves. Immerse mold and prop in hot water if needed to free the prop. Lift flashing flaps, especially around the hub, and pull on the end spears to snap the prop free.
Finishing and balancing
- Remove most flashing with scissors, leaving ~1/8 in from the mold line.
- Use a sharp, flat, medium-coarse file to remove the last 1/8 in by filing along the cleft between flash and prop. Use an X-Acto knife and file for hub detail.
- Cut away end spears with scissors after filing a groove across the tongue with a file.
- Balance the prop by removing material from the top (curved) surface only. Use a file and sandpaper, progressing from No. 150 to No. 500 for final polish. Avoid sanding the bottom surface, which will change blade pitch.
- If necessary, add small amounts of roving and resin to build up thin areas, or sand excess material to reach desired balance and contour.
- Aim for a resin-to-roving weight ratio of at least 60:40 (resin:rovings) by weight. The exact amount of strand required will be refined by trial and correction on subsequent attempts.
Safety and handling reminders
- Use gloves and a face mask if necessary, and ensure adequate ventilation.
- If you have allergic reactions to resins, do not proceed.
- Dispose of waste and clean tools according to the resin and solvent manufacturers’ instructions.
Material sources
- Auto body filler: C-UZ from NAPA Automotive Stores; White King from K-Mart, Wal-Mart, and most auto supply stores.
- Steel-filled epoxy: 1 qt kit EPOCAST® 11B-A with #9812 hardener — E.V. Roberts & Assoc., Box 868, Culver City, CA 90232; phone 1-800-421-0284.
- Epoxy resin (EPON 815): Shell Chemical — available from E.V. Roberts & Assoc.
- Epoxy catalyst (TETA): E.V. Roberts & Assoc.
- Polyester resin: K&B Manufacturing — from most hobby shops.
- Fiberglass rovings: Owens-Corning Product #447-211 or #352-211; CertainTeed Product #282-81. See Yellow Pages under Fiberglass Materials.
- Carbon fiber roving: Gougeon Bros., Box X908, Bay City, MI 48707; NFFS Supplies, 12 Cook St., Rowayton, CT 06853.
If you need help locating supplies or cannot purchase them in small lots, contact Bob Dunham, 4730 S. Yorktown, Tulsa, OK 74105. A starter kit (auto body filler, PVA, EPON 815, TETA, vinyl gloves, fiberglass rovings) was offered for $60 postpaid in the U.S.; it contains enough materials for a couple of molds and 20–25 medium-size props.
Transcribed from original scans by AI. Minor OCR errors may remain.

