

How To Tow Signs
Besides being a lot of fun, sign towing is a great way to boost your club
HOW WOULD YOU like to tow a variety of signs at your next fun-fly? First, you might assemble one that says BOMB DROP EVENT STARTS PROMPTLY AT 9 A.M. And next, a message to rib your friends: PLEASE REPLACE DIVOT AFTER EACH LANDING. And later, one that reads DON'T FORGET—ELECTION NEXT MEETING.
Does that raise a lot of questions? I hope so because, if you're interested, I'd like to tell you how you can make your own field-kit of interchangeable letters and tow just about any sign you want.
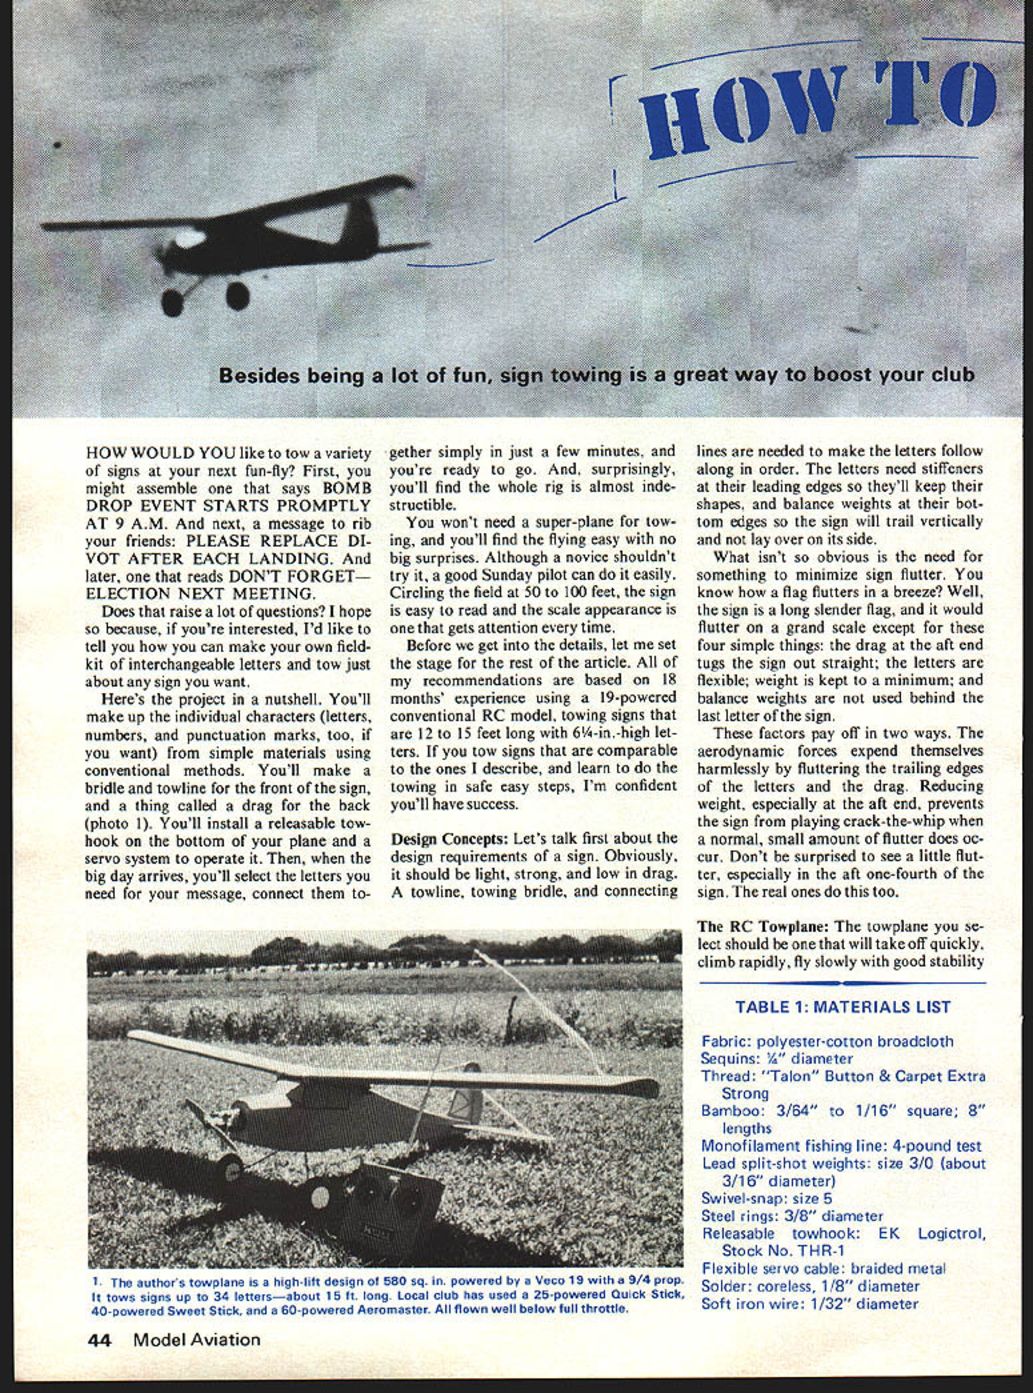
Here's the project in a nutshell. You'll make up the individual characters (letters, numbers, and punctuation marks, too, if you want) from simple materials using conventional methods. You'll make a bridle and towline for the front of the sign, and a thing called a drag for the back (photo 1). You'll install a releasable towhook on the bottom of your plane and a servo system to operate it. Then, when the big day arrives, you'll select the letters you need for your message, connect them together simply in just a few minutes, and you're ready to go. And, surprisingly, you'll find the whole rig is almost indestructible.
You won't need a super-plane for towing, and you'll find the flying easy with no big surprises. Although a novice shouldn't try it, a good Sunday pilot can do it easily. Circling the field at 50 to 100 feet, the sign is easy to read and the scale appearance is one that gets attention every time.
Before we get into the details, let me set the stage for the rest of the article. All of my recommendations are based on 18 months' experience using a 19-powered conventional RC model, towing signs that are 12 to 15 feet long with 6-1/4-in.-high letters. If you tow signs that are comparable to the ones I describe, and learn to do the towing in safe easy steps, I'm confident you'll have success.
Design Concepts
Let's talk first about the design requirements of a sign. Obviously, it should be light, strong, and low in drag. A towline, towing bridle, and connecting lines are needed to make the letters follow along in order. The letters need stiffeners at their leading edges so they'll keep their shapes, and balance weights at their bottom edges so the sign will trail vertically and not lay over on its side.
What isn't so obvious is the need for something to minimize sign flutter. You know how a flag flutters in a breeze? Well, the sign is a long slender flag, and it would flutter on a grand scale except for these four simple things: the drag at the aft end tugs the sign out straight; the letters are flexible; weight is kept to a minimum; and balance weights are not used behind the last letter of the sign.
These factors pay off in two ways. The aerodynamic forces expend themselves harmlessly by fluttering the trailing edges of the letters and the drag. Reducing weight, especially at the aft end, prevents the sign from playing crack-the-whip when a normal, small amount of flutter does occur. Don't be surprised to see a little flutter, especially in the aft one-fourth of the sign. The real ones do this too.
The RC Towplane
The towplane you select should be one that will take off quickly, climb rapidly, fly slowly with good stability.
TABLE 1: MATERIALS LIST
- Fabric: polyester-cotton broadcloth
- Sequins: 1/4" diameter
- Thread: "Talon" Button & Carpet Extra Strong
- Bamboo: 3/64" to 1/16" square; 8" lengths
- Monofilament fishing line: 4-pound test
- Lead split-shot weights: size 3/0 (about 3/16" diameter)
- Swivel-snap: size 5
- Steel rings: 3/8" diameter
- Releasable towhook: EK Logictrol, Stock No. THR-1
- Flexible servo cable: braided metal
- Solder: coreless, 1/8" diameter
- Soft iron wire: 1/32" diameter
and control, and have reserve power beyond what's needed to tow the sign. You may want to use a lower pitch prop than usual to improve these characteristics.
What type of plane will work? I've been pleasantly surprised to find that an RC model can tow one heck of a lot. My towplane (photo 2) is a conventional high-lift design of 580 sq. in. powered by a standard Veco 19 turning a 9x4 prop. It regularly tows signs up to 34 letters in length (about 15 feet). It lifts the sign off the ground with no struggle and requires less than full throttle to maintain level flight. I've set my limit at 34 letters so I'll have a performance safety factor: with a full sign and full power it can climb slowly on up to altitude.
These signs have also been towed by three other planes in our club and each did the job with ease: a 25-powered Quick-Stick, a 40-powered Sweet-Stick, and a 60-powered Aeromaster. All three had to be slowed down, well below full throttle, to maintain a realistic airspeed as they circled the field. The Sweet-Stick, however, has to be flown a little faster than desirable to maintain safe control.
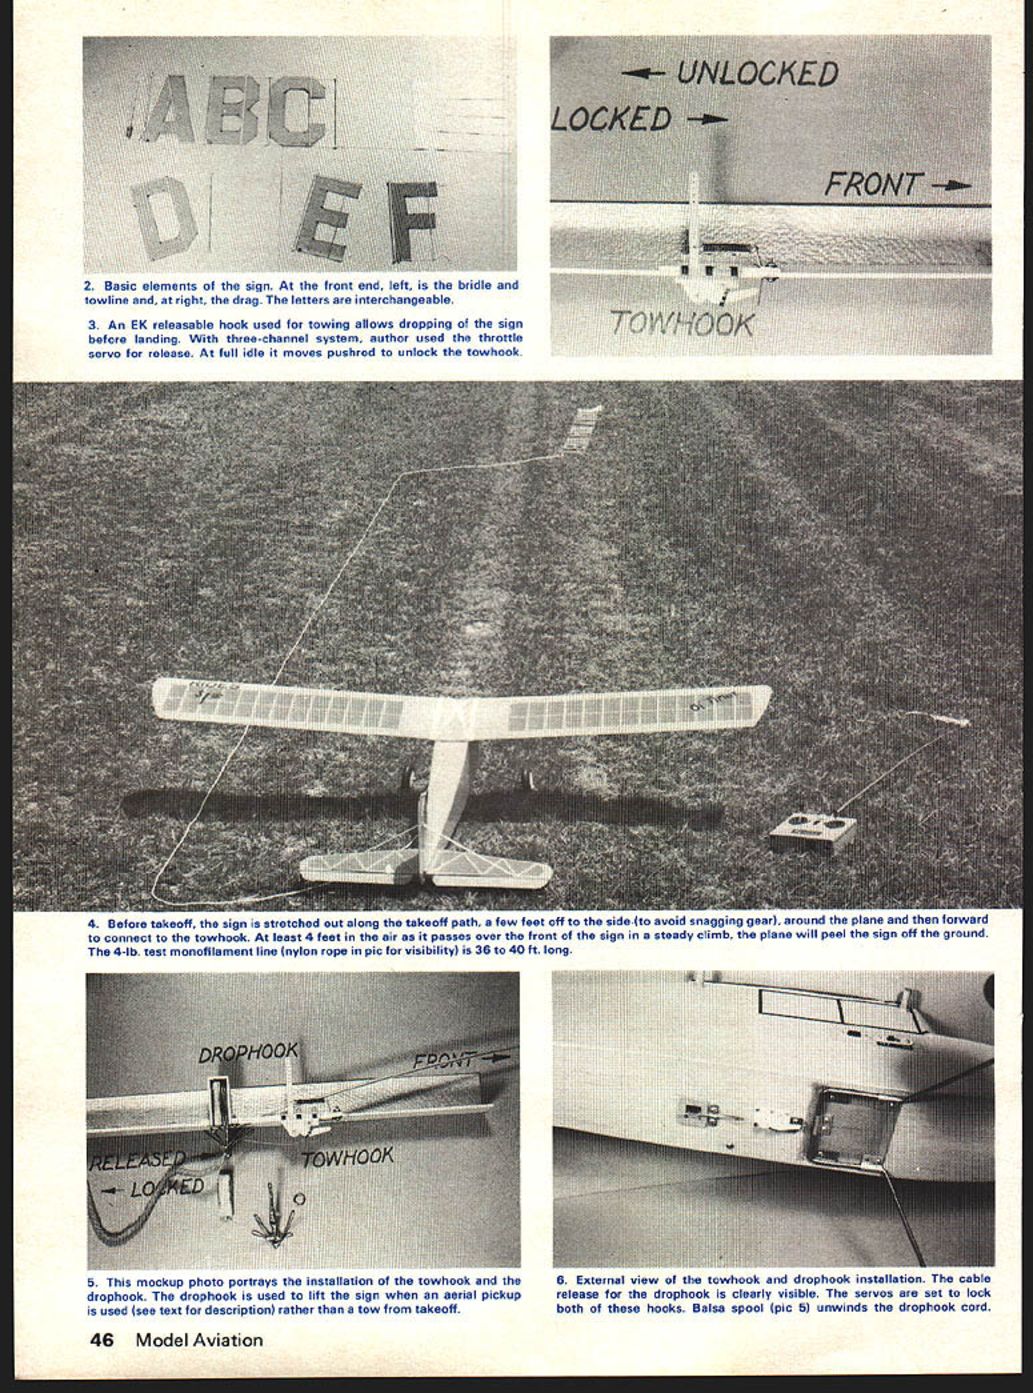
So you can tow the sign and also drop it before landing, your plane will need a releasable towhook. It should be located on the bottom of the fuselage as near the center of gravity as possible. The EK Logictrol hook does an excellent job; photo 3 shows a mockup of the installation. A simple metal guard, added at the front of the hook, prevents the towline from falling off the hook while preparing for takeoff. A light spring is also added to keep the hook in locked position until the servo releases it. How you actuate the towhook release with a servo will depend on the setup in the plane you select and your ingenuity. Since my plane uses only three channels, I use the throttle servo: bringing the throttle to full idle moves a pushrod to unlock the towhook.
Towing the Sign:
There are two methods of lifting a sign off the ground; both were used Before takeoff, the sign is stretched out along the takeoff path, a few feet off to the side (to avoid snagging gear), around the plane and then forward to connect to the towhook. At least 4 feet in the air as it passes over the front of the sign in a steady climb, the plane will peel the sign off the ground. The 4-lb. test monofilament line (nylon rope in pic for visibility) is 36 to 40 ft. long. by the old-timers and are still used today. Either way is an interesting challenge for the RC pilot and, because of the realism, both are exciting for the spectators to watch.
In the first method, you'll lift the sign off the ground as your plane takes off and climbs out. Start by placing your plane in takeoff position. Stretch the sign out directly along the takeoff path with the front of the sign nearest the plane (See photo 4). Connect a monofilament towline to the bridle on the sign and then run the free end of the line back to your plane, but not straight back. If it lays along the takeoff path, it might catch on the landing gear or horizontal stabilizer during takeoff. So, lay it about 3 to 4 feet off to the side of the takeoff path, bring it around behind the plane, and then run it up forward and connect it to the towhook.
How long should the towline be? Just long enough so your plane can take off and be at least 4 feet in the air as it passes over the front of the sign in a steady, normal climb. As your plane continues its climb, the sign will peel off the ground and follow along. This way, the sign never drags across the ground. Make the towline from 4-lb. test monofilament and tie a 3/8-in. tow ring to each end. After you gain experience, you'll want the towline as short as good judgment will allow for a more realistic appearance. My plane requires a 36- to 45-ft. towline; the length depends on how the wind affects takeoff.
Make all takeoffs into the wind. The sign gets a kite-like lift during the first few moments of lift-off, until it starts trailing vertically. This considerably eases the burden on the towplane.
After climb-out, regulate the power and airspeed to fly a slow path around the field.
TABLE 2: CHARACTER DIMENSIONS
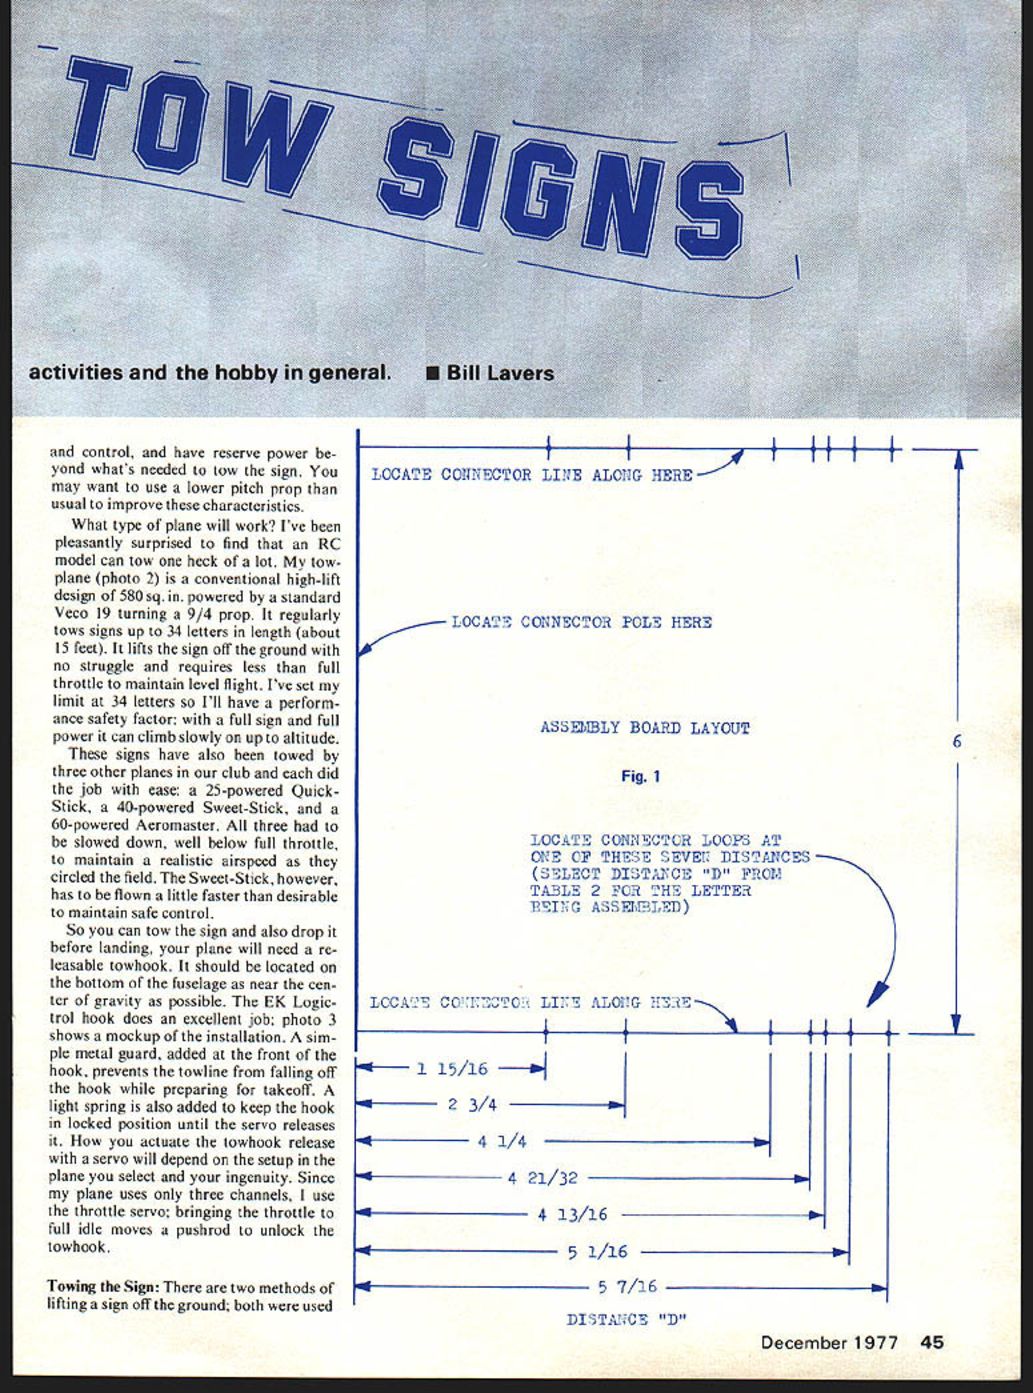
Use these distances: Dist. "W" Dist. "D" For these characters: 1 3/16 1 15/16 I, apostrophe 1 3/16 2 3/4 Colon 3 1/2 4 1/4 E, F, J, L 1 3/16 4 21/32 Space 1 1/2 4 21/32 Period, comma 3 7/8 4 21/32 Dash 4 1/4 4 13/16 B, D, N, O, P, Q, R, U, 2, 3, 5, 6, 7, 8, 9, 1 4 1/4 5 1/16 A, T, V, X, Y, 4 4 1/16 5 7/16 C, G, H, K, S, Z, $ 4 11/16 5 7/16 M, W
Note: All dimensions are in inches. All characters, except small punctuation marks, are 6 1/4" high. All characters have a 1 3/16" stroke. at 50 to 100 feet. Fly just fast enough to keep the sign tugged out straight and maintain a safe, controllable airspeed for your plane. Flying too fast, which is easy to do, will appear unrealistic and cause undue sign flutter. Since each letter flutters like a miniature flag, continuous high airspeed can eventually damage the sign.
As you might expect when towing a load like this, your plane will fly slower for any given power setting, and therefore respond more slowly to control movements. However, because the towline is attached at the center of gravity, your plane should have positive control response with no unusual flight characteristics. When I speak of a towing load, I'm referring to the drag created by the sign and not its weight. A complete 30-letter sign, including the bridle and drag, weighs about 4 ounces, so the weight is of little significance.
Dropping the sign is simple: just actuate the towhook release and the sign will drop gently to the ground with no damage.
Now, if you have any doubts about yourself or your plane in trying all of this, here's the safe, easy way to do it. On the first few flights, tow only one word to get the feel of the system and the method. Then try two words, then three, etc., making several flights at each stage until you are towing a full sign. Be prepared to abort the tow any time the plane or sign doesn't behave the way you want. Just drop the sign and think it over later. Each time you increase the load, climb up to a safe altitude and check the plane's performance and control response. By progressing slowly like this, you'll accomplish two things: (1) you'll develop full confidence in yourself and your plane, and (2) you'll find out how long a sign your plane can safely tow.
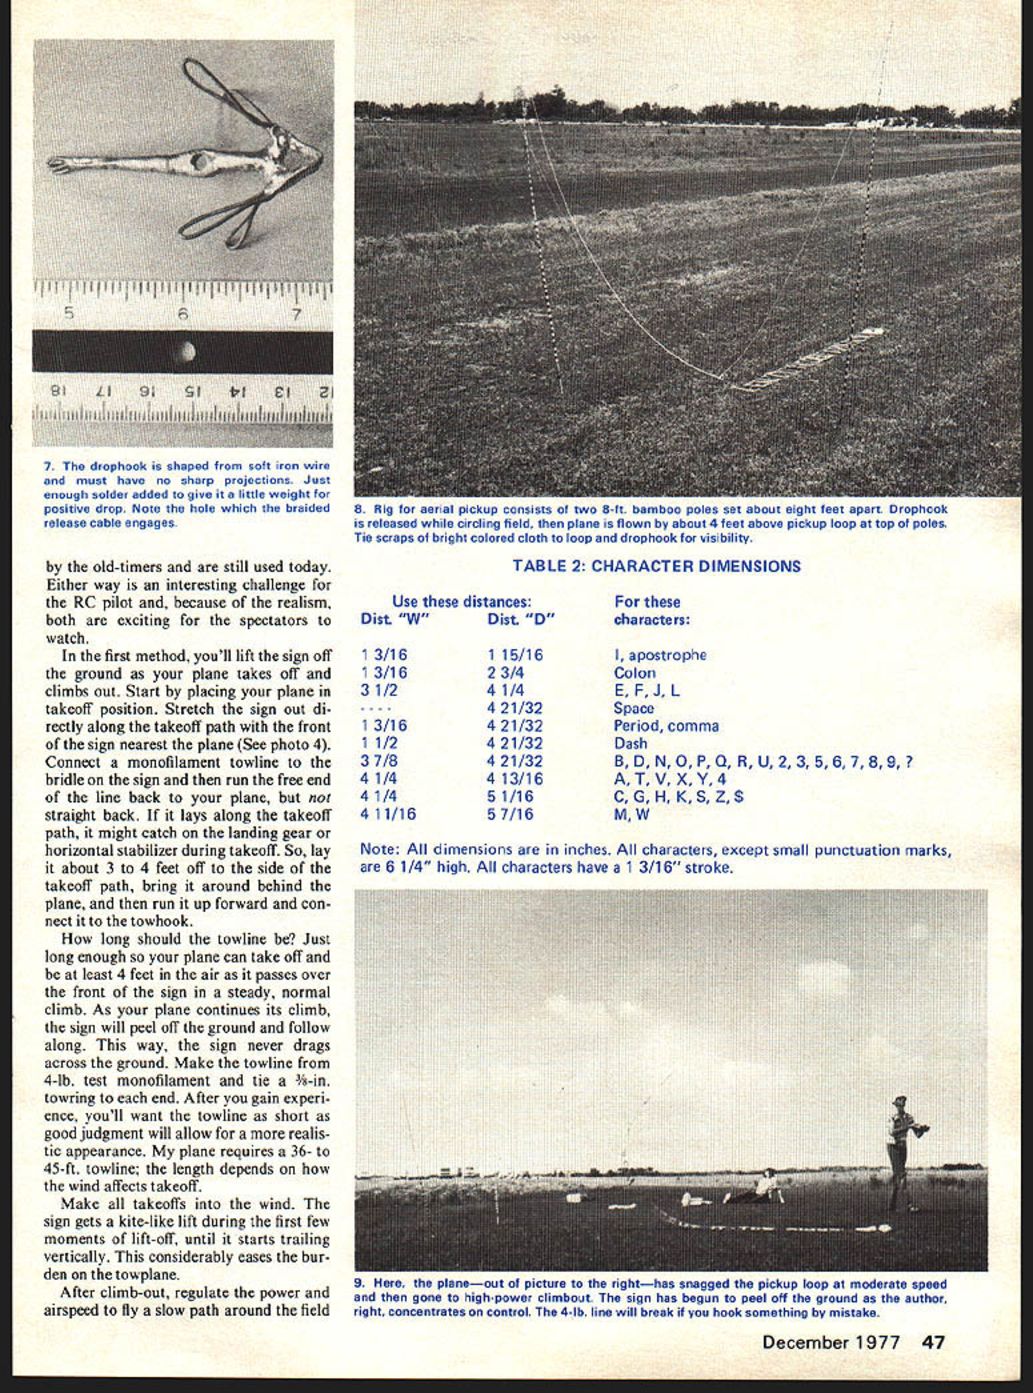
The second method of lift-off, and the extra equipment required, is optional. It requires more precise flying, but don't hesitate to try it—it's fun. In this method, you'll fly your plane over the sign and pick it up with a trailing drophook. You'll need the same towhook as before, but you'll also need the drophook, towline, and release mechanism shown in photos 5, 6 and 7. For the towline, run a 10-ft. length of monofilament through the center of a rectangular balsa spool. Tie a tow ring to the top end, and a drophook to the bottom end. Make the drophook of soft iron wire, so it has no sharp projections, and just enough solder to give it a little weight. To store the line for flight and keep it from tangling, wrap it snugly around the spool and then place the spool and hook in the hook-housing. Put the tow ring on the towhook and then set your servos to secure the towhook and drophook in place prior to flight. The braided throttle cable shown works fine for the drophook release. As before, I'll leave it for you to design the servo action needed to release the drophook.
Photo 8 shows how to rig the sign for pickup. Set up two 8-ft. bamboo poles about 8 feet apart. Beforehand, make a small vee-notch in the tip of each pole. Lay the sign out along the flight path, as you did in the first method, with the towing bridle centered between the poles. Then, make a 24-ft. monofilament line for the pickup loop. Connect both ends of the line to the bridle and then lay the loop that is formed across the top of the two notched poles. Last, tie a piece of bright-colored yarn at the center of the loop and another piece to the end of the drophook to make the loop more visible.
Take off, and then release the drophook while circling the field. As it falls, the towline will unwind from the balsa spool until it is fully extended. Since the airstream will make it trail back at an angle, the hook will be about 8 feet below the plane. Guide your plane, at a moderate speed, to fly about 4 feet above the center of the poles. Just as the plane reaches the poles, apply full throttle and establish a normal climb. If you did everything right, the drophook will catch the pickup loop and the sign will gently peel off the ground (photo 9). If you didn't, you can always circle around and try it again.
With the dimensions given, the total towline will be 22 feet long; the drophook line is 10 feet and the pickup loop stretches out to 12 feet. This length gives a more realistic appearance than the longer towline you may need for the takeoff method.
Now that you understand how the sign is picked up, consider these two precautions. Use the 4-lb. test monofilament—if you hook something by mistake, you'll be glad when it breaks. Don't plant the poles too firmly in the ground. Can you guess why?
Now, who can tow a sign? I don't recommend it for a novice, but I don't think you have to be an expert pattern-pilot either. My best advice is this: if you can fly your plane and not vice versa; if you can make your plane go where you want and do what you want, you can tow a sign.
Sign Construction:
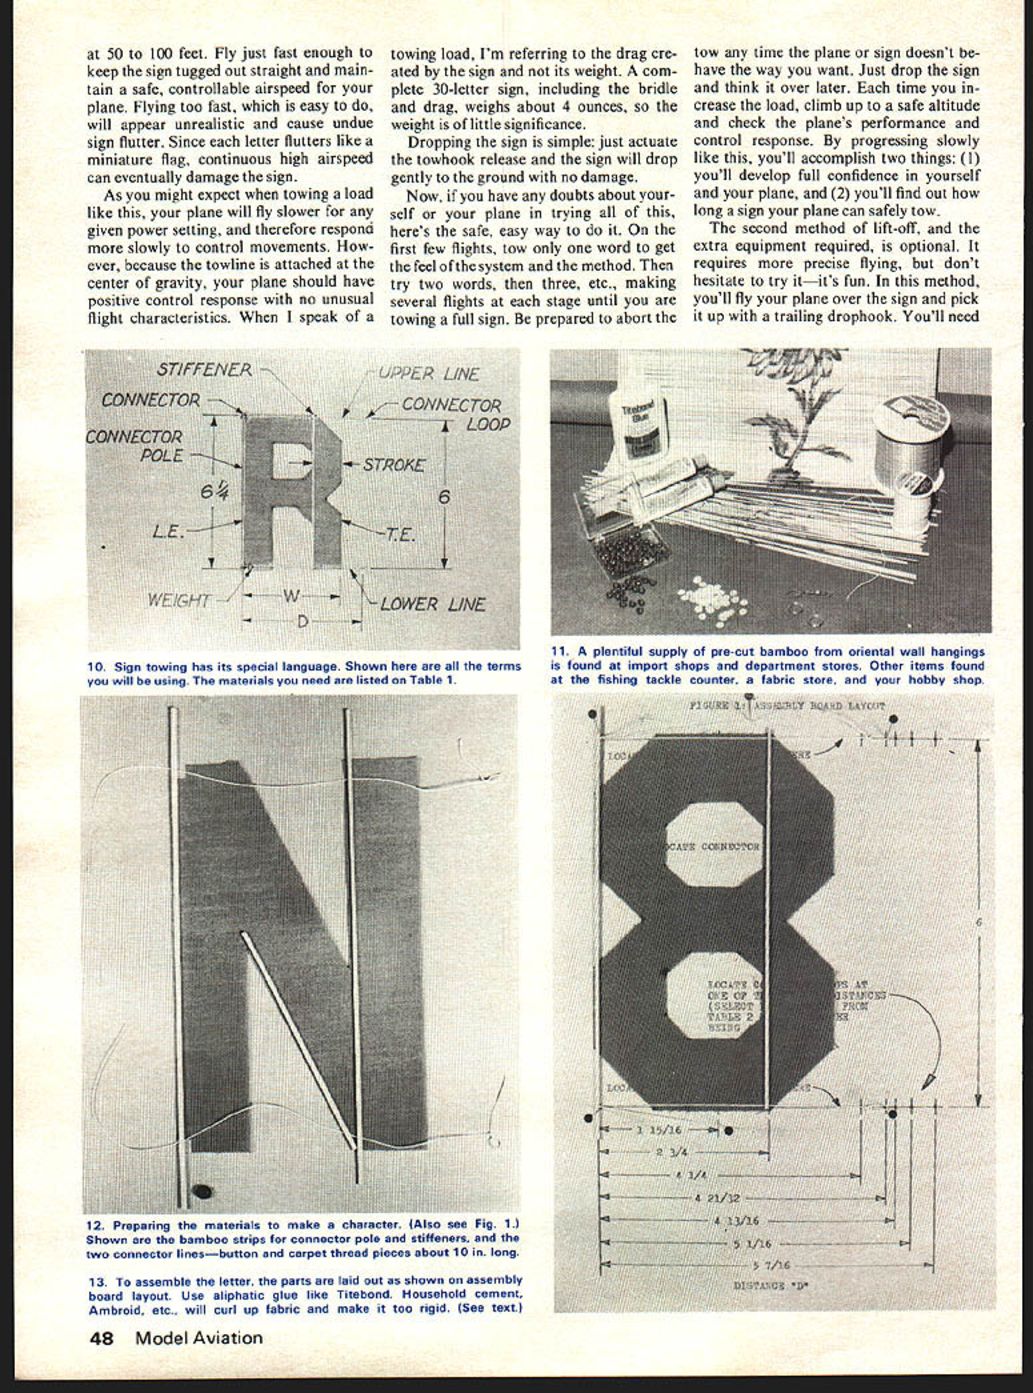
First of all, check the terms we'll be using shown in photo 10. The materials you'll need are listed in Table 1; quantities aren't specified since that will depend on how many letters you intend to make. A fabric store, a fishing tackle counter, and your favorite hobby shop will supply all of your needs except one, and photo 11 reveals where you can find that: a plentiful supply of pre-cut bamboo from oriental wall-hangings that you can find in import shops and department stores. The quality and size of the strips vary somewhat, but after you cut out the bad ones, you'll have one of the toughest materials going. Use strips that are about 3/64 to 1/16-in. square; slight variations won't hurt.
Now, how about the shape of the letters? Space won't permit drawing out the whole alphabet; there are plenty of reference books on this. However, I do recommend using the Gothic style letters shown. They're boxy enough to be simple to make, yet have some eye-appeal and are easy to read.
Also, I'd like to recommend some basic proportions and sizes so your letters will provide a weight and drag similar to these that have been tested. From Table 2, you can see that all characters (except small punctuation marks) are 6-1/4-in. high and have a 1-3/16-in. stroke. And, as you will probably know, all letters are not the same width, and the spacing between different combinations of letters varies to give a pleasing appearance. In Table 2, distances "W" and "D" are provided for this purpose.
Once you've designed your letters around these basic proportions, draw each one out on a 5 x 8 card and then, so it can be used as a template, punch tiny holes in the card where the lines forming the letters intersect. Lay the template on the fabric, line the edge of the card up with the fabric grain, and push a felt-tipped pen through each hole to provide points outlining the letter. As you cut each letter out, handle the raw edges with care to prevent raveling. You'll read later on how to prevent this on the finished letter.
Next, you'll need to prepare a simple assembly-board to hold the pieces of a letter in place as you glue them together. Fig. 1 shows how to lay it out on a piece of plywood. Any of the letters, numbers or punctuation marks can be assembled on this one scheme, the only difference being where you locate the connector loops to establish distance "D" for the character you are making.
Photo 12 shows the next step: preparing the materials to make a letter. Cut out the letter you want to start with and select the bamboo strips for the connector pole and stiffeners. Next, prepare the two connector lines. For each one, cut a piece of "button and carpet thread" about 10 in. long. Form the connector loop by tying it snugly around a scrap of Nyrod tubing that is slightly smaller in diameter than the sequins used to form the connector (see photo 14). For 1/4-in. diameter sequins, 3/16-in. diameter Nyrod works out just right. Apply a drop of glue to the knot before trimming off any excess thread. Make sure the glue doesn't penetrate the loop itself, because the loop should remain soft and limber.
From photos 12 and 14 you can see that the loops and connectors form the simple connections between letters. When connecting letters together, the loop will stretch out to an oval shape and slide over the connector easily. When the sign is towed, each loop stretches out tightly and remains secure on its connector. Disassembling the letters is equally simple. I suggest you make up a sample or two of the loop and connector to make sure they assemble easily and yet are secure when subjected to a pull.
To assemble the letter, lay the parts out as shown in photo 13. Insert pins or brads in the assembly-board to establish distance "D," which from Table 2 would be 4-21/32 in. for the number 8 shown being assembled. Be sure the connector lines are under slight but equal tension. Then, apply a slender bead of blue along the joints between the bamboo, thread and fabric. Make sure the glue joints are complete, but keep them as narrow as possible so the letter will remain flexible. Use an aliphatic glue like Titebond; household or Ambroid glue will curl up the fabric and also make it too rigid. You'll find it helpful to hold the bamboo strips down with heavy fishing weights while the glue dries.
Next, use a small paint brush to coat all remaining raw fabric edges with aliphatic glue that has been thinned 50-50 with water. Coat just a 3/16-in. margin of the fabric and it will effectively stop the edges from raveling and yet leave the letter flexible. After the glue is dry, remove the letter from the board and trim off excess thread, rough fabric edges, and any part of the stiffener that extends beyond the edge of the letter. Leave the connector pole extra long for now.
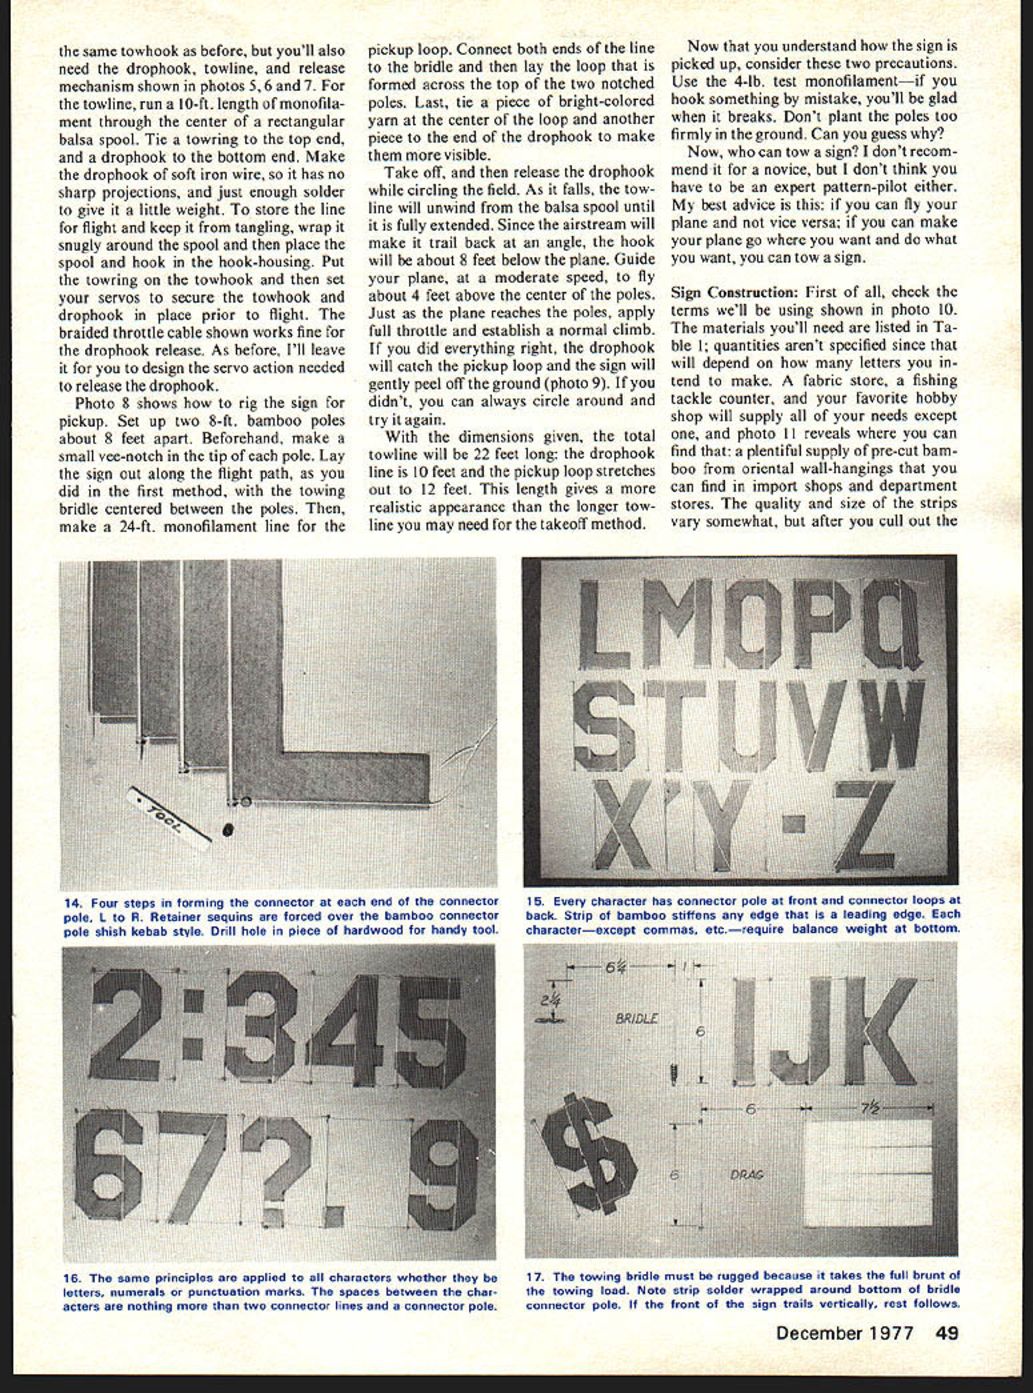
Photo 14 shows the steps in forming the connector at each end of the connector pole. Notice that letters with square front corners must have the fabric cut out slightly in this area. Slip the two sequins in place, leaving 1/16 to 3/32 in. between them. Although the hole in the sequin is small, they can be forced over the bamboo easily, shish kebab style. A scrap of plywood with a hole in it makes a fine tool to push them on with. Then, trim off the bamboo leaving about 1/32 in. projecting to form a good glue joint. Now, glue the sequins in place with epoxy. Be sure to form a complete fillet of epoxy between the bamboo and all sequin surfaces. As you form the inboard fillet, let the epoxy cover the joint between the connector line thread and the connector pole for reinforcement.
The junction of the pole, sequins and thread must be good and strong since the entire towing load is concentrated at this point.
One last step and the letter is finished. Slide a split-shot weight in place (photo 14) and squeeze it on tightly so it is fastened over both the connector line thread and fabric. You'll have to trim the fabric edge back a little to get the weight in the right position.
The shapes of other characters vary from the one illustrated, but the construction principles are the same. Every character has a connector pole at the front and connector loops at the back. A strip of bamboo stiffens every edge that is a leading edge. Every character needs a balance weight. The size of the weight varies with the fabric and the size of the character. Table 2 will give recommended weights for each character size.
Building the letters is the most time-consuming part of the job but the rest of the system is fairly simple.
Figure 1 shows the basic idea. The letters are connected together by loops and connectors into a message which is towed from the back by the drag line. The bridle goes to the tow hook on the plane. The drag line is the main load and the bridle just positions the sign behind the airplane. The connection between the bridle and sign is made with a releasable hook. This makes it possible to drop the sign before landing.
What type plane will work? I've been pleasantly surprised to find RC models can tow a heck of a lot. My own towplane is a conventional high-lift design of 580 sq in powered by a Veco 19 turning a 9x4 prop and it regularly tows signs up to 34 letters long (about 15 ft). It lifts the sign off the ground with no struggle and requires less than full throttle to maintain level flight. I've set a limit of 34 letters to allow a performance safety margin so I can climb slowly if necessary. Signs have also been towed by three other planes my local club used: a 25-powered Quick Stick, a 40-powered Sweet-Stick and a 60-powered Aeromaster. All three slowed down well below full throttle and maintained realistic towing airspeed while circling the field. The Sweet-Stick, however, has to fly a little faster than is desirable to maintain safe control.
So, can you tow a sign and then drop it before landing? Yes. The plane will need a releasable tow hook located on the bottom fuselage near the center of gravity. An EK Logictrol hook does an excellent job. Photo 3 shows a mockup installation. weight, except for the very light ones such as the letter I, the comma and the space. Look over the various photos, especially photos 15 and 16, and you'll see how these principles are applied to the entire alphabet, the numbers and punctuation marks. You'll see too, that a space is nothing but two connector lines and a connector pole.
Making a letter takes little more time than reading about it. But, if making lots of them sounds tedious, lay out the Fig. 1 pattern in ten or more places on a sheet of plywood and you can assembly-line the project, making several at one time.
The simplicity of the drag is shown in photo 17, and the assembly methods are the same. The four fingers, formed by cutting slits in the drag, do a better job of reducing flutter than a solid piece of fabric. Incidentally, I've tried a variety of drag designs, including the U-shaped type used on real signs. Although the one shown doesn't provide scale appearance, it does the best job. Be sure to coat all raw fabric edges with thinned-out glue, and don't put a balance weight on the drag.
The towing bridle, also shown in photo 17, must be rugged because it takes the full brunt of the towing load. Use monofilament for the bridle, rather than thread, and use heavier bamboo or dowel, about 3/32 in. diameter, for the pole. Tie the monofilament to the swivel-snap so the 2 1/2 in. dimension won't change and then tie it to each end of the pole. After that, you can form the connector loops about 1 in. behind the pole. Epoxy the monofilament to the pole and epoxy all knots, too. Wrap 4 inches of 1/8-in. solder around the bottom of the pole for the balance weight. When you get the front of the sign to trail vertically, the rest of the sign is more inclined to do the same.
Now, how many letters, numbers and punctuation marks will you need? Here's an easy way to find your own answer. Plan your first sign to be a message you'll want to tow regularly. Mine read: JOIN THE PALM BEACH SKYHAWKS TODAY. This provides you with the beginning of your letter inventory and lets you start flying as soon as possible. Then, as you invent new messages to tow, build only the additional characters you need. This way, you can build your inventory over a long period of time and yet enjoy towing signs while you're doing it.
My field kit (photo 18) contains 106 characters. It has five each of the most commonly used letters and fewer of the others. The expanding file shown provides handy storage and keeps the letters unwrinkled. Come to think of it, I have 107. The last one is a Santa-in-a-sleigh that I towed at the front of a Merry Christmas sign.
I suggest you keep a written inventory of the characters you have so that each time you plan a message, you can check quickly to see if you have enough A's, N's, T's, etc. to make it. And, if you plan a sign and then find you lack certain letters to complete it, stop and think how a slight rewording might put your idea across with the letters you have.
The Big Day Arrives:
Okay, so now you're ready to try the signs for the first time. Here are some final thoughts and reminders. When you get to the field, you'll find it takes only 15 minutes or so to assemble a full sign. If you decide to make one up the night before flying, you'll be pleased to learn that a complete sign folds neatly into a shoe box with room left for your lunch.
Be sure to keep the signs dry; make sure the grass isn't even damp when you lay it out. All that fabric would soak up moisture like a blotter and you'd never get it off the ground. Using that item for a start, let's make up a checklist of precautions for those first few flights:
- Keep the signs dry.
- Before takeoff, check the sign to be sure all connectors are secure. If the wind flips the sign about, check them again.
- Do your test flying in easy stages: first one word, then two, . . .
- Keep spectators off to the side when you make a pass with the drophook trailing.
- Make all sign lift-offs into the wind and make normal climb-outs.
- During lift-off, keep your eyes and attention only on the plane. Don't worry about the sign—it will follow along; it has no other choice.
- Be prepared to drop the sign if the engine falters, especially during lift-off and climb-out.
- Maintain a performance safety factor by never towing a sign that is so long that you can't climb your plane to altitude.
- Abide by your field safety rules as usual. You'll be tempted to tow the sign right over the crowd, but don't.
The End:
Well, that's how you build 'em and that's how you tow 'em. I hope many of you readers will try it because it's a challenging and yet useful project. Also, you might want to look into the prospects of making this a club project: parcel out the work of making the kit of letters, and then qualify several planes and pilots for towing.
So, with my last 33 letters, I'll close by saying: TRY TOWING YOUR OWN SIGNS—ITSALOTTA FUN. (Let's see now, that takes 5 T's, 2 R's, 2 Y's, 4 O's, . . .)
Photographs for this article were made by Lee Boozer, Jimmy Zeak, Chuck Stevens and Emilio Fuente who, with Bill Lavers, are members of the Palm Beach Skyhawks.
Transcribed from original scans by AI. Minor OCR errors may remain.

