

How to work with Microfilm
By Bud Tenny
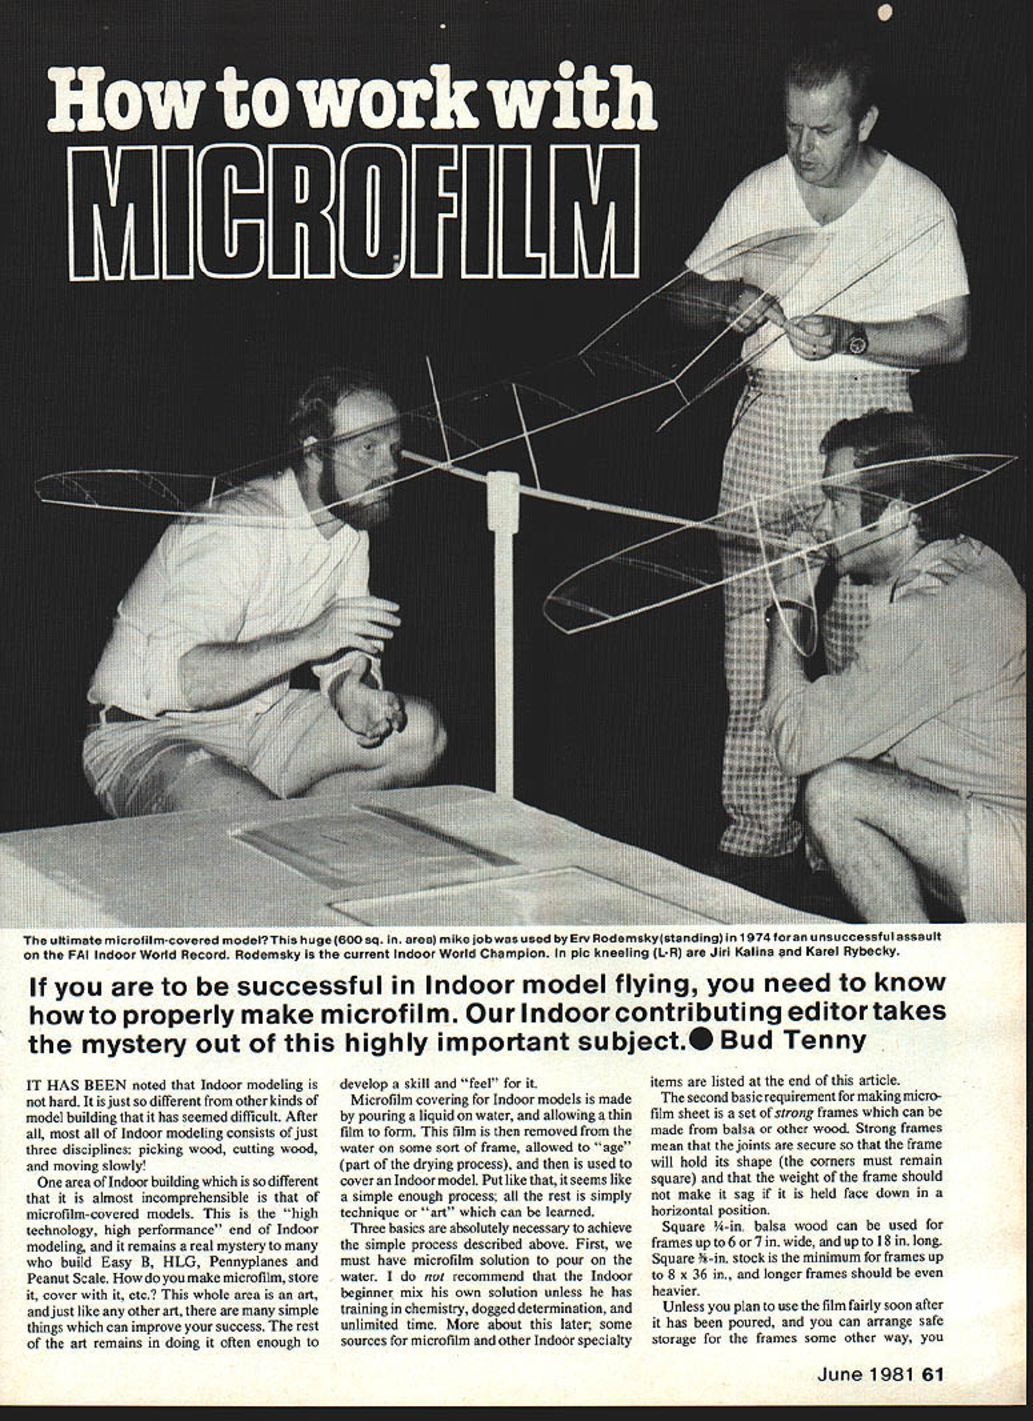
Microfilm-covered models represent the high-technology, high-performance end of indoor modeling. The basic process is simple: pour a liquid microfilm solution on water, allow a thin film to form, pick it up on a frame, let it age, then use it to cover a model. Success, however, depends on good technique, clean conditions, and practice.
Three basics
- Microfilm solution: buy a ready-made solution unless you have chemical training, time, and patience. (Sources are listed at the end.)
- Strong frames: frames must hold their shape and not sag when held face down.
- A microfilm tank: a large, flat box to hold at least 1/2 to 1 in. of water for several hours. Also plan safe storage for finished sheets.
Equipment and setup
Frames
- Use square 1/4-in. balsa for frames up to 6–7 in. wide and 18 in. long.
- Use square 3/8-in. stock for frames up to about 8 x 36 in.; larger frames should be heavier or braced.
- Joints must be secure and corners square to avoid sagging and tearing.
- Clean frames before use: remove fingerprints, oil, grease, or wax with a good solvent, then rinse in distilled water.
Tank and working area
- A very usable tank size is about 3 ft. wide by 6 ft. long. Allow at least 1 ft. clearance between each edge of your largest frame and the tank edge.
- Set up in a well-ventilated area near a drain for easy emptying.
- Use a large heavy-weight plastic drop cloth to line the tank; do not use the plastic for anything else to avoid contamination.
- Protect the plastic from soap and mechanical damage; patch pinholes promptly (vinyl mending tape or patch + contact cement).
- Place a layer of newspaper beneath the tank to detect leaks early (newspaper shows puddles immediately).
- For storage of frames and finished film, have box storage or pin frames to a wall (moving air helps aging, but dust is a risk).
Pouring technique
Preparing to pour
- Allow tank water to equalize to room temperature; water between about 75° and 85°F generally works well. Pour water about 15 minutes before the first pour.
- If solution has been stored, shake it vigorously about an hour before use to release trapped bubbles. Avoid introducing bubbles when filling the pour spout.
- Rinse the pour spout with acetone after each session; collect and discard rinse solvent properly.
Pour spout and orifices
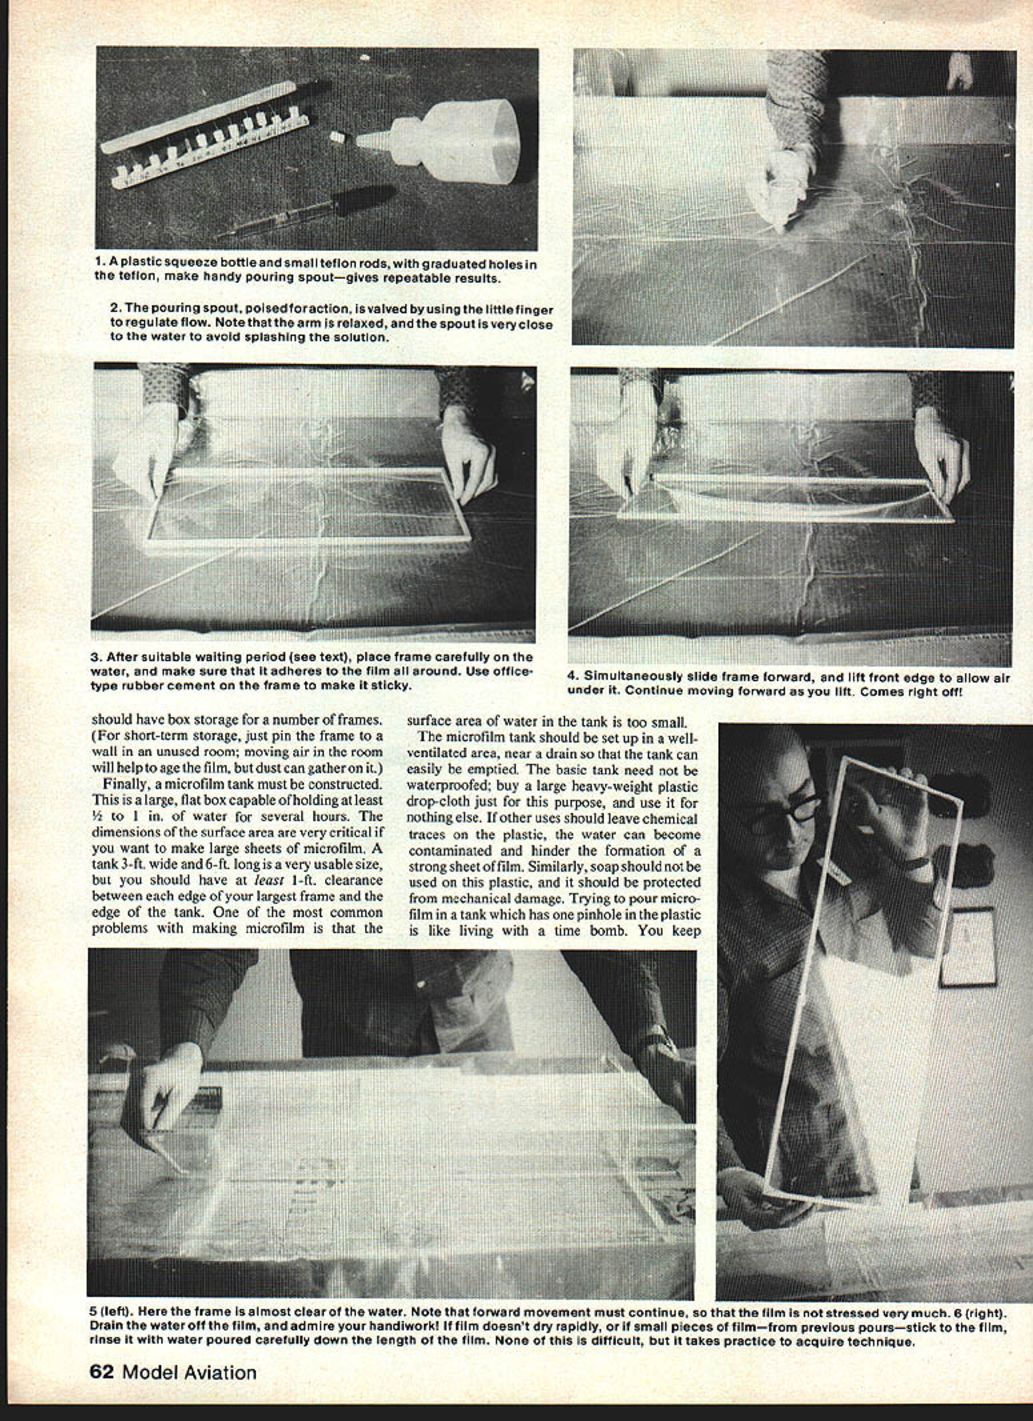
- A good pour spout can be made from the top of a plastic squeeze bottle with interchangeable orifices made from Teflon rod drilled to sizes (machinist's drills #30–#49 are useful). Store orifices on a rack.
- Fill the spout to about 1 in. depth and stopper the orifice with your little finger while positioning. This maintains a near-constant head and steady flow when you release the finger.
The sweep
- Practice with plain water to develop a comfortable, uniform sweeping motion. Keep the arm relaxed and move in a straight line across the tank.
- Start and stop the flow about 8–10 in. from each end of the tank to avoid crowding the edges.
- Pour a thin, even stream close to the water surface (but don't plow the water), so the film spreads evenly.
Picking up, draining, rinsing, and aging
Attaching the frame
- Just before pouring, brush a coat of rubber cement on the frame face that will contact the film on the water; solvents will evaporate by the time you need it.
- After pouring, let the film sit on the water a few minutes (time varies with solution and conditions) until it is ready to adhere.
- Lay the frame flat on the film so corners do not tear the sheet. Check that the frame has adhered all around.
Removing excess and lifting
- Push the frame toward the tank edge in each direction so excess film bunches up; grab and tear off the excess film to avoid leaving small pieces on the water.
- To lift, depress the rear of the frame slightly and raise the front edge to clear the film from the water; push the frame away as you rotate it upward.
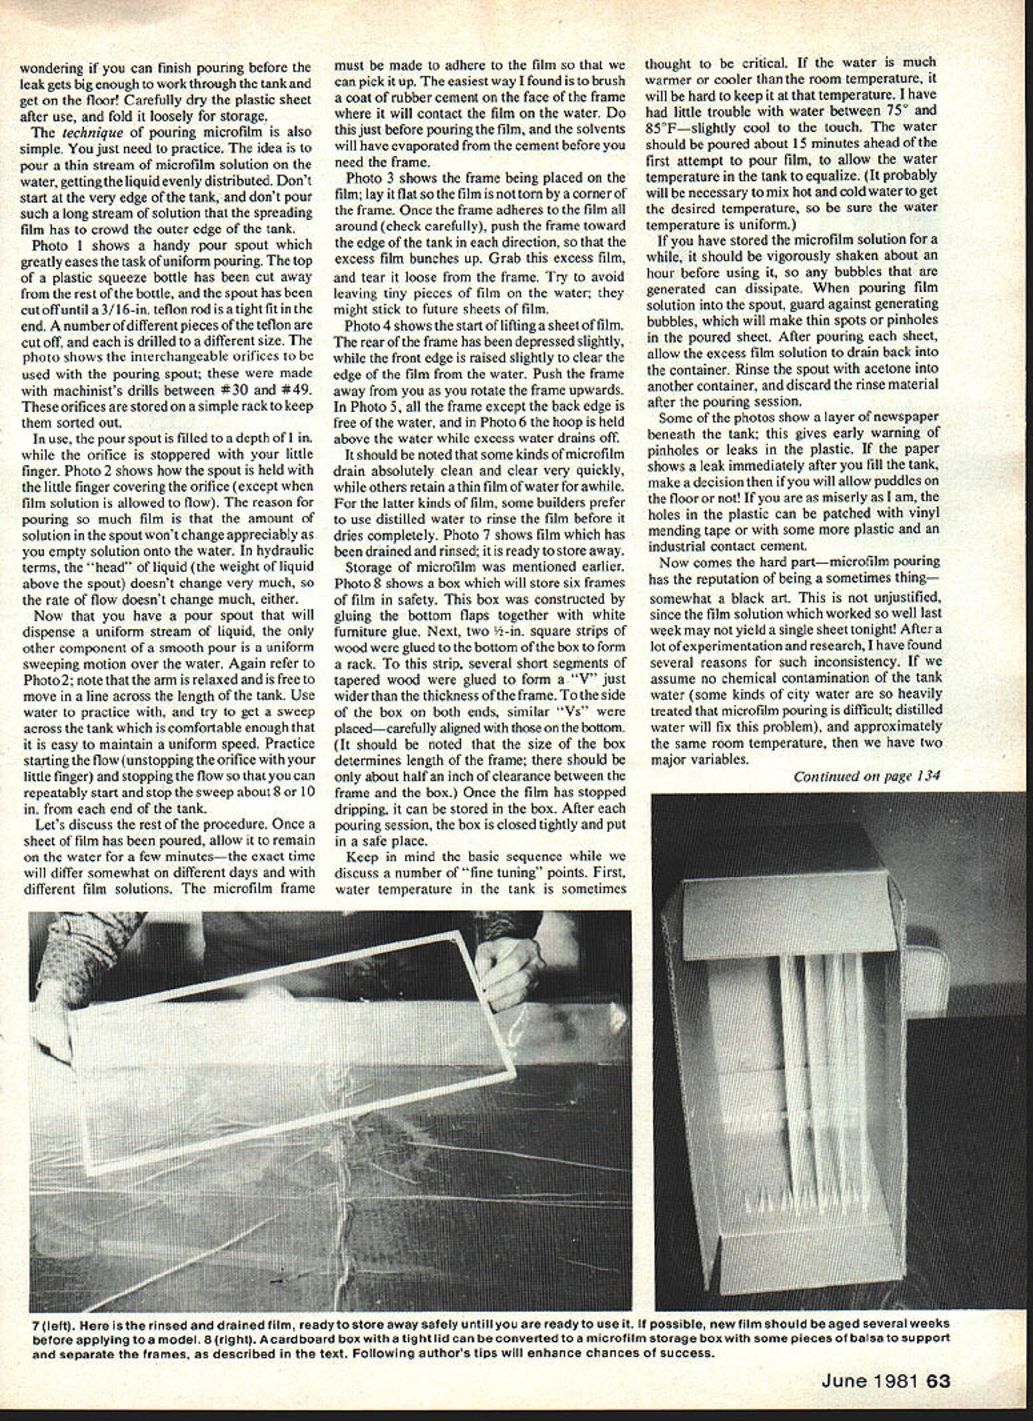
- Allow excess water to drain off. Some films drain very cleanly; others retain a thin water layer and may be rinsed with distilled water before drying.
Storage and aging
- After draining/rinsing, allow sheets to dry slowly on a smooth non-stick surface (glass works well).
- Store finished sheets in a proper box or roll loosely with the face out. If using a box, provide V-shaped supports to hold frames so they do not touch; allow only about 1/2 in. clearance between frame and box.
- Close the storage box tightly and keep it in a safe place until you use the film.
Fine tuning and environmental variables
- Atmospheric pressure is an important variable; keep a barometer and record pressure when a batch works well. Large pressure differences often change results.
- Relative humidity can affect pouring but is generally less critical than pressure. High humidity with rapid solvent evaporation can cause film to blush (cloud) and become weak—try cooler water and wait longer before lifting.
- Keep everything clean: dust, oil, or grease on frames or in the tank will produce holes or weak spots.
- Frame stiffness is critical: if film comes off in ragged strips, the frame likely flexed; use a heavier or braced frame.
Troubleshooting common problems
- No visible color (very pale silver): film may be too thin to lift. Aim to see at least a gold color across the area beneath the frame before lifting.
- Abrupt color changes: pour flow too fast relative to arm sweep or uneven water temperature.
- Pinholes or thin spots: caused by bubbles or splash during pour; ensure solution is bubble-free and pour close to the water.
- Double lines or abrupt changes across a line: solution separation during pour—try re-shaking solution and letting bubbles disperse.
- Film tears while drying on the frame: likely lifted before shrinkage was complete; wait longer before lifting next time.
- Separate panels separated by cracks: poor technique or contaminated/incorrect solution.
Chemistry and mixing your own solution
Microfilm is usually made from nitrocellulose (NC). Mixing your own requires careful technique and recordkeeping.
- 1) NC "speed" (viscosity) matters: very short-chain NC (fast ratings) makes weak, uneven film. Five- to six-second NC is about the lower limit; longer-chain NC makes stronger, tackier film.
- 2) Batch variability: dissolved NC batches can vary. A batch that works well may be hard to duplicate from different suppliers.
- 3) Solvent balance: use a blend of solvents with different evaporation rates (e.g., acetone fast, methyl ethyl ketone medium, amyl acetate slow). The right balance depends on NC grade, water temperature, and atmospheric pressure; finding it requires trial and error.
- 4) Plasticizers: raw NC is brittle; plasticizers are essential to give toughness. Too much plasticizer causes stickiness and dust attraction; some plasticizers can exude out over time.
If you mix your own:
- Use graduated glassware and measure accurately.
- Pour NC into the mixing beaker first, then rinse the NC container with solvents to use all measured material.
- Use a calibrated glass dropper for small amounts.
- Record detailed batch notes: ingredient amounts, percentages, water temperature, air temperature, relative humidity, barometric pressure, frame sizes used, and pouring results.
- Make small test frames (e.g., 6 x 12 in.) to evaluate batches before attempting large sheets.
Tests for film quality
- Static/stick test: free a small triangular flap; some films flip and stick due to static alignment. Repeated folding can build static.
- Strength test: on a small frame, place half a ping-pong ball in the center and record the weight required to rupture the film (compare like colors).
- Stability test: cover a model part (e.g., stabilizer), store it in a box for months, and watch for warps or tightening.
- Sticky test: cover small flat rudders and press film sides together; if they separate easily, film is likely non-sticky (beware static in quick tests).
- Fan aging: pin a small frame to a wall and blow a fan at it; loose, wrinkled film is aging well. If it tightens quickly, it may be unstable.
Safety
- Solvents and nitrocellulose are flammable and some solvents are toxic.
- Work in a well-ventilated area, keep solvents away from open flames, and wear chemical-resistant gloves and eye protection.
- Dispose of solvent rinses and contaminated materials according to local regulations.
Sources
- Aerolite, 36659 Ledgestone, Mt. Clemens, MI 48043.
- Indoor Model Supply, P.O. Box C, Garberville, CA 95440.
- Micro-X Products, P.O. Box 1063-A, Lorain, OH 44055.
Microfilm pouring is not a true "black art." Understand the variables, keep everything clean, record conditions, and practice. With patience you can produce large, strong sheets suitable for covering lightweight indoor models. Happy flying!
Transcribed from original scans by AI. Minor OCR errors may remain.

