
Humm Bug
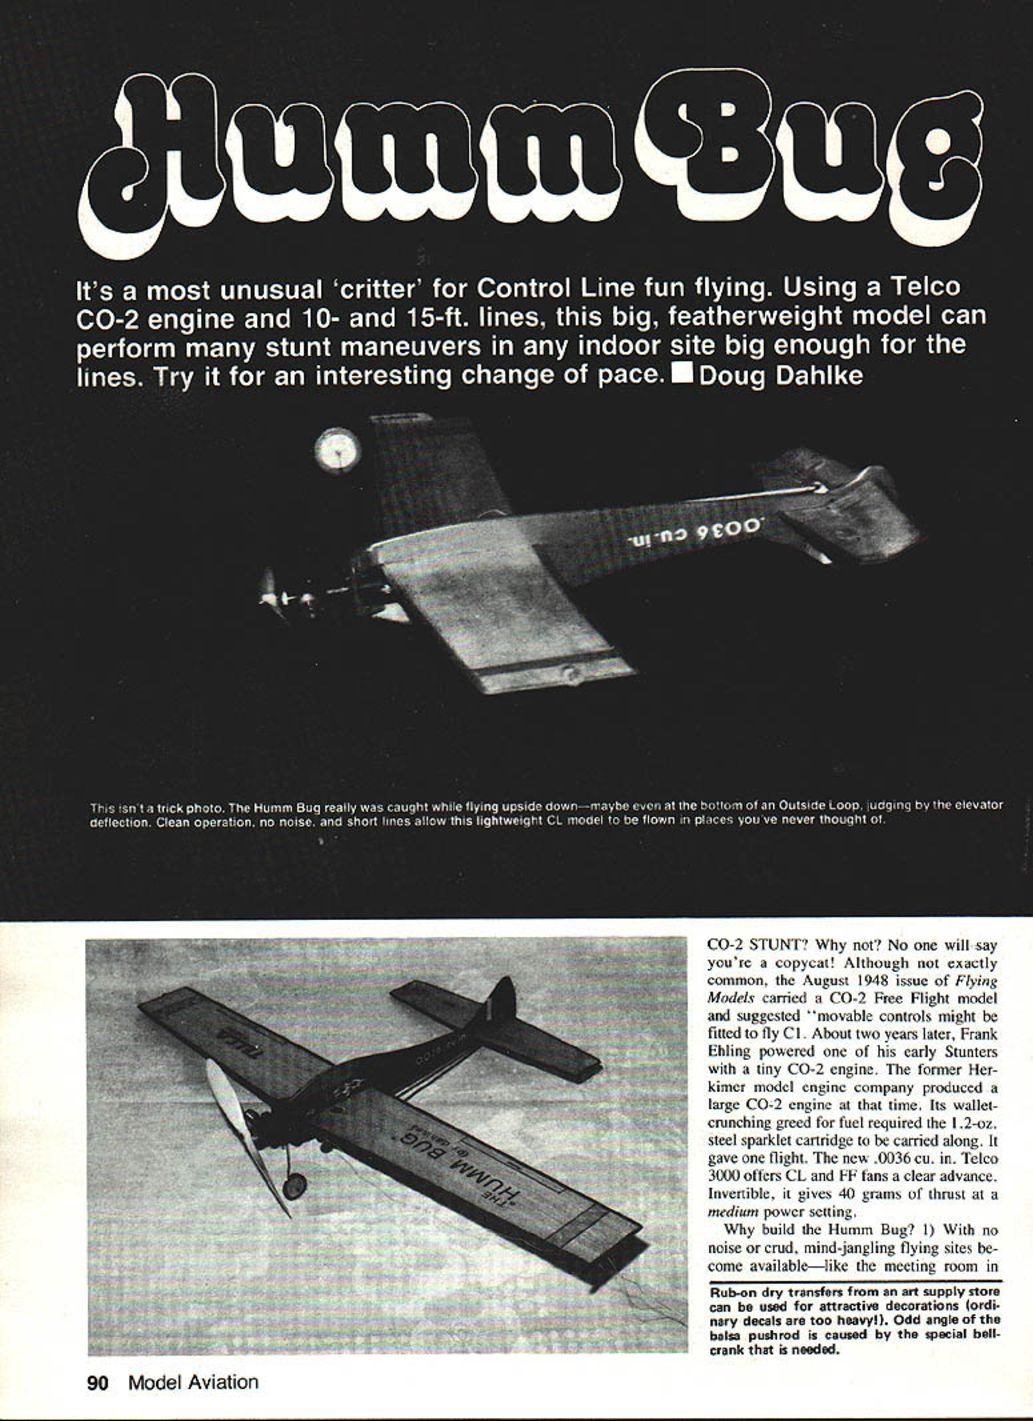
It's a most unusual "critter" for Control Line fun flying. Using a Telco CO-2 engine and 10- and 15-ft. lines, this big, featherweight model can perform many stunt maneuvers in any indoor site big enough for the lines. Try it for an interesting change of pace. — Doug Dahlke
CO-2 stunt? Why not?
No one will say you're a copycat! Although not exactly common, the August 1948 issue of Flying Models carried a CO-2 Free Flight model and suggested movable controls might be fitted to fly C/L. About two years later, Frank Ehling powered one of his early Stunters with a tiny CO-2 engine. The former Herkimer model engine company produced a large CO-2 engine at that time. Its wallet-crunching greed for fuel required the 1.2-oz. steel sparklet cartridge to be carried along. It gave one flight. The new .0036 cu. in. Telco 3000 offers CL and FF fans a clear advance. Invertible, it gives 40 grams of thrust at a medium power setting.
Why build the Humm Bug?
- With no noise or crud, mind-jangling flying sites become available—like the meeting room in your local library after the club adjourns. If there's room, here's the model.
- You can learn much about really building lightweight that will, hopefully, carry over to your larger models.
- This allows us blizzard‑bound balsa builders to keep a hand in flying. You lose a lot of controlling ability over the winter by not flying at all.
- Some indoor modeling folks may have wanted to try Control Line without losing any indoor comfort. Here's their chance.
- Sport fliers will find this a real change of pace.
- It makes an unusually good trainer, as flights can be shortened to less than 10 seconds.
- Mall-type hobby shows are great to attract young beginners by doing a few simple stunts like loops and inverted flight. It was after just such a display that I conceived the Humm Bug.
- I suspect Indoor Combat could be flown with 3/4-in. tissue streamers. Wild!
Realize before you start this model that it is no Jr. Stiletto—nor is it the last word in the genre. It is offered as a starting point. Let's build a Humm Bug. It's a gas!
Construction
A full night of leisure work should produce this model. Use 4- to 6-lb. balsa stock for the fuselage. Remember that 6-lb. stock is 50% heavier than 4-lb., and you are building to a 40-gram thrust level.
If you lack a scale, Model Aviation advertisers will sell you plans for making an accurate one for $3.00. If you're short of time to get a scale "right now," remember this: three standard Daisy steel BBs weigh one gram. Put 81 of these BBs (27 grams) in the smallest plastic bag you have, trim off the excess, and tape it shut. A simple teeter-totter balance can be made using a common yardstick. The balsa must balance the BBs.
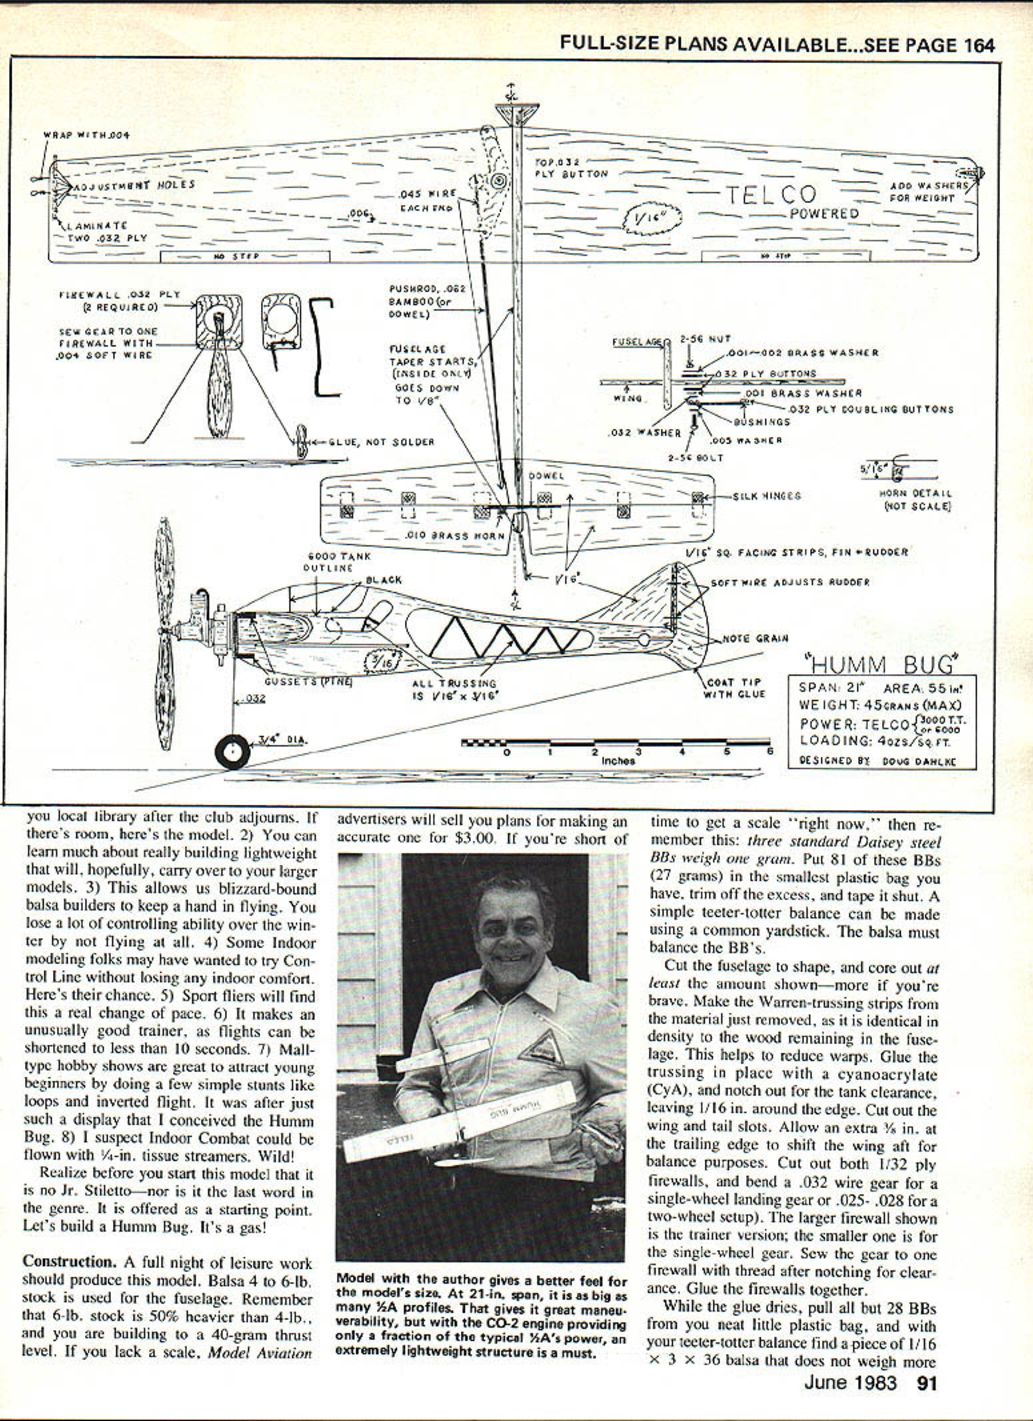
Cut the fuselage to shape, and core out at least the amount shown—more if you're brave. Make the Warren-trussing strips from the material just removed, as it is identical in density to the wood remaining in the fuselage. This helps to reduce warps. Glue the trussing in place with cyanoacrylate (CyA), and notch out for the tank clearance, leaving 1/16 in. around the edge. Cut out the wing and tail slots. Allow an extra 3/16 in. at the trailing edge to shift the wing aft for balance purposes.
Cut out both 1/32 ply firewalls, and bend a .032 wire gear for a single-wheel landing gear or .025–.028 for a two-wheel setup. The larger firewall shown is the trainer version; the smaller one is for the single-wheel gear. Sew the gear to one firewall with thread after notching for clearance. Glue the firewalls together.
While the glue dries, pull out all but 28 BBs from your neat little plastic bag, and with your teeter-totter balance find a piece of 1/16 x 3 x 36 balsa that does not weigh more than nine grams. My sheet was 7.9 grams, giving a 4.9 lb./cu. ft. density. Cut out the wing and tail surfaces from this wood. Round the edges, but don't try to "airfoil" these flat-plate surfaces, as this will only cause a warp. A cotton swab stick is glued in place to connect the elevators. Install the soft-wire rudder hinges and tip-weight box. Epoxy on the firewall with the tiniest dabs possible. Glue in the firewall gussets; when dry, drill the engine-mount holes.
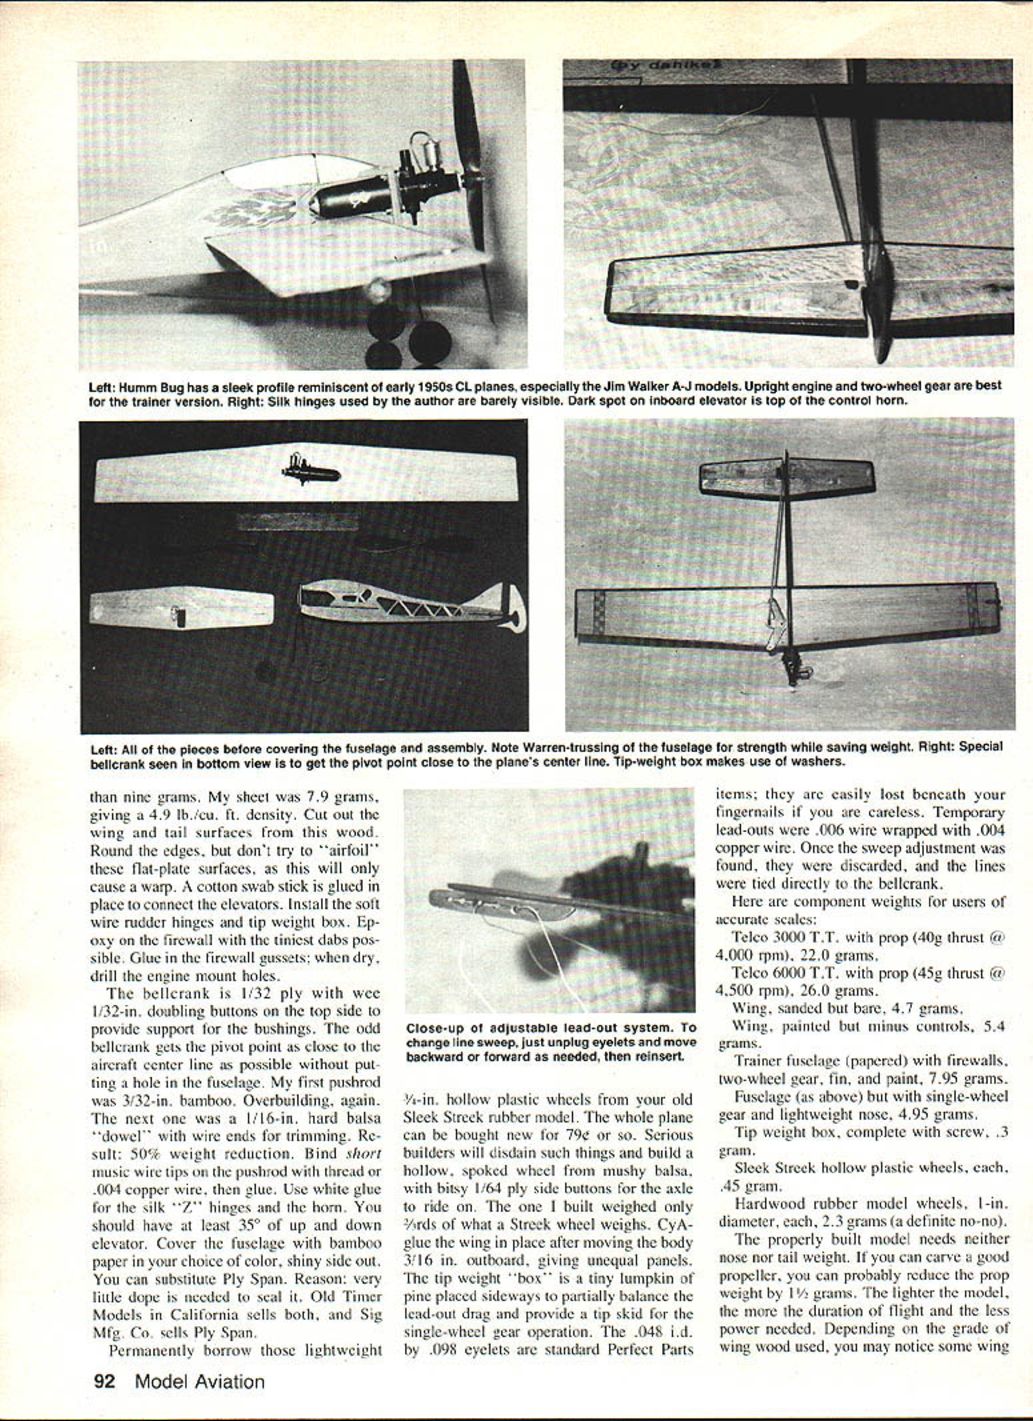
The bellcrank is 1/32 ply with wee 1/32-in. doubling buttons on the top side to provide support for the bushings. The odd bellcrank gets the pivot point as close to the aircraft centerline as possible without putting a hole in the fuselage. My first pushrod was 3/32-in. bamboo—overbuilding, again. The next one was a 1/16-in. hard balsa "dowel" with wire ends for trimming. Result: 50% weight reduction. Bind short music wire tips on the pushrod with thread or .004 copper wire, then glue. Use white glue for the silk "Z" hinges and the horn. You should have at least 35° of up and down elevator.
Cover the fuselage with bamboo paper in your choice of color, shiny side out. You can substitute Ply Span. Reason: very little dope is needed to seal it. Old Timer Models in California sells both, and Sig Mfg. Co. sells Ply Span.
Permanently borrow those lightweight items; they are easily lost beneath your fingernails if you are careless. Temporary lead-outs were .006 wire wrapped with .004 copper wire. Once the sweep adjustment was found, they were discarded, and the lines were tied directly to the bellcrank.
Component weights
Here are component weights for users of accurate scales:
- Telco 3000 T.T. with prop (40 g thrust @ 4,000 rpm): 22.0 grams.
- Telco 6000 T.T. with prop (45 g thrust @ 4,500 rpm): 26.0 grams.
- Wing, sanded but bare: 4.7 grams.
- Wing, painted but minus controls: 5.4 grams.
- Trainer fuselage (papered) with firewalls, two-wheel gear, tissue and paint: 7.95 grams.
- Fuselage (as above) but with single-wheel gear and lightweight nose: 4.95 grams.
- Tip weight box, complete with screw: 0.3 gram.
- Sleek Streak hollow plastic wheels, each: 0.45 gram.
- Hardwood rubber model wheels, 1-in. diameter, each: 2.3 grams (a definite no‑no).
The properly built model needs neither nose nor tail weight. If you can carve a good propeller, you can probably reduce the prop weight by 1½ grams. The lighter the model, the more the duration of flight and the less power needed. Depending on the grade of wing wood used, you may notice some wing flex in flight. I doubt if this affects the flight, but if it bothers you, add .004 copper flying wires on the top and bottom—or V‑braces of 1/32 mushy balsa.
You may have no idea how badly most of us tend to overbuild. My calculator pointed out interesting things to me, like the fact that for a given length, .045 wire has twice the volume, hence twice the weight, of .032 wire. My Ohaus scale told me that the four stock Telco mounting screws weigh a total of one gram. My toolbox produced four replacements of the same length, but thinner; they weighed .42 gram, a 58% reduction. Of course, a single‑wheel gear is half the weight of a standard one for two wheels. During one point in my testing, a friend suggested I try nose weight. Reassemble if needed, but add no weight!
At the current 39.6 grams, I have vertical takeoff capability with a medium power setting. For those who, despite all warnings, have managed to produce an embarrassingly heavy model, I suggest you fit in a Cox .01. At least you will have something to fly for your efforts, although the previously‑mentioned advantages will be lost. Without braces, the .01 engine may shear the wing.
Finish
Brush three separate coats of 50/50 clear nitrate dope/thinner on the fuselage, sanding lightly between coats. Next, spray on three coats of 30/70 nitrate clear/thinner over the whole model, sanding if needed with 600‑grit paper. Yep, 30/70 is correct; you need to keep the weight down. One coat of Aerogloss Bonanza Blue was sprayed on for color. Cockpit lines are India ink applied with a Rapidograph technical pen. The fin flash reflects the Anglo‑Saxon heritage of the Telco.
Flying
Do read Telco's instructions. Operating this engine isn't hard, just a bit different from what you may be used to. It shouldn't take over 60 seconds for the liquid CO‑2 to run down through the tiny inside diameter of the needle into the tank via the also tiny tank inlet. Do not lay the cylinder level or point it downward when you are first puncturing the cartridge; liquid CO‑2 may freeze things open, and the charge will be lost.
The prop I received with the engine had the hole off‑center; check yours. It is a sturdy prop of low pitch, and it should be able to withstand very high rpm safely. Using ready‑made props, my best results were achieved with the prop from a "no‑name" CO‑2 sold by mail a few years ago. It has a diameter of 5½ in. Of course a balsa prop would be best of all, and I doubt that you would break one very often.
One‑pound‑test line will more than withstand a 10‑g load safely—that is if your model weighs 45 grams or less. The "ancients"—who actually used to build models rather than import or cast them—have been known to "build" their flying lines as well. Cloth lines can be stretched out and doped, sanding between coats with 600‑grit; two thin coats of dope is all you need. This reduces line stretch in flight (which is not the problem here), and it also cuts line drag (which never hurts).
I didn't bother with this. My "natural" lines approximately .010 to .015 diameter (ever try to measure cloth lines?) were tried in both 10 and 15‑ft. lengths. The 10‑ft. lines were better.
Be prepared to assist the model just as PAMPA folks do with their big Precision Aerobatics models by occasional whipping during maneuvers. I have gotten seven Inside Loops in one flight before the lines started getting sticky. Inside Square Loops were recognizable, and so was my Triangle. A Lazy Eight and Inverted Flight have also been done. Clearly, other maneuvers are possible. Short lines are the functional equivalent of extra gram‑power, and 40 grams is what you have to work with.
Warning! My girlfriend, apparently cowed by the bark and snarl of the throbbing Telco, failed to snap the prop completely over. Only bumping it against compression resulted in a nice engine run—backwards! Upon release, the Humm Bug responded normally to negative thrust, backing away at a fair pace. Despite this being my first careful clockwise taxi effort, I realized what was wrong and kept full‑down elevator. I'm glad this happened in private!
A couple of times while flying inverted, I ran out of charge, and I landed inverted atop the copper motor feeder tube. At such low flying speeds and low weight, no damage was done. The Humm Bug is quite forgiving.
Humm Bug — Continued
If this happens, your helper can easily catch the model by simply cocking both arms up at the elbow so they are level with the floor and letting the model coast in on their chest.
The model decelerates quickly when power fades, which is typical of lightly‑loaded aircraft. Lightly loaded, low‑powered models may stall easily, but they also recover readily. If more line tension is needed, bend in more rudder, add a .010 to .020 shim behind the engine to give outboard thrust, or alter the line sweep. The crankshaft is the throttle, and it is controlled by turning the flat hex nut just behind the prop. Do not raise or lower the dot more than 15° from the factory setting.
"Sprint" performance, as the factory calls it, will give you 78 grams of thrust—but for a shorter period of time. It would, however, generate the power for more complex vertical maneuvers. Rotating the cylinder 90° outward into sidewinder configuration slightly reduces the required tip weight, and the extra drag of the cylinder is correctly placed. I am not certain that it runs as well in this position, though, and I seemed to have more irregularities in the runs. This may have been due to other causes, and further testing is needed.
Have fun with your Humm Bug.
Transcribed from original scans by AI. Minor OCR errors may remain.

