

Improve Your Work Area
The author suggests two relatively simple and inexpensive things you can do to improve your work/storage area. A little organization can perhaps save you money and reduce lost time hunting for parts.
There are many techniques for organizing a work area. Building projects can quickly clutter a shop; I envied others whose shops were neat and usable. My shop was often cluttered with too many projects and a poor storage system for tools and parts. The aggravation of lost production time searching for missing parts and buying duplicates gave me a strong desire to improve the situation.
The first step for anyone in a similar predicament is to decide that no case is hopeless — otherwise you will never get started. Try to avoid drastic ideas like moving; unless you succeed in organizing the clutter, you'll only move the problem to a new location. Consider the following ideas and other techniques to decide what will work best for you.
Storage bins
My family tried to help by giving me cabinets of 50 or 60 plastic trays. I soon found many parts were too large to fit the trays, and I was too lazy to separate my vast wealth of junk into dozens of tiny categories. I wanted a system that was easier and faster to set up with room for larger items. The best solution was the fold-and-lock cardboard bins used by industrial parts wholesalers and manufacturers.
- Common bin sizes:
- Small: 4 in. wide × 12 in. deep — ideal for wheels, tanks, servos, batteries, drill bits.
- Large: 8 in. wide — will handle props, small tools, and engines.
What made the bins easier to use was generalizing labels instead of listing dozens of parts individually. For example, a bin labeled "Engines" can include the engine, mounts, mufflers, and related hardware. Other useful group categories include:
- Radio
- Small hand tools
- Landing gear / wheels
- Chargers
- Electronics
- Tape
- Props
- Metal / Nylon / Paper (for screws, bolts, fittings, and receipts)
Some items will fit under several labels; just pick the bin that seems naturally correct to you. Use a permanent marking pen that won't smear and self-sticking labels for changeable identification. Leave several bins unmarked for special projects (gathering hardware for your next model or storing parts removed from a crashed model).
Storage units are available in 40- to 80-bin packages. You can order a complete system that includes bolt-together metal shelves or order cardboard bins separately. Units are available from industrial wholesalers such as Grainger (about $50) and from retail office supply stores (about $85). Look for brands like Dayton, Bankers Box, and Safco.
You will still need old kit boxes for extra-long items such as covering materials and balsa. After you set up a reasonable system, take a careful inventory of what you are storing — you may find usable second-hand items and avoid unnecessary purchases. A good storage system can pay for itself in saved time and reduced duplicate purchases.
The parking shelf
To make room for my hobby and to avoid working in a cold garage, I added a "rec" room to my house. Once the room was in use, models on the floor made it feel like an obstacle course. The only clear area was the wall space above the stereo, sewing machine, and desk. The area wasn't high enough to hang models on the wall, but by installing a wide shelf I converted the unused space into a parking ramp.
Hardware stores carry a variety of ready-to-install shelving. If the parking shelf were ordinary size, no extra instructions would be needed. However, this shelf is two to three times deeper than most shelves, so it places two to three times the leverage on the mounting brackets. For safety you must reduce the shelf weight and ensure the mounting system has adequate strength. These suggestions relate to shelves intended for models of about a six-foot span and smaller.
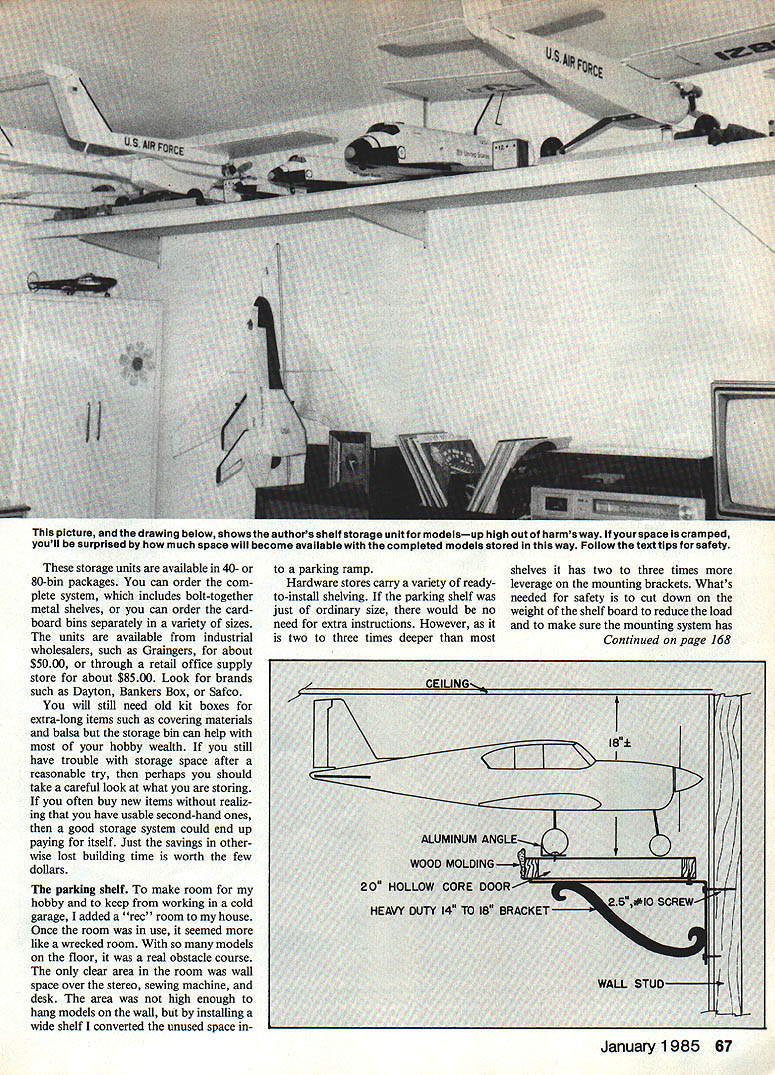
Recommended materials and hardware:
- Shelf material:
- Hollow-core door panel — considerably lighter than plywood or chipboard, already framed inside, and stays flat. A 20 in. door costs about $18 (often on sale for $10).
- Bracket types:
- Gray stamped-metal brackets — inexpensive, moderate strength.
- Scrolled wrought-iron brackets — attractive and stronger; 16 in. bracket is reasonably priced.
- Adjustable steel standard brackets (department-store type) — very strong; do not confuse with aluminum brackets, which may not handle this load.
- Fastening recommendations:
- Select plug-in brackets with a locking screw, or install a screw in the slot above the bracket.
- Space brackets at every other wall stud (about 32 in.) for most installations.
- Mount brackets with screws directly into wall studs — do not rely on plugs or molly bolts alone for this load. Plasterboard can break up under heavy outward pull.
- To locate studs, use a stud finder (or a magnet to locate concealed nails), then probe with a small finishing nail and mark the center point.
- Screw sizes:
- Wrought-iron brackets: 2-1/2 in. #10 pan head.
- Steel standards (countersunk): 3 in. #10 flat head (wood) screw.
- Drill a 1/8 in. pilot hole in the stud to prevent splitting.
The key is how you mount the shelf. The weight places outward pressure on the front screw of the bracket; mounting into studs relieves stress on the plasterboard or paneling and makes the unit as strong as the wall itself.
Assembly and installation tips:
- Assemble the shelf from hollow-core door panels (each door is typically 80 in. long). If you need a shorter length:
- Cut with a fine-tooth blade in a saber saw.
- Break the wood veneer away from the scrap piece, chisel off fragments and glue, and test the fit into the main door opening.
- Glue and nail the joint with 1 in. paneling nails.
- Butt panels together with seams over wax paper to protect the floor. Apply white glue to the 20 in. edge and drive corrugated nails about 1 in. from the front and rear edges; then nail the other side.
- On the front edge, glue and nail a wood trim (3 in. base ranch or feather edge molding) with about 1 in. protruding above the shelf surface to serve as a wheel stop.
- Allow glue to dry with the shelf set flat on the floor.
- I installed the shelf with a 1 in. gap between the shelf and wall to run extension cords to battery chargers and to provide clearance for large models. If more depth is needed, move the shelf out an inch or two and secure with small screws or angle braces.
- Mount the shelf so the top is about 18 in. below the ceiling (roughly door height). This allows many models to rest on landing gear with minimal clearance issues. Large trike-type models will be braced by the ceiling and front trim; taildraggers should have a support behind the CG to raise the tail and 1 in. wheel chocks to prevent rolling.
- For easier access and safety, use a step stool to reach models and the shelf. The step stool also doubles as a handy chair at your workbench.
Layout and use suggestions:
- Alternate high- and low-wing models to maximize shelf capacity.
- Make easy-to-change wheel chocks from 1/2–1 in. aluminum angle stock and secure with small screws; models should be liftable over the chocks.
- Line up chargers and transmitters with each model and run them to an extension cord or power bar.
- Don’t store heavy flight cases on the shelf; keep heavy items on the floor.
I fell into an accidental overload once — someone used a swivel chair to climb up and then did chin-ups on the edge as he fell. It’s nice to know the shelf will survive such mishaps if properly mounted.
I hope these ideas add to the pleasure of working in your shop. They have certainly improved my enjoyment of model building. My next project is a desk and file cabinet so I won't misplace letters.
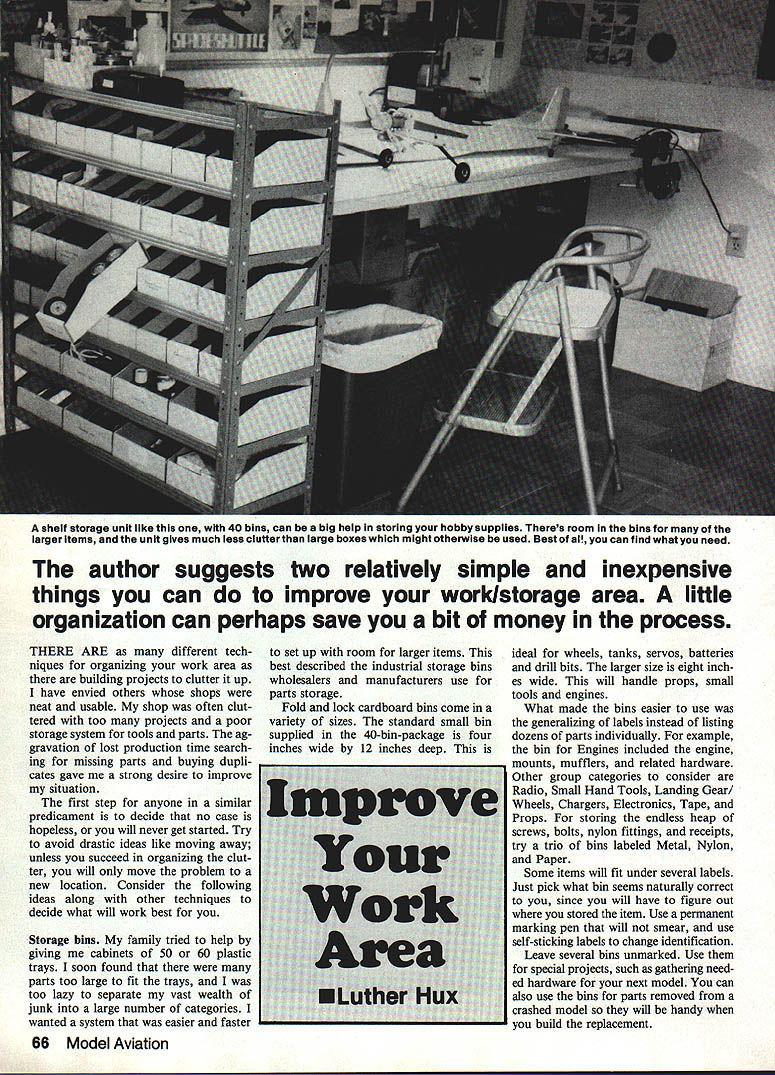
A shelf storage unit with 40 bins can be a big help storing hobby supplies — there's room for bins and larger items, and it creates much less clutter than large boxes. Best of all, you can find what you need.
— Luther Hux
Transcribed from original scans by AI. Minor OCR errors may remain.

