
Improving by Degrees
Handy but inexpensive tools can be made with the aid of full-size patterns presented with this article. Use them to improve your modeling skills. — Larry Kruse
Why small tools help
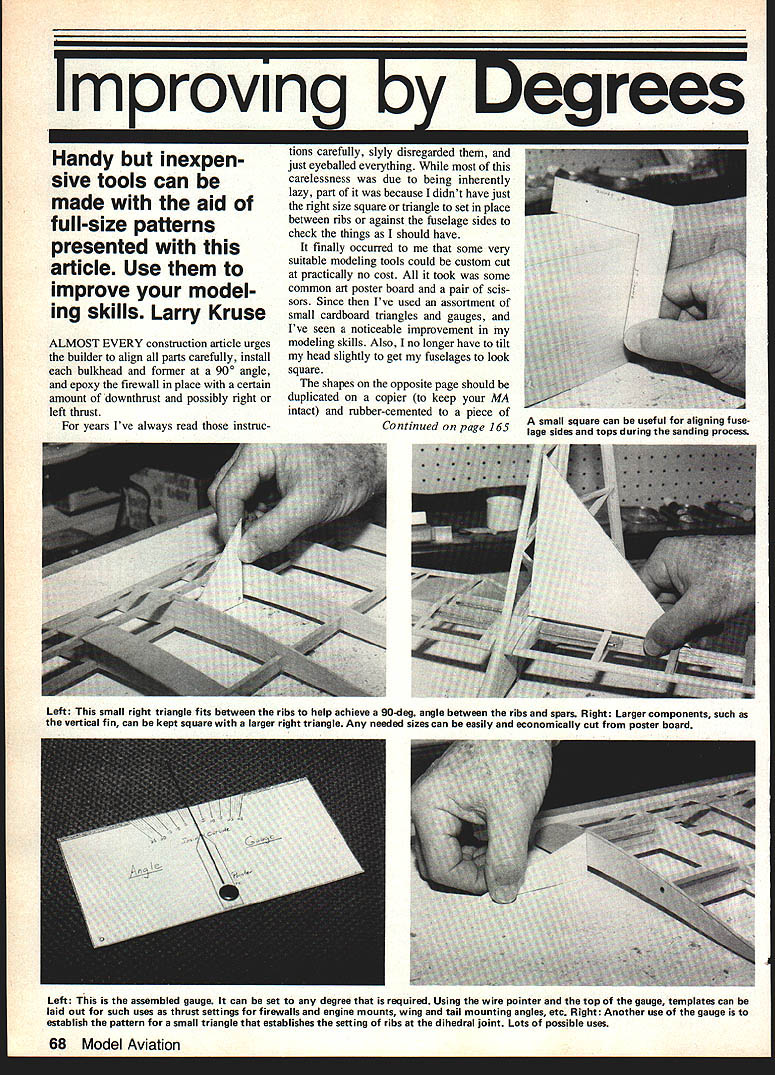
Almost every construction article urges the builder to align all parts carefully, install each bulkhead and former at a 90° angle, and epoxy the firewall in place with a certain amount of downthrust and possibly right or left thrust.
For years I read those instructions carefully, slyly disregarded them, and just eyeballed everything. While most of this carelessness was due to being inherently lazy, part of it was because I didn't have just the right size square or triangle to set in place between ribs or against the fuselage sides to check things as I should have.
It finally occurred to me that very suitable modeling tools could be custom cut at practically no cost. All it took was some common art poster board and a pair of scissors. Since then I've used an assortment of small cardboard triangles and gauges, and I've seen a noticeable improvement in my modeling skills. Also, I no longer have to tilt my head slightly to get my fuselages to look square.
Making the tools
The shapes on the opposite page should be duplicated on a copier (to keep your master intact) and rubber-cemented to a piece of poster board. Poster patterns should be rubber-cemented to poster board before they're cut out. A coat of rubber cement on both the poster board and the paper will keep the paper firmly attached.
The angle gauge can be fastened together with a punched-hanger fastener. The pointer should have a 4-inch length of .032 music wire glued to it. Templates for various needs are provided and can be made from this gauge. For example, if you need a firewall positioned at 3° downthrust relative to the centerline of the fuselage, set the pointer at 3° and draw lines along the pointer wire to the top of the gauge and then along the top of the gauge from the pointer wire outward. The template can then be cut along these two lines and used as a guide for mounting the firewall.
Several other variations on this theme are possible, of course, depending on your imagination and specific needs. Hopefully these small implements will help you become a more accurate — and consequently better — builder of model aircraft.
Covering and finishing
- Cover the center section and outside panels of the wing separately.
- Shrink the tissue by misting it lightly with water from an atomizer or by dabbing it with alcohol and a cotton ball.
- Pin the parts, except the fuselage, to your building board until dry. Use wax paper or Saran Wrap between the surfaces and the building board, or they'll glue themselves to each other.
- Thin the dope 50/50 and give everything two even coats. When dry, you can add some contrasting tissue trim or leave it plain.
- Glue on the acetate windshield and windows with a model airplane cement such as Ambroid or Duco.
- Attach the wheels by bending right angles in the ends of the axles or epoxying on a paper washer.
Assembly
- Using a pin, pierce the rudder and fin to accept the soft wire hinges. Wire from a twist-tie works well. Insert the wires and give them a dab of glue.
- Glue the rudder to the top of the stabilizer, making sure it is square. Use Duco, Ambroid, or a cyanoacrylate (CyA) glue because water-based glues won't hold the doped parts as well.
- Glue the tail surfaces and wing to the fuselage.
- A thin trim tab is attached to the trailing edge of the left wing in the same way the rudder was attached to the fin. Cut the trim tab from a piece of 1/16" balsa, and sand it down to about 1/32".
Now, take a few minutes to admire your handiwork.
Flying and trimming
Flying is the best part. Finished Tutors have weighed as little as 7 grams and as much as 15 grams; all have flown well. The plane is designed for a gym with a 25-ft. ceiling, but it also flies well outdoors. The heavier versions are less bothered by wind outdoors and aren't significantly handicapped indoors.
Trimming is simple. Follow these steps:
- Balance the model by adding bits of clay to the tail or nose until the plane sits perfectly level when pivoted on the spar. Do this with the rubber motor installed — loosely wound so it doesn't bunch up in the front or back. Keep the prop from unwinding with a pin in the nose block.
- Tie the rubber motor loop with a square knot, put a dab of CyA on the knot, then work some commercial rubber lube (or liquid soap) into the rubber.
- A rubber winder makes life simpler. Bend about 1/16" of left rudder into the tail, then put in about 20 turns with a 1:6.1 winder (about 300–350 hand winds).
- Launch level with a gentle shove after releasing the prop a split second earlier. Carefully observe the flight.
If the circle is too large, tighten it by shimming the nose to the left with balsa or thick paper about 1/32" at a time. If the plane climbs abruptly but then stalls, add downthrust in the same manner until the climb becomes even. If you have the circle size you want but the plane tends to spiral in, depress the wing a little until you achieve a flat turn.
Flights will be around 20–25 seconds. One of our kids got a 15-gram model (with a motor tied from several worn-out, broken ones) to fly 48 seconds with 35 turns on the winder.
Final thoughts
In retrospect there seems to have been an awful lot of instruction and philosophy for such a simple model. If you've never built a model before, you still might have questions. If you're an expert or experienced modeler, project yourself into a teaching situation and it should make sense. If you want to test the validity of all this, walk into a roomful of inexperienced modelers with a $3.00 kit under your arm and show them how to build and fly it.
Usually there is an undercurrent of tongue-in-cheek humor in what I write, but not so this time. This is serious, as you'll learn when you see the look on a child's face as his first model cruises magically near the beams in his school's gym.
Transcribed from original scans by AI. Minor OCR errors may remain.

