
IRON DOG
Kent E. Thomas
FOR THE P-39 Airacobra, "The Iron Dog" was not a complimentary name for such a clean, beautifully proportioned airplane. This sleek, streamlined shape, the absence of cheek cowls or large airscoops, makes it a good subject for a quarter-midget racer. The full-scale plane was raced with great success just after WW II, so it does qualify as an eligible design.
As a quarter-midget racer, it has been in development for about three years and for the past 24 months has brought home more trophies than any other quarter midget in Southern California.
To Start: I always choose the lightest wood I can find. A light airplane, as close to 2½ lbs. as possible, is desirable. Strength has been no problem. I use aliphatic resin glue and five-minute epoxy for all construction, except gluing wing sheeting together and sheeting the wing. Zap or Hot Stuff will speed up fuselage construction if you are pressed for time.
Fuselage: Lay out and cut identical right and left sides on 1/8" balsa. Firmly mark L.E. and T.E. formers, firewall, and thrustline locations on inside of each. Glue on 1/2" triangles, 1/8" wing saddle doublers, and 1/8" nose doublers. While this is drying, cut out 3/16" balsa L.E. and T.E. formers and 1/8" plywood firewall. Mark vertical centerline on all three and also mark thrust line on firewall. I usually mark front and rear of all the above. Cut out L.E. former for tank cradle and epoxy 1/16" plywood doubler across the bottom to support wing dowels. Tank cradle is cut so centerline of tank is 1/4" below thrust line. I use a 4-ounce slant Sullivan tank. Using the centerlines previously drawn on the firewall, locate Tatone mount, drill holes and insert 6-32 blind nuts. Mount the Tatone mount with 6-32 screws. Bend 1/8" music wire for nose gear. Drill firewall below Tatone mount and J-bolt the nose gear to the firewall.
I do not use a steerable nose gear. Takeoffs are started from full throttle and rudder steering is very positive without creating an over-control. The plane is usually ahead of the pack going into the #1 pylon after takeoff due to superior ground handling (even though you have to go and get the plane after landing, the advantage more than offsets this).
Draw a centerline end to end on the 3/16" x 3" balsa fuselage top. Do this on both sides. Pin top to a flat surface and accurately mark position of firewall, L.E., and T.E. formers. Epoxy L.E. and T.E. formers to tops using an L-square for accurate alignment. Lay out the sides and, using an X-acto saw, make about four cuts through the 1/2" triangle just behind T.E. former top and bottom. Also make about six cuts just ahead of the L.E. former top and bottom. These cuts allow the fuselage sides to bend around the formers. Epoxy sides together, tail post being certain square will create twist. Fuselage sides glued to top usually, pinning sides to T.E. former lining marks. Pull rear together over centerline, pin and epoxy. Now about ready to put parts together. Get out at least one large C-clamp large enough to use across the width of the fuselage, scrap pieces of plywood, glue and pins. Before proceeding, try fuselage sides for proper fit and alignment with formers. Using a liberal amount of glue thinned with water if necessary, glue and pin fuselage sides to top formers. Using C-clamps padded with scrap plywood, pull sides ahead leading edge until pressing against firewall. Make sure sides and firewall are coated with glue and pressed back against nose doublers. Be sure no down- or up-thrust is built in. By sighting down along the Tatone mount and aligning centerline top, you can assure no side-thrust is being built. Be sure centerline firewall is aligned with centerline top; everything lined up, pin solid, double check and leave overnight to dry. Use aliphatic glue as it allows working time for alignment. Using care, the fuselage will come out straight and true. We'll come back... Tail: Cut out stabilizer, fin, rudder, and elevator from 3/16" balsa. Complete elevator: R and L is cut in one piece, marking but not cutting out, Vee in the center. With a razor-plane and sandpaper, taper rudder and elevator to shape. At the L.E. of the elevator, cut a 3/16" by 3" notch. Epoxy 3/16" square hardwood in notch. When epoxy has cured, cut out Vee to separate R and L elevator. This assures alignment of elevators.
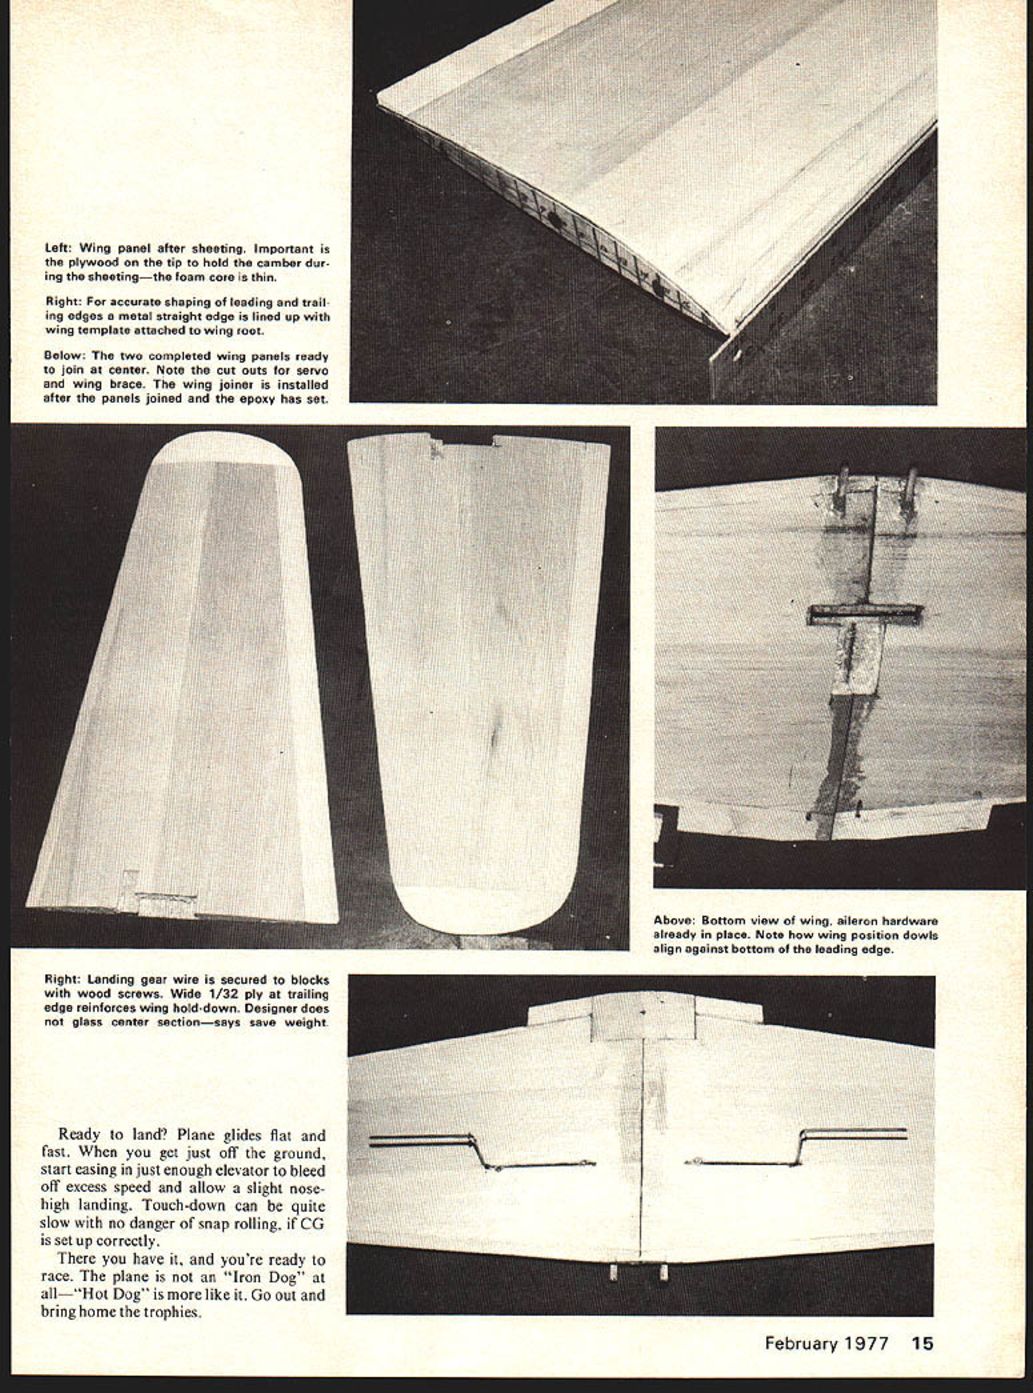
Wing: Cut core in a conventional manner with no washout. When a core is cut as thin as this one, a great amount of care is necessary to prevent warps and twists being built in during the skinning process. The core at the tip is about 1/8" thick and almost transparent. You say you can't cut foam wings? Buy a Jack Stafford P-51 quarter-midget wing kit. Then proceed as follows. First, epoxy in landing gear boards as marked on plan, then cut 1/2" off at L.E. of core for balsa L.E. and 1" off at T.E. for balsa T.E. With top part of foam block secured to a flat table and core pinned to block, epoxy 1/32" plywood to tip. Use wax paper so plywood won't adhere to block. When epoxy has cured, insert a row of pins next to the plywood, pinning core tip to block. Angle-pin root to core. All other pins will be removed. Core should be in exact spot it was cut from block.
Using model cement, glue your 1/16" balsa sheeting together before skinning the wing. Using any one of the available adhesives, glue sheeting to core. Place other half of block on top of section just sheeted and weight down while you work on the other panel. When both panels are sheeted on one side (sheet the bottom first), remove from block and trim sheeting. Nail the other half of block to the table, pin core down as before, and sheet second side. Weight as before. Remove later and trim. Pin cores back on to blocks and glue leading and trailing edge balsa to core using epoxy or aliphatic glue. When glue is dry, remove cores from the blocks, cut off 1/32" plywood from tips, trim tips to end of sheeting. Match the lengths of R and L panels by trimming tips.
Reinstall templates used in cutting cores and mark center of leading and trailing edges at both ends. Use straightedge and draw a line root to tip on L.E. and T.E. Get out the trusty razor-plane and rough shape using reference lines just drawn as a guide. Starting to look like a wing, isn't it? Finally, glue on tip block, plane and sand to top and bottom curve. Cut rounded...
Iron Dog
tips with knife and sand tips to final shape.
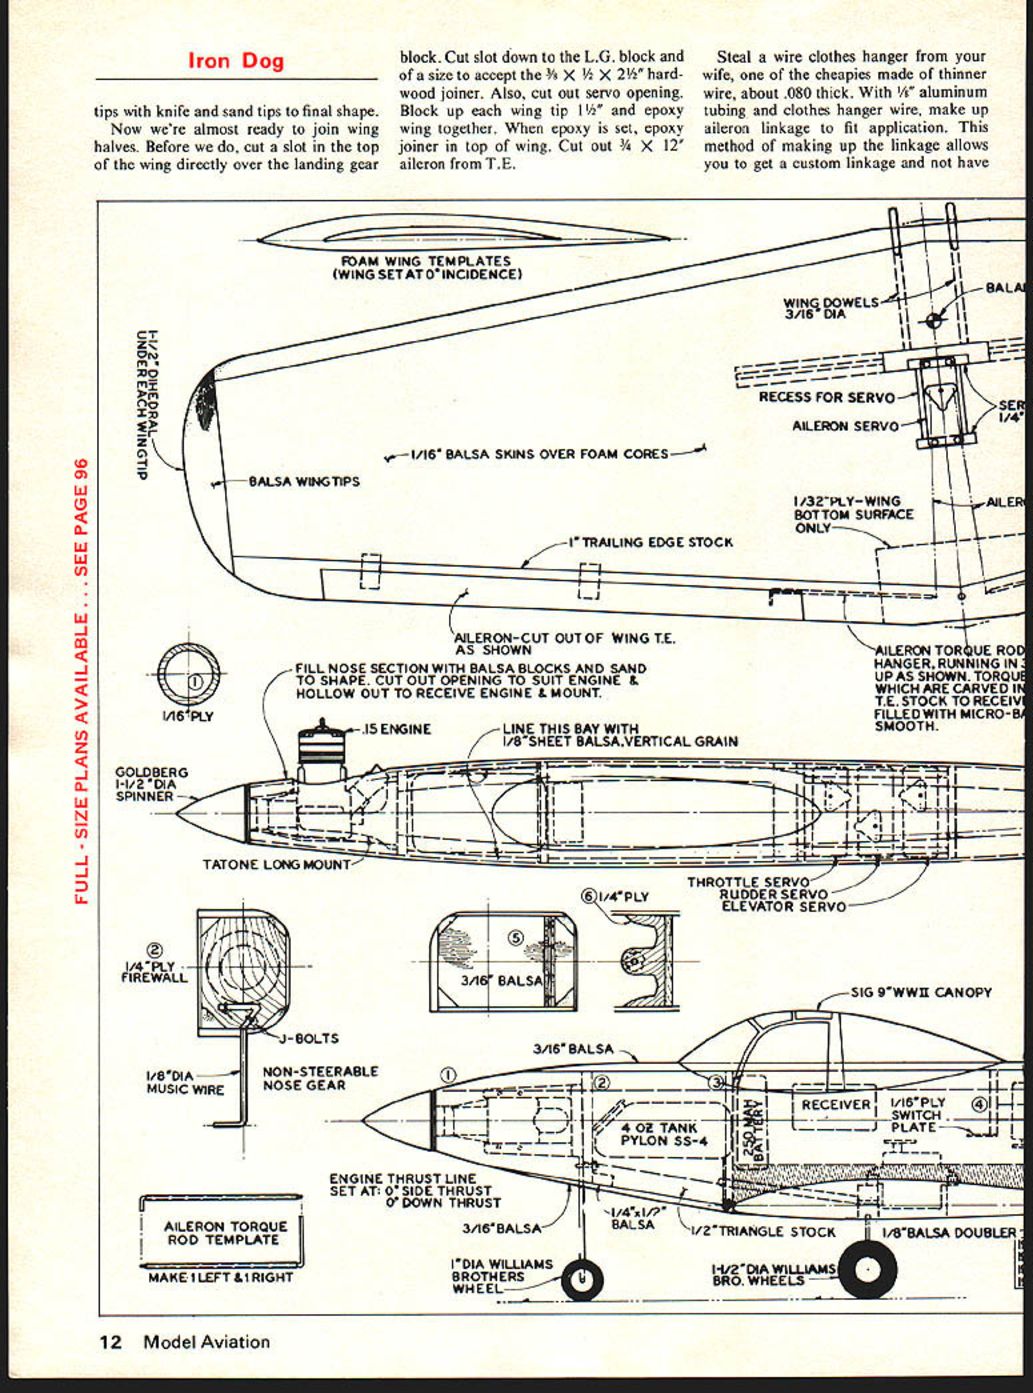
Now we're almost ready to join wing halves. Before we do, cut a slot in the top of the wing directly over the landing gear block. Cut slot down to the L.G. block and of a size to accept the 3/8" x 1/2" x 2-1/4" hardwood joiner. Also cut out servo opening. Block up each wing tip 1-1/2" and epoxy wing together. When epoxy is set, epoxy joiner in top of wing. Cut out 3/4" x 12" aileron from T.E.
Steal a wire clothes hanger from your wife, one of the cheapies made of thinner wire, about .080" thick. With 1/8" aluminum tubing and clothes hanger wire, make up aileron linkage to fit application. This method of making up the linkage allows you to get a custom linkage and not have
Start: always choose the lightest wood you can find. A light airplane — close to 2 lbs. possible — is desirable. Strength is no problem; use aliphatic resin glue or five-minute epoxy in construction except when gluing wing sheeting together. Sheeting the wing with Zap Hot Stuff will speed up fuselage construction when pressed for time.
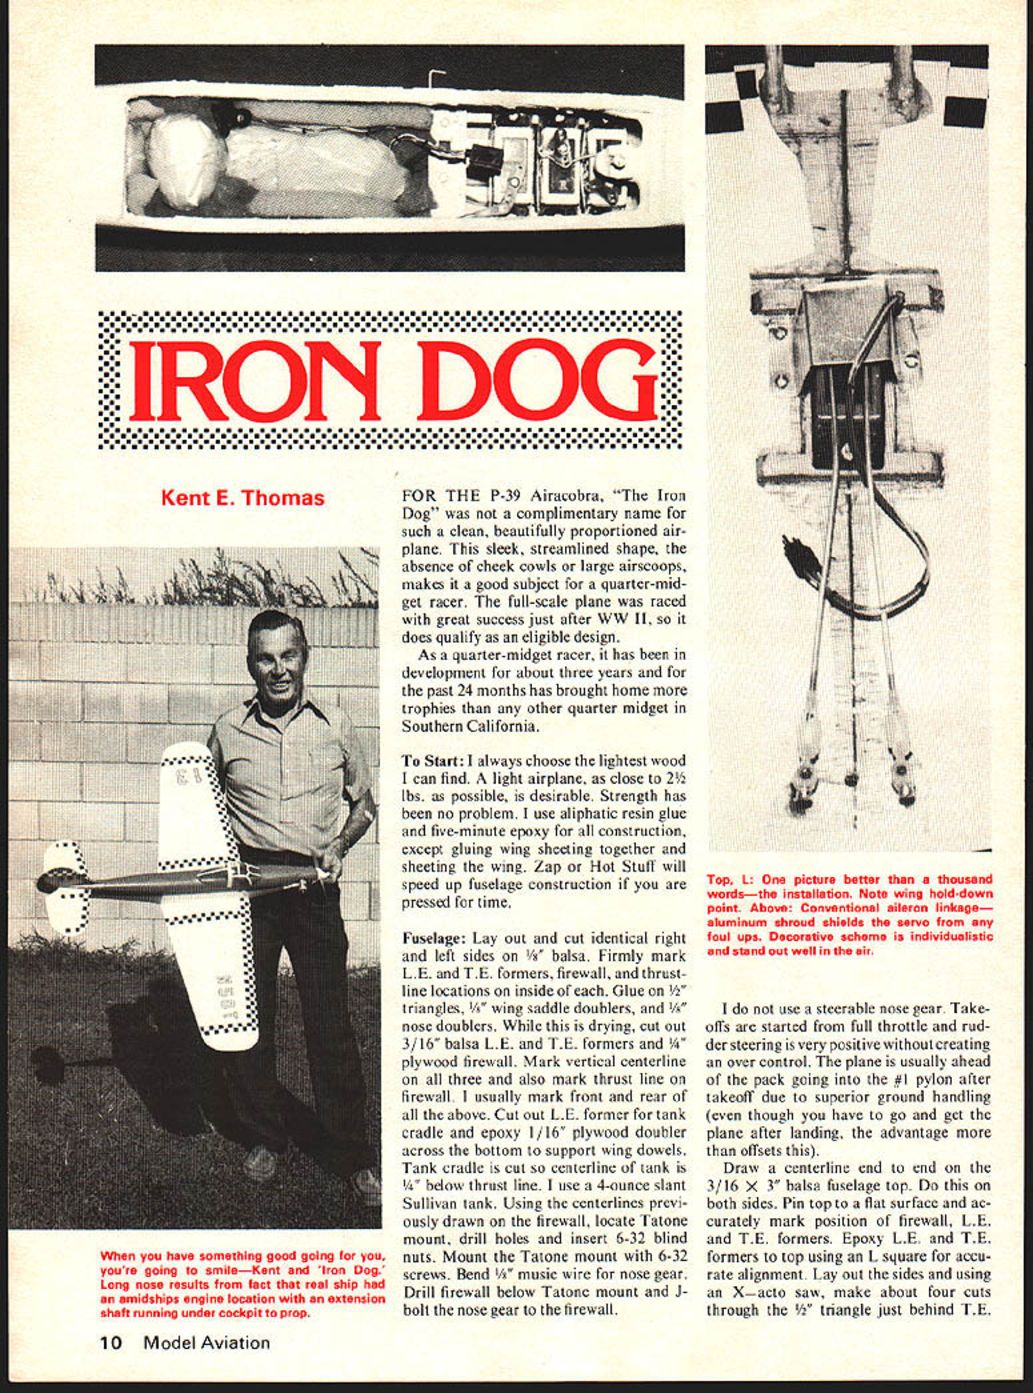
Fuselage. Lay out and cut identical right and left sides from 1/8" balsa. Firmly mark L.E., T.E., formers, firewall and thrustline locations inside. Glue 1/2" triangle 1/8" wing saddle doublers and 1/8" nose doublers. While drying, cut out 3/16" balsa L.E. and T.E. formers and wood firewall. Mark vertical centerline, then also mark thrust line on firewall (usually mark front and rear above). Cut out L.E. former tank cradle. Epoxy 1/16" plywood doubler across bottom to support wing dowels. Tank cradle: cut centerline; set tank with thrust line; use 4-ounce slant Sullivan tank. Using centerlines previously drawn on firewall, locate Tatone mount, drill holes and insert 6-32 blind nuts. Mount Tatone mount with 6-32 screws. Bend 1/8" music wire nose gear. Drill firewall below Tatone mount for J-bolt nose gear firewall. Top picture better than a thousand words — the installation. Note wing hold-down point.
Above: Conventional aileron linkage. Aluminum shroud shields servo foul-ups. Decorative scheme is individualistic — stand out well in air. Use steerable nose gear. Takeoffs: start full throttle; rudder steering very positive, creating over-control. Plane usually ahead of pack going to #1 pylon after takeoff due to superior ground handling, though you have to go get the plane after landing; advantage offsets.
Draw centerline end-to-end on 3/16" x 3" balsa fuselage top on both sides. Pin top on flat surface and accurately mark position of firewall, L.E. and T.E. formers. Epoxy L.E. and T.E. formers to top using an L-square for accurate alignment. Lay out sides using X-Acto saw; make about four cuts through 1/2" triangle just behind L.E. Cut through triangle's top and bottom. Also make about six cuts just ahead of L.E. former top and bottom; these cuts allow fuselage sides to bend around formers. Epoxy sides together at tail post, being certain square — a twist will be created if not. Fuselage sides glued to top, usually pinning sides to T.E. former lining marks on sides; former pulls rear together over centerline; pin and epoxy.
Now about ready to put parts together. Get out at least one large C-clamp large enough to use across width of fuselage, scrap pieces of plywood and glue pins. Before proceeding, try fuselage sides for proper fit and alignment with formers. Using liberal amount of glue (thin where necessary), glue and pin fuselage sides to top formers. Using C-clamps padded with scrap plywood, pull sides ahead along leading edge until pressing against firewall. With sides and firewall coated with glue, press back against nose doublers and be sure no down- or up-thrust is being built. Sighting down along the Tatone mount and aligning centerline top can assure no side-thrust is being built. Be sure centerline of firewall is aligned with centerline of top; everything lined up, pin solid, double-check and leave overnight to dry. Use aliphatic glue where you want working time for alignment. With care the fuselage will come out straight and true.
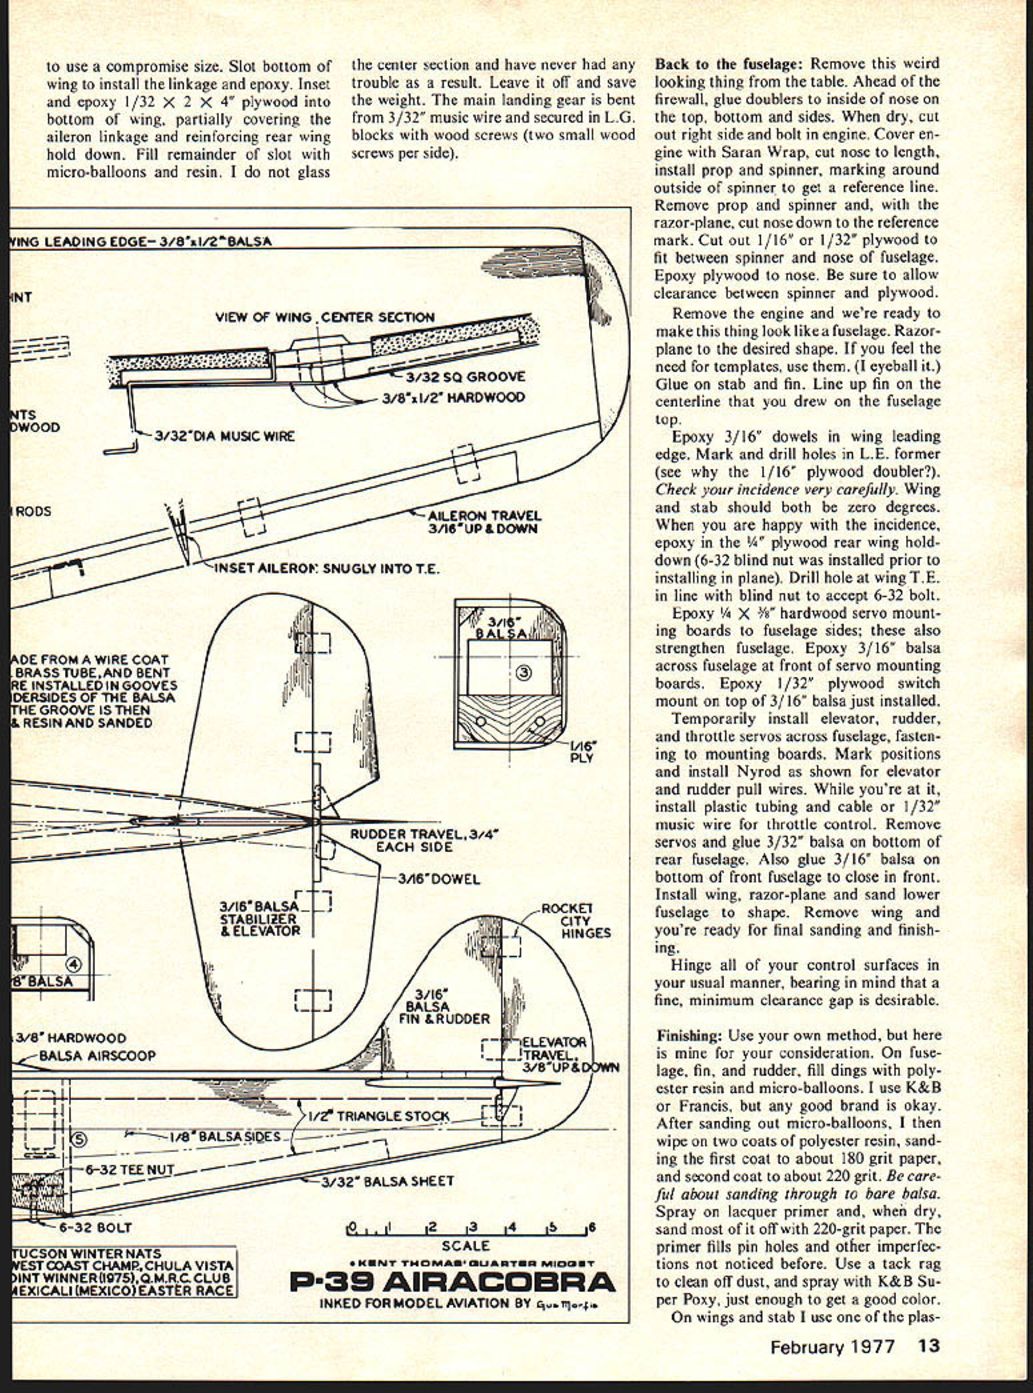
Well come back f to use a compromise size. Slot bottom of wing to install the linkage and epoxy. Inset and epoxy 1/32" x 2 x 4" plywood into bottom of wing, partially covering the aileron linkage and reinforcing rear wing hold down. Fill remainder of slot with micro-balloons and resin. I do not glass the center section and have never had any trouble as a result. Leave it off and save the weight. The main landing gear is bent from 3/32" music wire and secured in L.G. blocks with wood screws (two small wood screws per side).
Back to the fuselage: Remove this weird looking thing from the table. Ahead of the firewall, glue doublers to inside of nose on the top, bottom and sides. When dry, cut out right side and bolt in engine. Cover engine with Saran Wrap, cut nose to length, install prop and spinner, marking around outside of spinner to get a reference line. Remove prop and spinner and, with the razor-plane, cut nose down to the reference mark. Cut out 1/16" or 1/32" plywood to fit between spinner and nose of fuselage. Epoxy plywood to nose. Be sure to allow clearance between spinner and plywood.
Remove the engine and we're ready to make this thing look like a fuselage. Razor-plane to the desired shape. If you feel the need for templates, use them. (I eyeball it.) Glue on stab and fin. Line up fin on the centerline that you drew on the fuselage top.
Epoxy 3/16" dowels in wing leading edge. Mark and drill holes in L.E. former (see why the 1/16" plywood doubler?). Check your incidence very carefully. Wing and stab should both be zero degrees. When you are happy with the incidence, epoxy in the 1/4" plywood rear wing hold-down (6-32 blind nut was installed prior to installing in plane). Drill hole at wing T.E. in line with blind nut to accept 6-32 bolt.
Epoxy 1/4" x 3/8" hardwood servo mounting boards to fuselage sides; these also strengthen fuselage. Epoxy 3/16" balsa across fuselage at front of servo mounting boards. Epoxy 1/32" plywood switch mount on top of 3/16" balsa just installed.
Temporarily install elevator, rudder, and throttle servos across fuselage, fastening to mounting boards. Mark positions and install Nyrod as shown for elevator and rudder pull wires. While you're at it, install plastic tubing and cable or 1/32" music wire for throttle control. Remove servos and glue 3/32" balsa on bottom of rear fuselage. Also glue 3/16" balsa on bottom of front fuselage to close in front. Install wing, razor-plane and sand lower fuselage to shape. Remove wing and you're ready for final sanding and finishing.
Hinge all of your control surfaces in your usual manner, bearing in mind that a fine, minimum clearance gap is desirable.
Finishing: Use your own method, but here is mine for your consideration. On fuselage, fin, and rudder, fill dings with polyester resin and micro-balloons. I use K&B or Francis, but any good brand is okay. After sanding out micro-balloons, I then wipe on two coats of polyester resin, sanding the first coat to about 180 grit paper, and second coat to about 220 grit. Be careful about sanding through to bare balsa. Spray on lacquer primer and, when dry, sand most of it off with 220-grit paper. The primer fills pin holes and other imperfections not noticed before. Use a tack rag to clean off dust, and spray with K&B Super Poxy, just enough to get a good color.
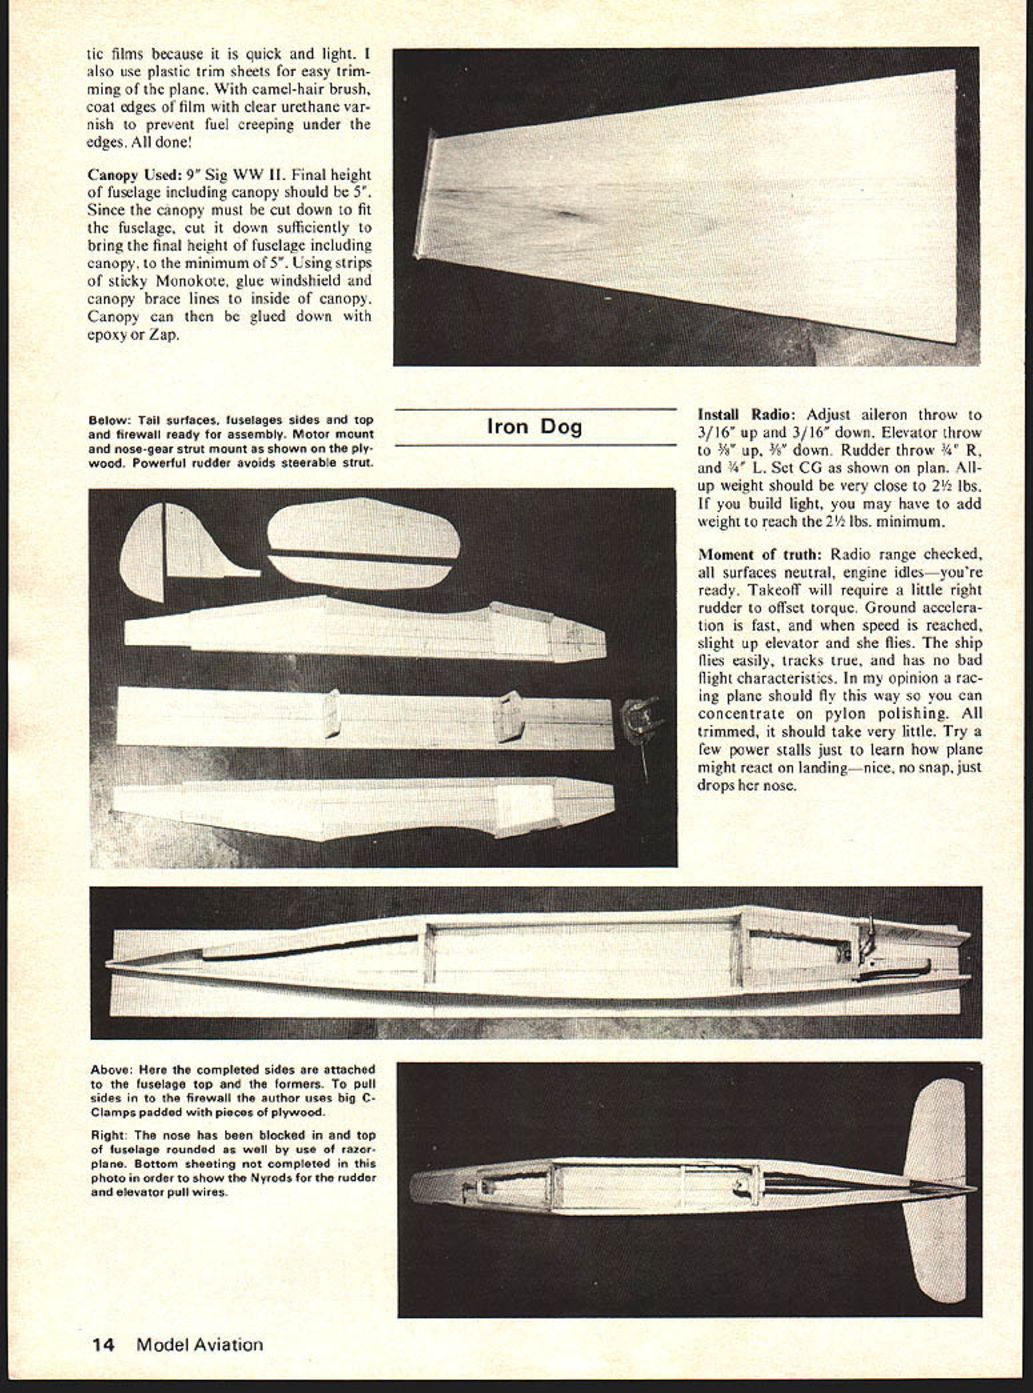
On wings and stab I use one of the plas- tic films because it is quick and light. I also use plastic trim sheets for easy trimming of the plane. With camel-hair brush, coat edges of film with clear urethane varnish to prevent fuel creeping under the edges. All done!
Canopy Used:
9" Sig WW II. Final height of fuselage including canopy should be 5". Since the canopy must be cut down to fit the fuselage, cut it down sufficiently to bring the final height of fuselage including canopy to the minimum of 5". Using strips of sticky Monokote, glue windshield and canopy brace lines to inside of canopy. Canopy can then be glued down with epoxy or Zap.
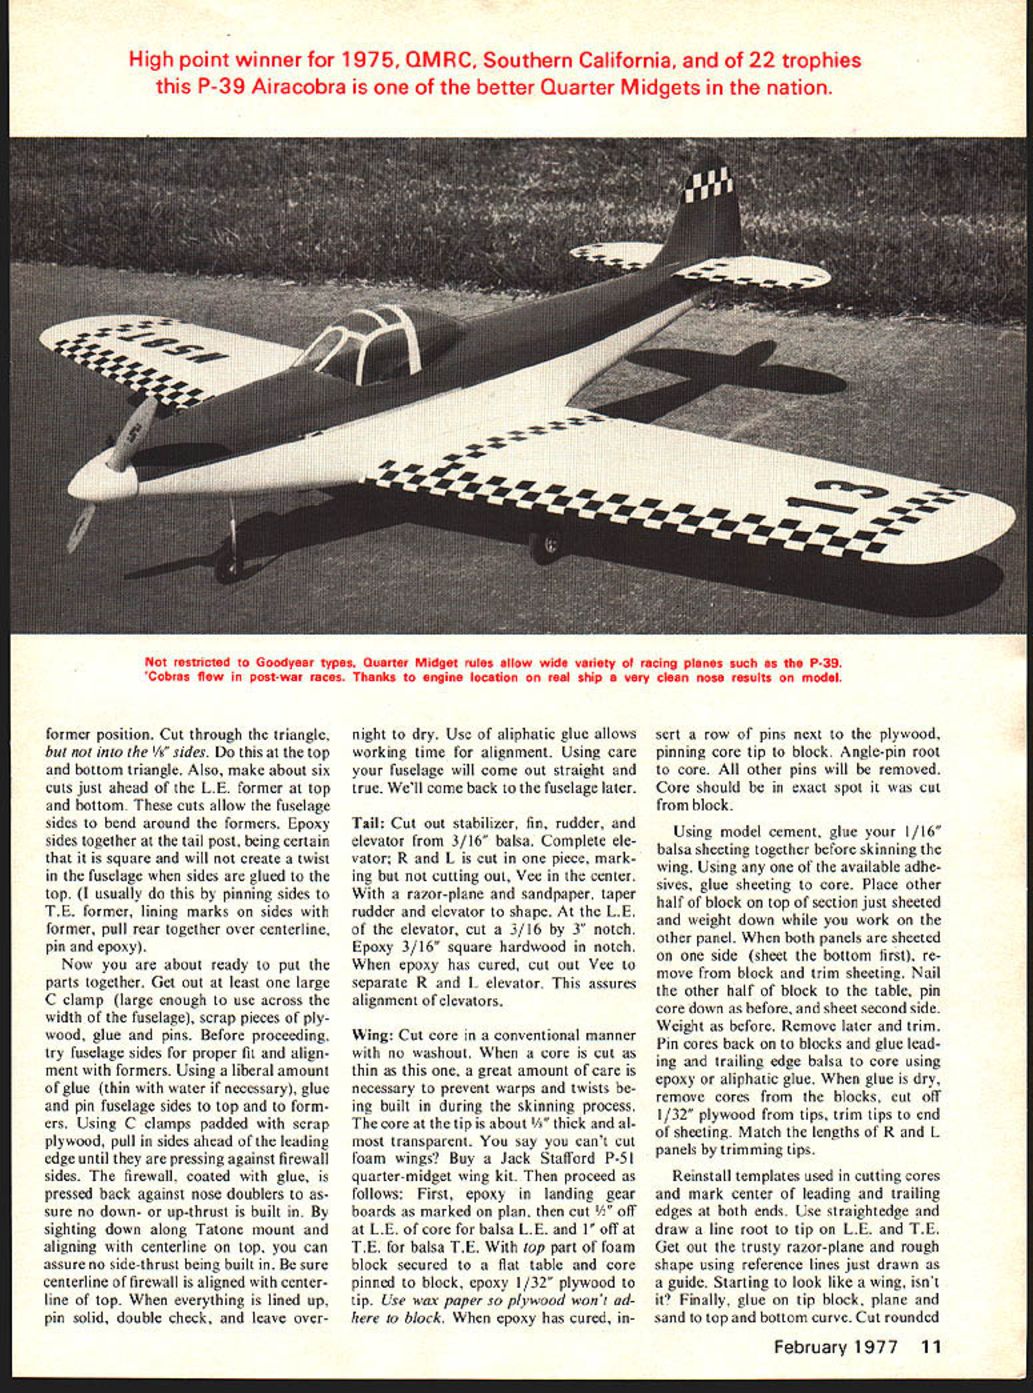
Long nose results from the fact the real ship has an amidships engine location with an extension shaft running under the cockpit to the prop. Start: always choose the lightest wood you can find; a light airplane (close to 2 lbs possible) is desirable. Strength is not a problem — use aliphatic resin glue. Five-minute epoxy construction is fine except when gluing wing sheeting together. Sheeting the wing with Zap Hot Stuff will speed up fuselage construction when pressed for time.
Fuselage: Lay out and cut identical right and left sides from 1/8" balsa. Firmly mark LE, TE, formers, firewall and thrustline locations inside. Glue 1/2" triangles, 1/8" wing saddle doublers, and 1/8" nose doublers. While drying, cut out 3/16" balsa LE and TE formers and good firewall. Mark vertical centerline; then also mark the thrust line on the firewall (usually mark front and rear above). Cut out LE former and tank cradle; epoxy a 1/16" plywood doubler across the bottom to support the wing dowels. Tank cradle: cut on centerline; locate tank with thrust line — use a 4-ounce slant Sullivan tank. Using the centerlines previously drawn on the firewall, locate the Tatone mount; drill holes and insert 6-32 blind nuts. Mount the Tatone mount with 6-32 screws.
Bend 3/32" music wire for the nose gear. Drill the firewall below the Tatone mount for the J-bolt nose gear to the firewall. The photos show the installation well.
Note wing hold-down point. Conventional aileron linkage with aluminum shroud shields the servo from fouling. Use a decorative scheme individualistic enough to stand out well in the air, and use a steerable nose gear. Takeoffs: start full throttle. Rudder steering is very positive, creating some over-control; the plane is usually ahead of the pack going to the #1 pylon after takeoff due to superior ground handling. You may have to go get the plane after landing — the advantage offsets that.
Draw the centerline from end to end on 3/16" x 3/8" balsa fuselage top on both sides. Pin the top flat on the building board and accurately mark the position of the firewall, LE and TE formers. Epoxy the LE and TE formers to the top using an L-square for accurate alignment. Lay out the sides and, using an X-Acto saw, make about four cuts through the 1/2" triangle just behind the LE former. Also make about six cuts just ahead of the LE former (top and bottom cuts) to allow the fuselage sides to bend around the formers.
Epoxy the sides together at the tailpost, being certain everything is square — a twist will be created if not. The fuselage sides are glued to the top, usually pinning the sides to the TE former lining marks. Pull the rear together over the centerline, pin and epoxy.
Now about ready to put parts together. Get out at least one large C-clamp large enough to use across the width of the fuselage, some scrap pieces of plywood, glue and pins. Before proceeding, try the fuselage sides for proper fit and alignment with the formers. Using a liberal amount of glue (thin with a little water if necessary) glue and pin the fuselage sides to the top formers. Using C-clamps padded with scrap plywood, pull the sides ahead at the leading edge until pressing against the firewall. With the firewall coated with glue, press the sides back against the nose doublers. Be sure no down- or up-thrust is being built in. Sighting down along the Tatone mount and aligning the centerline top will assure no side-thrust is being built. Be sure the centerline of the firewall is aligned with the centerline on top; once everything is lined up pin solid, double-check, and leave overnight to dry. Using aliphatic glue allows working time for alignment. With care, the fuselage will come out straight and true.
Install Radio: Adjust aileron throw to 3/16" up and 3/16" down. Elevator throw to 3/8" up, 3/8" down. Rudder throw 3/4" R and 3/4" L. Set CG as shown on plan. All-up weight should be very close to 2-1/2 lbs. If you build light, you may have to add weight to reach the 2-1/2 lbs. minimum.
Moment of truth: Radio range checked, all surfaces neutral, engine idles — you're ready. Takeoff will require a little right rudder to offset torque. Ground acceleration is fast, and when speed is reached, slight up elevator and she flies. The ship flies easily, tracks true, and has no bad flight characteristics. In my opinion a racing plane should fly this way so you can concentrate on pylon polishing. All trimmed, it should take very little. Try a few power stalls just to learn how the plane might react on landing — nice, no snap, just drops her nose. Ready to land? Plane glides flat and fast. When you get just off the ground, start easing in just enough elevator to bleed off excess speed and allow a slight nose-high landing. Touch-down can be quite slow with no danger of snap rolling, if CG is set up correctly.
There you have it, and you're ready to race. The plane is not an "Iron Dog" at all — "Hot Dog" is more like it. Go out and bring home the trophies.
Transcribed from original scans by AI. Minor OCR errors may remain.

