
JAGUAR
Robert J. Morgan
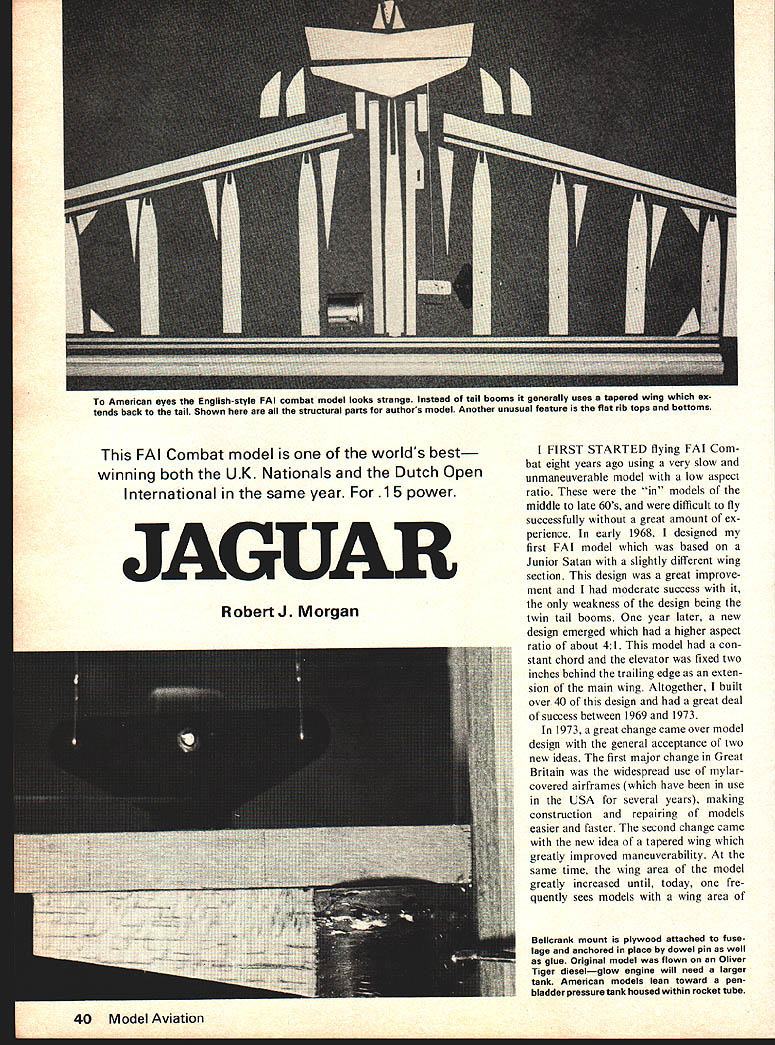
This FAI Combat model is one of the world's best—winning both the U.K. Nationals and the Dutch Open International in the same year. For .15 power.
I first started flying FAI Combat eight years ago using a very slow and unmaneuverable model with a low aspect ratio. These were the "in" models of the middle to late 60's, and were difficult to fly successfully without a great amount of experience. In early 1968, I designed my first FAI model which was based on a Junior Satan with a slightly different wing section. This design was a great improvement and I had moderate success with it, the only weakness of the design being the twin tail booms. One year later, a new design emerged which had a higher aspect ratio of about 4:1. This model had a constant chord and the elevator was fixed two inches behind the trailing edge as an extension of the main wing. Altogether, I built over 40 of this design and had a great deal of success between 1969 and 1973.
In 1973, a great change came over model design with the general acceptance of two new ideas. The first major change in Great Britain was the widespread use of mylar-covered airframes (which have been in use in the USA for several years), making construction and repairing of models easier and faster. The second change came with the new idea of a tapered wing which greatly improved maneuverability. At the same time, the wing area of nearly 400 sq. in. (Jaguar is 350 sq. in.). These three things together made the model weaker than we were used to in the U.K. and hence to greater carnage during competition.
The Jaguar is designed to help to eliminate weak spots and you will notice the use of spruce and ply in strategic areas. Great importance must be given to keep the model as light as possible with an all up airframe weight not more than 7-1/2 ounces. All the major pieces of wood (L.E., T.E., ribs, etc.) must be cut from straight grain wood with no twists and an even density. Building time for a straightforward model such as this is quite low but more can be saved by building several at a time, i.e. by making the ribs sandwich method. The glue used all the way through is a good woodworking adhesive, except when affixing the engine pod.
The first step is to cut out the 1/4" sheet trailing edge and glue together making sure that it is kept flat; the spruce strengthener is added at this stage. While this is drying, the spruce spars are glued to the leading edge which is bought pre-shaped. If this type of leading edge is not available, then a piece of 1" sq. can be shaped to suit. The trailing edge must be shaped now as it becomes more difficult when the model is assembled. The ribs are cut to shape and their positions carefully marked on the L.E. and T.E. The centre rib is cut from 1/2" sheet of medium weight and the bellcrank slot cut out at the correct position. The bellcrank mount should be glued and securely clamped until dry. The plywood capping strips are added to the centre rib and the whole unit is left to dry.
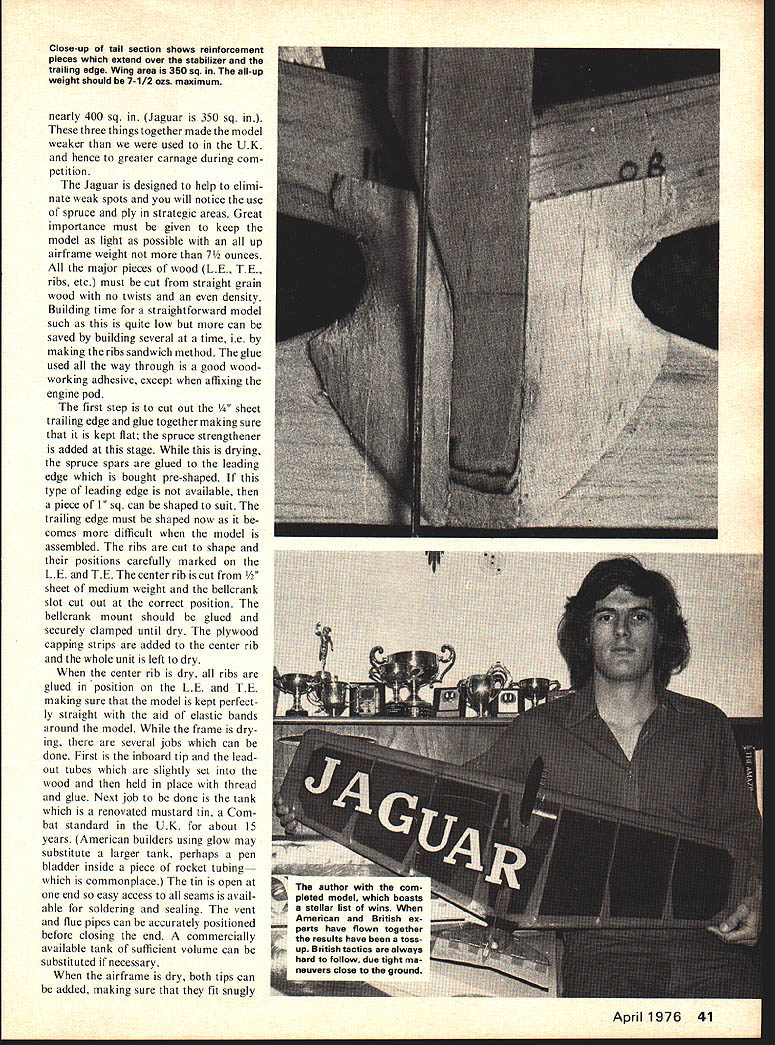
When the centre rib is dry, all ribs are glued in position on the L.E. and T.E. making sure that the model is kept perfectly straight with the aid of elastic bands around the model. While the frame is drying, there are several jobs which can be done. First is the inboard tip and the leadout tubes which are slightly set into the wood and then held in place with thread and glue. Next job to be done is the tank which is a renovated mustard tin, a Combat standard in the U.K. for about 15 years. (American builders using glow may substitute a larger tank, perhaps a pen bladder inside a piece of rocket tubing, which is commonplace.) The tin is open at one end so easy access to all seams is available for soldering and sealing. The vent and flue pipes can be accurately positioned before closing the end. A commercially available tank of sufficient volume can be substituted if necessary.
When the airframe is dry, both tips can be added, making sure that they fit snugly.
The tailplane should be cut from 1/8" medium sheet and glued in position accurately, making sure the elevator will be parallel to the L.E. On the higher side other tailplane packing pieces either side of the centre rib should be added. When dry, the tank can be epoxied in place making sure it is level, otherwise you will get different engine settings. The bellcrank assembly is a little awkward as the pushrod hole in the plywood must clear the leadout wires; solder the leadouts to the bellcrank before operation. Gussets may now be added, making note of the grain direction. The basic airframe must now be sanded.
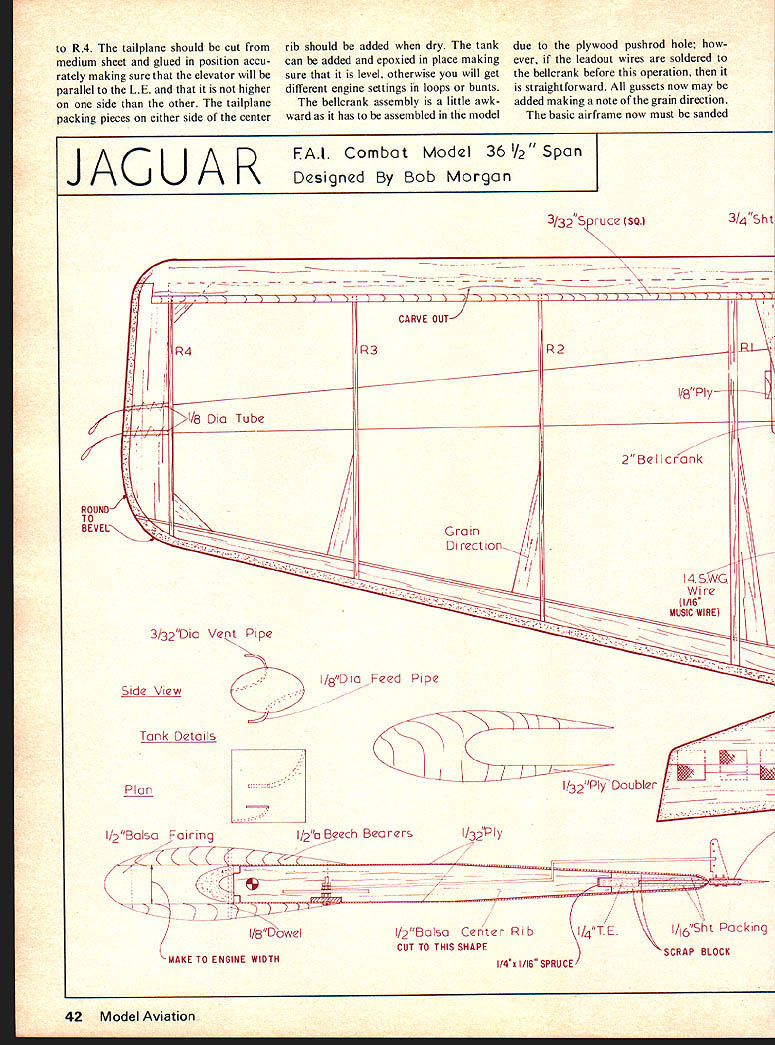
JAGUAR
F.A.I. Combat Model 36 1/2" Span
Designed By Bob Morgan down to slope, taking particular care with the tailplane area. The first step in covering is to cut to shape lightweight tissue for the tailplane which should be given four coats of medium strength dope. The elevator now can be cut to shape and sanded to a very sharp section and the plywood elevator horn plates added top and bottom. This is then added to the tailplane using the nylon hinges as shown on the plan. The elevator is also covered in lightweight tissue and given four coats of medium dope.
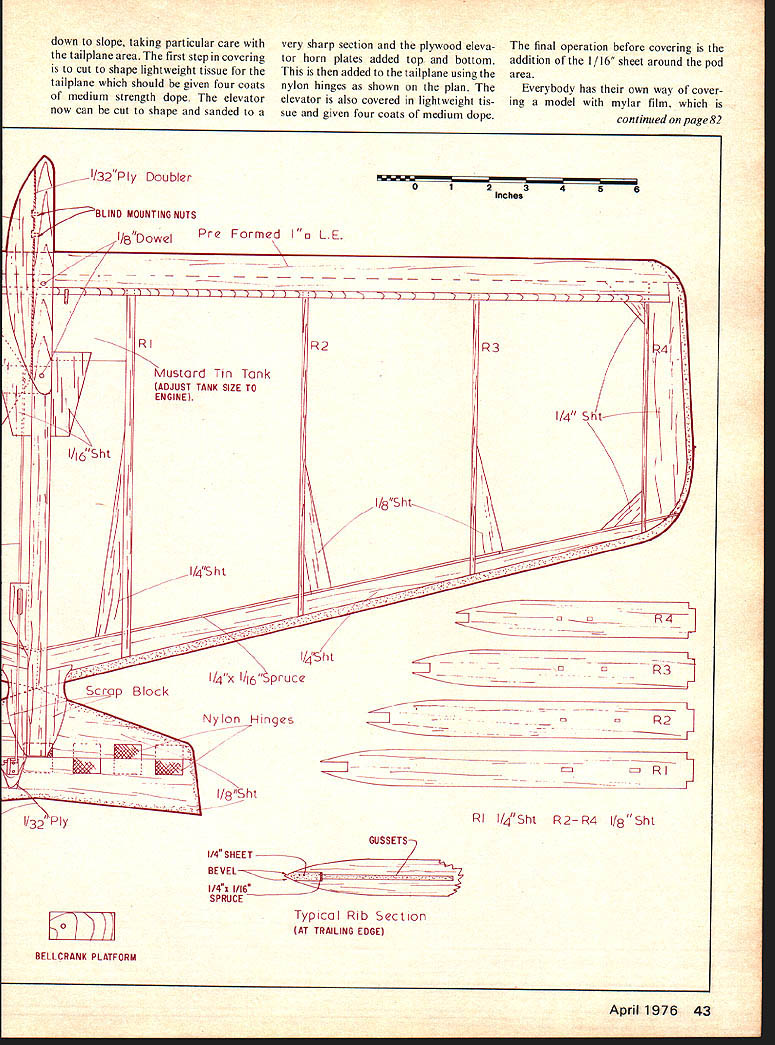
The final operation before covering is the addition of the 1/16" sheet around the pod area.
Everybody has their own way of covering a model with mylar film, which is continued on page 82. known under several trade names. The most important factor is to get a nice clean finish around all the edges. When covered, the pod can be constructed accurately making sure that it is a snug fit. The covering material must be cut away where the pod fits so as to give the epoxy something to grip on. The 1/8" dowels are added, being careful that the rear one goes through the bellcrank mount and the front misses the spruce spars. When fixed and sanded to shape, the pod should be covered in tissue and given four coats of dope and then painted in the desired color scheme, finally given two coats of good fuel-proofer as is the elevator and tailplane at this stage.
Depending upon the type of motor used, the center of gravity will change, but it is desirable to have it as near as possible to the indicated spot. Flying an FAI Combat model is an art in itself as many of you will know, with quick reactions and a good model/motor combination essential for success. The art in the U.K. is to follow your opponent at all times, even if he is faster than you. This may sound difficult but with a lot of practice and skillful anticipation, it will become second nature. A great tip is to do as many small maneuvers near the ground as possible and wait for the opponent to hit the ground. In FAI Combat the aim is to get several small cuts which needs practice and skill. The "kill" method does not pay and is to be avoided at all costs. Have you ever tried to stay out of the way of an opponent for over three-quarters of a bout — not an easy task.
The Jaguar is a very competitive model and in the right hands is a world beater. During the last two years, I have flown the design and beaten the previous six U.K. champions with it including Messrs. Evans, Tieman, Hunt and most of the top European fliers. This year is the first time that anyone has won the U.K. Nationals and the Dutch Open International in the same year. Its pedigree is proved.
Transcribed from original scans by AI. Minor OCR errors may remain.

