

Keep It Simple, Stupid
Barry Baxter
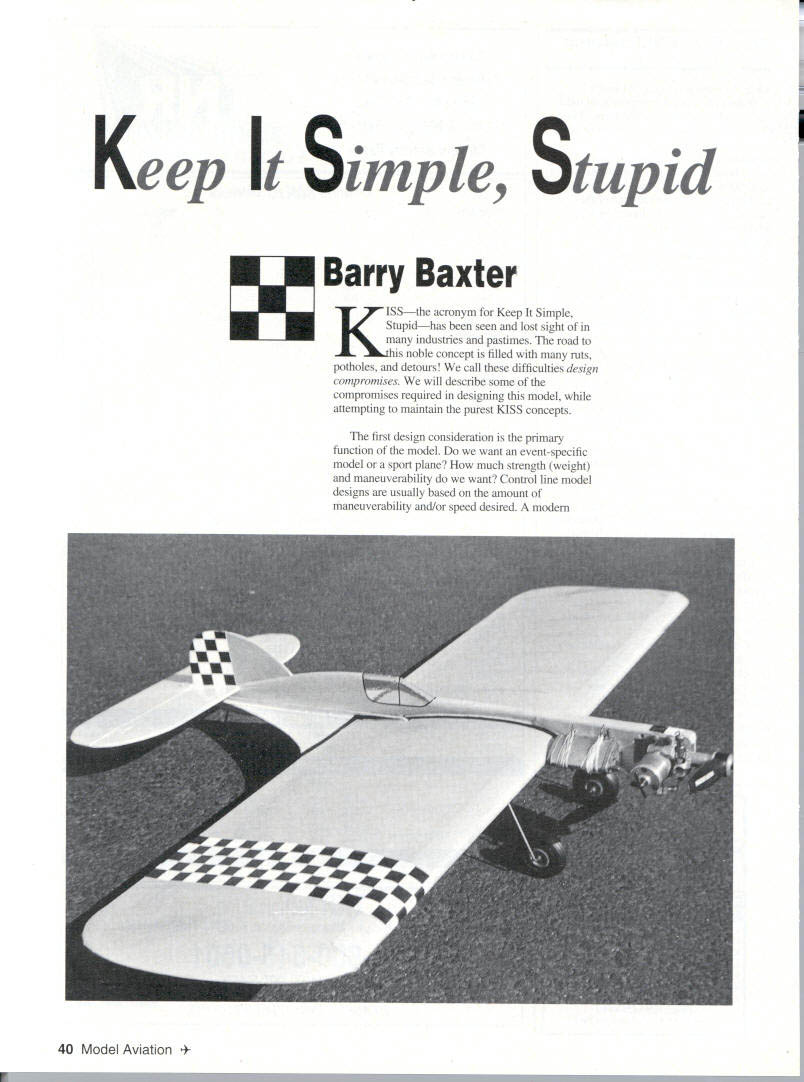
KISS—the acronym for Keep It Simple, Stupid—has been seen and lost sight of in many industries and pastimes. The road to this noble concept is filled with many ruts, potholes, and detours. We call these difficulties design compromises. We will describe some of the compromises required in designing this model, while attempting to maintain the purest KISS concepts.
The first design consideration is the primary function of the model. Do we want an event-specific model or a sport plane? How much strength (weight) and maneuverability do we want? Control-line model designs are usually based on the amount of maneuverability and/or speed desired. A modern competitive Stunt model is built to perform smooth, stable maneuvers at a slow speed, and is built with a thick wing and flaps and a large engine—the former to actually slow the model down and dampen the maneuverability, the latter to supply adequate power to maintain speed in the maneuvers.
Since KISS is a basic trainer for beginners and a Stunt trainer for more advanced fliers, we needed to provide a reasonable amount of strength for the novice's occasional inadvertent contact with terra firma, yet the model had to be maneuverable enough to whet the desires of the more advanced fliers.
Optimum model size is a primary consideration. The larger the model, the easier it is to break. Since the model is to perform as a trainer, it must not break too easily. Because KISS is a trainer, the 1/2A powerplants were not considered; the engines can be finicky and disheartening to a beginner, and can be a real bear to make perform properly in aerobatics.
The .09–.15 size engines are available at reasonable cost, are simple to operate, and are light enough to allow us to build a small model—one not prone to breakage, and large enough to be maneuverable yet stable.
The simplistic KISS model would be the rock-on-a-string concept that some people feel is proper for trainers. These overweight, undersized, slab-winged, solid-balsa 1/2A designs are barely capable of becoming airborne, and offer virtually no training into what proper control response should be expected, other than the fact that if you do anything it will probably go down. It can teach a new pilot to go around in circles, but so can a rock on a string. The old adage from flying full-sized aircraft is: "If you want to go up, pull back on the stick; if you want to go down, pull back farther."
The profile fuselage design is a compromise. The standard profile model construction methods make them fragile; in a crash, the fuselage invariably breaks behind the wing. Profile fuselages also bend and twist with control inputs, which tends to make flying a little less precise. Giant fillets have been added to this design to support the fuselage and reduce twisting and crash damage.
The shape of profile fuselages is, of course, purely a styling exercise; this model is based on a combination of 1930s racers and Brewster fighters. The only aerodynamic consideration is to have more side area toward the tail to reduce yaw, but the lack of a thick fuselage can be made up by having a larger fin and rudder.
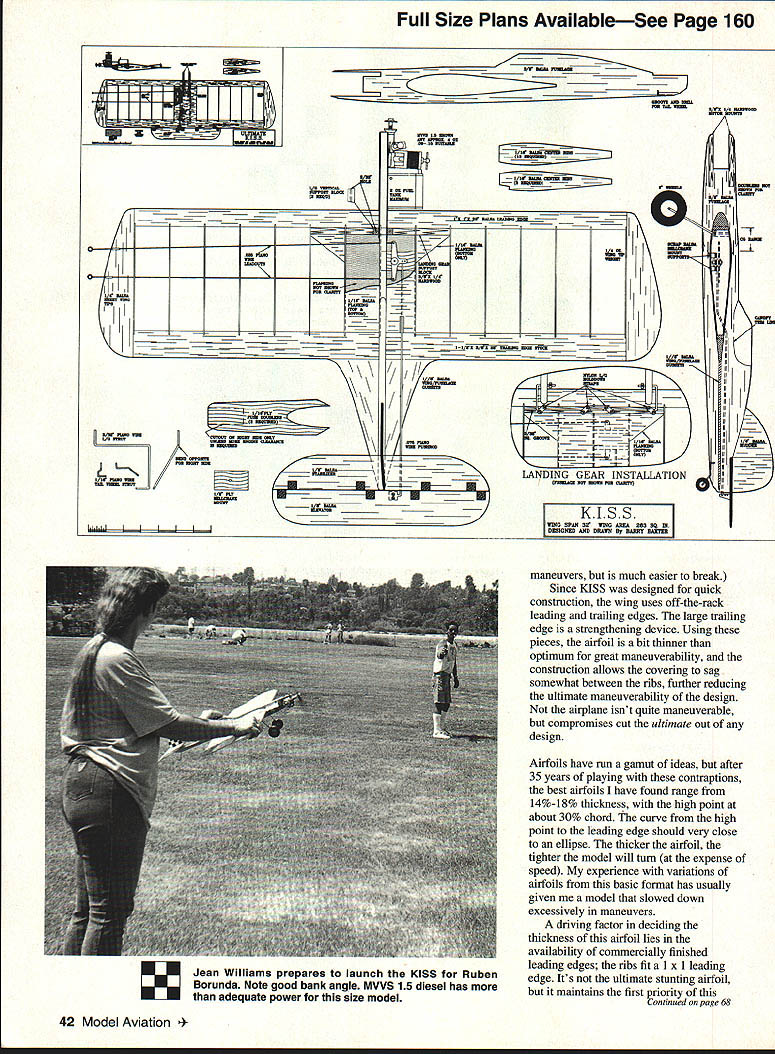
The wing is a low-aspect-ratio design, so that adequate wing area is maintained while keeping the span short to reduce the leverage that longer wingtips provide on long, thin wings. From a pure performance standpoint, a high-aspect-ratio wing offers better maneuverability with less speed loss through maneuvers, but is much easier to break. Since KISS was designed for quick construction, the wing uses off-the-rack leading and trailing edges. The large trailing edge is a strengthening device. Using these pieces, the airfoil is a bit thinner than optimum for great maneuverability, and the construction allows the covering to sag somewhat between the ribs, further reducing the ultimate maneuverability of the design. No, the airplane isn't quite as maneuverable as a dedicated stunt ship, but compromises cut the ultimate out of any design.
KISS
- Type: CL trainer
- Wingspan: 32 inches
- Engine size/type: .09–.15
- Flying weight: 16 ounces
- Construction: Built-up wing, sheet fuselage/tail
- Covering/finish: MonoKote/Micafilm wing, fuelproof finish on wood surfaces
Airfoils have run a gamut of ideas, but after 35 years of playing with these contraptions, the best airfoils I have found range from 14%–18% thickness, with the high point at about 30% chord. The curve from the high point to the leading edge should be very close to an ellipse. The thicker the airfoil, the tighter the model will turn (at the expense of speed). My experience with variations of airfoils from this basic format has usually given me a model that slowed down excessively in maneuvers.
A driving factor in deciding the thickness of this airfoil lies in the availability of commercially finished leading edges; the ribs fit a 1 x 1 leading edge. It's not the ultimate stunting airfoil, but it maintains the first priority of this model: KISS!
There is a decades-old argument about the use, effectiveness, and desirability of flaps. Flap travel up to 10–15° can have a positive effect on the maneuverability of a model, particularly if the airfoil is not very efficient. Speaking from a purely aerodynamic standpoint, any flap travel beyond 15° rapidly builds up drag and offers little or no increase in lift.
The wingtips have an aerodynamic advantage over the more standard shapes. As an airplane flies, there is a low-pressure area on the side of the wing opposite the relative wind. The air from the opposite side attempts to flow to the low-pressure side, especially at the tips. This loss of air occurs inboard from the tips and is the source of wingtip vortices. With the wingtip turned down at the trailing edge, the flow around the vortices is reduced, causing an increase in effective wing area and lift. This is the same effect produced by winglets on current full-size designs, but since models don't always fly right side up, the winglets will usually only be effective on the up-turning side of the wing.
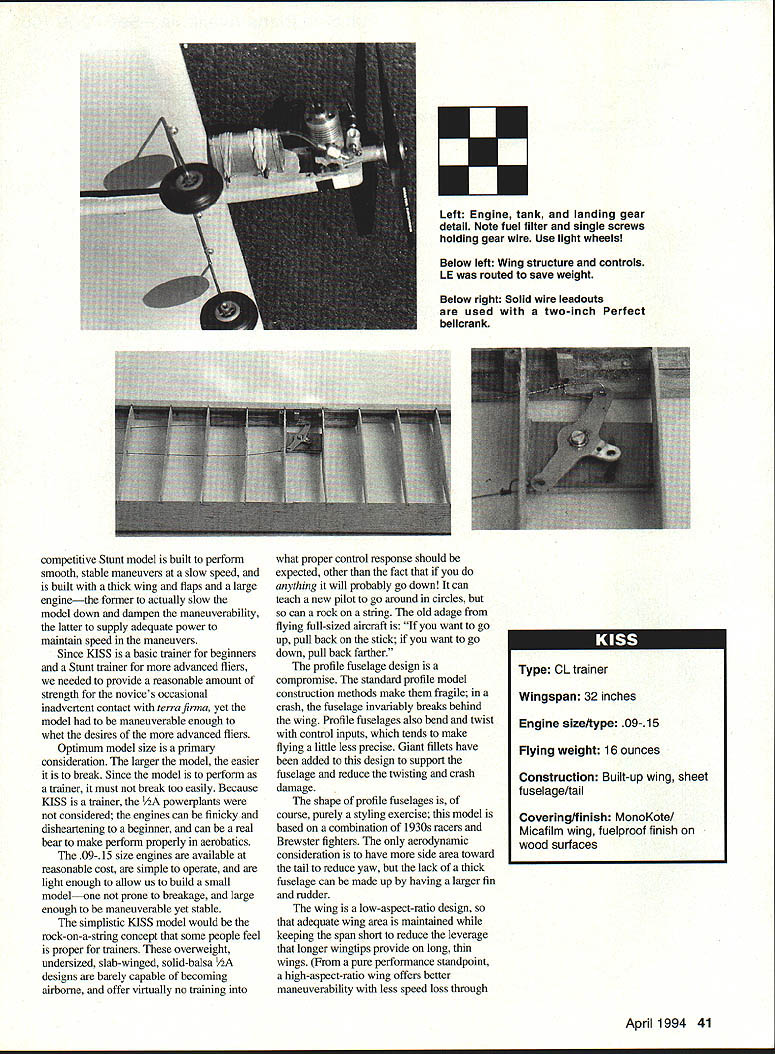
The landing gear design is another compromise. The simple, standard through-the-fuselage gear is lighter, but doesn't look as good, and does not offer ease of removal or, in case of damage (or the desire to simply fly without landing gear). The hardwood gear mount on KISS stiffens the center section of the wing. KISS also uses substantial engine offset, which is required in lighter, slower designs. As model size and weight increases, centrifugal force can replace the offset. The amount of rudder offset is minimal, because we don't want the model to be excessively yawed from the arc of the flying circle. The engine offset will hold the model at the end of the lines, while the rudder will control the heading of the model. A small amount of rudder offset is nice when the engine has quit.
Wingtip weight should be applied in small doses. The spanwise center of gravity of the model should be just outside the fuselage, about 3/8" outside the centerline of the fuselage. The wingtip weight is most effective during takeoff, by counteracting engine torque when the model is released. To determine whether you have the right amount of weight, watch the model pull out of a loop or wingover and determine whether either wingtip drops. If the outboard wingtip drops, there is too much weight, and vice versa. One-half ounce is usually enough for any model.
CONSTRUCTION
- Make a kit. Cut out all the parts and bend the gear wires so you can get into the "assembly" mode. Once you start gluing, this beast goes together fast.
- Landing gear: optional. If you fly exclusively on grass fields, leave the gear off. It's unnecessary weight, and will only tend to nose the airplane on takeoffs and landings. If you choose to install the gear, glue the landing block to the leading edge, then stick the ribs into the slots in the leading and trailing edges. Hold this assembly together with rubber bands to make sure all twists and misalignments are removed before the ribs are glued in.
- Set the wing where you can stand about 10 feet behind it and look from the trailing to the leading edge. Ensure the two edges are aligned. Once the wing is perfectly straight, glue the ribs to the leading and trailing edges.
- Glue in the bellcrank floor and install the control system. KISS uses a two-inch Perfect bellcrank and a Carl Goldberg nylon control horn. Engineering note: bellcrank location is not particularly critical; the criteria is that the leadouts should pull straight out of the wing with the model at its normal flight yaw angle to prevent binding and wear.
- Leadout location at the wingtip is the critical measurement. If the leadouts are too far forward, the model will tend to have slack lines; too far back and the model will pull your arm off in level flight but go slack in maneuvers. This is the reason many Stunt models now use adjustable leadouts; if you don't get it right the first time, you can try again easily. Add the upper and lower planking, and the wingtips.
- Hinge the stabilizer and elevator using your favorite method. Nylon hinges, commercial products, or cloth hinges are all acceptable. Slide the wing through the fuselage and glue it in, assuring that it is properly aligned.
- Note that the fuselage is mounted slightly to the right of the wing centerline, allowing slightly more wing area on the left (inboard) side of the model. Since the inboard wing flies more slowly than the outboard wing, more area is required to equalize the lift.
- Install and align the stabilizer so that it is parallel to the wing. Attach the control horn and pushrod, and adjust the elevator travel to about 30° up and 30° down.
- Add the wing fillets next. As mentioned earlier, these items are not styling exercises; they add significant strength. Install the maple engine mount beams and plywood doublers. Glue the rudder on; note the minimal offset.
- Cover the wing with your favorite material. The prototype was covered with gray MonoKote—one of the iron-on covering materials (the other is Micafilm) resistant to diesel fuel. If you choose to use a glow engine, the choices are more numerous. I would recommend Micafilm to the novice pilot because of the high strength of the material. Paint the remainder of the model with fuelproof paint in your favorite colors.
- Install the landing gear using screws and washers to hold the landing-gear wire in the hardwood mount's slot. The plans show the use of landing gear plates, but photos of the prototype reveal that only screws and washers were used, and this arrangement works well. Pick your poison on this one—just remember: KISS!
- Position the engine to get the center of gravity (CG) where you want it located within the range shown on the plan. The farther forward the CG is, the less sensitive the model will be. Flight characteristics tend to suffer a bit with a more forward CG location, but for the beginner a more forward location is recommended. The engine can be moved back as the pilot gains experience.
- Limit the model to engines that weigh no more than five ounces. Most .09s will fall into this weight range and some .15s (such as the old Fox .15X) will be quite appropriate. Anything heavier and the CG will end up too far forward for good control response, and the total model weight will increase to an unacceptable amount.
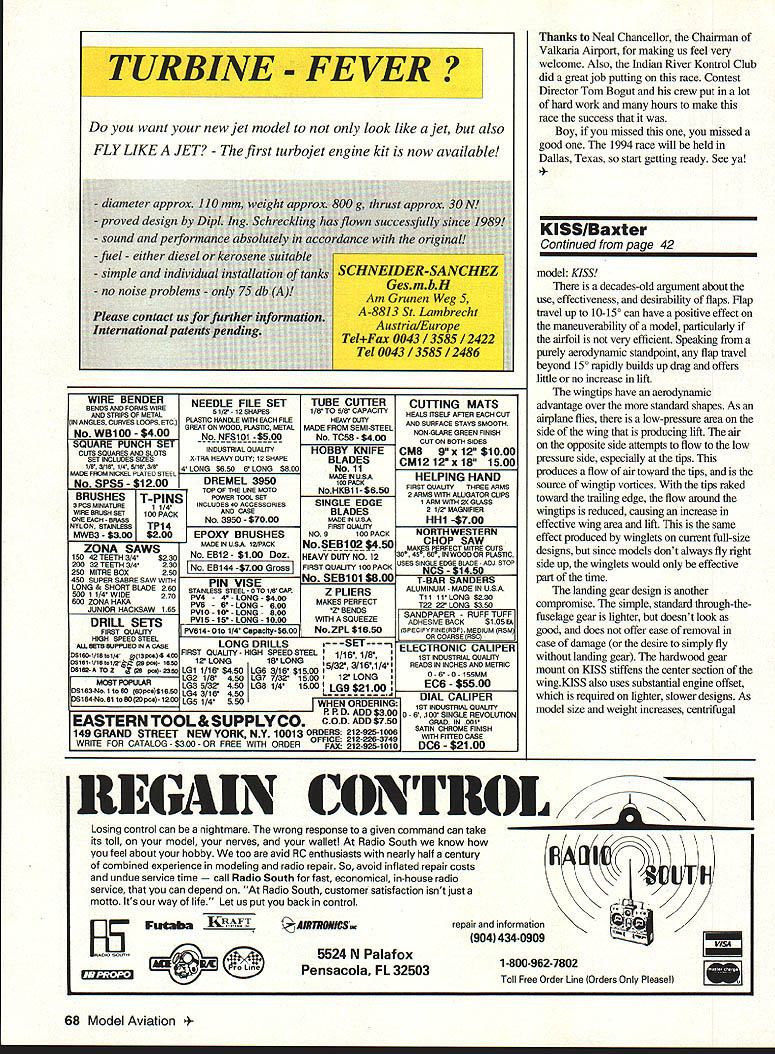
The finished model weighed 16 ounces, and could have been built much lighter with careful wood selection. The prototype was powered by a 1.5cc MVVS (.09) diesel, which performed most adequately. The MVVS starts and runs easily, and has more than ample power for this model. This engine was available from Carlson Engine Imports, 814 East Marconi Avenue, Phoenix, Arizona 85022. The price was less than $40 at the time of writing. A Master Airscrew 7 x 6 was the prop of choice.
The fuel is contained in a 1.5-ounce (approx.) Perfect tank that is held on by rubber bands hooked to wires passing through the fuselage. There are other tank mounting techniques in use; pick your own. With the economy of the diesel engine, flight time exceeds five minutes with this small tank.
KISS' first flight was performed by the author, and the model went through all the AMA stunt maneuvers with room to spare on only 35-foot lines. The too-short lines were the only lines I had available that were less than 60 feet long.
The second flight was handled by a novice flier who was impressed with the way the model flew (after he tested the strength of the plane with a hand-launch prang). The third flight was flown by a man who had not flown anything in more than twenty years. He was also impressed by the model's stability. His only problem was dizziness, but he did complete the flight.
KISS has no nasty flight characteristics, so whether you are a novice or an experienced pilot, if you want a fun, simple flying machine that can be built quickly, you will enjoy this one!
Transcribed from original scans by AI. Minor OCR errors may remain.

