
Keith-Rider R2 Bumblebee
If you haven't tried No-Cal Scale, take a look at this colorful racer from the 1930s. Its terrific lines and quick construction (on top of great flying habits) just may have you cutting tissue before you know it. — A. A. Lidberg
Background
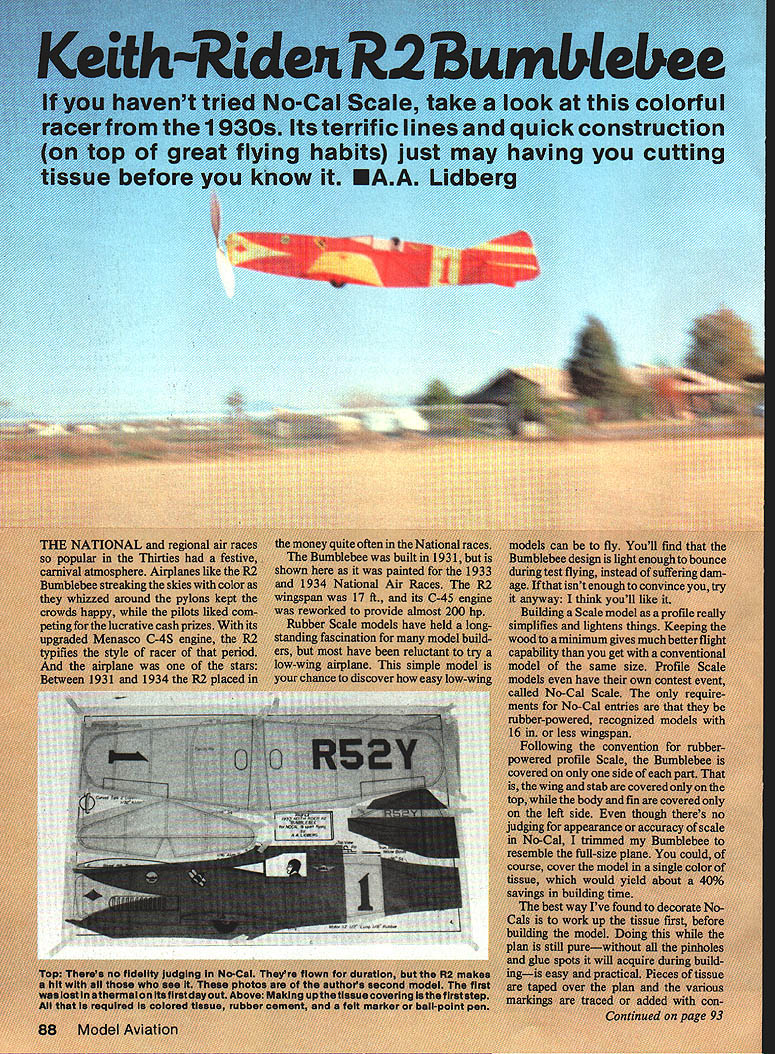
The national and regional air races so popular in the Thirties had a festive, carnival atmosphere. Airplanes like the R2 Bumblebee streaked the skies with color as they whizzed around the pylons, keeping the crowds happy while the pilots competed for lucrative cash prizes. With its upgraded Menasco C-4S engine, the R2 typifies the style of racer of that period, and the airplane was one of the stars. Between 1931 and 1934 the R2 placed in the money quite often in the National races.
The Bumblebee was built in 1931 but is shown here as it was painted for the 1933 and 1934 National Air Races. The R2 wingspan was 17 ft., and its Menasco C-4S engine was reworked to provide almost 200 hp.
Rubber Scale models have held a long-standing fascination for many model builders, but most have been reluctant to try a low-wing airplane. This simple model is your chance to discover how easy low-wing models can be to fly. You'll find that the Bumblebee design is light enough to survive a bounce during test flying instead of suffering damage. If that isn't enough to convince you, try it anyway; you'll probably like it.
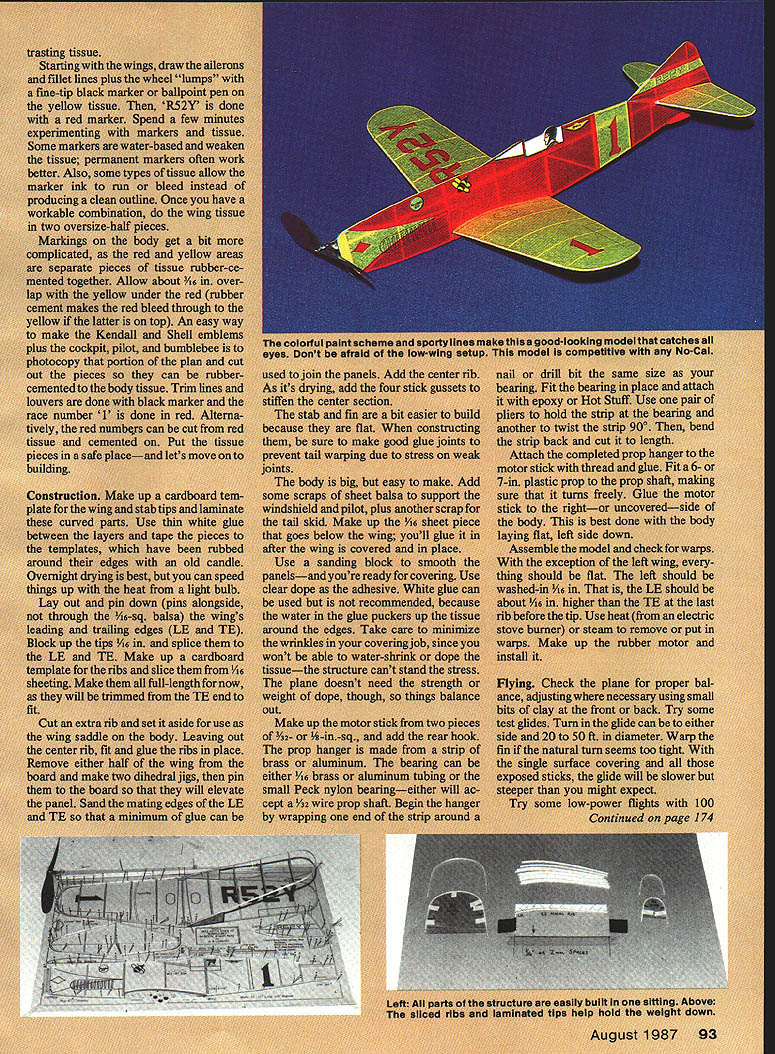
Building a scale model as a profile really simplifies and lightens things. Keeping the width to a minimum gives much better flight capability than you get with a conventional model of the same size. Profile scale models even have their own contest event, called No-Cal Scale. These events for No-Cal entries are for rubber-powered, recognized models with 16 in. or less wingspan.
Following the convention for rubber-powered profile scale, the Bumblebee is covered on only one side of each part: the wing and stab are covered only on the top, while the body and fin are covered only on the left side. Even though there's no judging for appearance or accuracy of scale in No-Cal, I trimmed my Bumblebee to resemble the full-size plane. You could, of course, cover the model in a single color of tissue, which would yield about a 40% savings in building time.
Decoration
The best way I've found to decorate No-Cals is to work up the tissue first, before building the model. Doing this while the plane is still pristine—without all the pinholes and glue spots that will acquire during building—is easy and practical. Pieces of tissue are taped over the plan and the various markings are traced or added with contrasting tissue.
- For the wings: draw the ailerons and fillet lines plus the wheel "lumps" with a fine-tip black marker or ballpoint pen on the yellow tissue. Lettering and the registration "R52Y" can be done with a red marker.
- Test markers on scrap tissue first. Some markers are water-based and weaken the tissue; permanent markers often work better. Some tissues allow the marker ink to run or bleed instead of producing a clean outline.
- Do the wing tissue in two oversize half-pieces.
Markings on the body are a bit more complicated, as the red and yellow areas are separate pieces of tissue rubber-cemented together. Allow about 3/16 in. overlap with the yellow under the red (rubber cement makes the red bleed through to the yellow if the latter is on top). An easy way to make the Kendall and Shell emblems plus the cockpit, pilot, and bumblebee is to photocopy that portion of the plan and cut out the pieces so they can be rubber-cemented to the body tissue. Trim lines and louvers are done with black marker and the race number "1" is done in red; alternately, the red numbers can be cut from red tissue and cemented on. Put the tissue pieces in a safe place—and let's move on to building.
Construction
Make up a cardboard template for the wing and stab tips and laminate these curved parts. Use thin white glue between the layers and tape the pieces to the templates, which have been rubbed around their edges with an old candle. Overnight drying is best, but you can speed things up with the heat from a light bulb.
Wing
- Lay out and pin down (pins alongside, not through the 1/16-sq. balsa) the wing's leading and trailing edges (LE and TE).
- Block up the tips 1/8 in. and splice them to the LE and TE.
- Make a cardboard rib template and slice ribs from 1/16 sheeting. Make them all full-length for now; they will be trimmed from the TE end to fit.
- Cut an extra rib and set it aside for use as the wing saddle on the body.
- Leaving out the center rib, fit and glue the ribs in place.
- Remove either half of the wing from the board and make two dihedral jigs, then pin them to the board so that they will elevate the panel.
- Sand the mating edges of the LE and TE so that a minimum of glue can be used to join the panels. Add the center rib. As it's drying, add the four stick gussets to stiffen the center section.
Stab and fin The stab and fin are easier to build because they are flat. When constructing them, be sure to make good glue joints to prevent tail warping due to stress on weak joints.
Body The body is big but easy to make. Add some scraps of sheet balsa to support the windshield and pilot, plus another scrap for the tail skid. Make up the 1/16-in. sheet piece that goes below the wing; you'll glue it in after the wing is covered and in place. Use a sanding block to smooth the panels—and you're ready for covering.
Covering Use clear dope as the adhesive. White glue can be used but is not recommended, because the water in the glue puckers up the tissue around the edges. Take care to minimize wrinkles in your covering job, since you won't be able to water-shrink or dope the tissue—the structure can't stand the stress. The plane doesn't need the strength or weight of dope, though, so things balance out.
Motor stick and prop hanger
- Make up the motor stick from two pieces of 1/32- or 1/16-in.-sq. and add the rear hook.
- The prop hanger is made from a strip of brass or aluminum. The bearing can be either 1/16 brass or aluminum tubing or the small Peck nylon bearing—either will accept a 3/32 wire prop shaft.
- Begin the hanger by wrapping one end of the strip around a nail or drill bit the same size as your bearing. Fit the bearing in place and attach it with epoxy or Hot Stuff.
- Use one pair of pliers to hold the strip at the bearing and another to twist the strip 90°. Then bend the strip back and cut it to length.
- Attach the completed prop hanger to the motor stick with thread and glue. Fit a 6- or 7-in. plastic prop to the prop shaft, making sure that it turns freely.
- Glue the motor stick to the right (the uncovered) side of the body. This is best done with the body laying flat, left side down.
Assembly and warps Assemble the model and check for warps. With the exception of the left wing, everything should be flat. The left should be washed-in 1/16 in. That is, the LE of the left should be about 1/16 in. higher than the TE at the last rib before the tip. Use heat (from an electric stove burner) or steam to remove or put in warps. Make up the rubber motor and install it.
Flying
Check the plane for proper balance, adjusting where necessary using small bits of clay at the front or back. Try some test glides. Turn-in of the glide can be to either side and 20 to 50 ft. in diameter. Warp the fin if the natural turn seems too tight. With the single-surface covering and all those exposed sticks, the glide will be slower but steeper than you might expect.
Try some low-power flights with 100 turns or so. You will need to bend the prop hanger to obtain down and left thrust. This should help achieve a non-stalling climb to the left in fairly wide circles. Work up to maximum turns in stages, changing the balance to improve the glide in very small increments as needed. To arrive at the appropriate number for maximum turns, take the motor off the plane and wind it until it bursts, then use that number of turns less 10% as a practical limit. With a motor this long, use of a winder (unhook and wind from the rear) is definitely recommended, since 1,000 turns or so takes a long time to wind by hand! Also, use rubber lube to prolong the life of the motor and to give more consistent results.
If your Bumblebee has been built fairly light, you should have little trouble achieving flights of about one minute using a winder. I was reminded—the hard way—of how lightweight the little planes are one recent afternoon, when the first one I built was last seen spiraling out on a four-minute thermalling. So I'd suggest putting your name and phone number on the plane as a safeguard.
One interesting idiosyncrasy of this model is that as you approach maximum winds the long body develops a twist, and the whole plane will fly around the center, rather like a Frisbee, causing the tail to tilt. This looks funny, but shouldn't lead to any problems—provided you've taken your time in adjusting and testing. When the motor runs out the twist disappears, so the glide is not affected. I haven't figured out exactly why it does this, although it does seem connected with heavy winds and pronounced dihedral in the wing tips. I've been unable to eliminate the tendency and have learned to live with it.
Don't be afraid to try some radical changes in balance if you have persistent trouble. Move the CG ahead a little, increase the thrust line, or try less rudder. But you'll probably end up discovering that the model is inherently stable under most conditions.
Why not see if you can interest some friends in building No-Cals, too? They are definitely gems: quick and easy to build and fun to fly. Enjoy!
Plans and Reference
Plans and building instructions are available from: Keith R. Rider 604 Hebron Ave. Fullerton, CA 92832 Price: $3.00
Scale Reference: Mendenhall, C. A. The National Air Racers in 3 Views, 1929–1949. Rochester, New York: Diane Publishing Co., 1971. (Diane Publishing Co., P.O. Box 2726, Rochester, NY 14626.)
Transcribed from original scans by AI. Minor OCR errors may remain.

